98. Customize a Title Text Font  BEFORE YOU BEGIN BEFORE YOU BEGIN
96 Use and Customize a Title Template
 SEE ALSO SEE ALSO
101 Create a Star WarsStyle Credit Roll
Not only can you customize a title template and change the text that appears there, you can also customize the attributes for the font you are using. The font attributes can be customized not only in style, size, italics, and underline, but also with various color and drop shadow options. Using the Color Properties dialog box to create unique fonts to use in your titles. 1. | Select and Open a Title
If you have already created a title and it is located in the Media panel, double-click it to open the title in the Titles workspace. If you have not created a title yet, follow the instructions in 96 Use and Customize a Title Template to select and open a title in the Titles workspace. In this example, I used a title created from the Stage_Title template in the Entertainment category.
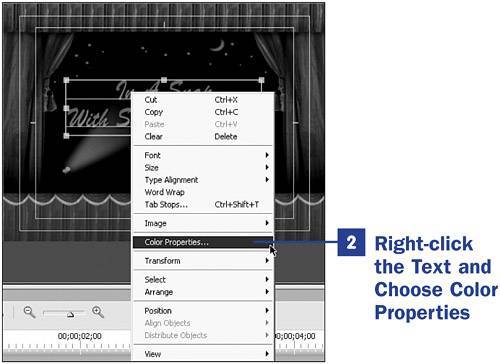
| 2. | Right-click the Text and Choose Color Properties
Right-click the block of text in the title that you want to customize. The context menu opens. Select Color Properties to open the Color Properties dialog box.
 NOTE NOTE
For instruction on changing the text font; making the font bold, italic, or underlined; and changing the text direction or size, see 103 Create a Title from Scratch. 98. Customize a Title Text Font 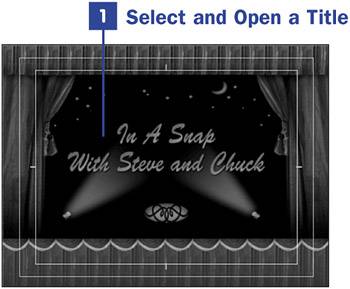
 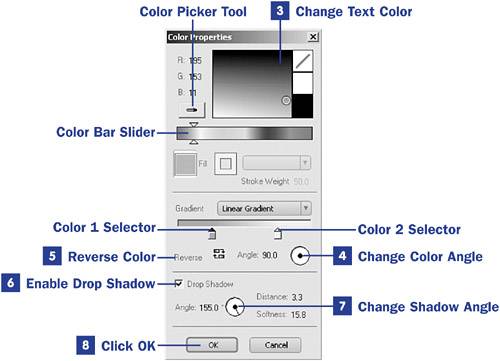
| 3. | Change Text Color
Depending on the color format used by the text in the original template, you will have various options for changing the text color. In this example, you are customizing text with a linear gradient color fill. You can change the colors by clicking the Color 1 Selector and then clicking in the color picker window or by entering the correct R, G, and B numbers. Then click the Color 2 Selector and click to choose another color. You can also use the Color Bar Slider to change the colors in the color picker window. Alternatively, click the Color Picker tool and select a color with it. The linear gradient fill provides a two-color gradient; other options provide as many as four colors.
| 4. | Change Color Angle
For the color gradients like the one in the sample, you can change the color angle. Do this by rotating the Angle icon or by entering an exact number of degrees.
| 5. | Reverse Color
Click the Reverse Color button to reverse the gradient colors.
| 6. | Enable Drop Shadow
Not only does the Color Properties dialog box enable you to adjust the text color, it also allows you to add and adjust a drop shadow effect for the text. To add a drop shadow to your text, enable the Drop Shadow check box.
| 7. | Change Shadow Angle
To change the angle of the drop shadow, you can rotate the Angle icon or enter an exact number of degrees.
| 8. | Click OK
When you are finished customizing the text color and effects, click the OK button.
|
|