76. Make an Area of a Clip Transparent  BEFORE YOU BEGIN BEFORE YOU BEGIN
22 Prepare a Still for Video 29 About the Timeline and Video Tracks 68 About the Properties Panel 74 About Advanced Effects
 SEE ALSO SEE ALSO
63 Reset or Remove an Effect 85 Move a Car Across a Map 88 Make a Person Appear with a Different Background 89 Make a Person Appear to Be Miniaturized 90 Make a Person Appear to Fly
Keying means making an area of a clip transparent based on its color values. Chroma Key is a more general version of the same effect that appears as the Blue Screen Key, the Green Screen Key, and the Non-Red Key effects (the latter effects are preset to certain commonly used key colors, while the Chroma Key effect can be set to any color). The Chroma Key effect tells Premiere Elements to treat a color or a range of colors in your clip as transparent, revealing a clip or clips on the tracks below through the transparent area.  NOTE NOTE
The Chroma Key effect is the most general of several Key effects, all of which accomplish the task of designating a color or range of colors on a clip as transparent. The Green Screen Key, Blue Screen Key, and Non-Red Screen Key effects are basically the same as the Chroma Key effect, although the former effects are prekeyed to certain commonly used color ranges. Green and blue are the most commonly used Key colorsthey are used in virtually all television and feature film effects shotsbecause they are not found in human flesh tones and therefore their effect can be isolated to certain intentionally colored areas of the screen image.
76. Make an Area of a Clip Transparent 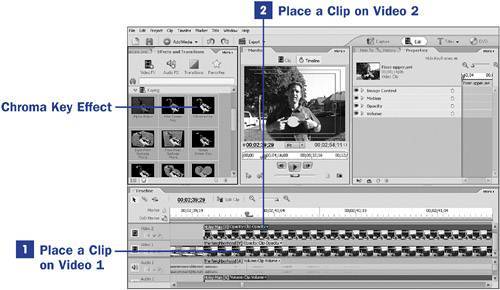 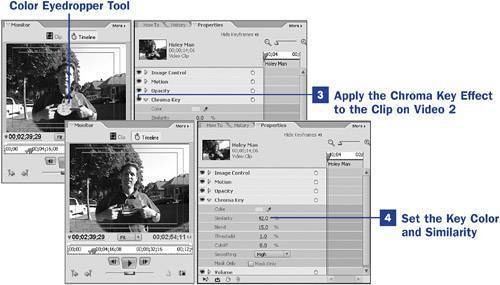
1. | Place a Clip on Video 1
Place a clip on the Video 1 track. Because this clip appears on the lower track, it is the clip that will be revealed through the transparent areas of the clip on Video 2. The clip you place on Video 2 should include the background you want to show through your keyed clip.
| 2. | Place a Clip on Video 2
Because of the way the Chroma Key effect works, it's best to select as your foreground video a clip that has an area of flat colorsuch as a blue or green screen or the purple side of a barn, or a red velvet curtainand this color should appear only in the area you want to make transparent.
In this example, I posed the man in my video clip holding a bright-green circle against his chest. I was careful to choose the material for this circle (a smoothly-colored piece of paper) in a shade of green that did not appear anywhere else in the shot. My intent is to key the green circle so a video clip on a lower track can show through it, making it look as though the man is holding a moving picture between his fingers.
Place this clip on the Video 2 track, directly above the clip you placed on the Timeline in step 1.
| 3. | Apply the Chroma Key Effect to the Clip on Video 2
Open the Effects and Transitions panel and click the Video FX button. Scroll to find the Keying category and look for the Chroma Key effect.
Drag this effect to the clip on Video 2. The Chroma Key effect is added to the list in the clip's Properties panel. Click the triangle to the left of the Chroma Key name in the Properties panel to open the effect's control panel.
| 4. | Set the Key Color and Similarity
Although you can set the Key color using the color panel, it's usually easier to use your screen image to designate the Key color. Click the Color eyedropper icon in the Properties panel; the mouse pointer becomes an eyedropper. Now click the color in the image in the Monitor panel that you want to designate as transparent. In this example, I clicked the green circle held against the man's chest.
You'll see an effect immediately: The clip on Video 1 is revealed through the area of the clip on Video 2 that you just keyed. Unless your clip has an absolutely flat area of color with no color variations (as was the case in this example), you'll probably have to adjust the Similarity setting (which widens the range of color to be affected) to get a good, clean, transparent area. For example, if you have a video of a man wearing a yellow shirt, and want to make the shirt transparent to reveal a video of a woman and child (so that it looks as if the shirt is made of a moving video), adjust the Similarity setting in the Properties panel to select all of the varieties of yellow in the man's shirt. The higher the Similarity setting, the more shades of yellow will be selected.
The Blend, Threshold, Cutoff, and Smoothing settings in the Properties panel also help you control transparency and the softness of the transparent area's edge.
When adjusting your key settings, you might find it helpful to turn on the Mask Only option. This option temporarily masks the areas that will not be keyed out, revealing only the transparent portions of your screen image. When you have a good, clean Chroma Key set up, uncheck the Mask Only option to return to normal view.
The end result, in my example, is that you can now see the clip which was on a lower video track through this keyed, or transparent, area. And because the clip on the lower track was of the scenery behind the man in my shot, the illusion is that you can actually see through a round hole in the man's chest!
|
TIP For some illusions, you might want to resize or reposition the clip on the lower track so that it "fits" in the keyed area of the top track. See 23 Scale and Position a Still for more information.
|