Objective 3.5.2: Designing VPN Connectivity
So far in this chapter, we have discussed how to use Windows Server 2003 as a router between subnets in the same office, or between subnets in different geographical locations. You can also use Windows Server 2003 as a remote access server for end users to dial directly in to. Assuming you have the budget to pay for dedicated lines, these types of connectivity are superior both in terms of efficiency and security. However, with the proliferation of the Internet, companies have begun discovering the VPN as a way to cut costs from the bottom line.
The goal of the VPN is to provide a means for connecting corporate entities together by using the public Internet (or other public network) instead of costly telephone or digital leased lines. These entities can be end users telecommuting from home, an external business vendor who wants to connect to your network, or a branch office connecting to the main corporate office in another city. In any of these cases, either a remote access VPN or a LAN-to-LAN VPN can be established using RRAS, but the question is, how to secure such a configuration? To best understand the security needs of a VPN design, some knowledge about how a VPN works is necessary.
A VPN emulates a secure point-to-point connection, such as an employee who uses an analog modem to dial up the corporate remote access server. Even though the data might travel to any number of third-party locations during its sojourn on the public network, it ends up at the correct endpoint. This is accomplished by wrapping, or encapsulating , the data with enough information for the data to be routed properly to its destination. Once it is received at the destination, it is unpackaged so that the data inside can be read. To the end user , it looks like just another point-to-point connection. The security of a point-to-point link is emulated by encrypting the data that is to be sent. That way, even if packets are captured somewhere on the public network, they are still unusable to the attacker. This combination of encapsulation and encryption make the VPN an attractive alternative to an expensive point-to-point connection.
For a VPN design to be considered secure, it must exhibit proper user authentication, data encryption through the use of keys, and IP address assignment management. VPNs use tunnels and tunneling protocols to accomplish these tasks . Think of a VPN tunnel as you would a train tunnel through a mountain. Both before it enters and after it exits the tunnel, the train is visible and even vulnerable. Inside the tunnel, however, no outside source can see in the tunnel. Figure 7.9 shows how a VPN is used to connect two remote company sites:
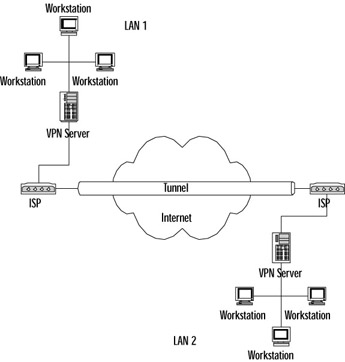
Figure 7.9: Two Sites Connected via VPN Tunnel
Notice that the satellite office router connects to a local ISP using either a dial-up or a dedicated connection. At headquarters, the VPN server is always connected to another local ISP in order to accept incoming connections. This way, all long-distance charges are saved. A similar situation is where a single user employs a client machine to connect to a local ISP and then to the corporate VPN server.
The key to all of this is the tunnel. It is the means by which data is made to traverse a foreign network. Consider an example in which you are trying to send an automobile from the city of Chicago in the United States to Osaka in Japan. Of course, the car can travel on highways from Chicago to, say, Los Angeles, but then what? Since the driver of the car has neither the specific knowledge of the ocean (after all, AAA doesn t make road maps of the Pacific) nor the ability to travel on it using only a car, he must rely on the foreign network of water instead of the familiar highway. The car can be loaded inside a cargo ship so it is protected from the wind and the waves, and assuming the ship has the appropriate navigational ability, it will arrive at a port in Japan some time later. Upon arrival, the car must be unloaded and then driven on a once-again familiar highway to its final destination.
Data travels across a VPN tunnel in much the same way. A packet originates on a computer and then travels as far as it can on the familiar network (the LAN). When it reaches the border of the Internet, it must be encapsulated and encrypted so that it can securely journey across the Internet to the destination site. Once there, it must be unwrapped and decrypted so that it can be delivered to the destination computer. In the next section, we discuss the protocols that make VPN tunnels possible.
Selecting Protocols for VPN Access
When designing a secure VPN solution, perhaps the most important choice to make is which tunneling protocol to use. Server 2003 supports both the Point-to-Point Tunneling Protocol (PPTP) and the Level 2 Tunneling Protocol (L2TP). Each has advantages and disadvantages, but the final decision on which to use might be limited by the design of your network infrastructure and your willingness to change that design. L2TP is widely regarded as more secure than PPTP, even by Microsoft, and should be the protocol of choice if strong security is a primary concern of your network design. PPTP, while less secure, requires less administrative effort to set up and maintain.
PPTP
PPTP is a standards-based protocol (RFC 2637) that can be used either in a LAN-to-LAN or a remote access VPN. It is based on the extremely popular Point-to-Point Protocol, or PPP. PPP has several features that make it a good base ”in particular, user authentication, data compression, and dynamic address assignment. In fact, the PPTP packet that makes its way across the public network has, at its core , a PPP packet.
When using PPTP, a PPP packet is encapsulated by two headers ”a Generic Routing Encapsulation (GRE) header and an IP header as shown in Figure 7.10. These headers allow the packet to be routed on the public network. Notice that the encrypted portion of the packet is only the PPP data itself.
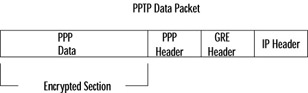
Figure 7.10: Diagram of a PPTP Packet
Before implementing PPTP, you need to be familiar with the authenticating protocols that PPP (and therefore PPTP) uses. Windows Server 2003 s implementation of RRAS supports Password Authentication Protocol (PAP), Challenge-Handshake Authentication Protocol (CHAP), Microsoft Challenge-Handshake Authentication Protocol (MS-CHAP), MS-CHAP version 2 (MS-CHAPv2), and Extensible Authentication Protocol (EAP). Among these, EAP is the strongest and should be used in a highly secure environment. MS-CHAPv2 is also considered secure but can only be used with Microsoft s more recent operating systems. MS-CHAPv2 provides mutual authentication (the client verifies the server and the server verifies the client) and allows for two encryption keys ”one for sent data and the other for received data. If for any reason EAP cannot be used, MS-CHAPv2 is the next best thing. MS-CHAP, CHAP, and PAP (PAP uses vulnerable plain text) are not recommended unless absolutely necessary.
Implementing PPTP can be somewhat daunting. In Exercise 7.02, we ll take you step by step through the process of enabling RRAS in a router-to-router VPN scenario assuming a demand dial interface. As you will see, there are two major steps. First, we ll set up RRAS and then we ll set up the demand dial interface. This exercise assumes that you have not set up RRAS as an internal router as in Exercise 7.01. If you did, you can disable RRAS by right-clicking on the server name and disabling routing and remote access ”you are then free to complete the following exercise.
| |
-
On the server that is to function as either the calling or the answering router, click Start , Administrative Tools , Routing and Remote Access .
-
Right-click your server, and choose Configure and Enable Routing and Remote Access.
-
On the Configuration screen, select Remote access (dial-up or VPN) and click Next . This is shown in Figure 7.11.
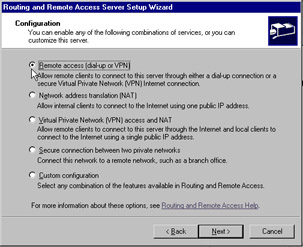
Figure 7.11: Configuration Screen of the Routing and Remote Access Setup Wizard -
The next screen, Figure 7.12, gives you the choice of whether to accept VPN or dial-up clients . Choose VPN and click Next .

Figure 7.12: Remote Access Screen of the Routing and Remote Access Setup Wizard -
Figure 7.13 shows the VPN Connection screen. Here, select the interface that faces the Internet, and make certain that the Enable security on the selected interface by setting up static packet filters option is selected. This option allows VPN traffic into the interface, but disallows all other types of traffic. Click Next .
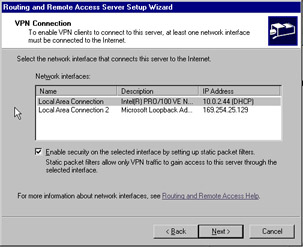
Figure 7.13: VPN Connection Screen of the Routing and Remote Access Setup Wizard -
To assign an IP address to the remote client (or remote router in this case), you need to choose between DHCP and a static pool of addresses. For our purposes, select Automatically and click Next . Figure 7.14 shows the IP Address Assignment screen.
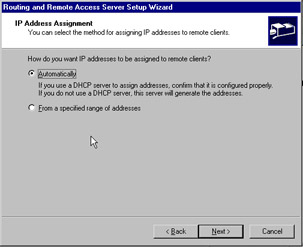
Figure 7.14: IP Address Assignment Screen of the Routing and Remote Access Setup Wizard -
The Managing Multiple Remote Access Servers screen really does not apply in our scenario because we are only configuring two routers across a demand dial connection. Choose No, use Routing and Remote Access to authenticate connection requests and click Next .
-
Click Finish to complete the task. Figure 7.15 shows the dialog box that appears. It s a reminder to configure the DHCP Relay Agent to support relaying DHCP messages.
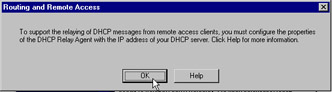
Figure 7.15: DHCP Relay Agent Reminder -
Now that RRAS has been configured, we will set up a demand dial interface. Right-click the Network Interfaces container on the main RRAS screen, and select New Demand Dial Interface as shown in Figure 7.16. Click Next to continue past the introductory screen.
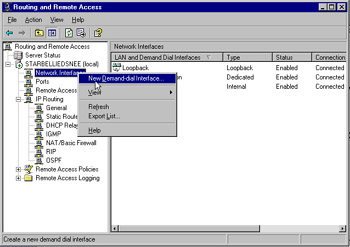
Figure 7.16: Setting Up a Demand Dial Interface -
On the next screen, type a name for the demand dial interface ” Remote Router will be sufficient. Click Next to proceed to the Connection Type screen, as seen in Figure 7.17. Select Connect using virtual private networking (VPN) , and click Next .
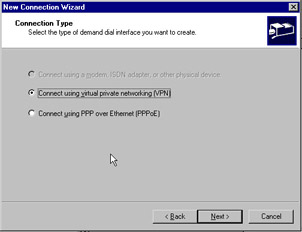
Figure 7.17: Connection Type Screen of the Demand Dial Wizard -
On the VPN Type screen, choose Point to Point Tunneling Protocol (PPTP) , and click Next . This is shown in Figure 7.18.

Figure 7.18: VPN Type Screen of the Demand Dial Wizard -
On the next screen, Figure 7.19, you will enter the IP address or host name of the destination router you are connecting to. Click Next when complete.

Figure 7.19: Destination Address Screen of the Demand Dial Wizard -
The Protocols and Security screen allows you to add a user account so a remote router can dial in. It also allows you to make certain that IP packets can be routed. Make sure both options are selected and click Next . See Figure 7.20.
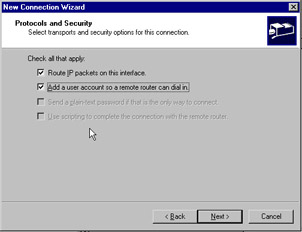
Figure 7.20: Protocols and Security Screen of the Demand Dial Wizard -
You need to enter a static route for the remote networks that you will connect to. After you do so, click Next . You are now presented with the Dial In Credentials screen as seen in Figure 7.21. Enter an appropriate password, confirm it, and click Next .
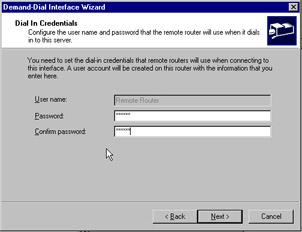
Figure 7.21: Dial In Credentials Screen of the Demand Dial Wizard -
The Dial Out Credentials screen is similar, as you see in Figure 7.22. The difference lies in that you must enter a username (of the router) and a domain name. Enter values for these fields, click Next , and complete the wizard.
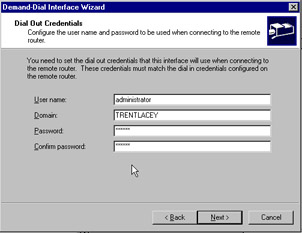
Figure 7.22: Dial Out Credentials Screen of the Demand Dial Wizard
| |
Implementing a PPTP remote access VPN is identical on the server end to the steps in the exercise we just completed, except that you would of course not need a demand dial interface. You would only need to configure the individual client.
In addition to user authentication, data encryption provides security that a VPN needs. Microsoft s implementation of PPTP uses the Microsoft Point-to-Point Encryption (MPPE) protocol for data encryption. MPPE uses automatically refreshing keys, and although the initial MPPE protocol was somewhat flawed, the version currently in use by PPTP is quite strong. It only encrypts the data, however, and does not encrypt the entire authentication process.
| Exam Warning | Windows Server 2003 supports IPSec Network Address Translator (NAT) Traversal (NAT-T), but no other Microsoft operating system natively does. If you have a NAT server under Windows Server 2003, you can now use L2TP/IPSec as well as PPTP. |
L2TP
L2TP is a protocol that was a new feature of Windows 2000. It is a combination of PPTP and Layer 2 Forwarding (L2F), which was put forth by Cisco Systems. L2TP can encapsulate PPP frames just as PPTP can, but in contrast can then be sent over IP, ATM, or Frame Relay. It is rather more complicated than PPTP, and it is more secure.
The IPSec Encapsulating Security Payload (ESP) protocol is used to encrypt L2TP traffic. As you can see in Figure 7.23, one advantage of IPSec is that it encrypts more than just the PPP data packet:
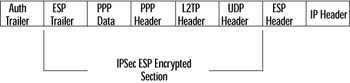
Figure 7.23: Diagram of an L2TP Packet
As to security, L2TP is extremely strong. In addition to requiring user authentication through PPP, L2TP requires machine authentication via certificates. Although certificates are covered in Chapter 3, you need to understand the following requirements for an L2TP implementation of a LAN-to-LAN VPN: First, a user certificate needs to be installed on the calling router, and a computer certificate needs to be installed on the answering router.
| Test Day Tip | If the answering router is a member server in a domain, a computer certificate is required for L2TP. However, if the router is a domain controller (DC), a DC certificate is needed. |
Next, the user certificate needs to be mapped to the answering router. Finally, to complete the answering router configuration, we turn to Exercise 7.03.
| |
-
Open the RRAS configuration utility, right-click the server, and choose Properties .
-
On the Security tab, click the Authentication Methods button as in Figure 7.24.
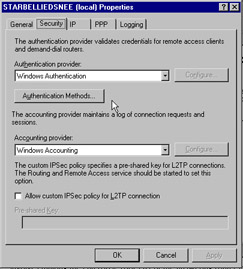
Figure 7.24: Security Tab of the Answering Router s Properties Sheet -
Make sure that the Extensible authentication protocol (EAP) and the Microsoft encrypted authentication version 2 (MS-CHAP v2) are selected. If extra security is required, clear the Microsoft encrypted authentication (MS-CHAP) option.
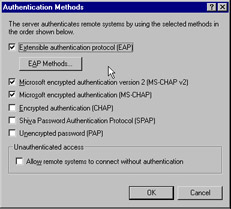
Figure 7.25: Authentication Methods Screen
| |
With the answering router thus set, we need to finish the configuration of the calling router. This involves making the enterprise root CA of the answering router trusted by the calling router. Finally, we need to configure the calling router s RRAS to use certificates ”somewhat similar to Exercise 7.03, when we configured the answering router s RRAS to accept certificates.
The first step in this configuration is to right-click the appropriate interface from the Network Interfaces container (such as a demand dial interface) and select Properties as shown in Figure 7.26.

Figure 7.26: Choosing Properties of a Demand Dial Interface
On the Security tab as in Figure 7.27, you would choose Advanced (custom settings) and then click the Settings button.

Figure 7.27: Security Tab of the Demand Dial Interface
Next, you would choose Use Extensible Authentication Protocol (EAP) , and then click the Properties button. This is seen in Figure 7.28.
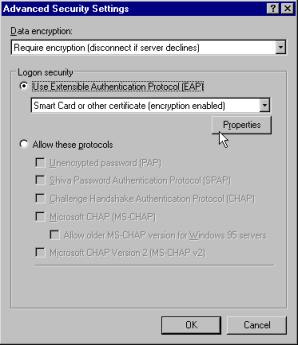
Figure 7.28: Advanced Security Settings Screen of the Security Tab
On the dialog box that appears, check the Validate server certificate box, and choose the trusted enterprise root CA that we spoke about earlier. Figure 7.29 illustrates this step.
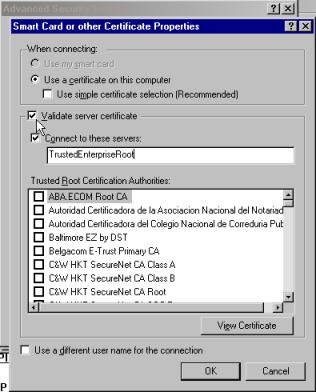
Figure 7.29: Smart Card or Other Certificates Properties Screen
Finally, returning to the main RRAS window, you would again right-click the same interface and select Set Credentials , as shown in Figure 7.30.

Figure 7.30: Setting Credentials on the Demand Dial Interface
By setting the credential to the certificate that was mapped earlier, we will have completed the configurations on the calling router.
New Windows Server 2003 VPN Features
In addition to providing general security (for example, limiting the membership of the Administrators group and physically securing the system) and choosing a tunneling protocol as described earlier, there are other security matters to be concerned with when designing a VPN strategy. We will discuss some of the key points, such as remote access policies and IP packet filtering, in a few moments. First, however, we will discuss two of Windows Server 2003 s VPN components .
Connection Manager and Connection Point Services are billed by Microsoft as security points, but in reality they are more useful considered from an administrative view. The Connection Manager, or CM, is a combination of Connection Point Services (CPS), the Connection Manager Administration Kit (CMAK), and the CM client dialer software. The CMAK is a management tool that helps administrators design customized CM profiles (dialers). These profiles can boost security on the VPN client because when the user invokes them, they automatically configure the appropriate VPN connections, including security. CPS is used to create and distribute customized phone books ”that is, collections of local phone numbers that users spread across a geographically disparate organization can use to dial local ISPs when starting the VPN connection process.
| |
PPTP versus L2TP
When choosing which layering protocol to use for a secure VPN, you should understand some of the differences between them. One of the largest differences between PPTP and L2TP is the method of encryption that each uses. PPTP uses MPPE, and L2TP uses IPSec ESP.
When PPTP negotiations happen between a client and the VPN server, the authentication phase is not encrypted, even when using the strongest form of MPPE (128-bit RSA RC4). IPSec encryption, however, is negotiated even before the L2TP connection is established. This allows the securing of both data and passwords. Moreover, IPSec can be configured to use Triple DES (3-DES). 3-DES is based on three separately generated 56-bit keys, for true 168-bit encryption. It is the strongest encryption method natively supported by Windows Server 2003.
Another consideration when choosing between L2TP and PPTP is how to implement packet filtering. In RRAS, packet filters can be implemented through the external interface s property sheet, located in the General IP Routing section. To allow only PPTP traffic through the VPN server requires the dropping of all traffic except TCP port 1723 and protocol ID number 47 on both the input and output filters. L2TP, however, is more complicated. It requires the dropping of all traffic except UDP port 500, UDP port 4500, and UDP port 1701.
Even though the implementation of L2TP is more administrative work than PPTP, it is recommended for all high-security environments. However, you should keep in mind that both L2TP and PPTP can be used on the same VPN server. It is also recommended that you use packet filtering and firewalls on all LAN-to-LAN and remote access VPNs.
| |
Network Access Quarantine Control is used to ensure that before a normal remote access connection is allowed to proceed, the connection is placed in a quarantined mode. The mode has very limited network access abilities , and is used until the remote system is checked for integrity and security. This check is performed by a script that is usually created by an administrator and implemented by policy on an Internet Authentication Server (IAS), and can be extremely useful in making certain that remote systems attempting to connect are secure themselves .
Using Remote Access Policies
One of the most important aspects of securing a remote access or VPN Windows Server 2003 system is the use of remote access policies and remote access profiles. Policies control such restrictions as what time of day and which groups have permission to connect, whereas profiles control such restrictions as maximum session time and idle timeout. In other words, think of a policy as defining who can access your remote access or VPN server, and a profile as what you can do once you get there.
After launching the RRAS utility, right-click on Remote Access Policies and select New Remote Access Policy . As you can see in Figure 7.31, you can add a number of policy conditions, such as authentication type and tunnel type matches. You can also control access by means of group membership ”you simply specify the appropriate group membership as a policy condition. Authorization on an individual user basis can be done through the user object s property sheet on the Dial-in tab.
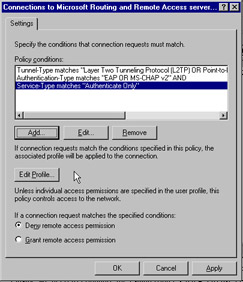
Figure 7.31: Remote Access Policy Settings Screen
If any of the policy conditions don t match, access is denied or granted based on the option button choice made at the bottom of Figure 7.31. However, if all the conditions are met, the associated profile is then applied. Clicking the Edit Profile button gives us the screen shown in Figure 7.32. The Authentication tab allows you to choose which protocols are allowed for the connection. It is recommended that only EAP and MS-CHAP v2 be used in secure environments, and only under very controlled situations should you select unauthenticated access.
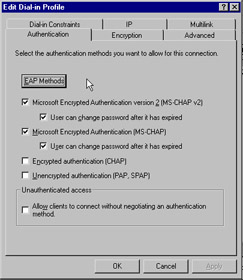
Figure 7.32: Authentication Tab of the Remote Access Profile Screen
The Encryption tab, shown in Figure 7.33, gives you the choice of whether to use MPPE 40-bit basic level encryption, MPPE 56-bit strong level encryption, or MPPE 128-bit strongest level encryption.
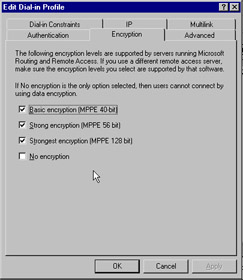
Figure 7.33: Encryption Tab of the Remote Access Profile Screen
Once a client is connected to the remote access server, the Dial-in Constraints tab can be used to limit the amount of time the client can connect, set the amount of time the server can remain idle, or allow connections only during specified times set by the administrator. Figure 7.34 shows the details of this tab.
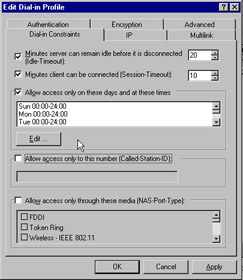
Figure 7.34: Dial-in Constraints Tab of the Remote Access Profile Screen
The tab that controls which packets can come and go is shown in Figure 7.35. The IP tab is used to set input filters and output filters. These filters define which packets the interface receives, based on type, and are perhaps the easiest and most effective component of remote access security that you can implement.
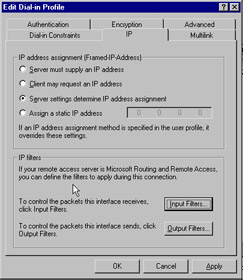
Figure 7.35: IP Tab of the Remote Access Profile Screen
| Test Day Tip | If multiple remote access servers are to be implemented in your network design, it is strongly recommended that you use IAS as a RADIUS server. This way, IAS can be used to centrally administer and control authentication for all the remote access servers in your organization. If this is the case, the policies and profiles discussed previously would not apply. |
Designing Routing between Internal Networks
Windows Server 2003 can be used as a router on the internal network. As such, it can be used to secure internetwork traffic between locations and to control traffic between internal subnets by using IP filtering.
IP filtering can determine what action should be taken when IP traffic matches the IP filter criteria. Actions are permit, block, and negotiate. Negotiate allows the security measures to be further configured. The IP filters base their actions on source and/or destination IP addresses, specific protocols, and/or ports. This allows Windows Server 2003 to control the traffic that is being passed between internal networks.
Objective 3.6.1, 3.6: Designing an Extranet Infrastructure
Most of the time, we think of using VPNs to connect remote users or branch offices to the local network. We can also use a VPN to create a link to another company such as a third-party vendor. In this case, we call the remote network an extranet . An extranet is a portion of the network that can be extended to business partners or vendors . It can make all or part of your network accessible to outside organizations. Since the network will be extended between the companies over a public network or Internet, security will always be a concern for both companies. Previous sections of this chapter have already covered the mechanisms required to design a secure VPN, and we now review some of those features that are used to create the extranet.
The extranet will require that you create a site-to-site ( router-to-router or LAN-to-LAN are synonyms) VPN connection. In the extranet, the calling router initiates the VPN connection. The answering router listens for a connection request and then responds to create the connection. The calling router then authenticates itself to the answering router. The site-to-site VPN connection can be a persistent or a demand dial connection. Persistent connections are always connected. If the connection is lost, it is retried immediately. A persistent connection is created on the calling router by selecting Persistent connection on the Options tab on the VPN interface.
The answering router completes the persistent connection by going to the Dial-in Constraints tab on the site-to-site VPN connection s profile properties of the remote access policy. On the tab, clear the Minutes server can remain idle before it is connected and Minutes client can be connected check boxes. The demand dial connection for a site-to-site connection is only made to forward specific traffic across the VPN. The connection can be terminated if thresholds are reached for connection times or idle times. The answering router controls these times. To prevent the calling router from making unnecessary connection, demand dial filtering and dial-out hours can be set. Once the connection has been made, Remote Access Policy Profiles can control the traffic between the sites by implementing packet filtering. The profiles can specify the types of IP traffic, which VPN clients can send traffic, and which users are allowed to connect through the VPN. Remote access policies can also be used for authenticating and authorizing the traffic between sites.
One element that we have not yet discussed is the placement of the VPN server in relation to a firewall. Often, a VPN server will be placed outside the firewall to facilitate easy communication with potentially different extranets. In this case, however, traffic through the firewall can be limited to L2TP/IPSec and PPTP. If the VPN server is placed between two firewalls (a DMZ or screened subnet), traffic both to and from the server can be regulated . This is Microsoft s preferred method of VPN placement. Remember also, however, that the firewall will likely have to support other protocols such as HTTP on port 80 and SMTP on port 25. As a final note, ensuring that a firewall only permits traffic to pass that is absolutely necessary is a primary tenet of securing the network infrastructure.
Objective 3.6.2: Cross-Certification of Certificate Services
If you plan to use L2TP/IPSec connections or EAP-TLS authentication over the VPN, you will need to use cross-certification of certificate services. For the L2TP connections, a computer certificate will need to be installed on both the calling and answering VPN servers. This will provide the ability for both computers to provide the required authentication needed to create the session and enable the use of IPSec.
A computer certificate needs to be installed on the authenticating server, which can either be the answering VPN server or a RADIUS server (IAS) if EAP-TLS authentication will be used. A user certificate must then be installed on the calling VPN router.
EAN: 2147483647
Pages: 122