Objective 3.5: Designing Security for Communication Between Networks
Many experts would agree that sharing information is the lifeblood of any company. Indeed, it is the need to share information that serves as the primary motivation for most corporations computer networks. The majority of these networks are traditional in nature. That is, one or several servers are accessed by many clients , all of which are physically located in the same office. Indeed, most of the chapters in this book thus far have been aptly related to this kind of network and applicable security issues.
In recent years , however, more and more networks have to deal with external elements. These elements might include full-time telecommuters who need to access the corporate network from home or from the road, or they might include LAN-to-LAN links across vast geographical distances. For telecommuting road warriors, there are two choices. The user can connect directly to a company remote access server (usually by means of a dial-up modem), or the user can connect to the Internet and then connect to a company remote access server. One advantage of the latter method is that most Internet connections are made by accessing a local ISP, and can save companies large long distance bills. The other main advantage is that many users now have high-speed Internet access (thanks to the proliferation of cable and DSL modems), and are no longer limited to analog modems or ISDN connections.
Whether a user dials directly or uses a VPN to traverse the Internet to connect to the company LAN, Windows Server 2003 can play the role of the remote access server. As a matter of fact, using Routing and Remote Access Services (RRAS) allows Windows Server 2003 to be used as a local router or a so-called perimeter router, depending on how your network subnets are arranged. For a local router ”one that connects two or more local subnets ”the choice and implementation of routing protocols is probably the most important security consideration and we ll discuss it in detail shortly. The same goes for a perimeter router that interfaces with another perimeter router at a distant site with a dedicated connection.
When a routing and remote access solution includes demand dial or VPN connections, however, security considerations become more complex. Luckily, Windows Server 2003 comes with many new features and components such as Network Access Quarantine Control that are specifically designed to accommodate a wide variety of security needs when using RRAS. As we will see, connecting private networks together ( especially across a public network) requires a great deal of thought and planning.
Objective 3.5.1: Using Windows Server 2003 as a Router
When they hear the word router , most people think of a dedicated hardware device. However, by using a computer running Windows Server 2003, it is possible to implement a secure and cost-effective routing solution across any internetwork. In the simplest of terms, a router segments networks into two or more sections. Perhaps the segments are in different geographical locations and are connected over a WAN link, or perhaps one segment has become too large and needs to be subdivided in order to efficiently control the routing of network messages. In either case, a multihomed computer (a system that has more than one network interface card, or NIC) running RRAS fits the bill nicely .
Exactly how a router works and why it might be beneficial to your network is beyond the scope of this book; however, to actually use Windows Server 2003 as one, you first need to configure RRAS.
| Exam Warning | If you are not a domain administrator and are installing RRAS on a member server, you will need to have an administrator add the server s computer account to the RAS and IAS Servers security group before proceeding with RRAS configuration. Alternatively, the netsh ras add registeredserver command can be used ”but only with administrative privileges. |
In Exercise 7.01, we will configure RRAS to act as a simple router. Once the exercise is complete, you would need to add routes using one of the methods described in the next sections for the router to be functional.
| |
-
On a member server, click Start Administrative Tools Routing and Remote Access.
-
Right-click your server, and choose Configure and Enable Routing and Remote Access as shown in Figure 7.1.
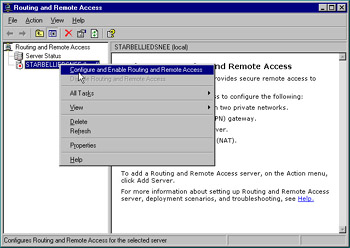
Figure 7.1: Configuring Routing and Remote Access -
When the Routing and Remote Access Server Setup Wizard appears, click Next to get past the initial screen. On the Configuration screen, select Custom Configuration and click Next . See Figure 7.2.
-
On the Custom Configuration screen, as in Figure 7.3, select LAN routing and click Next .
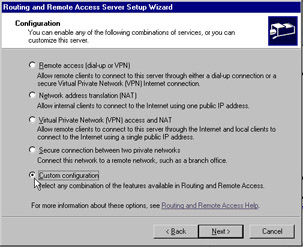
Figure 7.2: Routing and Remote Access Server Setup Wizard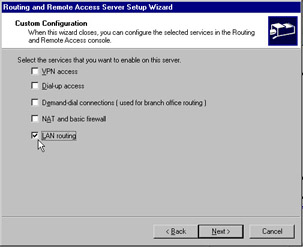
Figure 7.3: RRAS Custom Configuration Screen -
Finally, click Finish on the Summary screen to complete the task.
| |
As far as security is concerned , the first line of defense is to secure the server running RRAS just as you would any other server using the principles you have already learned in this book. This might include physical security, as well as logical security pieces such as limiting administrator group membership and using strong authentication protocols.
It is also advisable to simplify your network infrastructure design. This can mean using fewer interfaces and NICs if possible, especially public interfaces. The more interfaces that an infrastructure contains, the more entry points an attacker has available to target ”similar to a house that has a large number of windows and doors through which a burglar might choose to enter. Arguably the most important security consideration when dealing with a 2003 RRAS router, however, is the handling of routes and routing protocols. In a small network with only one router, the router by definition has first-hand knowledge of each network s address that is attached to it. For example, if two segments A and B are attached to a router and a host on B attempts to send a message to a host on A, the router will know how to reach the destination without any help. However, in a more complicated network with many segments, routers must rely on routing tables to assist them.
Routing tables contain entries (called routes ) that help the router direct traffic. Think of a routing table as a crossroads sign. You know, the ones that say Paris is 500 miles this direction and Rome 450 miles that direction, and Berlin 800 miles in yet another direction. If you think about it, the information contained in such a table could be very valuable to an attacker. After all, it s a virtual roadmap to your entire infrastructure. Routing tables work like this. When a packet arrives at the router, the router consults its routing table, and forwards the packet appropriately. If a matching destination is not found, the router forwards the packet to its default route. Note that in the case where one router interface points to the Internet and another interface points to the local intranet, in order to prevent conflicts with the default route pointing to the Internet, you must not configure the default gateway on the intranet interface. As you can see, routing tables are critical to the implementation of RRAS as a router, and the security of these tables is certainly important. To understand some of the methods to protect the routes, we first need to understand how the tables are built.
Static Routes
One way to build a routing table is to have an administrator enter each route manually, using either the RRAS snap-in or the netsh utility. The problem is that the amount of administration is quite often prohibitive, especially on larger networks. After all, each and every router must have a table, and the larger your network, the more complex your routing tables are likely to be. Moreover, there is no fault tolerance for static routes. If a Windows Server 2003 router loses its static table, it must be rebuilt from scratch.
From a security standpoint, static routes are actually quite secure. Unless auto-static updates are used, routing information is not passed over the network. This makes it impossible to intercept such transmissions. When configuring static routes on a router, you can opt to use summarization routes. These routes encompass multiple subnets on the receiving router by shrinking the subnet mask, which makes implementation a bit easier but also lessens security slightly.
| |
Summarization Routes
The concept of static routes is simple ”an administrator programs each and every destination route into the routing table of the RRAS server. When a packet comes in to the server from one interface, the server checks its routing table to determine where the packet should be forwarded to. However, the more complex an infrastructure becomes, the more difficult it is to keep track of all the possible destination networks.
One possible answer is to use summarization routes, which are made possible through the mathematics of subnet masks. For an example, let s assume that you want to add destination routes of 192.168.15.0, 192.168.16.0, and 192.168.17.0 to your routing table. Let s further assume that each network has a subnet mask of 255.255.255.0, or 24 bits. Since each of the three networks has a common root network ID of 192.168, it is possible to insert just one entry to the routing table instead of three individual ones. The singular route of 192.168.0.0 with a 16-bit mask encompasses all three destinations, making the implementation and upkeep of routing tables much less work.
There is a possible price to be paid, however. In our example, any destination network that has the 192.168 root would be considered reachable by the server. This might include nonexistent networks that would slow down the server considerably (picture a mail carrier searching the block for a make-believe address), or it might include a real rogue network set up by an attacker. This type of network would be created deliberately for the purpose of intercepting traffic. However, this kind of attack would be extremely difficult to perpetrate ”in part because it requires prior knowledge of not only the routing table, but the infrastructure as well. It would further require physical access to the network.
| |
| Test Day Tip | Auto-static updates are another method of populating a static routing table. A router interface that is configured in this way sends out a request asking for all of the routes on the other interfaces, similar to the RIP protocol. The auto-static request must be made by an administrator, however. |
RIP
The Routing Information Protocol, or RIP, was designed to allow routers to build their routing tables dynamically, by periodically communicating with other dynamic routers. The largest advantage of such a design is that the route exchanges happen automatically without user intervention. RIP versions 1 and 2 are supported by Windows Server 2003 s RRAS and are extremely easy to configure and use. However, RIP is not suitable for large networks for two reasons. First, networks that are more than 15 hops away are simply not reachable (a hop is a metric, which means that a router is traversed during transit). Second, the RIP protocols broadcast (version 1 or 2) or multicast (version 2 only) quite frequently. This can cause a deluge of network traffic when topology changes are implemented. RIP can be implemented by right-clicking General under IP Routing in the RRAS utility. This can be seen in Figure 7.4.

Figure 7.4: Setting Up a New Routing Protocol
After selecting RIP Version 2 for Internet Protocol as in Figure 7.5, you will be able to configure it from the main screen.
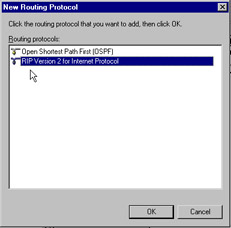
Figure 7.5: Choosing RIP
There are several security measures that you as an administrator can take to make RIP broadcasts less vulnerable to sniffing or other types of threats. If RIP version 2 is used, simple passwords can be set up such that any router receiving an RIP transmission checks to see if the password matches before accepting the announcement. Unfortunately , the simple passwords used are sent in plain text over the network, which provides no protection from network packet intercepting attacks. To enable passwords, select RIP from the IP Routing section of the RRAS snap-in. In the right-hand pane, right-click the interface that you want to enable passwords on. Click Properties , and on the General tab, check the Activate authentication check box. Finally, enter a password in the Password field as shown in Figure 7.6.
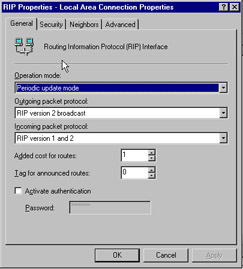
Figure 7.6: General Tab of the RIP Property Interface Sheet
Another security measure is the use of route filters. Filters are used whenever a route is received and is being considered for adoption into the receiver s table. If the route is not potentially reachable on the internetwork (a 192.168.0.0 network, for example, would not be reachable from a 10.0.0.0 network, since both of these are private, nonroutable networks), it is discarded. Filters can be applied from the Action section of the Security tab of the RIP properties sheet, and you can select either For incoming routes or For outgoing routes .
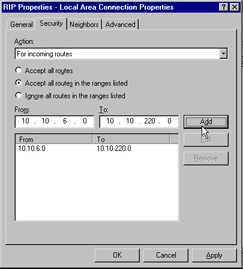
Figure 7.7: Security Tab of the RIP Property Interface Sheet
Finally, you can use peer limiting. Using peer limiting, you can specify that only immediate neighbors receive router announcements through a directed unicast packet rather than through broadcast or multicast. This is done on the Neighbors tab of the RIP Properties sheet ”see Figure 7.8.
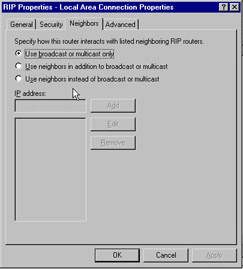
Figure 7.8: Neighbors Tab of the RIP Property Interface Sheet
You can also add peer filters by means of the RIP Protocol s Security tab to specify by IP address which routers can send acceptable announcements. Note, however, that only immediate neighbors can be set for unicasting . All announcements received from routers not on the list will be discarded.
Open Shortest Path First
The final method used by routers to build their tables is the OSPF protocol. An extremely efficient model, OSPF is unfortunately rather difficult to set up and maintain properly. Most of this efficiency is a result of the concept of areas and area border routers (ABRs). Similar to how sites and bridgehead servers are used to control replication in Active Directory, areas and ABRs serve to lessen the amount of network traffic generated by topological changes while maintaining a high degree of accuracy and synchronicity.
Installing OSPF is similar to RIP as described in the last section, but OSPF is different from RIP because it does not simply use the number of hops to define the metric of a particular route. Instead, OSPF calculates the least-cost path to each segment of the network, and because the path is guaranteed to have the least cost, it is also guaranteed to not have any loops in the routing structure ”something that RIP does not do. These least-cost paths are stored in the link-state database. Whenever changes to the database are received from another router, the database recalculates the routing table entries automatically.
Although the design of OSPF is quite complicated and beyond the scope of our discussion here, implementing security is not terribly difficult. An autonomous system , or AS, is the group of all the OSPF routers in the organization. Each router within the AS can advertise routes and they will be considered internal. However, external routes often need to be advertised as well, but by default only internal announcements are propagated as a security precaution. External routes can be static routes, RIP routes, or even SNMP routes. In order to have any of these routes announced through the AS, an OSPF router must be specially configured as an AS boundary router , or ASBR. Once a router is set as an ASBR, it imports and announces all routes that are defined as external. For added security, you would most likely want to limit the types or sources of external routes by setting up external route filters on all ASBRs.
All OSPF interfaces on an RRAS router have a default simple password of 12345678. It is presented as part of the OSPF Hello message, which is used to initiate announcements. Not only is the password simple, but it is sent in plain text. However, this password is not meant so much as a security measure, but more as a guard against corrupt OSPF data from a possibly unauthorized server.
| Test Day Tip | OSPF is not available when using any of the 64-bit versions of the Windows Server 2003 family. |
When all is said and done, whether your routing system uses static routes, RIP, or OSPF, the basic tenets of security are the same. Microsoft recommends that you implement physical security on the RRAS router, and that administrative rights only be given to those who are actually running RRAS ”simple, but good advice indeed.
Objective 3.5.3: Designing Demand Dial Routing between Internal Networks
RRAS routers can be used in many situations. As we discussed earlier, one of the reasons for segmenting traffic might be the disparate geographical locations of your corporate offices. If you have a main office located near Washington, D.C. with two satellite offices in Salt Lake City and San Diego, it is fairly obvious that you want as little traffic as possible going across the WAN links. After all, even so-called high speed WAN links such as T1 and T3 carriers are slow when compared with most LAN connections like 100 Mbps Ethernet. Therefore, it makes sense to have each geographical location represented by at least one logically separate subnet. Furthermore, we need to understand that not all companies have the financial resources necessary to support the luxury of high-speed WAN communications, and it is to these ends that we introduce the topic of demand dial routing.
A demand dial interface works in this way: Let s assume that we have a user in Salt Lake City who is at IP address 10.10.220.3 and is attempting to connect to a resource located in Washington, D.C. at IP address 10.1.35.92 on a different subnet. The two cities are connected via routers with analog modems. The 10.10.220.3 computer sends packets to the local router, SLRouter1, which is configured with a demand dial interface. SLRouter1 determines that a demand dial interface exists to the 10.1.35.92 address by checking its routing table, and finds that the interface is in a disconnected state. At this point, SLRouter1 knows that it must use the modem, and does so.
On the other end, DCRouter1 answers the incoming call, and immediately demands authentication credentials from SLRouter1. SLRouter1 sends a username (such as demand_salt_lake) and password. If demand_salt_lake exists as a user account on DCRouter1 and the password checks out and demand_salt_lake has the required dial-in permission, then the connection is accepted. However, DCRouter1 needs to see if the incoming call is an individual user dialing in to RRAS, or if it is a demand dial connection from a remote router. If the username demand_salt_lake is found in DCRouter1 s list of demand dial connections, then the status of demand_salt_lake is changed from inactive or disconnected to connected. Finally, the packets can be delivered to 10.1.35.92.
| |
Numbered and Unnumbered Connections
When an RRAS router initiates a demand dial connection to another RRAS router, it creates a virtual interface . After the creation takes place, the sending router asks the receiving router to assign its new interface a public or private IP address. The process is then reversed , and the receiving router creates its own virtual interface. Subsequently, the receiving router then asks the sending router for an IP address for the new interface. Once both interfaces have been assigned IP addresses from the other router, the logical interface connection is complete and communication can begin. This is known as a numbered connection .
The assignment of an IP to a virtual interface can be accomplished in a number of ways. The static addresses assigned to both routers user accounts (via the Dial-in tab) can be used, as well as dynamic address taken from a static address pool, if such a pool is set up on the routers. Perhaps the most common way, however, is for DHCP to assign the addresses automatically. This requires that each subnet has a DHCP server. If no server is available, dynamic assignment is still made through Automatic Private IP Addressing (APIPA).
Starting with Windows 2000 and continuing with Windows Server 2003, unnumbered connections can also be used with LAN-to-LAN communications. If an IP address is not available or is refused , a connection is still made ”just without IP addresses. In this situation, static routes must be used because RIP and OSPF do not function over an unnumbered connection.
| |
The security concerns of establishing a demand dial interface and connection are mainly focused on the authentication and authorization procedures. Eavesdropping and packet sniffing attacks are less likely on a demand dial connection than a LAN-to-LAN VPN connection (we ll discuss VPNs in the next section) because packets don t travel across public networks such as the Internet.
The strongest form of authentication that you can use for demand dial routing is certificate-based authentication that uses Extensible Authentication Protocol “Transport Level Security (EAP-TLS). According to Microsoft s TechNet Web site, the following steps are all required to implement such security:
-
Configure the calling and answering routers for demand dial routing.
-
Install a computer certificate on the main office router.
-
Configure the domain for Web-based certificate enrollment.
-
Create user accounts and export certificates.
-
Import the dial-out user certificate on the main office router.
-
Configure the main office router to support certificate-based authentication as a calling router and as an answering router.
-
Import the dial-in certificate on the branch office router.
-
Configure the branch office router to support certificate-based authentication as a calling router.
-
Connect to the main office and join the organization domain.
Certificates are covered extensively in Chapter 3, Designing a Secure Public Key Infrastructure. If EAP-TLS is not appropriate for your security requirements, you can use MS-CHAP v2 with strong passwords to support a relatively secure environment. We will implement a demand dial connection as part of Exercise 7.02 when we set up a PPTP LAN-to-LAN VPN server.
The need for encrypting data can be met in two ways. If your concern is only to protect the data as it travels between the two routers, then Microsoft Point-to-Point Encryption (MPPE) at either 128-bit or 40-bit strength can be used if EAP-TLS or MS-CHAP authentication is in place. MPPE only encrypts packets between the routers, also known as link encryption . If a more complete encryption is required ” namely end-to-end ”then IPSec can be used. IPSec encrypts data from the source host all the way to the destination host, not just between the routers. A more detailed discussion of IPSec can be found in Chapter 5, Securing Network Services and Protocols.
EAN: 2147483647
Pages: 122