Objective 3.7.1: Defining a Baseline Security Template
Securing servers is critical in today s environment where corporations run their businesses via electronic networks. To assist in managing large networks, Windows Server 2003 includes predefined security templates. These templates allow the network administrator to use or modify predefined settings that can be applied to any number of similar computers in a network. The task of securing servers is both simplified and enhanced, since templates reduce the likelihood of error or omission when designing security for the enterprise.
Windows Server 2003 contains several administrative security tools that together form a comprehensive interface for managing a secure environment. Collectively, these tools are called the Security Configuration Tool Set or the Security Configuration Manager, and have the following elements:
-
Security Configuration and Analysis snap-in The Security Configuration and Analysis snap-in works only on the local computer. It cannot be used to configure security on remote computers. However, network administrators often use it to design and test security configurations locally before rolling them out across the domain or organizational unit (OU).
-
Security Templates snap-in Windows Server 2003 provides predefined security templates that can be applied, as is, in various situations. These temples can be modified and are used to configure and apply security settings on computers in similar roles across the network. These templates contain settings that allow the network administrator to review and configure security levels for account policies, local policies, event logs, restricted groups, file systems, Registry settings, and system services. These templates can be access and modified in the Security Templates snap-in to the Microsoft Management Console (MMC).
-
The command-line tool secedit.exe The command line tool, secedit.exe , is used to analyze, configure, and export system security settings. There are a variety of command-line switches used with secedit , discussed in detail later in this chapter. This tool is often used in batch programs or scheduled tasks to apply security settings automatically. It is also the preferred tool for reapplying default security settings.
-
Security Extensions to Group Policy The Security Extensions to Group Policy are used to define security configurations for various users, groups, or computers within a GPO. The Security Extensions are accessed via the Administrative Tools via the Active Directory Users and Computers console or via the Group Policy Object Editor snap-in via the MMC.
-
Hfnetchk.exe and Microsoft Baseline Security Analyzer (MBSA) Windows Server 2003 also includes a command-line tool called Hfnetchk.exe , which stands for Hot Fix Network Checker, that analyzes Windows computers and reports any missing security updates. While this is not specifically a tool for setting security on servers, it is a useful tool for keeping your servers up to date with hotfixes and patches that can affect security after initial configuration and installation. Finally, there is a downloadable tool called Microsoft Baseline Security Analyzer (MBSA). As part of Microsoft s Strategic Technology Protection Program, the MBSA can perform local or remote scans of Windows systems. The tool runs on Windows 2000,
-
Windows XP, and Windows Server 2003 systems and is used to identify common system misconfigurations and missing security updates. It can be used to scan Windows NT, Windows 2000, Windows XP, Windows Server 2003, Internet Information Service (IIS) 4.0 and 5.0, SQL Server 7.0 and 2000, Internet Explorer (IE) 5.01 and later, as well as Office 2000 and 2002. MBSA will scan for missing security updates for the following products:
-
Windows NT 4.0, Windows 2000, Windows XP, Windows Server 2003
-
IIS 4.0 and 5.0
-
SQL Server 7.0 and 2000
-
IE 5.01 and later
-
Exchange Server 5.5 and 2000
-
Windows Media Player 6.4 and later
The MBSA tool uses the Hfnetchk.exe tool and creates an XML security report for each computer scanned. The MBSA tool provides a graphical user interface (GUI) for reviewing the reports via HTML. The current version, v1.1.1, can be downloaded from the Microsoft Web site.
To set baseline security for a network, you need to begin by analyzing the network and determining the security needs for numerous elements including servers (based on server role), client computers, applications, network communication, file systems, user accounts, and system services, to name just a few. In this chapter, we re focusing on setting baseline security for servers based on their roles.
-
Best Practices for Security Templates
Windows Server 2003 provides a number of predefined security templates. Before working with the templates, it s a good idea to review best practices as they relate to these security templates.
-
Always test security templates, whether predefined or customized, in a test environment before using them on a live or production system.
-
Never edit the Setup security.inf file. This is what establishes a minimum baseline security level for a Windows Server 2003 network. If you ever need to reapply security settings, you can use this file to reestablish a secure baseline. You ll also need to use this file if you remove a security template from a GPO. To avoid tattooing (discussed earlier), you should reapply the portion of the Setup security.inf file to restore all default settings changed by the removed template. If you want to define different baseline security components , you can create a copy of this file and edit the copy. However, be aware that the additional security templates build on this known baseline.
Your best bet is to modify the other templates and leave the Setup security.inf file unmodified.
-
Do not apply the Setup security.inf file via Group Policy. It should only be applied via the Security Configuration and Analysis snap-in or via the secedit command line. The best scenario is to apply specific parts of the Setup security.inf via the command line.
-
Never apply the Compatible template to DCs, as this will expose your DCs to serious security risks.
-
Always save modifications to templates as a different filename to preserve the original security template.
-
Thoroughly document all changes you make to each template. This way, you ll be able to assess the results of applying several templates, and it will greatly assist in troubleshooting.
Now that we ve reviewed best practices related to security templates, let s look at the predefined templates provided in Windows Server 2003.
Windows Server 2003 Predefined Security Templates
Windows Server 2003 provides several different security templates, each of which applies a different group of security policy settings for distinct security needs. The release of Windows Server 2003 represents a departure from the way Microsoft has implemented security in the past. With this release, security is set to the fewest possible permissions. It is up to you, the network administrator, to modify settings as needed. However, before you make any changes, research and test the results to discover potential weaknesses and find out how intruders might exploit them to gain access to your network resources.
These predefined templates can be modified, although the default settings are more secure than were the default settings in previous Windows Server products. The templates can be accessed and modified via the Security Templates snap-in via the MMC. The security settings for a particular computer can be configured and analyzed via a related snap-in, the Security Configuration and Analysis snap-in, also accessed via the MMC, via the command-line tool secedit , or by importing the template into the local security policy. To configure a group of machines with a security template (either predefined or modified), you can import a template into security settings, an extension to Group Policy. The predefined templates are stored in the systemroot \Security\Templates location. The templates included in Windows Server 2003 are:
-
Default security (setup security.inf)
-
Domain controller default security (DC security.inf)
-
Compatible (compat*.inf)
-
Secure (secure*.inf)
-
Highly secure (hisec*.inf)
-
System root security (rootsec.inf)
-
No Terminal Server user SID (notssid.inf)
The asterisk (*) in some of the filenames means that the characters will change based on application. For example, if applied to a DC, the secure*.inf file would be called securedc.inf. If applied to a workstation, the file would be called securews.inf. Each of these templates and their appropriate applications are discussed next . Using these templates provides baseline security for your network. Using these templates helps ensure you don t inadvertently omit or change a security setting that will leave your network vulnerable to both intentional and unintentional security breaches. Modifying these templates carefully will allow you to customize your network security to meet the needs of your organization.
| Exam Warning | Windows 2000 used a template called Basic*.inf to apply default security settings. In Windows Server 2003, this template is called Setup security.inf. Windows Server 2000 also used a template for dedicated DCs called Dedica*.inf to optimize security for local users on DCs that did not run other server applications. Windows Server 2003 provides several templates related to DCs, including DC security.inf, securedc.inf, and hisecdc.inf. Be sure you re familiar with the templates used in Windows Server 2003 so you won t be confused between Windows Server 2000 and Windows Server 2003 security templates. |
Each security template is designed with the assumption that it will be applied to computers that use the default security settings. This is why it s inadvisable to modify the Setup security.inf file ”the file that provides the default security settings used in Windows Server 2003. These templates incrementally modify security settings, so it s important to understand what each security template does and how it s applied before modifying any of the templates. It s also critical to understand that if security settings have been modified from the default settings, it s recommended that you reapply default settings before applying these security templates. The security templates do not apply the default settings prior to making modifications, so you can end up with unspecified results if you apply these templates on top of nondefault security settings.
| Exam Warning | When answering questions about security templates, try to determine if the security settings have been modified or if the settings are the defaults. On the exam, remember that these templates do not apply default settings; they work with existing settings, which are assumed to be default settings, and apply additional settings based on the template selected. |
The security templates are text files and can be viewed using Notepad. To modify the templates, you should use either the snap-in or the secedit command-line tool. Figure 2.1 shows the Setup security.inf, the default security template, in Notepad.
Default Security (setup security.inf)
The default security template is applied during initial installation of the operating system on each computer. Since installations can be clean or upgrades, the resulting settings can vary from computer to computer. This template establishes the default security settings applied to the system, including the file permissions for the primary system drive. It can be used on both client and server systems, but is not used on DCs. Baseline security for DCs is provided via the DC security.inf, discussed in the next section.
The Setup security.inf template should not be applied via Group Policy, because this baseline template contains a large amount of data (over 1000 security settings). Since Group Policy is refreshed from time to time, the large amount of data in the
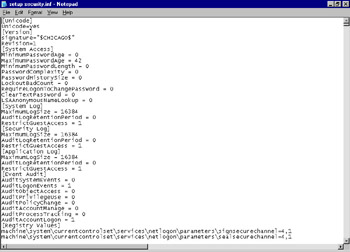
Figure 2.1: Setup security.inf Viewed in Notepad
Setup security.inf file can seriously degrade performance. Microsoft recommends applying the Setup security.inf template in sections, when needed, using the secedit command-line tool, discussed later in this chapter.
When you install Windows Server 2003, default security settings are installed via the Setup security.inf file. However, if you re upgrading from a previous Windows operating system or if you ve previously modified settings, some of these security settings might not be set to the default values used in Windows Server 2003. To establish a sound baseline, it is sometimes best to reapply the default values, which does two things. First, it sets all security values to a known value so you don t have to guess where changes might have been made. Second, applying any of the other predefined security templates does not set default values. The templates modify certain security settings, but if the default values are not in place, there might still be settings that leave your network vulnerable.
Reapplying Default Security Settings
Since beginning at a known starting point is critical to securing the network, you might choose to reapply default security settings. One important point to note is that even reapplying the security settings via the Setup security.inf file, settings that are not defined in the template will persist. Security settings persist when:
-
The setting is for a file system object.
-
The setting is for a Registry object.
-
The setting has not been defined previously for the computer.
Although there are a number of reasons why persistent settings might occur, many such incidents can be avoided by getting in the habit of setting security via the use of security templates to make sure that settings are defined in the security database and that valid values are used. When a value does not exist for a previously defined setting that also no longer exists, a value might be left as is. This is sometimes referred to as tattooing. Although you can reapply all default security settings via the Setup security.inf file, it is a significant step that should be avoided if possible. Rather than reapplying all default settings, you can use the secedit command to reapply default settings for just a portion of the database. We ll explore the secedit command and restoring default settings via the secedit command later in this chapter.
Domain Controller Default Security (DC security.inf)
This template is automatically generated any time a server is promoted to a DC. It contains default file, Registry, and system services settings appropriate to securing a DC. You should be aware that reapplying the Domain Controller Default security template will reset values to default values, which could cause problems on files, Registry entries, or system services created by other applications. To determine if applications have modified any of the default settings, you can use the Security Configuration and Analysis snap-in to compare current settings to the default template. As with the other predefined templates, the DC security.inf template can be configured and applied using either the Security Configuration and Analysis snap-in or the secedit tool.
Compatible (compat*.inf)
The default security configuration (Setup security.inf) allows certified applications to run for members of the Users group. Noncertified applications ”those applications not part of the Windows Logo Program for Software ”will often only work when an end user has Power User permissions, because these applications require permissions that are typically only granted to the Power Users group, such as the ability to access the system s Registry. Rather than add all users to the Power Users group, the Compatible template modifies just those permissions needed by end users to run noncertified applications. This allows the network administrator to modify permissions for end users to run these noncertified applications, while maintaining tight overall security. Best security practices dictate that users be given the fewest possible permissions while still allowing them to access appropriate network resources. In the past, the only choices a network administrator had were to either add all users to the Power Users group or modify the User group permissions. Both scenarios create security holes by granting too many rights to end users who simply need to run a noncertified application. Using the Compatible security template, the network administrator can allow end users to have appropriate permissions to run noncertified applications and still not grant the full permissions granted to Power Users.
The Compatible template should not be applied to DCs. The template should not be imported to the Default Domain policy or the Default Domain Controller policy, as it will significantly compromise the security of the DC.
Secure (secure*.inf)
The Secure templates define security settings for all areas except those that are related to running noncertified applications. The Secure templates do not modify security settings for files, folders, and Registry keys, which are set by the Setup security.inf template. Secure templates are used to define stronger passwords, lockouts, and audit settings and to limit the use of LAN Manager and NTLM authentication protocols. The limiting of LAN Manager and NTLM authentication protocols is accomplished in two ways. First, servers are configured to refuse LAN Manager responses, and clients are configured to send only NTLM v2 responses. Computers running Windows NT must be Windows NT 4.0 SP4 or later to use NTLM v2. Windows 9 x computers must have the Directory Service client installed in order to use NTLM v2. The Secure template has one additional effect that should be noted ”it removes all members of the Power Users group.
It is also important to be aware of the compatibility constraints in using these security settings. These constraints can cause connectivity issues in a mixed environment and should be thoroughly tested before implementing them on your live network. Guidelines for using the secure*.inf template in a mixed environment include:
-
If you want to apply the securews.inf security template to a client computer, you must ensure that all DCs that contain user accounts that might be accessed through the client computer are running Windows NT 4.0 Service Pack 4 or later (also referred to as NT4.0 SP4). If this is not the case, you cannot apply the securews.inf template to that client computer.
-
If you want to apply the securews.inf security to client computers on domains with DCs running Windows NT 4.0, the DCs and client computers must have their time clocks set within 30 minutes of each other. If the clocks are more than 30 minutes off, the client will not be able to connect using a local account that is defined on the DC.
-
The securews.inf template prevents the use of LAN Manager or NTLM authentication protocols. Therefore, if a client computer is configured to use the securews.inf template, it will not be able to connect to servers that use only LAN Manager authentication or that run Windows NT 4.0 prior to Service Pack 4.
-
If servers are running Windows XP or later, a client computer configured to use securews.inf will not be able to connect using a local account on the target server unless the clocks on the client and server are within 20 hours of each other.
Test Day Tip The secure*.inf security template prevents the use of LAN Manager Authentication protocol or the NTLM authentication protocol. For computers running Windows NT 4.0 Service Pack 4 or later, you can configure the system to send only NTLM v2 responses via the Registry. The setting is located in the HKEY_LOCAL_MACHINE\SYSTEM\CurrentControlSet\_ontrol\LSA\LMCompatibilityLevel key. This should be set to 3, Send NTLM v2 authentication only.
The secure*.inf template is also used to restrict anonymous user permissions. It prevents anonymous users from enumerating account names and shares. Clearly, access to account names and shares provides one half of the equation for gaining access to the network ”the other half is the password. Gaining illicit access to a network is made far easier when account and/or share names are supplied. Thus, the secure*.inf template closes this door to anonymous users. It also prevents anonymous users from translating SID to names or names to SID. The SID, or security ID, is the data structure that identifies the user, group, and computer account. Every account is issued a SID when created. Preventing anonymous users from translating SID to name or name to SID also helps maintain a secure network.
The last notable feature of the secure*.inf template is that it enables (but does not require) server-side Server Message Block (SMB) packet signing. SMB is a file-sharing protocol, and packet signing secures packets shared between computers. SMB packet signing is disabled by default on servers but enabled by default on client computers. By enabling SMB packet signing on the server side, SMB packets will be negotiated when both sides are using the secure*.inf template. Enabling SMB signing requires that every packet in the stream be verified , which will have a noticeable impact on performance. If sensitive data is subject to attack, the reduced throughput might be an acceptable side effect for your organization.
| Exam Warning | You re likely to see exam scenarios that involve authentication protocols in a mixed network environment. Keep in mind that the Secure template requires NTLM v2, so read the scenario carefully to see if it is referring to LAN Manager, NTLM, or NTLM v2. Microsoft Windows NT 4.0 requires Service Pack 4 (SP4) to support NTLMv2, and Windows 9 x platforms need the Directory Service client installed in order to support NTLMv2. In addition, look for clues regarding clock times that are more than 30 minutes off, or, in the case of Windows XP, 20 hours off. |
Highly Secure (hisec*.inf)
This security template is used for setting very high security between computers for network communications. It secures network traffic and protocols used to communicate between computers. Computers configured to use the hisec*.inf template cannot communicate with down-level computers, such as those running Windows 98 or Windows NT.
This template enhances the security settings of the secure*.inf template and adds further restrictions via encryption and signing requirements for authentication and data flow over secure channels. For example, while the secure template enables server-side SMB signing, the hisec*.inf template requires it. This template also requires strong encryption and signing for transmitting channel data related to trust relationships in the domain.
As you can see, applying the hisec*.inf template will increase your security for network communications, but it can also cause problems with down-level computers.
Let s look at a few of the configuration rules you should keep in mind when considering how to apply the hisec*.inf template.
-
All DCs for the domain to which the client computer is joined must be running Windows 2000 or later. The client computer, in this instance, is the computer to which the hisec*.inf template is being applied.
-
All DCs containing user accounts that will be accessed via the client computer must be running Windows NT 4.0 SP4 or later.
-
If a client is configured with hisecws.inf and is using local accounts defined on the server, clocks of both the client and the target server running Windows 2000 or Windows NT 4.0 SP4 must be set to within 30 minutes of each other.
-
If a client is configured to use the hisecws.inf template and is using local accounts defined on the target server, the clocks on the client and the target Windows XP server must be within 20 hours of each other.
-
The client computer configured to use the highly secure template cannot connect to LAN Manager servers using share-level security.
-
To apply the highly secure template to DCs, hisecdc.inf, all DCs in all trusted and trusting domains must run Windows 2000 or Windows Server 2003.
If a server is using the highly secure template, clients that do not support NTLM v2 authentication protocol will be unable to connect. Windows 2000 or later clients can be configured to send only NTLM v2 responses by specifying this in the network security option on the local computer. This can be implemented via Group Policy in the Local Policies Security Options Network security settings. The variety of settings for both client and DCs is delineated in Table 2.1 and is set in the Network security: LAN Manager authentication level security settings policy shown in Figure 2.2.
Table 2.1: Comparison of Client and Server Authentication Settings in Group Policy Clients
Domain Controllers
Settings
L M
NTLM
NTLMv2
L M
NTLM
NTLMv2
Send LM & NTLM responses
Yes
Yes
No
Accepted
Accepted
Accepted
Send LM & NTLM ”use NTLMv2 session security if negotiated
Yes
Yes
Yes*
Accepted
Accepted
Accepted
Send NTLM response only
No
Yes
Yes
Accepted
Accepted
Accepted
Send NTLMv2 response only
No
No
Yes
Accepted
Accepted
Accepted
Send NTLMv2 response only/refuse LM
No
No
Yes
Refused
Accepted
Accepted
Send NTLMv2 response only/refuse LM & NTLM
No
No
Yes
Refused
Refused
Accepted
*Yes, if supported by the server.
-
If a server is configured to use the hisec*.inf template, all clients must use SMB packet signing. Windows 2000 and Windows XP clients enable SMB packet signing by default, but other clients do not. These clients will require manual enabling of SMB packet signing, which is required in the hisec*.inf security mode.
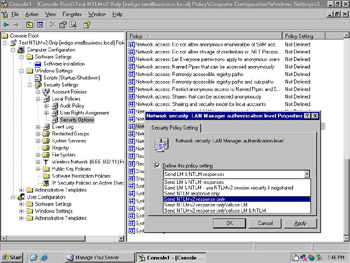
Figure 2.2: Network Security Settings: LAN Manager Authentication Level Security Settings Policy
The hisec*.inf template also limits the use of cached logon data, including data stored by Winlogon and Stored User Names and Passwords. This creates a more secure setting because logon data is not stored or cached on the system and cannot be retrieved by those attempting to gain illicit access to network resources. This security template also removes all users from the Power Users group and ensures that only Domain Admins and local Administrator accounts are members of the local Administrators group. Essentially , this template clears out the Power User and Administrator accounts to ensure that no inappropriate groups or users are included unless specifically added by a network administrator.
The hisec*.inf template assumes that all applications being run on the system are part of the Windows Logo Program for Software, which are considered certified programs. In this case, all users can run these applications without using the Compat*.inf security template and without modifying User permissions.
The secure*.inf and hisec*.inf templates are two of the most commonly used templates in setting security across the enterprise. Table 2.2 compares these two templates security features.
| secure*.inf | hisec*.inf |
| Strong password | Strong password |
| Account lockout | Account lockout |
| Auditing policies | Auditing policies |
| Servers refuse LAN Manager responses | Servers refuse LAN Manager and NTLM responses |
| Enable server-side SMB packet signing | Require server-side SMB packet signing |
| Allow strong encryption | Require strong encryption Data signing for LDAP required Remove all members of Power Users group Ensures only Domain Admins and local Administrator accounts are members of local Administrator group |
System Root Security (rootsec.inf)
When you initially install Windows Server 2003, all folder and file permissions are set using default values. The system root security template, rootsec.inf, resets these permissions on the system root folder, which then propagates to all subfolders and files. This template can be used to reset the root permissions of the system drive back to default values in the event they are inadvertently changed. This template can also be used to set the same root permissions on other volumes .
The permission entries of the root folder are replicated to all subfolders and files except in cases where a folder or file has permissions explicitly set. In this case, the explicitly set permissions will remain in effect. Only permissions inherited by the child object will be propagated; explicit permissions on the child object remain .
No Terminal Server User SID (notssid.inf)
Terminal server can be implemented using one of two security configurations:
-
Full Security
-
Relaxed Security
Relaxed security is used when legacy applications accessed through Terminal Server require access to the Registry, similar to using the compat*.inf template on non-Terminal Server servers. Full Security does not allow legacy applications access to the Registry. These are the only two actions that affect the security of Terminal Server itself. Using the No Terminal Server user SID template, Notssid.inf, does not increase the security on Terminal Server. It s only action is to remove the Terminal Server user SID from the access control lists (ACLs) on the server. Applying this template will not implement Full Security nor will it improve security on Terminal Server. When Terminal Server is not being used, this template can be used to remove the Terminal Server SIDs from the file system and registry locations. When running in Full Security mode, Terminal Server SIDs are not used.
We ve looked at the security templates, so let s take a moment to review how to access the MMC and add both the Security Configuration and Analysis and the Security Templates snap-ins. Once you ve done this, you can review any of the security templates in depth.
| Test Day Tip | Review the predefined security templates so you ll remember the proper application of each, the settings each affects, and the limitations on using the templates in different settings. When you re comfortable with these templates and how they re used, the exam questions will be easier to answer because the obvious problems will pop right out at you, such as down-level clients, clocks out of sync, or authentication methods . |
| |
To add the Security Configuration and Analysis and Security Templates snap-ins to the MMC, perform the following steps.
-
Click Start , then click Run .
-
In the Run dialog box, type in mmc , then click OK .
-
To create a new console, click on File and select New .
-
To open an existing console, click on File and select Open . Locate the console you want to open, click on it, and then click OK .
-
In the File menu, click Add/Remove Snap-in .
-
In the Add/Remove Snap-in dialog, click Add .
-
In the Add Standalone Snap-in dialog, locate then click Security Configuration and Analysis , and click Add . This step is shown in Figure 2.3.
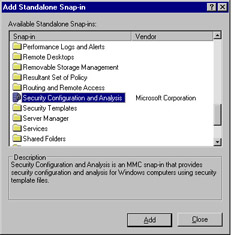
Figure 2.3: Add/Remove Snap-In to the Microsoft Management Console -
In the Add Standalone Snap-in dialog, locate then click Security Templates , click Add , click Close , and then click OK to add the snap-ins.
You are not required to have administrative credentials to perform these tasks. It is always recommended to perform tasks while signed in with the least permissions to maintain the highest possible security.
| |
Notice that there are many snap-ins available to the management console, but in this case we re only interested in the Security Configuration and Analysis snap-in and the Security Templates snap-in. For more information on available snap-ins, consult the Windows Server help files or the Microsoft Windows Server 2003 Web site at www.microsoft.com/windowsserver2003/default.mspx.
Once you ve added the Security Configuration and Analysis and the Security Template snap-ins, you can review the security templates in more detail. Figure 2.4 shows the security templates and how to review and modify any of the values in the templates. The template tree is shown in the left pane. You can see that the Setup Security template is open (indicated by the minus ( “) sign to the left of the template name) and the Password Policy is selected (indicated by the gray bar across the words Password Policy ). In the right pane, the security policies related to passwords in this template are shown. In this case, there are six policies listed. The second policy, Maximum password age, is selected. By double-clicking the policy name or by right-clicking on the policy name and selecting Properties from the menu, the Maximum password age Properties dialog box is displayed. The value for the Maximum password age policy is set in this dialog. In this example, it is set to 42 days. Notice the check box indicating that this value will be included in the template. After modifying a setting, click OK to accept changes or Cancel to exit without keeping changes. Remember, however, that it is recommended that you not make changes to the Setup security.inf template and that if you make changes to other templates, you should do so on a copy, not the original file.
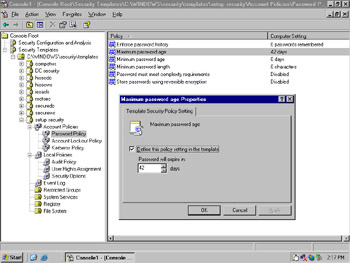
Figure 2.4: Viewing and Modifying Predefined Template Settings
Take a moment to review the different security templates included in Windows Server 2003 in your MMC to see the various options and settings available in each template.
Configuring Security Templates
Now that we ve examined the predefined security templates in Windows Server 2003, let s discuss how to configure these templates to set Registry and file system permissions, account and auditing policies, user rights, and more.
| Exam Warning | Whenever a new feature is implemented or highlighted in a Microsoft product, it typically receives strong attention in the associated exam. In this case, expect to see many questions related to security templates and security policies on the exam. The preferred method of ensuring a consistent application of security policies is via security templates and the use of group policies, so make sure you re quite comfortable with these topics before sitting for the exam. |
As discussed earlier, it s important not to modify the predefined templates provided in Windows Server 2003. Instead, select a template and save it with a different name to create a duplicate copy. Then, modify the copy of the template to ensure that the original file is always available both as a backup and as a method of comparing baselines to modified settings.
| |
In the last exercise, you added the Security Configuration and Analysis snap-in and the Security Templates snap-in to the MMC. In this exercise, you ll learn how to save the console for future use and to save the templates to preserve the original settings.
-
If you don t currently have the MMC open, click Start , then click Run . In the Run dialog box, type in mmc , then click OK .
-
To create a new console, click on File and select New . Add any snap-ins you want to save in this console. If you re working from the console in the previous exercise, you should have both the Security Configuration and Analysis snap-in and the Security Templates snap-in in the console.
-
In the File menu, click Save . The Save function will save the console with the snap-ins you ve added. Select a name for the console, and then click OK.
-
To save the security templates with different names, click on the desired template in the left pane of the MMC. Right-click to display the menu and select Save As . Select a name different from the predefined template but one that will be descriptive of the template function. Click OK .
-
Once you ve saved the predefined template with a new filename, you ll see that the MMC will update and show an additional template file. Make changes to this file to preserve the predefined settings in the Windows Server 2003 provided templates.
| |
Each template has settings related to various areas of security. When you look at the security templates you opened in the MMC in Exercise 2.01, you saw that the template listing could be expanded. If you examined the tree, you saw that each template had the same elements, although the specific settings for each template differed. These areas are account policies, local policies, event log, restricted groups, system services, Registry, and file system. Let s review each of these areas.
Account Policies
Account policies define policy settings for password, account lockout, and Kerberos. The password policy contains settings for enforcing password history to prevent users from reusing the same password too frequently. It also sets the minimum and maximum password age parameters as well as the minimum password length. The password policy specifies whether a password must meet complexity requirements and whether passwords are stored using reversible encryption.
Strong passwords are defined as those that meet the criteria delineated in Table 2.3. When a strong password policy is set, user passwords must meet all of these criteria.
| Password Requirement | Example |
|---|---|
| At least seven characters | T4%v2(lm |
| Does not contain username, real name, company name | Not MicrosoftX2, martin$jones |
| Does not contain complete dictionary word | Not windows>n5s, icecream4U |
| Is different from previous passwords | Not studio1, studio2, studio3 |
| Contains characters from four groups | |
| Uppercase | A, B, C |
| Lowercase | a, b, c |
| Numerals | 1, 2, 3, 4,5 |
| Symbols | ~!@#$%^&*(){}<>?[]\; ,./ |
The Account lockout policies include the duration of the account lockout, the lockout threshold (how many invalid attempts are allowed before the account is locked), and how long before the account is reset. These settings are used to thwart attempts by individuals and automated programs from gaining unauthorized access to accounts. Keep in mind, however, that if these restrictions are too tight, your IT department will be dealing with excessive user complaints and requests for account access.
The Kerberos settings, which are used only on DCs, allow you to enforce user logon restrictions, set the maximum lifetime for a service ticket or a user ticket, set the maximum lifetime for user ticket renewal, and set the maximum tolerance for computer clock synchronization. You ll notice if you look at the Account Policies/Kerberos Policy settings in most of the templates that these settings are not included in the template. This brings up an important point. Each template contains the same defined areas. However, the settings in each template are not the same. When you review the list of policies in the right pane, any items not included in the template are listed as Not Defined. Once the check box to Define this policy setting in the template is checked, the settings are applied to the template and the value of the setting will be displayed in place of the words Not Defined.
Recall that for domain accounts, there is only one account policy, which is defined in the Default Domain policy and enforced by DCs in the domain. Local account policies can differ from domain account policies when the account is specifically for local accounts and not domain accounts.
Local Policies
Local policies are policies that, logically, affect the local computer. The three areas in local policies are audit policy, user rights assignment, and security options. Audit policy allows you to define what events to audit on the local computer. There is always a trade-off when auditing events. You want to audit events that are likely to be significant on your system. Auditing takes up computer resources, including disk space, and can impair system performance, so you ll need to find a balance between auditing and system performance that is acceptable in a given environment. Auditing can be used to log both successful and failed events.
Auditing logon events can be helpful in certain situations. Auditing successful logons makes sense only when you want to know who was able to gain access to the system. Since users often make typing errors, and unsuccessful logons do not allow a user onto the system, logging failed events can generate large log files. However, auditing failed logon attempts certainly makes sense as a security measure to detect and protect against brute-force attempts and dictionary attempts that continually try to log on. For servers that are exposed to the public network in any way to determine if someone is persistently trying to gain access and failing, auditing failed logon attempts is important.
Auditing account management success and failure can also be set in the Local Policies Audit Policies section. This can be used to determine who successfully or unsuccessfully attempted to manage accounts on the local system. Remember, a majority of the security breaches in companies come from inside the company, not from anonymous outsiders.
The success or failure of attempts to access directory services, logon events, object access, policy change, privilege use, process tracking, and system events can all be set in the Local Policies section. Remember that these affect the local computer. If you set these in a template and apply the template via group policy, remember that all computers to which this template is applied will enable these auditing features. Since computers have different roles on the network, a one size fits all auditing scheme would not make sense. The local policies can be modified in the appropriate templates and rolled out to groups of computers in similar roles. We ll discuss this later in the chapter.
Also under Local Policies is the User Rights Assignment section. The policies in this section are all involved with what user rights users have on the local computer. A partial list of the policies is shown next. For a full list, view the Setup security.inf template in the console you saved in the earlier exercise.
-
Access this computer from the network
-
Add workstations to domain
-
Allow log on locally
-
Allow log on through Terminal Services
-
Back up files and directories
-
Change the system time
-
Deny access to this computer from the network
-
Deny log on locally
-
Force shutdown from a remote system
-
Manage auditing and security log
-
Remove computer from docking station
-
Restore files and directories
-
Shut down the system
-
Take ownership of files or other objects
Remember, when configuring these policies, you should always add users to groups and add groups to these policies. Computers can have more than one policy applied, and this can create conflicts. The order of precedence for policies is from highest to lowest precedence, or OU, domain, and then local computer. Group policy is passed down from parent to child object within the domain. If you assign a policy to a parent object, all the child objects will have that policy applied. For example, if you apply the strong password policy at the domain level, these settings will be passed down to the child objects, which in this case would be all computers in the domain. If you apply the policy to a child object, that policy will take precedence over the parent object s policies. Exceptions to this are when you block policy inheritance at the domain or OU level or you enforce policy inheritance by setting the No Override option. When you select No Override, the child policy containers are forced to inherit the parent s policy even if the child s policy conflicts with the parent s policy and even if Block Inheritance has been set on the child object.
It s also important to note that some settings are not compatible with down-level clients. In the dialog box for such policies, a note is included warning you of the incompatibility , as in the Impersonate a client after authentication Properties dialog shown in Figure 2.5.
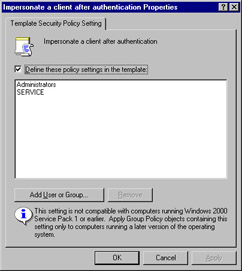
Figure 2.5: Information Warning Regarding Down-Level Clients
The third area covered in the Local Policies is Security Options. The Security Options section contains policies that affect accounts, auditing, devices, DCs, interactive logons, network clients, network access, network security recovery, shutdown, cryptography, and system settings and objects. In versions of Windows prior to Windows 2000, these types of security settings could only be modified via the Registry. In Windows 2000 and Windows Server 2003, these settings can be modified via the Local Policies Security Options section of the template.
As with other areas of the Local Policies, these elements affect only the local computer. A number of security elements are not defined in the Setup secure.inf template, meaning that they are listed, but the check box that would include them in the template is cleared. If you want to understand more about any of the policies listed, you can right-click the policy and select Help to open the Microsoft Management Console Help dialog. You can browse to any of the individual policies to learn more about what the policy does and how it is used. It is advisable to read this information before applying a policy that you re not 100-percent clear on. As mentioned earlier, it s even more critical to test any templates, whether predefined or modified, on a test system to see how it impacts the computer, the users, and the network in terms of both security and usability.
Event Log
The Event Log node allows you to configure settings related to event logs, such as maximum log size, access rights for each log, and retention settings. There are three log types used: logs of application activity, logs of security activity, and logs of system activity. You can see in the Event Log Policy area that each setting has three entries. For example, there is a maximum log size policy for applications, security, and system.
To view events logged in the event logs, you can use the Event Viewer, which allows you to view and monitor logged events. The Event Viewer is accessed via Administrative Tools.
Restricted Groups
The Restricted Groups node of the security templates allows you to specify exactly who can or cannot be members of a particular group. Restricted groups can be used to configure membership of sensitive groups, including the Administrator group. By using this feature, you can control who is and is not included in a group, and every time the policy is refreshed, group membership will be modified to include only the members specified in the Members list. It has two properties: Members and Member Of . The Members list defines who belongs to the restricted group. The Member Of list specifies which other groups the restricted group belongs to.
For example, suppose there are five users on the local computer. You add Luke and Chantal as members of the Administrator group. When the policy is refreshed, only Luke and Chantal will remain in the Administrator group for the local computer, regardless of which users were in the group before the policy was applied.
Restricted Groups can be applied in one of two ways. It can be applied as a setting in the security template, which will then be applied during configuration of the local computer. It can also be applied by defining the setting in a GPO directly, which means the policy will be enforced each time the GPO is refreshed, about every 90 minutes on a workstation or member server and every 5 minutes on a DC.
The Restricted Groups setting should be used with care, because any account not on the Restricted Groups list will be removed when the settings are refreshed, even if that account is part of the Administrator group. However, using the Restricted Groups to limit membership to sensitive groups like the Administrator group can be quite useful in maintaining tight security.
System Services
The System Services Policies in the predefined security templates allows the administrator to modify settings related to system services such as startup, shutdown, indexing, license logging, and many more. There are three settings available ” automatic, manual and disabled . If a service is set to automatic, check to make sure that it works properly before assuming no intervention is required. In addition, to optimize system performance and better security, set unused system services to manual so they do not automatically start up. This enhances system performance by starting up only those services that are needed. It also enhances system security because services that are not used are not running. Often, unused services that are left running create an opportunity for unauthorized access to the system or network.
Registry
The Registry Policy in any security template allows the administrator to define access permissions related to Registry keys and to set auditing on system access control lists (SACLs). To access the settings, double-click on the object name in the right pane of the MMC, or right-click and select Properties from the menu. Figure 2.4 shows the object named user\.default Properties dialog.
The Registry contains many different keys, and some keys have subkeys, much like the folder structure in Windows. In Registry Policy properties, you have two primary options:
-
Configure this key then
-
Do not allow permissions on this key to be replaced
When you configure a key via the Registry Policy properties by selecting Configure this key then , you have two additional choices for how that key should be configured:
-
Propagate inheritable permissions to all subkeys
-
Replace existing permissions on all subkeys with inheritable permissions
If you do not want to configure this key and do not want permissions on this key to be replaced, you can select the second radio button, as shown in Figure 2.6. Do no allow permissions on this key to be replaced will force permissions to remain as they are and not allow them to be modified. Selecting this choice disables the Configure this key options.
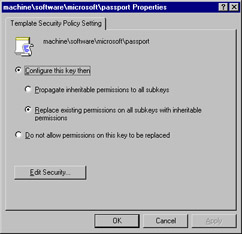
Figure 2.6: Registry Policy Properties
The final activity on in the Registry Policy Properties dialog is to edit security, if desired. By clicking Edit Security , you can add or remove groups or usernames, modify permissions, or use the Advanced button to fine-tune access.
File System
The final node of the predefined security templates is the File System node. When you click on the File System node in the left pane of the MMC, the various file system object names will be displayed in the right pane of the MMC. As with the Registry node, these objects can be configured in the same manner ”to propagate or replace permissions or to prevent permissions from being replaced on a file or folder object. This modifies both the discretionary access control lists (DACLs) and the SACLs.
| Test Day Tip | Before the test, briefly review the seven areas that security templates configure. Being familiar with these areas will help you identify security settings that might be out of place. |
Configuring Security for Down-Level Clients
We ve touched on several considerations related to down-level clients throughout our discussion of the various security templates. Now, let s pull this information together to understand specifically how to deal with down-level clients. A down-level client is a computer that is running an operating system that was released prior to the current version ”in this case, Windows Server 2003. Although a computer running Windows 2000 is now considered a down-level client, Windows 2000 computers are closely compatible with Windows Server 2003, and for the purposes of this discussion are not considered down-level clients. Common down-level clients include computers running Windows NT 4.0 SP6a or other earlier versions of Windows NT, and computers running Windows 98, Windows Me, or Windows 95. Although there are compelling reasons to upgrade clients, including better security and management capabilities, you might be responsible for managing a network that includes down-level clients.
If you have down-level clients, you must be careful when using the secure*.inf and hisec*.inf templates. Depending on the operating system in use, the clients might not be able to use the NTLM v2 authentication protocol. If they cannot and there is an account on the secured server that the down-level client needs to access, it will be unable to do so. In some cases, you might be able to add in NTLM v2 to the client. In other cases, you will be unable to do so. In those cases, you ll need to determine whether to upgrade the client or not use the Secure or Highly Secure templates on the server to which these clients need to connect. Although there are steps you can take to improve security on the network with down-level clients, such a discussion is outside the scope of this chapter.
Microsoft released Active Directory Client Services extensions for Windows 95/98 and Windows NT 4.0 SP6a around the same time it released Windows 2000.
These extensions enable Active Directory interaction with these down-level clients. The extensions provide some, but not all, Active Directory services. The features are summarized in Table 2.4. You can download this for Windows NT-based computers at www.microsoft.com/ntworkstation/downloads/Other/adclient.asp.
| Active Directory Client Services Extensions Provide | Active Directory Client Services Extensions Do Not Provide |
|---|---|
| Site awareness enables client to log on to and change passwords on any DC rather than just the primary domain controller (PDC). | Kerberos support. |
| Active Directory Services Interface (ADSI) allows programmers to interface with Active Directory Services on down-level clients. | Group Policy or IntelliMirror capabilities. |
| Provides access to distributed file system (DFS) fault tolerance capabilities. | Internet Protocol Security (IPSec) or Layer 2 Tunneling Protocol (L2TP) protocols used for VPN. |
| Provides access to Active Directory Windows Address Book (WAB) to users on down-level client machines. | Service principal name (SPN) or mutual authentication. |
| Supports NTLM v2 authentication. |
In addition, down-level clients cannot use certain local security settings because they only support the File Allocation Table (FAT) file system format. To secure the system, the computer should be using the NT File System (NTFS), which allows the administrator to control access to files and folders.
If older applications that require access to the Registry are running, you might have to use the compat*.inf template to modify settings for users without adding all users to the Power Users group or without upgrading all Users group settings. However, using the compat*.inf template does allow applications to access the Registry, which can cause a security hole that can be exploited. This should be implemented with care and should never be applied to a DC.
Deploying Security Templates
We ve discussed the various predefined security templates and you ve become re-acquainted with the MMC. Now, let s look at how these security templates can be deployed across the network ”from 1 computer to 10,000 computers.
Security settings can be analyzed and configured via the Security Configuration and Analysis snap-in, but as you learned earlier, this will only allow you to apply security settings to the local computer. If you configure security for a domain or OU using the Security Configuration and Analysis snap-in, you d have to configure each client individually. This might not be a major problem in a 5- or 10-computer network, but it becomes unwieldy in a larger network. In this case, there are three options for applying security templates on a large number of computers. The first option is to use Secure Templates to create a template and then apply it to the appropriate GPO. You can also use the Security Extension to Group Policy to edit individual security settings on a GPO. You can also use scripting to apply these security template settings. Let s look at each of these options in more detail.
Using Group Policy to Deploy Security Settings
Group Policy allows you to configure many different options for computers within your organization, including desktop configurations, Internet Explorer settings, and security settings, to name just a few. Group policies are applied through Active Directory Sites and Services for sites within the organization, or via Active Directory Users and Computers for Domains and Organizational Units for domains and OUs.
Security settings accessed via group policy are the same as those found in Security Configuration and Analysis. Each area of policy is applied in a cumulative manner when applied via group policy. The order of application is local, site, domain, and OU. Policies are applied in this manner:
-
Policies related to the local computer are applied.
-
If site-level policies exist, they are applied next and will overwrite local policies.
-
Domain policies are applied, overwriting settings from the site and local computer.
-
Settings from the OU are applied.
The interval for refreshing group policy is a value that can be customized to your organization s needs, but the default setting is every 90 minutes for a workstation or server and every 5 minutes for a DC. The settings are also refreshed every 16 hours, regardless of whether there are changes. Group policy is also refreshed when a computer is restarted. Group policy can be manually refreshed by using the gpupdate command-line utility.
You can use group policy to deploy security settings set in one or more of the security templates we ve discussed. The procedure for doing this differs slightly if you re on a workstation or server that is joined to a domain, or if you re on a DC and want to import a security template for a domain or OU. We delineate the steps in Exercise 2.03.
| |
In this exercise, you re going to apply a security template via the Group Policy Editor. Please make sure that you are working in a test environment and not on a live system or live network of any kind. If in doubt, check with your network administrator before taking the actions listed next. If you are unable to perform these tasks on a test system, be sure to cancel out of dialogs rather than click OK. This might prevent you from completing some of these tasks, but you should not risk applying these templates on a live system in any event.
To be able to import security templates, you must be a member of the Domain Admins group, the Enterprise Admins group, or you must have been delegated proper authority. As a security best practice, it s advisable to perform these actions using Run As rather than logging in to the Administrator account. For more information on using Run As, see the Help files in Windows Server 2003.
-
If you don t currently have the MMC open, click Start , then click Run . In the Run dialog box, type in mmc , then click OK .
-
To create a new console, click on File and select New .
-
Click File and select Add/Remove Snap-in .
-
In the Add/Remove Snap-in dialog on the Standalone tab (selected by default), click Add .
-
In the Add Standalone Snap-in dialog, scroll down until you locate Group Policy Object Editor . Click Add.
-
When you click Add , the Select Group Policy Wizard will open. In this wizard, you can select the GPO you want to work with.
-
When working on a workstation or server joined to a domain, the text box will be automatically populated with Local Computer. This means that the GPO that will be edited is the Local Computer GPO. If this is not the GPO you want, you can browse to locate the GPO. Your browse options include domains/OUs, sites, computers, or all.
-
Click Finish in the Group Policy Wizard dialog to select the Local Computer GPO and close the wizard dialog. This screen is shown in Figure 2.7.
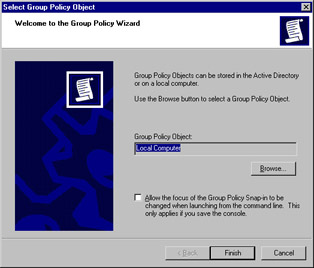
Figure 2.7: Group Policy Wizard -
Click Close in the Add Standalone Snap-in dialog.
-
The Add/Remove Snap-in dialog should now contain Local Computer Policy . Click OK to close this dialog.
-
In the MMC, in the left pane, you should see Local Computer Policy under the Console Root. Click on the plus sign (+) to the left of Local Computer Policy, or simply double-click on Local Computer Policy to expand the tree. The Computer Configuration and User Configuration nodes are shown. These can also be expanded by clicking the + sign to the left of each.
-
Each listing has three nodes below, and the nodes are the same for each: Software Settings , Windows Settings , and Administrative Templates. If you want to edit GPOs related to the local computer, expand the Computer Configuration tree. If you want to edit GPOs related to local users, expand the User Configuration tree. The options underneath each node are different because some GPOs are specific to the computer and some are specific to the user configuration. For example, in Windows Settings, you ll notice that Scripts shows a description of ( Startup/Shutdown ) in the Computer Configuration Windows Settings Scripts node. In the User Configuration Windows Settings Scripts node, the option is ( Logon/ Logoff ). This clearly makes sense since the computer is started up and shut down and the user logs on and off. For this exercise, expand Computer Configuration .
-
Expand the Windows Settings to locate the Security Settings node.
-
Right-click the Security Settings node and select Import Policy from the menu.
-
The Import Policy From dialog is displayed and defaults to the default security templates location (%systemroot%\Windows\Security\Templates ). Select the template you want to import. Remember that if you have modified or will modify settings in the templates, you should work with a copy of one of the predefined templates. You can also import other policies by opening the Policies folder and opening any policies you have defined.
-
Do not import the Setup security.inf template. This method is used to import other security templates but should not be used with the Setup security.inf file. For this exercise, select the securews.inf template.
-
After you ve the template to import, click Open .
-
Once you ve imported the template, you can view or modify elements. The resulting screen is shown in Figure 2.8.
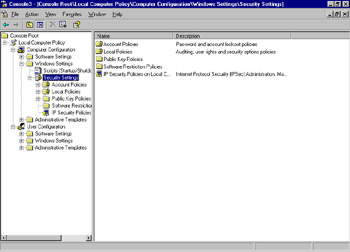
Figure 2.8: Imported Policy or Template in Group Policy Editor
| |
Remember that certain security settings from the domain or OU will override local settings, so not all of the settings you apply via the imported template might remain in effect on the computer. However, the settings you import will take effect for the local computer and local users. In addition, remember that the Setup security.inf file should not be applied via group policy in either exercise (2.03 or 2.04).
In the next exercise, you ll learn how to apply a security template on a DC. This process is very similar to that delineated in Exercise 2.03, but the starting point is different. Follow the steps in Exercise 2.04 closely.
| |
To be able to import security templates, you must be a member of the Domain Admins group, the Enterprise Admins group, or you must have been delegated proper authority. As a security best practice, it s advisable to perform these actions using Run As rather than logging in to the Admin account. For more information on using Run As, see the Help files in Windows Server 2003.
-
Click Start , select Administrative Tools , and then select Active Directory Users and Computers .
-
In the left pane, right-click the domain or OU to which you want to apply a security template. Click Properties from the menu.
-
In the domain or OU Properties dialog, click the Group Policy tab to select that option.
-
In the Group Policy Properties , the current GPO(s) will be shown. The objects highest in the list have the highest priority. Those lower in the list have lower priority.
-
If you want to create a new GPO, click New . The new object will be placed in the list. Type a name for the new GPO into the box and then press Enter .
-
Select the GPO you want to edit and then click Edit .
-
The GPO should now be listed in the left pane of the Group Policy Object Editor as shown in Figure 2.9.
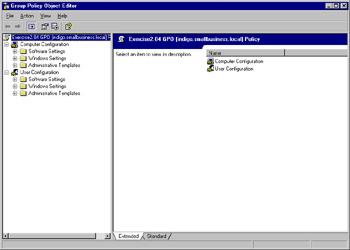
Figure 2.9: New Group Policy Object -
Each listing has three nodes below, and the nodes are the same for each: Software Settings , Windows Settings , and Administrative Templates .
-
Expand the Windows Settings to locate the Security Settings node.
-
Right-click the Security Settings node and select Import Policy from the menu.
-
The Import Policy From dialog is displayed and defaults to the default security templates location (%systemroot%\Windows\Security\Templates). Select the template you want to import. Remember that if you have modified or will modify settings in the templates, you should have created a copy of one of the predefined templates.
-
Do not import the Setup security.inf template. This method is used to import other templates and should not be used with the Setup security.inf file. For this exercise, select securews.inf .
-
After you ve selected the template you want to import, click Open .
-
Figure 2.10 shows the resulting console. It looks similar to the earlier console, but the settings from securews.inf have now been incorporated. To verify this, expand the Account Policies node and then click on the Password Policy node once. In the right pane, notice that the elements of the securews.inf template are visible. For example, the Password must meet complexity requirements policy is enabled, which is what you would expect to see in the securews.inf settings.
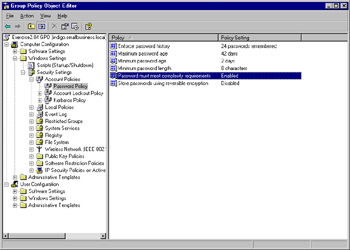
Figure 2.10: Applied Group Policy to Domain or OU
| |
Reviewing the Result of Security Policy Settings
We ve walked through two scenarios of importing security settings, via a template or group policy. You might be wondering how you can tell what the resulting security settings are. There are essentially three ways to accomplish this. First, you can use the Security Configuration and Analysis snap-in to analyze the local computer. You can also use the secedit command to analyze the local computer or any other computer or computer group (multiple computers can be analyzed via the secedit command). You can also use a snap-in called Resultant Set of Policy (RSoP). This allows you to see the results of the policies applied to a particular computer. In the next section, you ll learn more about the secedit command. Although the RSoP is often used to review other policies, it can be used to review the resulting security settings as well.
| |
The RSoP tool is very useful for seeing the result of group policy before it s applied across the enterprise. This exercise will help you become familiar with this tool.
-
Open the MMC via Start Run , type in mmc , and then click OK .
-
Load the RSoP by clicking File and then Add/Remove Snap-in . In the Add/Remove Snap-in dialog, click Add .
-
In the Add Standalone Snap-in dialog, scroll down to locate Resultant Set of Policy . Click to select it and then click Add . Click Close to close this dialog.
-
In the Add/Remove Snap-in dialog, click OK .
-
If you click the snap-in in the left pane, you ll get a message alerting you that you must Generate RSoP Data. This is shown in Figure 2.11.
-
On the menu, click Action and then click Generate RSoP Data . This launches the Resultant Set of Policy Wizard . The wizard allows you to view policy settings applied to selected computers and users via logging mode, or simulate policy implementation to plan changes to your network via the planning mode. Click Next .
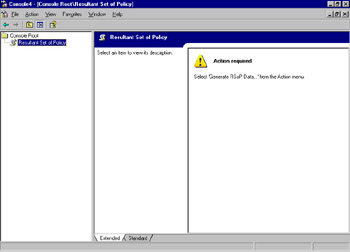
Figure 2.11: Action Alert in Resultant Set of Policy Snap-In -
The Mode Selection screen allows you to choose Logging mode to review policy settings or Planning mode to simulate policy changes by using data from the Active Directory directory service.
-
Select Logging mode , and then click Next .
-
The Computer Selection screen in the wizard asks you to select which computer you want to check. If you select Another computer , you can use the Browse button to locate the computer. You also have the option of not displaying policy settings for the computer in the results, meaning that you will display only user policy settings by clicking in the check box. Select This Computer and click Next .
-
The next screen, User Selection, asks you to select the user for which you want to display results. Your choices are Current user , Select a specific user , or Do not display user policy settings in the results . This last choice is the inverse of the previous dialog that allowed you to display only user settings. Select Current user and click Next.
-
The next screen is the Summary of Selections screen. It shows a summary of the selections you ve chosen . If you want to change any of the settings, click the Back button. You can choose to Gather extended error information by checking the check box. Selecting extended error information might significantly increase the time it takes to view the RSoP. At the same time, the extended error information can be very helpful in resolving any conflicts or errors that occur. Click Next to begin the test. The progress bar at the bottom of the wizard screen will show relative progress in the testing process. When it s complete, the wizard will display the final screen. To view the results, click Finish .
-
Figure 2.12 displays the result. By expanding nodes in the left pane and examining policies in the right pane, you can see the resulting GPO and the source. Figure 2.12 shows the Computer Configuration Windows Settings Security Settings Account Policies Password Policy node in the left pane. In the right pane, you can see that the Enforce password history policy shows the Computer Setting (actual value) and the Source GPO. In this case, it is the policy from the previous exercise. Other policies in this pane are the result of the Default Domain policy.
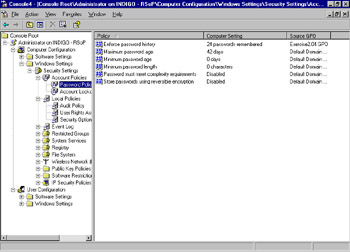
Figure 2.12: Resultant Set of Policy ResultsThis process can be helpful whenever you want to see the effects of policies on users, groups, or computers, or whenever you want to see the effect of changes you d like to make before you actually apply them.
| |
Using Security Configuration and Analysis to Review Security Settings
Previously, we discussed using the MMC with the Security Configuration and Analysis snap-in to review security settings on a computer. The analysis compares settings in the database to the active configuration on the computer. This allows you to see what the effect of applying those settings would be on a particular computer. Although you cannot use the Security Configuration and Analysis snap-in to deploy security on anything but the local computer, you can and should use it to determine the effect on security before deploying to your network. For example, you can configure a DC running IIS and run the analysis. Depending on the results, you might modify the security database. Once completed, you could then deploy the modified security template via group policy or via the command-line tool secedit.exe.
Exercise 2.06 walks you through running an analysis on your computer and shows you some of the icons displayed based on the results of the analysis.
| |
Analyzing and comparing the current security configuration on a computer with another configuration can be useful when assessing a specific computer or when evaluating potential changes to security settings. This exercise steps you through this process.
-
Click Start , select Run , and then type mmc in the Open box. Click OK or press Enter .
-
In the Console, click File and select Add/Remove snap-in .
-
In the Add/Remove snap-in dialog, the Standalone tab is selected by default. Click the Add button.
-
The Add Standalone snap-in dialog is displayed. Scroll through the list until you locate the Security Configuration and Analysis snap-in. Click to select it, and then click Add . This box stays open so you can add several snap-ins to a console without continually re-opening it. When you have finished selecting the desired snap-in(s), click Close to close the dialog box.
-
The Add/Remove snap-in dialog box now displays Security Configuration and Analysis in the dialog box. Click OK to close this dialog.
-
Click Security Configuration and Analysis in the left pane of the console for instructions on how to open or create a database for analysis.
-
Right-click Security Configuration and Analysis in the left pane and select Open database from the menu.
-
In the Open database dialog box, type Exercise205 in the File name: box. Click Open. If you wanted to select an existing database, you can select one shown in the Open database dialog box listing. In this case, we are creating a new database named Exercise205.sdb.
-
The Import Template dialog is displayed. For this exercise, select the hisecdc.inf template by clicking to select it, and then click Open . Remember, this will not apply these settings to your computer; it will simply use them for comparison.
-
You are returned to the Security Configuration and Analysis console. Notice there are new instructions in the right pane describing how to configure or analyze your computer.
-
In the left pane, right-click Security Configuration and Analysis and select Analyze Now .
-
The Perform Analysis dialog opens prompting you for the location of the log file it will create. Accept the default by clicking OK .
-
The Analyzing System Security progress screen is displayed while security is being analyzed. Depending on the number of settings and the speed of your computer, this display might be shown for only a very brief time.
-
When the analysis is complete, there will be new items listed below the Security Configuration and Analysis node in the left pane of the MMC.
-
Browse through the various nodes in the left pane. Explore various policies in each grouping.
-
Select Local Policies and then select Security Options . The related policies are shown in the right pane. Table 2.5 lists and describes the various icons you might see after performing an analysis.
-
Review a number of settings in different nodes to become familiar with the results of the analysis.
| |
| Icon | Description |
|---|---|
| Red circle with white X | The entry is defined in the database used for analysis and on the local system but the settings do not match. |
| Green check mark | The entry is defined in both the database and the local system and the settings match. |
| Question mark | The entry is not defined in the database used for analysis; therefore, the setting on the local computer was not analyzed. If an entry is not analyzed, it is possible the user running the analysis lacks sufficient permissions to perform the analysis on a specific object or area. |
| Exclamation point | The item is defined in the database used for analysis but does not exist on the local computer. |
| Standard icon (no flag) | The entry is not defined in the database or on the system. |
| Test Day Tip | Before the test, perform one or more security configuration analyses so you re very familiar with the results and what the different icons mean. You re likely to see at least one scenario question on the exam that includes this information. Be sure you are very clear about what each icon means so you can quickly assess what s going on in a scenario question that includes these icons. |
Using the secedit.exe Command-Line Tool
Throughout this chapter, we ve referred to the secedit.exe command-line tool. In this section, you ll learn more about the uses of the secedit command and you ll learn some of the common switches used with this tool. In a later section, you ll learn how you can use the secedit tool to automate security configuration tasks.
To run secedit , begin by clicking Start Accessories Command Prompt . Alternately, you can click Start , select Run , type in cmd , and then press Enter or click OK . A command prompt window will open. To view all switches for the secedit command, type secedit ? and press Enter . When the command is entered without any parameters, the help information is displayed. You can use the secedit command to configure, analyze, import, export, validate, or generate a rollback. If you type the secedit command with one of the switches and no parameters, the help information for that switch will be displayed. We ll look at each of these options so you understand how to use this handy command-line tool.
secedit configure
The first switch shown in the secedit help file is the configure switch. It is used to configure a system with security settings stored in a database. The parameters are described in Table 2.6.
| Parameter | Description |
|---|---|
| /db filename | This argument specifies which database file to use to perform the security configuration. It is a required argument. |
| /cfg filename | This argument specifies a security template to import into the database prior to configuring the system. |
| /overwrite | This switch specifies whether the database should be emptied prior to importing the security template. If this parameter is not specified, the settings are accumulated in the database (if you import more than one security template, all settings will accumulate). If this parameter is not specified and there are conflicting security settings between the database and the imported template, the template settings win. |
| /areas area1 area2 | This argument specifies which security areas to apply to the system. If the parameter is not specified, all settings defined in the database are applied. To configure multiple areas, separate each with a space. See Table 2.7 for a description of the security areas that can be specified. |
| /log filename | This argument is used to specify the path to the log file. If no path is specified, the default log file will be used. |
| /quiet | This switch suppresses screen and log output. You can still review results of the analysis in the Security Configuration and Analysis snap-in in the MMC. This switch is commonly used when secedit is used in a batch or scheduled task. |
| Security Area Name | Description |
|---|---|
| SECURITYPOLICY | Includes local and domain policy for the system, including account policies, audit policies, event log settings, and security options. |
| GROUP_MGMT | Includes Restricted Group settings for any groups specified in the Security template. |
| USER_RIGHTS | Includes User Rights assignment such as user logon right and granting of privileges. |
| REGKEYS | Includes Registry permissions on the local Registry keys. |
| FILESTORE | Includes file system permissions on the local file storage system. |
| SERVICES | Includes system service settings for all defined services. |
An example of the command is shown here. Keep in mind that the command will assume the current directory unless another path is specified. The parameters are shown in bold only for clarity. This example assumes the database is stored in the path c:\windows\security\database and that the template is stored in the path c:\windows\templates. Your database and template locations might vary, and if not in the current directory, they should be specified. In addition, this example specifies two security areas, the SECURITYPOLICY area and the FILESTORE area. Each area is separated by a space.
secedit /configure /db c:\windows\security\database\hisecws.sdb /cfg c:\windows\templates\hisecws.inf /overwrite /SECURITYPOLICY FILESTORE /log hisecws.log
It s worth noting here that this is how you can reapply portions of predefined security templates and in particular, the setup security.inf. For example, suppose you ve been working on creating a Security template for a particular group of computers on your network including the one you re working on. You imported the securews.inf template and made some modifications and saved the template as secure123.inf. However, you want this template to use default Registry settings from the setup security.inf. You can use the secedit /configure command with the /overwrite switch and specify REGKEYS to configure just this set of policies in your custom template.
secedit analyze
The analyze switch causes secedit to analyze security for whichever element is selected. The parameters for the analyze switch are shown in Table 2.8. This switch allows you to analyze current database settings against other settings (typically baseline settings) and store the results in a log file. You can view the results in the Security Configuration and Analysis snap-in. The result will show you the difference between the current settings and the baseline settings, allowing you to see and address any potential security holes. This can be very useful when troubleshooting or for analyzing a system whose exact settings might be unknown as compared to a standard security template. You can also use this switch to analyze the difference between a baseline template and a custom security template you create.
| Parameter | Explanation |
|---|---|
| /db filename | This switch gives the path to the database that holds the stored configuration to be analyzed. This is a required argument. If the filename specifies a new database, the /cfg filename switch must also be used. |
| /cfg filename | This argument is only used with the /db parameter. It is the path to the security template to be imported into the database for analysis. If not specified, the analysis will be performed on the configuration already stored in the specified database. |
| /log logpath | This argument is used to specify the path to the log file. If no path is specified, the default log file will be used. |
| /quiet | This switch suppresses screen and log output. You can still review results of the analysis in the Security Configuration and Analysis snap-in in the MMC. This switch is commonly used when secedit is used in a batch or scheduled task. |
The /analyze switches use the same parameters as the /configure switch, although the area switch is not available for /analyze . The /analyze function analyzes the entire configuration, not sections of it.
secedit import
The secedit /import switch allows you to import a security template into a database to apply the template settings to a system or to be analyzed against a system. As with the other commands, there are a set of required and optional switches that determine the type and scope of the import. These switches are delineated in Table 2.9.
| Parameter | Description |
|---|---|
| /db filename | This argument specifies which database file to be used to perform the security configuration. It is a required argument. |
| /cfg filename | This argument specifies a security template to import into the database prior to configuring the system. |
| /overwrite | This switch specifies whether the database should be emptied prior to importing the security template. If this parameter is not specified, the settings are accumulated in the database (if you import more than one security template, all settings will accumulate). If this parameter is not specified and there are conflicting security settings between the database and the imported template, the template settings win. |
| /areas area1 area2 | This argument specifies which security areas to be applied to the system. If the parameter is not specified, all settings defined in the database are applied. To configure multiple areas, separate each with a space. See Table 2.7 for a description of the security areas that can be specified. |
| /log filename | This argument is used to specify the path to the log file. If no path is specified, the default log file will be used. |
| /quiet | This switch suppresses screen and log output. You can still review results of the analysis in the Security Configuration and Analysis snap-in in the MMC. This switch is commonly used when secedit is used in a batch or scheduled task. |
secedit export
The secedit command also allows you to export security settings contained in a specified database. Table 2.10 shows the required and optional parameters for the /export function. This function is typically used for two primary purposes. First, if you want to preserve the current settings on a system, you can export them. This can be useful if you want to experiment with various settings but want to bring the system back to its original known state. It s also commonly used to export customized settings that can be applied via GPO. For example, suppose you import the securews.inf template and make modifications to that template to address the particular needs of your organization. You save these settings as secureV1.inf. These are the settings you want to apply to all computers in your Finance department. Once you expert these settings, you can apply them via group policy to the computers in the Finance OU.
| Parameter | Description |
|---|---|
| /db filename | This argument specifies which database file to be used to perform the security configuration. It is a required argument. |
| /cfg filename | This argument specifies a security template to import into the database prior to configuring the system. |
| /mergedpolicy | This switch specifies whether to merge domain and local policy security settings before exporting. If you include this argument, you are merging domain and local policies prior to exporting the security settings stored in the database. |
| /areas area1 area2 | This argument specifies which security areas to be exported. If the parameter is not specified, all settings defined in the database are exported. To export multiple areas, separate each with a space. See Table 2.7 for a description of the security areas that can be specified. |
| /log filename | This argument is used to specify the path to the log file. If no path is specified, the default log file will be used. |
| /quiet | This switch suppresses screen and log output. You can still review results of the analysis in the Security Configuration and Analysis snap-in in the MMC. This switch is commonly used when secedit is used in a batch or scheduled task. |
An example of the /export command is shown. Recall that when the no path is specified, the current directory is used. This is important to remember when using the secedit command, and it is especially important when using secedit in a script or scheduled task.
secedit /export /db hisecws.inf /cfg hisecws.inf /log hisecws.log
secedit validate
This command is used to validate security settings in a specific security template. There is only one argument for this command, the /cfg filename argument. An example of the secedit validate command is:
secedit /validate /cfg hisecws.inf
secedit generaterollback
The secedit command-line tool also has a generaterollback switch. This switch allows you to generate a rollback template with respect to a configuration template. When you apply a configuration template (/cfg filename ) to a computer, the /generaterollback option allows you to create a rollback template that will reset the security settings to the values in place before you applied the configuration template. If you generate a rollback template and decide you want to go back to your original values, you would have to apply the rollback template using the secedit command /import . The generaterollback command simply takes a snapshot of current configuration values and creates a template that you can import to reset values. The syntax for this command is slightly different from other secedit commands, as shown by the parameters in Table 2.11.
| Parameter | Description |
|---|---|
| /cfg filename | This argument specifies a security template to import into the database prior to configuring the system. |
| /rbk filename | This switch specifies the name of the rollback template secedit will create. The file extension should be .inf. |
| /log filename | This argument is used to specify the path to the log file. If no path is specified, the default log file will be used. |
| /quiet | This switch suppresses screen and log output. You can still review results of the analysis in the Security Configuration and Analysis snap-in in the MMC. This switch is commonly used when secedit is used in a batch or scheduled task. |
An example of this command is:
secedit /cfg hisecws.inf /rbk hisecbk.inf /log /quiet
secedit refreshpolicy Replaced by gpupdate
In Windows 2000, the secedit command used the /refreshpolicy switch to refresh local Group Policy settings and Group Policy settings stored in the Active Directory. This command is replaced in Windows Server 2003 by the command gpupdate.exe . This command-line tool does what the /refreshpolicy switch in the secedit command did in Windows 2000. Table 2.12 shows the parameters for the gpupdate command. If you d like to view help options for the gpupdate command, use the following command line string:
gpupdate ?
Without the question mark, the command will simply execute ”meaning it will cause policy to be updated. This behavior is somewhat different from other command-line tools that will display help if you simply type in the name, such as secedit .
| Parameter | Description |
|---|---|
| /Target: {computer user} | This argument specifies that only a particular computer or a particular user policy settings should be refreshed. If not specified, both computer and user policy settings are refreshed. |
| /Force | This switch specifies that all settings should be refreshed. By default, only settings that have changed are refreshed. By using this switch, both changed and unchanged policy settings will be refreshed. |
| /Wait: {value} | This switch sets the number of seconds to wait for the policy processing to finish. The default value is 600 seconds or 10 minutes. The value 0 means do not wait. The value -1 means wait indefinitely. If the time limit exceeds the set value, the command prompt returns but the policy processing continues. |
| /Logoff | This argument is used to specify whether the command will cause a logoff after Group Policy settings have been refreshed. This option has no effect if there are no extensions called that require a logoff. This switch is required for those Group Policy client-side extensions that do not process policy in the background but process policy when a user logs on. In order to process refreshed policy in these cases, it s mandatory that the logoff be forced. One example of this type of refresh is folder redirections, which are applied when the user logs on. |
| /Boot | This switch is used to force a reboot after Group Policy has been refreshed. Just as some policy is applied at user logon, other policies are applied at computer start up. In these cases, the system must be rebooted before the refreshed settings will be applied. This scenario is typical with software installation that requires a system reboot. If there are no extensions that call for a reboot, this switch has no effect. |
| /Sync | This switch causes the next foreground policy application to be done synchronously. A foreground policy application (when policy is applied) is done at computer boot and user logon. You can specify this for the user, computer, or both using the /Target parameter. If this argument is used, the /Force and /Wait switches will be ignored if specified. |
Using the secedit command-line tool is the preferred method for applying sections of security templates (/areas) and is the recommended way to restore portions of the Setup security.inf template to a system. The gpupdate.exe command replaces the secedit command switch /refreshpolicy and is used to refresh Group Policy settings, including security settings.
Deploying Security Using Scripts
Now that you ve learned about the secedit and gpupdate commands, let s look at how these can be used in scripts to automate the rollout of security settings across the domain or OU. By calling the secedit.exe tool at a command prompt from a batch file or automatic task scheduler, you can automatically create and apply templates and analyze system security. The secedit command is extremely helpful when you have multiple computers on which security must be analyzed or configured and you need to perform these tasks during off-peak hours.
Security can be implemented via group p0licy, as you learned earlier in this chapter. Group policies are applied to two types of Active Directory objects ”users and computers. Group policies can be used to assign and run scripts at particular times, such as when the user logs on or when the computer is booted . Scripts are stored in the Scripts subfolder in the Group Policy Template (GPT). The GPT is a structure consisting of the GPT folder and a set of subnodes that together contain all the Group Policy configuration settings for a particular GPO. Scripts assigned to run at logon or logoff are stored in the \USERS\SCRIPTS subfolder of the GPT. Scripts assigned to run at computer startup or shutdown are stored in the \MACHINES\SCRIPTS subfolder. The GPT is located in the system volume folder on the Windows Server 2003 DCs. The folder name is the GUID (which is a hexadecimal number) of the GPO to which it applies. For example:
%systemroot%\Sysvol\sysvol\test.net\Policies\[A234C8352-F089-44E8-38B9-00C7EFD00C65]
| Test Day Tip | Although most of the Microsoft literature recommends using the secedit.exe command-line tool, you re more likely to see scenarios that use the Security Configuration and Analysis snap-in. Therefore, be familiar with the seced.exe commands and options, but also spend time before the exam walking through several configuration and analysis scenarios using the snap-in. |
| |
Working with Different Operating Systems and the Group Policy Management Console
As you ve discovered , not all Windows operating systems support the same level of security. Each version of the operating system builds on the previous one to improve security and respond to common security threats. Even Windows 2000 and Windows XP, which are very similar, have slightly different features. In planning your security, you should consider maintaining separate security templates for each operating system. Clearly, applying a template that contains settings that are incompatible with the operating system s features will cause problems. So too, will relaxing security for all operating systems to accommodate varying degrees of security in each system. Test security templates on appropriate operating systems and within their roles (workstation, member server, Web server, and so forth). This will help maintain the tightest possible security while creating an organized and systematic approach to security.
As you know, OUs are virtual groupings based on whatever structure makes sense for your business. In some firms, OUs will be by business unit such as Finance, Sales, and Service. In other firms, it might be some other structure. If your firm uses a business unit model, you might decide to create child OUs in each business unit OU to deal with down-level clients. For example, in the Finance OU, you might create three child OUs: Windows 95, Windows 98, and Windows NT 4.0. You can populate each OU with the computers in the Finance department based on the operating system each is running. Once you ve created these OUs, you can apply group policies related to the specific operating system without compromising security.
You can download and install the Group Policy Management Console (GPMC) from Microsoft to make working with Group Policy a bit easier. The GPMC is an MMC snap-in and can be accessed via Administrative Tools or via the MMC (added as a snap-in). As you can see in Figures 2.13 and 2.14, you can better visualize group policy via the GPMC. The GPMC allows you to better manage group policy because it centralizes and organizes information in a fairly intuitive manner.
Using the example of the OUs used to organize and manage down-level clients, Figure 2.13 shows what this looks like in the GPMC. In the left pane, you can see that Finance is an OU and there are three child OUs ”Windows 95, Windows 98, and Windows NT. You could apply certain policies to the Finance OU and apply other policies to the child OUs.
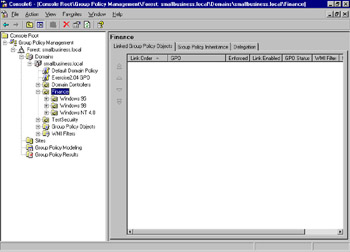
Figure 2.13: Group Policy Management Console ”Organizational Unit Management
By clicking on the OU in the left pane, you can see view Linked Group Policy Objects, Group Policy Inheritance, and Delegation for the OU. This makes managing down-level clients much easier and allows you to manage group policy in a more visual, intuitive manner.
You can also manage other aspects of your group policies. For example, both Figures 2.13 and 2.14 show WMI Filtering in the left pane. WMI Filtering is Windows Management Instrumentation, and the WMI filters allow you to dynamically determine the scope of GPOs based on the attributed of the target computer. When you link a GPO to a WMI filter, the filter is evaluated on the target computer. If the WMI filter evaluates to FALSE, the GPO is not applied. If the WMI filter evaluates to TRUE, the GPO is applied. The WMI filter is a separate object from the GPO, so to apply a WMI filter, you must link the filter to the GPO. Each GPO can only have one WMI filter, but that filter can be linked to multiple GPOs. It s important to note, however, that WMI filters are not supported in down-level clients ”another good reason to group down-level clients into OUs. Windows XP and Windows Server 2003 support WMI filters, but Windows 2000 clients (and earlier) will ignore WMI filters and the GPO will be applied, regardless of the WMI filter.
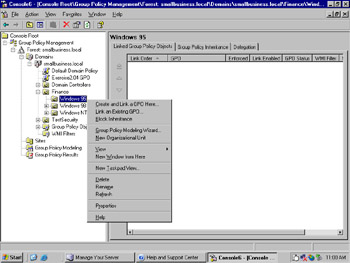
Figure 2.14: Group Policy Management Console ”Management Options
| |
EAN: 2147483647
Pages: 122