Movie Clip Symbol Behavior
| < Day Day Up > |
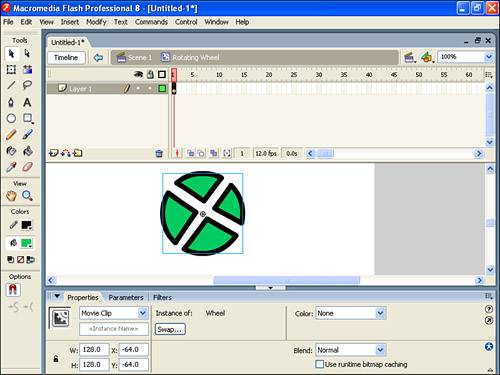
| Some people wrongly think that Graphic symbols are only for when the symbol contains a single frame and Movie Clip symbols are only for when you have multiple frames. The differences go much deeper than that. The best approach is to simply always use Movie Clips unless you have a reason to use Graphic symbols (which you'll learn this hour). The first thing to learn is that both Movie Clips and Graphic symbols can contain one or more frames. However, only Movie Clips will automatically loop regardless of where you place instances of that clip. Here's an example of how Movie Clips will automatically loop: Say you make a Movie Clip of a wheel (a circle with lines for spokes). You can then use an instance of your Wheel symbol inside another Movie Clip called Rotating Wheel where the Wheel symbol rotates. Then you can create another movie clip that serves as the Car (which includes two instances of the Rotating Wheel symbol). Because the Rotating Wheel is a Movie Clip, the wheels will rotate whether you put them on stage or inside the Car. Finally, the Car symbol can be animated across the screen, and both wheels will rotate the whole time. Don't worry if this is confusing; you'll do a task next to make it clear. Just remember, you can use movie clips even when you don't need multiple frames. Creating Nested Movie ClipsMaking a movie clip is like making any symbol. In the following task, you'll first create an animation inside a movie clip. Then, when you tween an instance of the clip, it will tween as well as animate. Specifically, you'll make a wheel and then use an instance of that wheel to create a rotating wheel. Finally, you'll use two rotating wheels to create a car symbol. You'll animate the car (and see its wheels rotating, too). Try It Yourself: Use a Movie Clip to Make a Rotating Wheel In this task you'll nest a clip of a wheel inside a clip that will become an animating wheel that you can use anywhere you want:
If you aren't familiar with nesting symbols, the preceding task might have been a little confusing. (Review Hour 4 if necessary.) In the preceding task you worked from the specific to the general. You made a Wheel symbol, and you made a Rotating Wheel symbol that contained Wheel because you needed a symbol inside Rotating Wheel to do a motion tween. Then you used two instances of Rotating Wheel in the creation of the Car symbol. Comparing Movie Clip Symbols to Graphic SymbolsIt makes no difference whether your master symbol is a graphic or a movie clip. The symbol behavior affects only the default symbol behavior for instances dragged straight from the Library. What matters is the symbol behavior of the instance on the Stage. If you drag a movie clip from the library, it will start with the Movie Clip behavior, but you can change it (for a given instance) to Graphic by using the Properties panel, as shown in Figure 12.3. It's the instance's behavior that matters. Figure 12.3. An instance on the Stage (regardless of the master symbol's default behavior) can have any behavior you select from the Properties panel.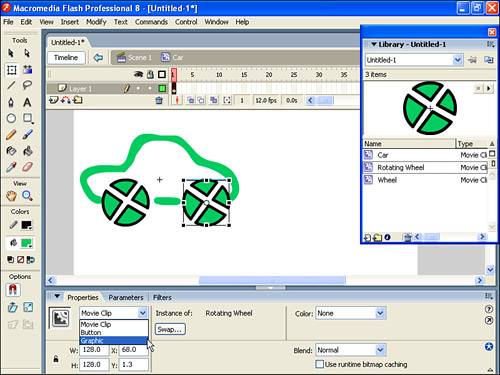 Graphic instances that contain multiple frames have a few unique options. The Properties panel changes to include a few extra options. When you select a symbol with the Graphic behavior, the Properties panel lets you specify which frame (within the symbol) will appear first. In addition, other options from the drop-down list provide a choice between Loop, Play Once, and Single Frame. By combining these settings, you can vary exactly how an instance with the Graphic behavior appears. Suppose you have two instances of Rotating Wheel that use 20 frames for one rotation. You could use both instances as graphics and set both to Loop, but on one, you could set the first frame to 10. The two wheels would both rotate continuously, but they would be offset by 180 degrees. If you compare the options in the Properties panel when a movie clip is selected (compared to a graphic), you'll notice only one seemingly minor field for Instance Name. It really isn't minor at all, as you'll see in the section "Addressable Movie Clip Instances," later in this hour, and again in Hour 15, "Using ActionScript and Behaviors to Create Nonlinear Movies." For now, just realize that you can name movie clip instances individually in the Properties panel. If the only difference was a few settings in the Properties panel, you could do exercises with Loop, Play Once, and Single Frame, and that would be the end of it. However, Graphic symbols differ in another major way. Multiframe Graphic symbols (even when set to Loop) are synchronized and need to match the duration of the Timeline in which you place them. For example, a 10-frame Graphic symbol placed in Frame 1 of a Timeline will display Frame 1 in Frame 1, Frame 2 in Frame 2, and so on. If you place this Graphic symbol in a Timeline that's only 5 frames long, the instance of the symbol will display Frame 5 when it gets to Frame 5, but it will go no further. It's locked to the Timeline where it's used. (If it helps, you can compare the Graphic behavior to sounds set to Stream, which you learned about in Hour 10, "Including Sound in Animations.") Movie Clip instances are independent of the timeline where they're used. They always play all their frames and loop. Think of a movie clip as marching to the beat of its own drummer. A 10-frame movie clip doesn't care if it's placed in a 10 frame timeline, 100 frames, or just 1 frame. It plays all its frames when it can, like Rotating Wheel used in creating the Car in this hour's first task. (Movie Clip behavior is like sounds with the Sync setting Event.) The next task will drive home the differences between graphic and movie clip instances.
Try It Yourself: Compare a Graphic Symbol to a Movie Clip Symbol In this task you'll see how movie clips loop independently of the Timeline in which they reside:
There are a few additional points to notice in the preceding task. First, movie clips always loop. (There's no "play once" option. In Hour 15 you'll learn how to write a script that says "Stop at the last frame.") But because of this, movie clips are sometimes extra work. Also, it might seem like a drag that only Graphic symbols are previewed when you scrub, but there's good reason for this. Graphics are previewed because they're locked to the Timeline, and therefore Flash knows exactly how they'll play. Movie clips play at their own rate (and can be started or stopped any time through scripting). Therefore, Flash has no idea exactly how they'll play and can't give you a preview. If nothing else, just remember to always use Test Movie if you want to see what the user will see. When to Use Movie ClipsGenerally, you should use movie clips for everything you can, even if it's just a static (single-frame) graphic. However, there are some reasons to use Graphic symbols instead. Multiframe Graphic symbols are appropriate any time you really need to preview while you're working. The fact that movie clips don't preview when you're scrubbing can be a real hassle. For example, if you're synchronizing lip movements in a character, you probably want to use multiframe Graphic symbols. Also, a movie clip's automatic looping means that if you don't want it to loop, you need to do more work you need to put a script into the last frame to make it stop. Also, specifying a first frame by using multiframe Graphic symbols is so easy that it's hard to resist this feature. Using scripting in movie clips to do this is more complicated and slightly more work (though also ultimately more powerful, too). Although the Graphic symbols lock themselves to the Timeline (making synchronization easier), there are difficulties to overcome as well. A common problem arises when the number of frames in the symbol doesn't match (or evenly divide into) the number of frames where you place it. For instance, if you use Graphic symbols for Rotating Wheel in this hour's first task, you have to make sure the Car symbol has exactly 20 frames in order for the wheels to fully rotate. If the car has 1 frame, the wheels won't spin. If the car has 10 frames, you'll see half the rotation, and then it will repeat. A movie clip, in contrast, will continue to play, regardless of how many frames it is given. If your nested animation has a different number of frames than your Timeline, you should either use movie clips or make sure the Graphic symbols have the appropriate number of frames. Using movie clips is usually much easier because they're more flexible than graphics. This discussion shouldn't distract from the main reason to use symbols (either movie clips or graphics), which is that you want to create a motion tween. You can use motion tweening only on an instance of a symbol. If the symbol you're tweening happens to have multiple frames, so be it. By nesting clips inside clips, you can create very complicated effects that would be very difficult to create by hand in one Timeline. So although either a graphic or a movie clip qualifies (as a symbol instance) for motion tweening, the difference is that a movie clip animates on its own time, and it doesn't matter how much space you provide in the Timeline where it is used. |

| < Day Day Up > |
EAN: 2147483647
Pages: 235
- Chapter II Information Search on the Internet: A Causal Model
- Chapter XI User Satisfaction with Web Portals: An Empirical Study
- Chapter XV Customer Trust in Online Commerce
- Chapter XVI Turning Web Surfers into Loyal Customers: Cognitive Lock-In Through Interface Design and Web Site Usability
- Chapter XVIII Web Systems Design, Litigation, and Online Consumer Behavior