| Your drawing tools should appear, by default, on the left side of the screen, as shown in Figure 2.1. If the tools aren't visible, you can access them by selecting Window, Tools. Figure 2.1. Flash's drawing toolbar might look simple, but because most tools have additional options, there's more than meets the eye. 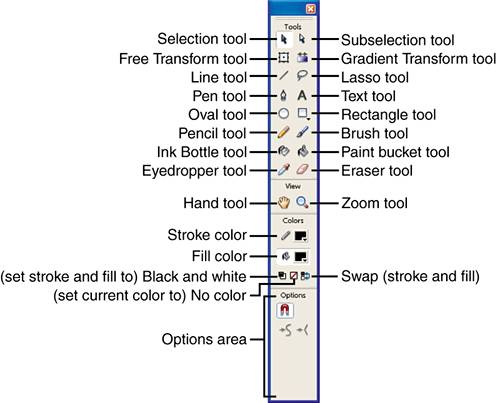
By the Way: Learning Shortcuts Without Memorizing When you click a tool, it becomes selected. Alternatively, you can select a tool by pressing its shortcut (or quick key). You can see each tool's quick key when you roll your cursor over the tool. In the ToolTip that appears, you see both the name of the tool and a letter in parentheses. For example, when you roll over the Selection tool, you see "Selection Tool (V)." Pressing the V key selects the Selection tool. (Try it out by first clicking another tool and then pressing V.) |
The following sections look at how to draw with these tools. You'll learn about all of them in this hour, although the really advanced techniques aren't covered until Hour 5, "Applied Layout Techniques." Keep in mind that whereas some tools (such as the Pencil and Brush tools) let you create artwork, others (such as the Selection and Zoom tools) simply help you modify or view your artwork. In the following sections you'll learn how to create and how to edit artwork. Viewing and Modification Tools Both View tools Hand and Zoom have no effect on artwork. You simply use them to help see your artwork. The following task walks you through a scenario in which you use both tools. Try It Yourself: Use the View Tools to Help You See In this task you'll explore how to use both the Hand and the Zoom tools. Follow these steps: 1. | Because you haven't drawn anything yet, you can use one of the sample files that ship with Flash. Open the sample file called ScriptableMasksPart2. fla. It's in the same Samples folder used last hour that is, adjacent to Flash in a folder called Masking inside Samples that's inside the Samples and Tutorials folder. Select File, Open and navigate to C:\Program Files\Macromedia\Flash 8\Samples and Tutorials\Samples\Masking\ ScriptableMasksPart2\ScriptableMasksPart2.fla.
| 2. | You can zoom in to critically inspect or change the artwork in the file. Click to select the Zoom tool (it's the one that looks like a magnifying glass). Notice that, as with many other tools, when you select the Zoom tool, additional buttons appear in the Options section of the toolbar. You should see two more magnifying glasses appear in the Options area, as shown in Figure 2.2.
Figure 2.2. The Zoom tool has two options: Enlarge and Reduce. 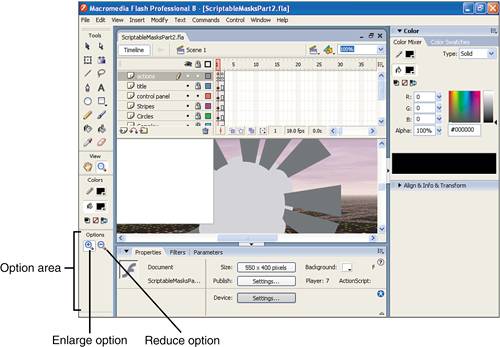
| 3. | Make sure Enlarge is selected (the option with the plus sign) and then click one of the arrow buttons displayed on the Stage. Click the same arrow a few more times, and you keep zooming in.
| 4. | While you're close up, chances are that most of the Stage is out of view. Of course, you can use the standard scrollbars on the left and bottom to change the portion of the (now very close up) Stage. You can also do this by using the Hand tool: Select the Hand and then click and drag to change your view.
| 5. | Now you can zoom out. Just select the Zoom tool and make sure you remember to select the Reduce option (the one with the minus sign). Click, and you zoom back out.
|
This task might seem pretty easy (it is), but there's more you should know. Using any View tool does not affect your file only your perspective on it. The View menu provides some of the same functionality as the Zoom, Hand, and View tools (such as zooming in and zooming out). Similarly, none of the View menu options have a lasting impact on a file. You used the Enlarge option of the Zoom tool by simply clicking the Stage. Another way to zoom is to click and drag. You see a rectangle as you drag, and when you let go, that rectangle defines the viewable portion of the Stage. In the sample ScriptableMasksPart2.fla file, for example, you can click and drag with the Zoom tool and draw a small rectangle around the text at the top left of the stage to zoom in on just that portion. You always see the current zoom level displayed in the drop-down list at the top right of the Stage (above the Timeline, if it's docked), as shown in Figure 2.3. If you click the Zoom control drop-down list, you can return to 100%. Another quick way to return to 100% is to double-click the Zoom tool (not the Enlarge or Reduce option, but the main Zoom tool's magnifier). Figure 2.3. The exact zoom level is always shown at the top right of the Stage. 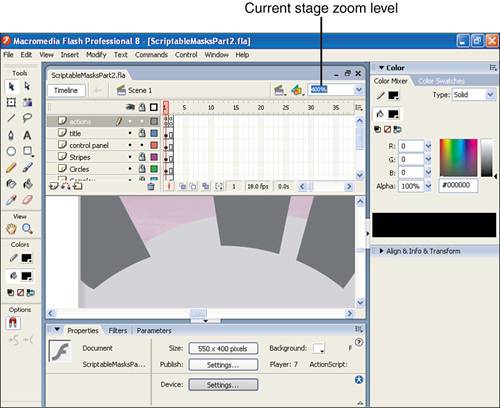
Speaking of quick techniques…both the Zoom and Hand tools have "spring-loaded" options. That means, for example, that while you're using another tool, you can press and hold down the spacebar to get the Hand tool. Then, when you let go of the spacebar, Flash springs back to the tool you had. Holding down Ctrl+spacebar gives you the Enlarge option of the Zoom tool, and holding down Ctrl+Shift+spacebar gives you the Reduce option. These spring-loaded features provide very quick ways to temporarily select tools without actually going to the toolbar. Creation Tools Although the View tools prove very useful, they can't change a file. To create artwork in Flash, you either have to add to an image, change something you've already drawn, or remove some or all of what you've drawn. In the following sections, you'll first see how to add to your artwork. This will, naturally, give you something to change or remove later. Let's go through each tool individually and then analyze how they can all be used together. Drawing Lines Two tools are available for just drawing lines: the Line tool and the Pencil tool. (To be fair, the Oval and Rectangle tools draw lines, but they also draw fills at the same time, as you'll see in the "Painting Fills" section, later in this chapter.) Lines can be given a stroke color, a stroke height, and a stroke style. In addition, Flash 8 adds the ability to control the Cap (or how the line ends) and the Join (or the look of a corner where two lines meet). What's interesting is that the geometric definition of a line the distance between two points doesn't include mention of color, thickness, or style. It's best to think of a line this way: It's just an infinitely thin line that happens to be given a color, stroke (or thickness), and style (such as dashed, dotted, or solid). You can change any of the stroke attributes any time without affecting the underlying line. So much for theory of lines! In the following task, you'll draw some. Try It Yourself: Draw and Change Lines In this task you'll begin to draw and manipulate lines. Here are the steps: 1. | Start a new file (by pressing Ctrl+N and selecting Flash Document). Lines can have different stroke attributes, so make sure the Properties panel is visible and in a convenient place first. If your Properties panel isn't present, select Window, Properties. Then you can drag the Properties panel to a blank area of the screen, as shown in Figure 2.4.
Figure 2.4. The Properties panel lets you set attributes of the lines you draw. 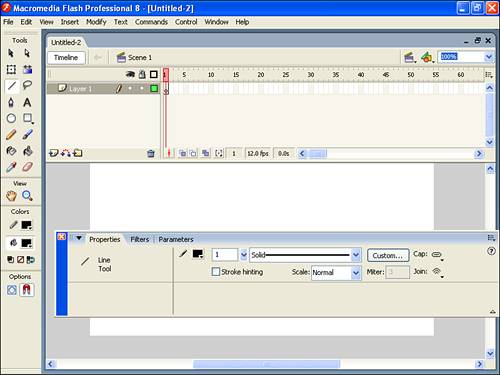
| 2. | Select the Line tool, which draws straight lines. When your cursor is on the Stage, it changes to a crosshairs. Click and drag to create a line. You might notice a dark ring that sometimes appears while you drag. This is Flash's way of assisting you while drawing. In the case of the line, you'll find drawing perfectly horizontal and vertical lines to be quite easy when the Snap to Objects option is selected from the View menu. (Holding Shift also constrains the angle to diagonal as well.)
| 3. | Changing any setting in the Properties panel will affect subsequent lines you draw. Select a different Stroke color in the square swatch on the Properties panel. Then change the stroke height, either by typing a number in the Stroke Height field or by clicking the arrow and dragging the slider. Set the stroke to 15. Then draw a horizontal line. For this exercise, we need a total of three copies of this line. Use the Selection tool to select the first line, select Edit, Copy and then choose Edit, Paste in Place then hold shift and press the down arrow on your keyboard. Repeat this so you have three identical lines.
| 4. | You can change any attribute of lines you've drawn through the Properties panel if you simply use the Selection tool to select the line. Select the first line and, from the Cap option menu in the Properties panel, select None. Select the second line and choose Round (the default Cap). Finally, set the last line and choose Square. The different Cap options are represented in an icon that appears on the Properties panel. I think the easiest way to really see the differences is to use the Subselection tool and click each line while holding shift. The skeleton of the line is shown with the two square handles at the endpoints (as shown in Figure 2.5). (Remember to get the Selection tool back, by pressing V, in order to simply select the lines.) Square Cap may appear identical to None, but Square is similar to Round in that it extends both ends of the line by half the stroke thickness. Think of the how you could draw the Round cap with a compass that's pinned to the endpoint.
Figure 2.5. To best understand the different cap options for lines use the Subselection tool. 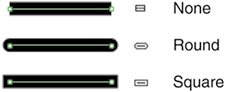
| 5. | Lines have a few other interesting properties that I'll go over at the end of this task. For now, you'll see some of the options available when drawing lines. Select the Pencil tool. Notice that the Pencil tool has the option Pencil Mode. Click and hold the button that appears in the Options section to change the Pencil Mode setting, as shown in Figure 2.6.
Figure 2.6. Pencil Mode is an option that affects exactly how the Pencil tool will behave. 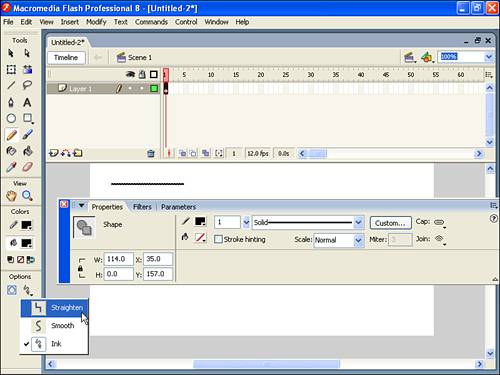
| 6. | The Straighten option attempts to straighten what you draw. Try drawing the letter S. It's likely to look jagged. Now try drawing the letter Z. It probably looks more like what you wanted. You'll learn to change the sensitivity later this hour, but drawing these letters should exemplify how the Straighten Pencil Mode setting works.
| 7. | Choose the Smooth option and try drawing an S and a Z. What happens to the S is nice, but the Z has curves where there weren't any before. The Smooth option can come in handy if you find that your hand-drawn images look too jagged. Also notice that you can change the degree of smoothing in the Properties panel. This setting for Smoothing (from 0 to 10) is only visible when you have the Pencil Tool (or Paint Brush as you'll see later) and you have the Smooth option selected.
| 8. | The Ink Pencil Mode setting draws almost exactly what you draw. Flash adjusts what you draw to reduce the file size. The simple line Flash creates takes less data to describe and results in a smaller file that's faster to download.
| 9. | Finally, notice the Option for Object Drawing in the Tools panel when the Pencil Tool is selected. The choice between Object Drawing or not (the opposite being called Merge mode drawing) is actually quite profound. For now be sure it's deselected (so you're in Merge mode) and you'll learn much more about it later this hour in "Selecting and Transforming Objects."
|
The Properties panel affects lines drawn with the Pencil tool in the same way it affects those drawn with the Line tool. One of the attributes that you haven't yet experimented with is the stroke style. The drop-down list shows you a visual representation of each style. Solid (the default) is like Hairline, but Hairline effectively sets the stroke height to the lowest number possible. You should use the other fancy stroke styles with extreme caution. This is simply because the more random-looking ones tend to add to the file size. File size issues are addressed in Hour 21, "Optimizing a Flash Site," but realize for now that you'll suffer a significant file size increase if you use some stroke styles. If those stroke styles aren't enough notice (when a line tool is selected) the Custom button on the Properties panel provides a way for you to create your own custom stroke styles. The dialog box that appears after you click the Custom button lets you control several attributes of your own custom line styles (see Figure 2.7). These are fun, but be warned: They can significantly add to file size. Figure 2.7. The Stroke Style dialog box, which is accessed from the Properties panel, lets you specify details of custom stroke styles. 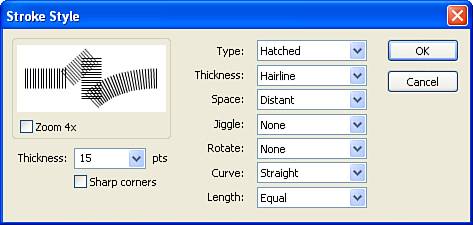
The Stroke hinting feature has a very subtle effect. Namely, lines you draw will always be anchored on round pixel numbers. Flash is a sub-pixel drawing tool meaning it's possible to make a line start, end, or pivot on any coordinate such as 103.4 pixels from the left. This is the case when Stroke hinting is not selected. At 100% zoom, such a point is rounded off to 103 but when you zoom in, one normal pixel might take up several actual pixels on the monitor. No stroke hinting is great for accuracy, but can make thin lines appear slightly blurry because Flash is effectively rounding some points up and rounding other points down. Select Stroke hinting to ensure sharp looking lines. Just realize if you zoom way in the lines might not appear exactly where you position them. Finally, the Scale option is the hardest feature to notice unless you know how to see it. Basically, Scale describes what sort of resizing should cause the stroke to thicken. Say you draw a rectangle which is made of both a stroke outline and a fill interior (which you'll do in "Drawing and Modifying Shapes by Using Lines and Fills"). If you enlarge (that is, "scale") the rectangle you may or may not want the stroke to also get thicker. The Scale option for Normal will cause the line to thicken in proportion to the scale where None will keep the line appearing the same thickness. Vertical and Horizontal means the thickness grows in proportion to the specified scale. For example, a line with Horizontal scale thickens only when you widen it; where making it taller has no impact on thickness. The worst part is that you won't see this effect until you put the lines inside symbol that gets scaled. You won't do that until Hour 4, "Using the Library for Productivity." Lastly, the properties for Join and Miter will be discussed later in "Using Snap to Objects to Connect Shapes" because it only applies when you connect two lines (although it also happens when you draw a rectangle with corners). Painting Fills In Flash, there can be only two components to any shape you draw: lines (strokes) and fills. Some shapes are just lines (as you saw in the previous section), but some shapes are just fills (as you're about to see), and some shapes contain both (as you'll see later in this hour). Fills and lines are different. A line has no thickness only applied stroke attributes. A fill, on the other hand, has a left side, right side, top, and bottom. You can think of lines as the candy coating on an M&M and fills as the chocolate center (if that helps). The two tools to create fills are the Brush tool and the Paint Bucket tool. You'll do a little experimenting with these tools in the following task. Try It Yourself: Paint Fills In this task you'll explore the basic features and some rather advanced features of fills. Here are the steps to follow: 1. | In a new file, use the Pencil tool to draw a few large circles. Be sure to first turn off Object Drawing (the option in the Tools panel when the Pencil is selected). Make at least one totally closed, one almost closed, and another obviously not closed, as shown in Figure 2.8.
Figure 2.8. These three hand-drawn circles will be filled. 
| 2. | Select the Paint Bucket tool. Notice that the Options section has two buttons: Gap Size and Lock Fill (see Figure 2.9). For now you'll explore only Gap Size; Lock Fill is covered in Hour 5, when you learn about gradients.
Figure 2.9. The Paint Bucket tool has a Gap Size option that controls the tool's tolerance. 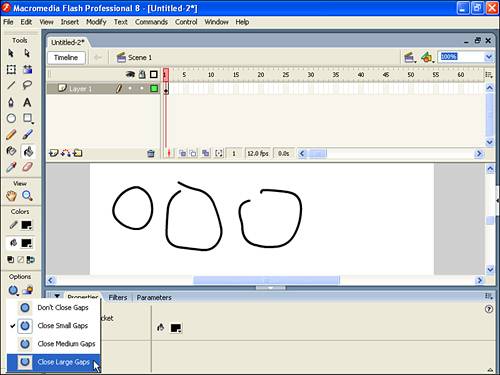
| 3. | If you click with the Paint Bucket tool in an empty part of the Stage, nothing happens. The Paint Bucket tool fills closed shapes with the selected fill color (the swatch next to the small paint bucket in the Colors section of the toolbox). It also changes the fill color of any fill already created. Change the Gap Size option to Close Large Gaps. Adjusting the Gap Size option should enable you to fill all your circles even if they are not totally closed.
| 4. | Select the Brush tool and quickly draw a line. Because you've used the Brush tool, it's really a fill (not a line), despite the fact it might look like a line.
| 5. | Now, choose a new fill color by clicking and holding the color fill color swatch (from the Colors section of the Tools panel). Then select the Paint Bucket tool and fill the shape you just drew with the Brush tool. Not only can the Paint Bucket tool change the colors of the filled circles you've already filled, but it can also change the color of fills created with the Brush tool.
| 6. | Now look at the Brush tool's Options area. The two drop-down lists that appear to be the same are actually quite different. The top one (Brush Size) controls the brush's tip size. On the other hand, the Brush Shape option controls the brush's tip shape. For example, you can have a calligraphy look with the angled tip, as shown in Figure 2.10. Lock Fill is covered in Hour 5, but the other option, Brush Mode, is very interesting and is covered in step 7.
Figure 2.10. The Brush Shape option affects the style of a drawing. Here's a calligraphy effect using the angled Brush Shape option. 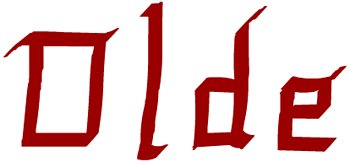
| 7. | Figure 2.11 demonstrates each Brush Mode option. Try one now. Select the Paint Inside Brush Mode option to experiment with it. Either use the closed circles you drew earlier or draw a few more circles by using the Pencil tool. Make sure you have the Brush tool selected (notice that the Brush Mode option remains where you last left it); then click and paint inside one of the circles. Try painting outside the lines. If you start painting outside the circle, the Paint Inside Brush Mode option prevents you from spilling any paint outside the shape! With Paint Inside selected, if you first click outside the shape, nothing happens.
Figure 2.11. The Brush tool has several Brush modes. In the Paint Selection example, I first selected the windows. The Paint Inside example worked only when I started painting inside the house graphic. 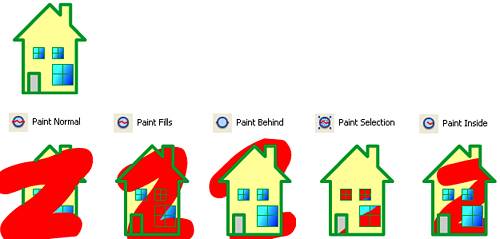
|
Let me recap just a few important points that are consistent for all the tools. First, certain tools have additional options that appear in the bottom section of the Tools panel. If you can't seem to find an option that you've seen before, you might have to remember for which tool it was designed. This fact shouldn't be too frustrating because any attribute you need to change after drawing is usually found in the Properties panel (which you'll learn to leave open all the time). Another thing to notice is that sometimes the same task can be achieved a number of different ways. For example, you have seen the Zoom command in the View menu, the Zoom tool, and the Zoom setting on the Stage. And you have seen that the fill color swatch can be changed from the Tools panel, the Properties panel, and the Color Mixer panel. The fact that you can do the same task by using different methods means you can find a style that works best for you. Drawing and Modifying Shapes by Using Lines and Fills When you use either the Oval tool or the Rectangle tool, you create a shape by using both a line and a fill. These shapes have a fill and a stroke, with all the attributes set in the Properties panel. You can actually draw an oval or a rectangle that has no fill by changing the fill to "no color" (the red line with an arrow pointing to it, as shown in Figure 2.12). Figure 2.12. When you use the Oval tool or Rectangle tool, one option for the fill color is no color (shown as a red slash). 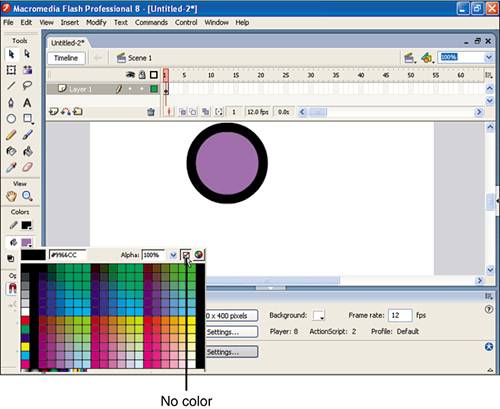
Similarly, you can create a shape without a stroke by changing the stroke color to "no color." These tools are pretty self-explanatory. The only Rectangle tool option to take note of is the Round Rectangle Radius setting. If this setting is selected before you draw, it makes all rectangles you draw have rounded corners. Creating ovals and rectangles is very easy. The following task walks you through a couple ways you can create and modify them. Try It Yourself: Draw and Modify Shapes This task combines what you've learned about fills and shapes, and it shows you a couple more tricks. Follow these steps: 1. | Select the Oval tool and then set the stroke height (in the Properties panel) to something significant, such as 5 or greater.
| 2. | Select colors for both the stroke and the fill just not the "no color" diagonal red line.
| 3. | Draw a circle. A circle is just an oval that happens to have equal height and width. To draw a circle, hold down the Shift key while you draw.
| 4. | Select the Rectangle tool, change the fill color, and draw a square (by holding down Shift while you draw). As with the Line tool and Oval tool, if Snap to Objects is selected in the View menu, the Rectangle tool will snap in certain places to form a perfect square so you don't have to hold down Shift.
| 5. | To change the fill color of the circle, select the Paint Bucket tool, pick a new fill color, and then click inside the circle you drew. The current fill color is applied to the circle's fill. The Paint Bucket tool is easy to understand it either creates a fill or changes a fill.
| 6. | Select the Ink Bottle tool and then pick a different stroke color. Click the edge of the circle you drew. The stroke color changes. What's really nice about this feature is that because the Ink Bottle tool affects only lines, you don't have to be particularly careful where you click because only the line portion changes.
| 7. | The Ink Bottle tool doesn't just change the color of the stroke. When the Ink Bottle tool is selected, you can select a different height (say, 10) from the Properties panel. While you're there, pick a different stroke style. Click the circle again. You're affecting all the stroke portion's attributes.
| 8. | Similarly to how the Paint Bucket tool can create a fill, the Ink Bottle tool can create a stroke where there wasn't one to begin with. Use the Brush tool to draw a quick shape. Then select the Ink Bottle tool and click the fill you just created. You add a stroke to the fill, effectively outlining it.
|
The preceding task shows that there are two fundamental components to the shapes you create lines (or strokes) and fills and each has a different set of tools. The Oval tool and Rectangle tool can create both strokes and fills at the same time. To create a new fill or affect one that's onscreen, you use the Brush tool or Paint Bucket tool. You can create lines by using the Pencil tool or the Line tool, and you can change their characteristics by using the Ink Bottle tool. I find it easiest to remember that the Ink Bottle tool draws lines because it appears in the left column of tools under the Line and Pencil tools. The Paint Bucket tool is under the Paint Brush tool. The Pen tool is primarily used to draw lines, but any time you use it to draw a closed shape, the shape gets filled automatically. Later in this hour you'll see how to modify drawn shapes (including removing the fill). By simply clicking with the Pen tool, you can add sharp anchor points on straight lines. The Pen tool can also draw curves. Instead of just clicking to create a point, you can click and drag to create a curve. The direction in which you drag creates what will become a tangent to your curve. The distance you drag determines how gradual or extreme the curve will be. If that makes perfect sense, I'm surprised. You'll just have to experience it to understand. Therefore, you'll experiment with these Pen tool basics in the following task. Try It Yourself: Use the Pen Tool In this task you'll use the Pen tool to draw controlled shapes. Follow these steps: 1. | To begin, draw a diamond by using the Pen tool. Select the Pen tool and from the Properties panel, set the stroke thickness high (say, 20) and set the Join option to Miter. Then, toward the bottom of the Stage, click and let go (this will be the bottom of the diamond). Then, up and to the left, click once for the left corner of the diamond. Click and release for the top and right corners as well. Finally, move your cursor near the first point you created. You should see the cursor change to include a little circle, as in Figure 2.13. Later in this hour you'll learn how the cursor frequently changes to provide information. For now, know that the little circle on the Pen tool indicates that if you click it, you'll enclose the shape you started. Click to enclose the shape. It should automatically fill with the current fill color. Feel free to repeat this step by first selecting the Join option Round and the corners in the diamond will look much different.
Figure 2.13. The Pen tool changes to include an extra circle, indicating that a click will enclose the shape you're drawing. 
| 2. | Next, draw a V shape by using the Pen tool. Click once for the top-left point of the V, click once for the bottom point, and then double-click for the third and final point (the top-right point). Double-clicking finishes the shape, even if it's not enclosed; if you click again elsewhere on the Stage, you'll be starting a new shape or line. Therefore, two ways to finish what you've started with the Pen tool are to double-click and to enclose the shape (as you did in step 1). A third way is to simply select another of the drawing tools or press the Esc key.
| 3. | Now try to create a curved line. Select the Pen tool (to make sure you're starting a new line) and then on the left side of the screen click once (and let go).
| 4. | Now you need to lay down an anchor point on the curve you want to create. Therefore, you need to click and drag before you let go. Above and to the right of the first place you clicked, click and hold the mouse down. While holding down the mouse button, if you move the mouse to the right, you'll see that your horizontal tangent causes a curve to appear and then level off, as shown in Figure 2.14.
Figure 2.14. When clicking to make an anchor point, if you drag (to the right, in this case) you establish a tangent for the curve that's created. 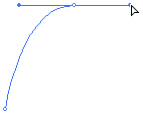
| 5. | Continue to hold down the mouse button while moving the mouse straight above the second point, and you should see that the shape of the curve is totally different because the tangent you're creating is different (see Figure 2.15).
Figure 2.15. Depending on the direction of the tangent (in this case, upward), the curve changes. 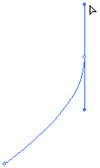
| 6. | Finally, while still holding down the mouse button, you can increase or decrease the distance you're dragging (from the point you clicked). This affects the influence on the curve's arc. Before your hand gets tired, move the mouse to the right. Then double-click down to the right at about the same height as the first point to make an arc. Even though this curve has three points, only the middle one needs a curve to it that is, when you create the first and last points, you didn't click and drag.
|
You can edit any drawn shape in the same manner in which you drew lines with the Pen tool in the preceding task. You just select a shape by using the Subselect tool (that's the white arrow at the top right of the Tools panel), and you see the same handles and anchor points as in the preceding task. Creating Text Now for a graphic element that involves neither line nor fill. In this section, you'll explore creating text. To create text, you simply select the Text tool, click, and start typing. If, when you first make the text, you click and drag you'll be setting the margins (otherwise, the margins adapt to what you're typing). You can modify the font, color, and style of what you've typed after you create it. Modifying your text after it's typed usually makes sense because only then will you be able to best judge how it looks. Creating text in Flash has never been easier or more sophisticated. The following task walks you through a couple quick maneuvers. Try It Yourself: Create and Style Text In this task you'll explore using text in Flash. Here are the steps: 1. | Select the Text tool, click the Stage, and then type Hello. This "click-and-type" technique expands the margin for the block of text to the exact width of whatever you type. The circle that appears at the top-right corner of the text block indicates that the margin will automatically adjust in this way (see Figure 2.16).
Figure 2.16. The subtle circle in the top right corner indicates the margins will adju st to fit what you type. Once you've set the margins (by dragging any handle on the text) the circle turns to a square. 
| 2. | When you click and drag this circle (to adjust the width), it turns into a square to indicate that the margins are fixed. You can double-click the square margin control to restore the automatic margin adjustment (that is, to make it a circle again).
| 3. | While editing the text block, you can set the margin. (Make sure the I-beam is blinking in the block; click inside the block of text, if necessary.) Grab the little circle at the top-right corner of the text block and widen or narrow the block of text. The circle margin handle changes to a square, which indicates that your margins are set and any text you paste or type into this block will wrap when it reaches this margin. Go ahead and type a couple lines of text. You should see the text wrap even though you don't press the Enter key.
By the Way: Adjusting Text Margins By the way, if you had clicked and dragged with the Text tool to the right before typing (instead of clicking and then typing), you would have created a margin in one step. You can always adjust the margins later too. There are two ways: If you're editing the actual text, you use the circle or square in the top right corner, or if you're not actually editing the contents of a text block, you can still select it using the Selection tool. In this case, you can change the margins by dragging any of the square handles in the corners. |
| 4. | Now that you have some text in the block and have set the margins, it's time to modify some attributes of the text. There are two ways to modify the text. First, where you're editing the contents of the text (and you can select all or some of the characters or add more). Second, you can select the entire block and pick it up and move it or just modify the attributes. (This is not the same as simply selecting all the characters while editing the block). Click the Selection tool to stop editing the text. Your text block should become selected. (If it isn't, just click it once, and a rectangle appears around it.)
| 5. | With the block selected, observe the Properties panel to make modifications. For now, just modify the text's color, font, and font height, as shown in Figure 2.17. Any setting you make here applies to all characters in the text (because you're editing the entire block). Most of the Properties are easy to learn. There's an especially nice feature that always displays a preview of the type face when you select a different font. The preview will actually display the characters you have selected if you're editing the contents of the text block (for example, if you double-click and then select some of the characters those characters appear in the preview).
Figure 2.17. The Properties panel allows you to change text attributes such as font size and color. 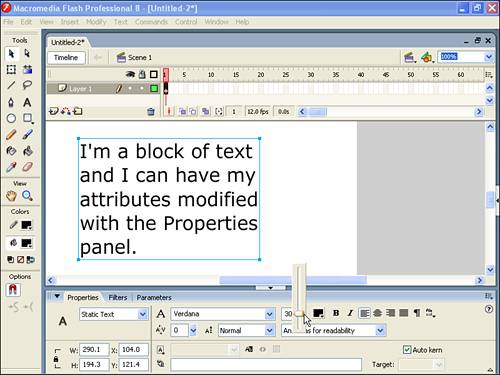
| 6. | Change the text style of just part of your text block to bold or italic by first selecting just the characters you want to change and then selecting bold or italic. Double-clicking the text block automatically selects the Text tool. You can select the characters as you would in any word processor (just click and drag). While some text is selected, use the Properties panel's settings to change just that text. If you want to change the font, the preview includes the text you have selected. You can use this method to change the properties of individual characters within any block of text.
| 7. | Select the Selection tool and then select the block of text. Using the Properties panel, change the alignment to Center Justify, as shown in Figure 2.18. Explore the other settings, which control attributes such as the margin padding and line spacing, by clicking the Format button.
Figure 2.18. When the block of text is selected, you can use the Properties panel > to change the alignment (to Center Justify in this case). 
|
There are a few options shown in Figure 2.18 that we haven't covered yet. Specifically, the Text Type options are explored in Hour 16, "Using ActionScript for Advanced Interactivity." For now, you should always leave the Text Type drop-down in the Properties panel set to Static Text. When you do this, the text you type will never change, and your audience will see the same font you've chosen. (Dynamic is for text that needs to change while the movie runs and Input is for text you want to let the user change.) The Selectable button simply gives your users the ability to select and copy the text. Another important option is the setting for Font rendering updated for Flash 8. This lets you control how the text aliases which affects how it will appear most notably, when the text is very small. Generally, you should select the rendering option by eye that is, simply select the option that looks best given your font, font size, and other layout conditions. For tiny text, like 8 or 10 point, Bitmap text is a good option although you should always at least preview how Anti-alias for readability looks. The option for Use device fonts is effectively "no anti-alias" (like Bitmap text) however the user will have to have the same font installed on their machine or a substitute will be used so it's a very risky option. There are actually two reasons to consider the Anti-alias for animation option: first, if the text is being moved for an animation it will look smoother; and second, this is the only version of anti-aliasing available when you plan to deliver your site to users with the older Flash players (more about targeting older players in Hours 19 and 24). Finally, the Custom anti-alias option (only available in Flash Professional 8) lets you fine tune the thickness and sharpness for any look you prefer. Aliasing and Anti-aliasing Anti-aliasing is a way of smoothing otherwise rough diagonals and curves with a blurry fuzz. If you zoom in on a diagonal line without anti-aliasing you'll see a stair-case effect. Adding fuzz can make that diagonal line look better, albeit blurrier. Normally, anti-aliased text appears smoother and is much more pleasing. One problem arises when the anti-aliased text is small it can be too blurry to read. In earlier versions of Flash the only viable solution for small text was to turn off anti-aliasing completely (which is still sometimes the best option) although now you have a variety of options. In addition, anti-aliasing affects how fast animated text can fly across the screen. |