| Now that you've seen how to create lines, fills, shapes (with both lines and fills), and text, it's time to explore how to modify them. The process is simple. You select the object you want to modify by using the Selection tool and then you modify it. Selecting exactly what you want to modify is often the most challenging part. The following section looks at some of the fundamentals, and you'll learn even more about this in Hour 5. Object Draw Mode Versus Merge Mode Before I can discuss selecting objects you need to understand the difference between the two ways to create objects: Merge mode and (new to Flash 8) Object draw mode. By default, and any time you don't have the Object Drawing option selected in the Tools panel, you're in what's called Merge mode. In merge mode, all the drawing tools create shapes. These fills and lines are all drawn on the same plane meaning that if you draw two shapes on top of each other, the one drawn second will wipe away the shape underneath. This behavior can actually be used to your advantage although it is disorienting to many at first. Appendix A goes over some such tricks. Object Draw mode makes everything you draw a "drawing object." Unlike shapes, Drawing objects can be stacked and won't eat away at each other. Despite the fact I've taught hundreds of students how to draw in earlier versions of Flash (that only worked in merge mode) I'm pretty sure Object Draw mode is a more intuitive way to learn. Normally, the draw mode you have selected affects what you draw. When you're in Object Draw mode, each time you click to draw line, fill, rectangle, or oval you create a new Drawing Object. Deep inside that Drawing object is a shape. You can double-click to edit the contents and you'll find a plain old shape inside. You may need to access the shape inside in order to select (and change, move, or delete) just part of the object. You'll learn much more about selecting shapes later this hour but selecting a Drawing object means selecting the whole object. (When you're done editing the shape inside a Drawing object you double-click off the object or click the blue arrow button at the left of the address bar as shown in Figure 2.19.) Figure 2.19. Use the address bar (officially, the "Edit Bar") to return to your main stage when finished editing the contents of a Drawing Object. 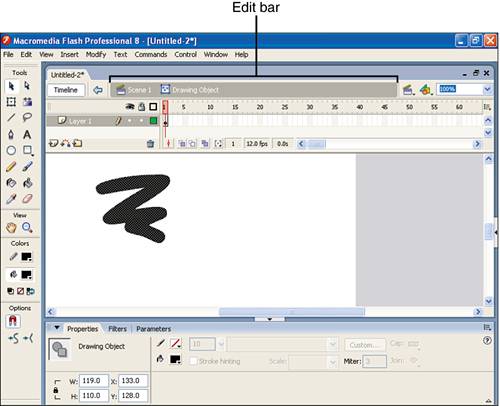
Because Drawing objects contain shapes (that won't eat away at other shapes), it shouldn't be a surprise that Flash provides a way to convert a shape or shapes into a drawing object. To convert a shape into a Drawing object, select all the shapes you want, and then choose Modify, Combine Objects, Union. Similarly, if you want the contents of a Drawing Object (that is, the shapes inside it) to reside as a shape then select the Drawing Object and choose Modify, Break Apart. Just realize those shapes will now behave like any shape and may get eaten away by other shapes on the sole plane where all shapes reside. The whole concept of shape vs. Drawing object only applies to lines and fills. Text behaves more like a Drawing Object (though, it's really neither) because it won't eat away at other things you draw. Another tidbit to know is that you can always toggle between Object Draw mode (and not) by pressing J. Keep in mind, this only affects things you're about to draw, not things you've already drawn. Like I said, I think Object Draw mode is more intuitive. Here's a quick review in order of importance: Realize you can only select an entire Drawing Object, not just some or portions of the shapes contained. In order to get at the shapes in a Drawing Object, double-click. Just be careful not to get lost while inside remember to exit the object by clicking the left arrow in the address bar. The setting in the Tools panel (for Object Draw mode or not) affects new things you draw, like to convert an existing shape or shapes to a Drawing Object via Modify, Combine Objects, Union, or to turn a Drawing Object into a shape select Modify, Break Apart.
Selection Tools The two basic selection tools are the Selection tool and the Lasso tool. The Subselect tool (the white arrow) is for selecting and editing individual anchor points (in the same way the Pen tool created them). If you're familiar with controlling shapes by using the Pen tool, this section will be familiar to you. If you're not familiar with using the Pen tool, you should master the basics before working with the Subselect tool. This section concentrates on just the Selection tool and the Lasso tool first. The Selection tool might seem so simple that it's not worth discussing, but it's actually quite powerful. You've already used the Selection tool to select an object by clicking it once. The key to the Selection tool is that the cursor changes to tell you what will happen when you click. You can try out this tool on a couple simple shapes in the following task. Try It Yourself: Use the Selection Tool to Select and Modify Shapes In this task you'll explore how the Selection tool's cursor changes to inform you what will happen when you click. Here are the steps: 1. | Select the Oval tool, but before you draw, select a very thick stroke height (5 or so) in the Properties panel. Turn on Object Drawing via the Options area in the Tool panel. Draw a circle and then select the Rectangle tool, turn off Object Drawing and draw a square.
| 2. | Select the Selection tool. Move the cursor to the middle of your square. The cursor changes to include the "move" symbol, indicating that if you were to click and drag, you would start moving this fill (see Figure 2.20).
Figure 2.20. The Selection tool's cursor changes when it is on top of a fill to indicate that clicking will start to move the fill. 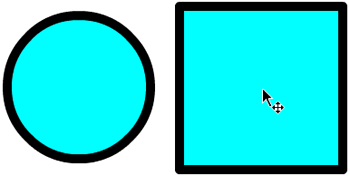
| 3. | Click and drag. Indeed, only the fill of the square moves. Select Edit, Undo (or press Ctrl+Z) to restore the fill. Also, make sure nothing is selected by just clicking the white area of the Stage or pressing Esc.
| 4. | Position the cursor over the circle you drew. If you click and drag you'll move the entire circle because it's a Drawing Object. Its fill and stroke are contained in one object.
| 5. | Move the cursor so that it is near the outside edge of the square. The cursor adds a curved tail, as shown in Figure 2.21. Now if you click and drag, you bend the line. Go ahead and click and drag to the left, and the line portion of the square bends. Notice that the fill bends with the line. This cursor behavior is consistent for Drawing Objects or shapes. However, because it's possible to select the square's fill and stroke independently (as it's a shape), you'll need to just click and drag don't click and then click and drag because that selects then moves the stroke portion.
Figure 2.21. When the cursor is near a line, it changes to indicate that clicking will start to bend the line. 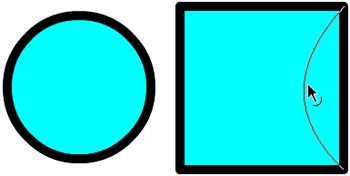
| 6. | Make sure nothing is selected and move the cursor so that it's near another corner of the square. A corner shape is added to the cursor, which means that if you drag, you'll be moving the corner point (see Figure 2.22). Try it. It's like you're bending the line, but instead you're just moving the corner.
Figure 2.22. When the Selection tool is near a corner, it shows yet another cursor, this time indicating that you can extend the corner. 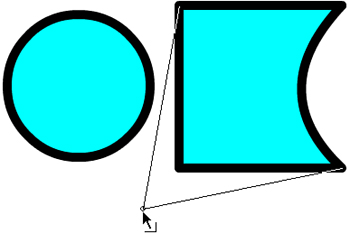
| 7. | You've seen the cursor communicate what will happen when you click and drag. Now you can use the Selection tool to simply select something. For instance, clicking anywhere on the circle (the line or the fill) selects the entire Drawing Object. However you can select just the line portion of one side of the square by clicking it.
| 8. | With part of the square's stroke selected, notice that the cursor adds the "move" symbol (when you're near the selected line). Click and drag now, and you can move the stroke. You can also just press Delete to remove that line portion. Do so now.
| 9. | Deselect everything (by clicking a blank area onscreen or pressing Esc) and this time double-click on what's left of the square's stroke. When you double-click a stroke, you select the entire stroke. At this point, you could move or delete the stroke. Just leave it for now.
| 10. | The circle was easy to select because it is a Drawing Object. Because the square is just a regular shape, if you click the fill, you select just the fill. If you click the stroke, you select just one side. If you double-click the stroke, you select only the stroke portion. However, if you double-click the fill of the square you should find that the entire square is selected. Now you can move or delete the square. In fact, you could even select Modify, Combine Objects, Union to turn the square into a Drawing Object. (Don't bother though.)
| 11. | Another way to select the square is to marquee it. With the Selection tool still selected, click outside the square and drag until you you've drawn an imaginary rectangle that surrounds the square entirely. When you let go, the square becomes selected.
| 12. | Sometimes the arrangement of other shapes onscreen makes the marquee technique difficult or impossible. Notice in 2.23 that you can't marquee just the square without selecting part of the circle. In fact, there's a preference (Edit, Preferences, General) called Contact-sensitive Selection and Lasso tools but that setting doesn't affect selecting shapes (only Drawing Objects, grouped shapes, and symbols covered in Hour 4). To select the square in such a sticky situation as Figure 2.23, you could simply double-click the fill of the square. However, there's another tool you can use to do this: the Lasso tool.
Figure 2.23. Sometimes using the marquee technique would select more than what you want. 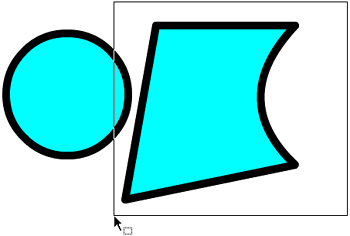
| 13. | Select the Lasso tool and then click and drag around a shape to select it. The Polygon Mode option for the Lasso tool makes the tool act almost like the Pen tool (though I get the feeling the Polygon Mode behaves like a string or rubber band). Select the Polygon Mode option, as shown in Figure 2.24, and click and let go. Then click and release in a new location to extend the selection. Continue to extend the selection and then double-click when you're done. (In this case, double-clicking the fill would probably be easier, but often when you're selecting several objects, you need to use this method.)
Figure 2.24. The Polygon Mode option for the Lasso tool lets you click for each corner of the selection you want to make. 
| 14. | Finally, you can decide to select just a portion of a shape. Suppose you want to chop off the top of the square. You can use either the Lasso tool or the marquee technique with the Selection tool to select the portion desired (see Figure 2.25). If you want to select just part of the circle you need to first double-click (to enter the drawing object) and then you can select the contained shapes as normal. Just remember to get back to your main stage by clicking the left-arrow in the address bar.
Figure 2.25. Using the Selection tool to marquee just part of a shape chops off the top of the circle in this case. 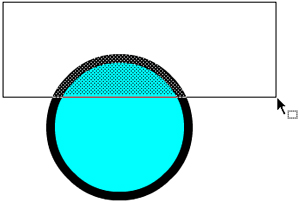
|
You use the Selection tool to employ the marquee technique. If you click and drag an object, it moves or bends. However, when you click the Stage where there are no objects, you see a rectangle appear while you drag (this is the marquee). You can draw that rectangle around other objects, and they will be selected when you let go. Using this marquee technique to select objects is often easier than clicking to select objects. You'll learn how to modify what you've selected in the next section, but at this point, you have the fundamental selection techniques under your belt. More advanced techniques are discussed in Hour 5, but the best clue as to what will happen if you click is to notice the cursor change. You'll find many places in Flash where the cursor is attempting to communicate information to you. For example, you can draw a line and see the same cursor changes discussed in the preceding task. The Dropper Tool One of the easiest ways to modify what you've drawn is to simply change the color. For example, the Paint Bucket tool can change a fill's color, and the Ink Bottle tool can change a stroke (its color and other attributes). This works fine when you make the effort to first select the fill color, for example, and then select the Paint Bucket tool and click a fill to change it. Sometimes, however, you want one fill to match the color of another. The Dropper tool lets you sample a color from an object that is already onscreen. The cool part is that it actually samples more than just color, as you'll see in the following task. Try It Yourself: Select Attributes with the Dropper Tool In this task you'll use the Dropper tool to select more attributes than simply color. Here are the steps to follow: 1. | Select the Oval tool, set the stroke height to 10, and draw a circle. Change the stroke height, the stroke color, and the fill color. Then draw another circle. Finally, change both the stroke and fill color settings and draw a third circle.
| 2. | At this point, if you wanted the second circle to have the same fill color as the first circle, you would just have to change the fill color. If you remember the color, you're in luck. However, better than relying on your memory, you can select the Dropper tool. Notice how the cursor changes to include a brush when you're over the fill of the first circle, as shown in Figure 2.26. This indicates that if you click, you'll select the fill attributes of this shape.
Figure 2.26. The Dropper tool changes its cursor to indicate that it will sample a fill when you click. 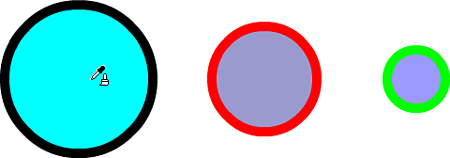
| 3. | With the Dropper tool, click the center of the first circle. Not only does the fill color change to the sampled fill color, but the Paint Bucket tool also becomes active. You can now fill the second circle with the color sampled by the Dropper tool.
| 4. | If you want to match the strokes on both circles, you could use the Ink Bottle tool, but you would have to set all the attributes manually. Better than that, you can use the Dropper tool to sample all the stroke's attributes in the first circle. Select the Dropper tool and move it near the stroke of the first circle. Notice that the cursor changes to include a pencil (see Figure 2.27). This indicates that you'll be sampling the stroke (or line portion) of that shape.
Figure 2.27. The Dropper tool changes its cursor to indicate that it will sample a stroke when you click. 
| 5. | Click to sample the stroke, and you see the stroke attributes update in the Properties panel. Also, the Ink Bottle becomes active, so you can click the second circle to change its stroke. The thing to remember is that the Dropper tool samples all attributes, not just color.
|
Transforming Scale, Rotation, Envelope, and Distortion You've seen how to bend, extend, and move shapes by using the Selection tool. You've seen how to change shapes that are already onscreen by using the Ink Bottle and Paint Bucket tools. There are still more ways to modify the objects you select. The Free Transform tool is your key to even more modifications. Basically, you just have to select an object with the Free Transform tool active. Four options appear any time you use the Free Transform tool and have an object selected. You can also find these options by selecting Modify, Transform. In the following task, you'll experiment with these options. Try It Yourself: Transform Drawn Objects In this task you'll explore the four basic options for the Free Transform tool. Follow these steps: 1. | Use the Rectangle tool to draw a square. Select the Free Transform tool and double-click the center of the square to select it entirely. (Interestingly, the Free Transform tool can perform many selection tasks.)
| 2. | At this point none of the four options should be selected (see Figure 2.28). This means you're in Free Transform mode, and if you have a steady hand, it's possible to rotate, scale, or distort the shape.
Figure 2.28. When an object is selected, you can choose the Free Transform tool's Scale option. 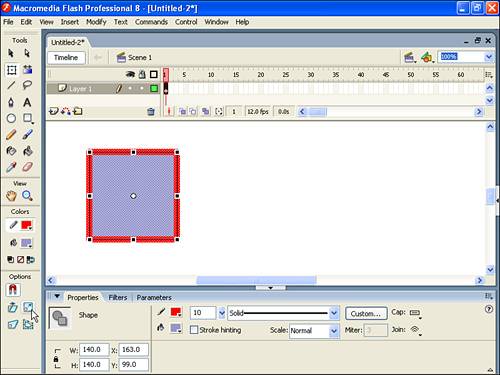
| 3. | Explore the possibilities by rolling your cursor over the square handles at the corners and sides of the shape but don't click yet. Depending on where you move your mouse, the cursor changes to two versions of the Scale option, as well as Rotate and Skew (as in Figure 2.29). Actually, if you hold down Ctrl, the corners make the cursor change to the Distort option.
Figure 2.29. Depending on which handle you grab and which option is selected, you can use both Scale and Rotate to modify the shape in multiple ways. 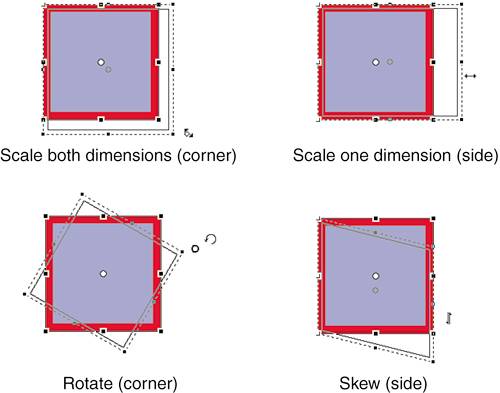
| 4. | Free Transform mode can be really touchy, so let's go through the options individually. The selected object shows square handles in the corners and on the sides. Notice that the cursor changes when you roll over these handles. The corner handles let you scale both width and height equally and at the same time. The side handles let you change just width or just height. Click and drag a corner handle to change the scale. Notice that this version of Scale (compared to Scale in Free Transform mode) maintains your shape's proportions (horizontally and vertically). Now drag a side handle, and you change just the width.
| 5. | Make sure the square is still selected and choose the Rotate and Skew option. Now the corner handles rotate; side handles skew. Roll your cursor over the handles to see the cursor change.
| 6. | Click and drag a corner handle and notice that you can rotate the square. Actually, if the default Snap to Objects option is selected (that is, if the magnet button is pressed in, as shown in Figure 2.30), the object snaps into place at 15-degree increments. (You'll learn more about this later in this hour.)
Figure 2.30. If Snap to Objects is turned on, when you rotate an object, it snaps to logical positions, such as 45 degrees. 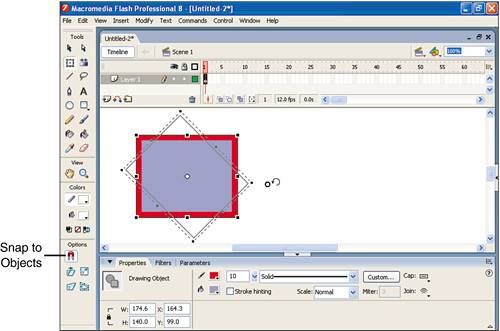
| 7. | Select the Distort option. Drag the shape by the handles on the corners to distort. It turns out that the Selection tool can create the same effect as Distort, but only when the shape itself has a corner to grab. Without this Distort option, you would find making a distorted ellipse nearly impossible. Finally, try holding down the Shift key when you distort (by dragging a corner handle). This way, you can distort two sides evenly.
| 8. | Finally, the wildest of transformation options Envelope. To best understand this option, draw a new square, select the Free Transform tool, and click the Envelope option. When your shape is selected, you see many handles. Move the square handles to "influence" the shape. It's as though the shape tries to touch all the squares, even if they're pulled out to one side. The circle handles are like the tangents created when you draw by using the Pen tool. They control the rate at which a shape bends to reach the square handles.
|
Handles are little white squares that provide a way for you to stretch, rotate, or otherwise transform a selected object. When you select an object, it is either highlighted or appears with a box drawn around its edges. When you select the Free Transform tool's Scale or Rotate and Skew options, for example, handles are added to the selection. Different handles often have different functions, but the cursor change is your best clue as to exactly what will happen when you click. Don't overlook the fact that you can select more than one shape or object and then transform everything that is selected in one move. Also, you can find all the tools explored in the preceding task by selecting Modify, Transform. You can find still another way to do all these things in the Transform panel. The Transform panel lets you rotate or skew any selected shape. You can also remove transformations immediately after making them by clicking the Reset button in the Transform panel (or by using the keyboard shortcut Ctrl+Shift+Z). Finally, there's a really interesting button, the Copy and Transform button, in the Transform panel. This button duplicates the selected object and applies the most recent transformation every time you click it. The result is a "spirograph" effect. Using Snap to Objects to Connect Shapes One of the most profound features in Flash is the way Snap to Objects helps you draw. By simply selecting View, Snapping, Snap to Objects (or clicking the magnet button in the main toolbar when the Selection or Free Transform tools are active), you can draw perfectly round circles, perfectly horizontal or vertical lines, and much more. The visual clue that Snap to Objects is helping you is the dark ring that often appears next to your cursor while you drag. When you see that ring, you know Flash is trying to help you draw. You might already know from using other software that holding the Shift key constrains your cursor similarly to Snap to Objects. But Snap to Objects can do much more. In addition to helping you draw perfect shapes, Snap to Objects also allows you to connect two shapes. It's much more than simply making two shapes touch they actually become bonded. In Flash, unless two shapes have been snapped together, they might look connected when they actually aren't. For example, you'll draw an arrow in the following task, but unless the arrow head is snapped to the arrow's body, it might not remain visually connected when you scale it larger. After a shape is snapped to another, it's forever connected. Try It Yourself: Use Snap to Objects to Draw Perfect Shapes and Connect Objects This task walks you through some of the amazing ways Snap to Objects helps you draw. Here are the steps: 1. | Confirm that Snap to Objects is selected in the View, Snapping menu, and then select the Rectangle tool. While you click and drag, if you're anywhere close to drawing a perfect square, you see the dark ring appear near your cursor (see Figure 2.31).
Figure 2.31. If Snap to Objects is turned on, while you're dragging with the Rectangle tool, a dark ring appears, to help you create a perfect square. 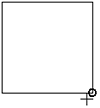
| 2. | Select the Line tool and draw a line at a 45-degree angle elsewhere on the Stage. This time you have to hold Shift as you draw the line to constrain it to 45 degrees.
| 3. | Connect the top of the line to a corner of the square. To do so, select the Selection tool and make sure before you click and drag the end of the line that the cursor changes to show the corner tail. You can then click and drag to extend the line, and you see it snap to the square. Keep dragging and notice how the line can snap to a corner or a side. (There are several different logical locations on the square.) Snap the line to a corner.
| 4. | The last step probably changed the angle of your line, so select Edit, Undo (or press Ctrl+Z) and try again. This time, single-click the line to select the whole thing; then click the end of the line and drag to move it. You should be able to snap the end of the line to the corner of the square (this time without changing any angles). The only touchy part of this step is that, when the line is selected, if you don't pick up and drag the line from the end point or the middle, you don't see the dark ring. If you don't see the dark ring, you need to let go and try picking up the line again.
| 5. | Now draw near the diagonal line two lines that are almost parallel to it.
| 6. | Use the Selection tool to extend (by dragging) the end points of the two lines. Extend one end to connect to another corner of the square and extend the other end to the end of the 45-degree line, as shown in Figure 2.32.
Figure 2.32. You can extend lines to connect end points by dragging. 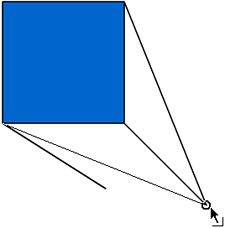
| 7. | To prove that everything is truly snapped together, use the Selection tool to drag the corner point where all three lines merge. If everything is snapped properly, all three lines move at once and don't disconnect from the object to which they're snapped.
|
The preceding task gives you just a taste of how you can create perfect shapes by using Snap to Objects. Consider, for example, vertical and horizontal lines. If you select a vertical line, select it, and then pick it up from the center, you can snap it to the right end of the horizontal line. Then you can just drag the point of intersection to the right while remaining constrained to the same horizontal line (which the dark ring will help you do). A perfect arrow is created! In Appendix A, "Shapes You Can Make in Merge Drawing Mode," I show you how to create several sophisticated geometric shapes by using Snap to Objects. Another related snap feature is called Snap Align. Snap Align creates dashed vertical and horizontal lines that appear when you're dragging an object (shown in Figure 2.33). When you select View, Snapping, you find settings to edit or disable Snap Align. Figure 2.33. Snap Align helps you align objects with intuitive and subtle dashed lines. 
If you select View Rulers, you can click in a ruler and drag it onto your Stage to create guides. If View, Guides, Snap to Guides is selected, you can draw objects that are lined up with and connected to the guides. The guides are just for your use they're invisible to your audience. Finally, if you ever find Snap to Objects or Snap to Guides distracting, remember that you can turn it off. Maybe you want to draw two lines really close, but you don't want them to snap together. In addition, you can control the sensitivity of Snap to Objects or Snap to Guides (and other ways Flash tries to improve your drawings) by selecting Edit, Preferences to open the Preferences dialog box and then selecting the Editing tab. |