File Size Considerations
| < Day Day Up > |
| The fastest way to lose your audience members is to make them wait a long time for a movie to download. In a minute, you'll see how to calculate how long a movie takes to download. An even simpler formula, however, is this: The faster the movie downloads, the better. Even as Internet connections are speeding up (with technologies such as DSL and cable modems, for example), the reality is that the majority of your potential audience members are still connected via dial-up connections (56kbps modems or slower). Even if you decide to target only those people with fast connections, there's no reason to create movies that are larger than absolutely necessary. The natural tendency is to push the technology to the limit and then push it a little further. If you fill a storage closet to capacity and then you are given a larger closet, most likely you will just fill the new closet and think you need even more room this is natural. Just because you can make large Flash files doesn't mean you should. Calculating Download TimesIt doesn't take any fancy math to estimate how long a file takes to download. You just need to know how big the file is and the rate at which it downloads. This is similar to estimating how long it takes to travel in a car; you just need to know the total distance and the speed of the car. For example, if the total distance is 30 miles and your rate of speed is 60 miles per hour, your trip should take one-half hour. Total distance in miles divided by miles per hour equals time in hours:
Applying this formula to download times is similar:
A file size that's 10 units big downloading at 5 units per second will download in 2 seconds. That was easy! We didn't even have to talk about bits, bytes, and kilobytes. All these terms refer to different units like inches and feet or dollars and pennies. The formula works the same as long as the units for file size and rate are the same. A car traveling 100 kilometers per hour will travel 50 kilometers in one-half hour. We'll eventually discuss bits and bytes, but for now, just keep the size / rate = time formula in mind. In reality, you can only estimate (not calculate) how long it takes to travel somewhere by car because speed varies slightly, depending on factors such as traffic and weather conditions. The same is true with Flash movies because download speeds vary. Just because you have a 28.8 modem (which, in theory, downloads 28 kilobits per second) doesn't mean an image that is 100KB (that is 800 kilobits because 1 kilobyte is 8 kilobits) downloads in 28 seconds (that is 800 Kbps/28Kbps = 28 seconds). Depending on several factors, including Internet congestion and the performance of the web server, the file might take longer to download. If the actual rate of download is only 23Kbps, for example, that 100KB file will download in 34 seconds. When it comes to calculating download times, realize it's always just an estimate. What's Big? What's Small?The formula to estimate download speed can be summed up as this: the bigger the file, the longer the download time. Therefore, a goal to reduce download time is really a goal to reduce file size. In the following sections, you'll learn which Flash features tend to create larger files and, more importantly, you'll learn alternative techniques to achieve the same effect with less impact on file size. Although a few Flash features should certainly be avoided at all costs (such as the Modify, Shape, Soften Fill Edges feature), you don't need to avoid features that increase file size you just need to use them only when they're needed. Lines Take Up Less File Space Than FillsWhen you draw either a fill or a line, Flash stores the math required to display your drawing. In the case of fills (drawn with the Brush tool, for example), information is stored for all sides of the shape. You can change just one side of a fill, as shown in Figure 21.1. A line, however, doesn't really have sides it has two end points, but no thickness. Suppose you draw a green line and give it a stroke of 10. Flash stores just the line, the stroke, and the color. Flash doesn't really store the thickness only that the line needs a stroke applied to it. The same shape drawn with a brush would require Flash to store information about all sides of the shape. In this case, think of a simple line as a four-sided shape. Check out Figure 21.2, where I drew two lines, turned one into a fill (by selecting Modify, Shape, Convert Lines to Fills), and then selected everything with the Subselect tool. You'll see that there are many more anchor points in the fill, meaning it will result in a larger file. Figure 21.1. Fills take up more file space than lines because Flash must store information about all sides of the shape (whereas lines have no thickness). Figure 21.2. The line on the right was converted to a fill. The Subselect tool can be used to see the additional complexity of the fill. Breaking Apart Text Can Increase File SizeWhen you select a block of text and choose Modify, Break Apart (actually, choosing Break Apart twice when you have more than one character), the text turns into a shape. Besides the fact that you won't be able to edit the text after it's broken apart, the file size usually increases because Flash stores all the curves in every character of the text. Actually, leaving the text alone also requires that the font outlines be stored as well but that's handled by the font itself, which tends to be very efficient. For example, the letter i might appear twice in the text Phillip, but it's only stored once in the font. If this word were broken apart, Flash would store the letter i each time. Broken-apart text will almost always add more file space than regular static text. Suppose you have a paragraph of text. Likely, breaking it apart will make your file bigger because Flash must save the shape information for all the characters. However, suppose you have one special font you use for a single character. If you break apart just that letter, you might find that your file is actually smaller! That's because when you use just one character (in static text), the necessary information Flash stores for that font might be more than the shape information had the character been broken apart. The upshot is that if you are using the same font in several places in a movie or if you have a lot of text (in the same font), you shouldn't break it apart. However, if it's used for just one character, you'll probably want to break it apart. (Later this hour, you'll learn ways to measure the difference so that you can just compare the effect of one method over the other.) Of course, the decision between broken-apart text and regular static text needs to include other considerations (such as whether you're absolutely sure you'll never need to edit the text again or you definitely need a shape in order to do a shape tween). Dynamic and Input Text with Embedded Fonts Can Be LargeThere are times when you don't have a choice between using broken-apart text and using static text. If you're using dynamic or input text, there isn't an option to break it apart (otherwise, the text wouldn't be changeable anymore). As you first learned in Hour 5 "Applied Layout Techniques" (and then again in Hour 16), when you use dynamic or input text, you have options as to which font outlines to include (if any). Figure 21.3 shows where you can choose to include font outlines. It's worth mentioning again that you shouldn't embed more font outlines than absolutely necessary because that adds significantly to the file size. Figure 21.3. Including font outlines is necessary when you want a dynamic field to display custom fonts but it adds significantly to the file size. The three situations that justify embedding fonts are
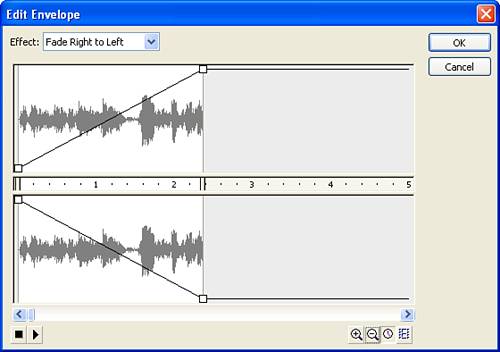
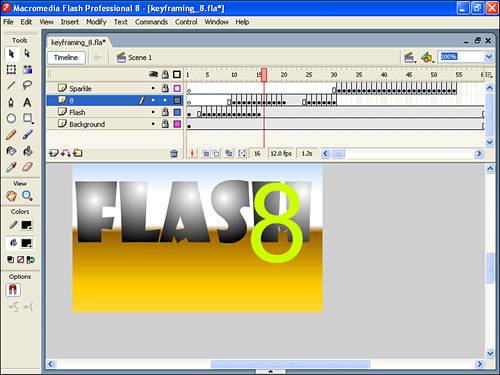
Finally, remember that when you do need to embed a font, embed as few glyphs as possible. For example, embed just the numerals 0 9 and a colon (:) if you're displaying the time. Shape Tweens, Motion Tweens, and Keyframes All Affect File SizeIgnore, for a moment, the visual and functional differences between using the different types of tweens and using keyframes for animation. Generally, shape tweens add to file size most significantly. The difference between using motion tweens and multiple keyframes is not so cut-and-dried. Basically, you want the fewest keyframes possible. A motion tween, however, requires Flash to effectively create in-between keyframes (even though you won't see them). In reality, if you use a motion tween to move a circle across the screen with a keyframe on Frame 1 and another on Frame 10, the effect would be the same as using 10 individual keyframes. (Of course, in either case, you would be using an instance of the Circle symbol, so there wouldn't be multiple copies of the shape.) Basically, using frame-by-frame animation conservatively and using motion tweens are about the same. However, when using frame-by-frame animation, you might find that you can pull off the same effect with fewer frames. Not only can this make the movement look more believable, but when fewer frames are used, you get a smaller file size. And just so I don't have to return to this point later this hour (when we look at performance optimization), frame-by-frame animations tend to perform better than tweens. To sum this up, avoid shape tweens and (in all cases) look for ways to use fewer frames. Take Optimization with a Grain of SaltAlthough the preceding tips (and those that follow in this hour) might seem like rules to live by, it's worth remembering that the file size creating features of Flash do have useful purposes. For example, there's nothing like a shape tween to get a morph effect. Just because shape tweens tend to add to file size doesn't mean you can never use them. Look for alternatives where appropriate, but feel free to use shape tweens when you have to. When you know which features tend to affect file size, you can make more educated decisions. These tips provide a good starting point. Later this hour you'll see how you can calculate the file size impact of each feature. Sounds and BitmapsSo far in this hour there has been no mention of sounds and raster graphics (such as .jpg and .bmp files). They have such a huge impact on file size that the following sections are devoted to studying them. The file size savings you gain from other tips (such as using lines instead of fills and Movie Clip instead of Graphic symbols) pale in comparison to the significance of managing sounds and bitmaps. That's not to say that text and vector graphics don't matter, but sounds and bitmaps are more significant. Anything you can do to reduce their size will result in a major savings in the file size of a movie. SoundsFlash provides several ways to compress audio and bitmaps. You saw that these compression settings are specified individually via the Library item properties for each imported bitmap or sound in Hour 3, "Importing Graphics into Flash," and Hour 10, "Including Sound in Animations." You'll also see in Hour 24, "Publishing a Creation," how you can set compression settings for all imported bitmaps and sounds at once via the Publish Settings dialog box. Although you know where to set the compression settings, you might not fully understand how this affects your movies. Different types of compression exist. For audio, you should always use MP3 or Voice. Although Flash supports ADPCM, you should only use this if you are publishing your movie as Flash 3 or lower. (That is, you want the audio in your movie to work for people who have only the Flash 3 player.) If you happen to be delivering your movie to run only on your hard drive (maybe you're creating an enhanced slide presentation that you're not distributing via the Web), you can specify no compression (that is, use Raw). Barring those two situations, MP3 is the best choice. A simple relationship exists between quality and file size. You learned how to set the compression settings individually for just one sound in Hour 10. Basically, you try one setting and listen to how it sounds. As you try greater and greater levels of compression, you'll both hear the difference and see the file size change. It's just a matter of balancing these two priorities good quality and small file size. There are a couple additional ways to optimize sounds. The easiest one to remember is that stereo sounds are twice as big as mono sounds. Therefore, you should let Flash always convert stereo to mono, unless you truly need stereo. Keep in mind that you can still use stereo panning effects on sounds that are mono. When a frame with sound is selected, you can use the Effect feature, you can use preset effects (such as Fade Right to Left), or you can make your own effects to give a mono sound stereo-like effects (see Figure 21.4). Figure 21.4. The Edit Envelope dialog box (accessed from the Properties panel) lets you create panning effects using mono sounds.
Another great way to reduce the impact of sounds on file size is to trim excessive silence from the beginning and end of every sound. It's customary for audio engineers to pad every sound file with a little silence. However, sounds take up the same file space for every second they're played, regardless of whether they're audible (although compression tends to counteract this). Ideally, sounds should be trimmed before they are imported, but you can trim them inside Flash through the Edit Envelope dialog box. You can review this technique in Hour 10, but for now remember that it means smaller file sizes. For example, by trimming excessive silence in a particular sound, in a recent project I cut the sound by 10 percent. That may not seem like a lot, but because sounds can be very large, 10 percent of a large file can be significant. What's more, because I just trimmed out the silence, I didn't lose anything. Consider, too, that a long fading-out sound could be trimmed and you might not notice the difference because the volume is so low there. BitmapsYou can reduce the file size impact of bitmaps in several ways. First of all, consider not using bitmaps at all. Although this might seem like a flippant tip, it's worth thinking about. Of course, you should avoid any unnecessary raster graphics (.jpg, .gif, .bmp, and so on) because each pixel's color is saved in the file, unlike with vector graphics, which store only the math necessary to redraw the shapes. However, certain types of images (such as photographs) only work as bitmaps. Therefore, it's not always a matter of choice. In addition, if you want a bitmap with transparency (also called an alpha channel) .png is the only alternative. One big warning: Using Modify, Bitmap, Trace Bitmap, as explored in Hour 3, does convert a bitmap into all-vector shapes. However, you should use this feature only when the bitmap contains clear and bold sections. If you find it necessary to set the Trace Bitmap dialog box to draw lots of tiny vector shapes instead of large, bold areas, as shown in Figure 21.5, you'll probably end up creating a vector version that's larger than the original bitmap. People tend to think that vector graphics are small and bitmaps are large, but taken to an extreme, vectors can be quite large, too. Therefore, use Trace Bitmap only when the content of your image file is better served as a vector that is, it contains bold geometric shapes. (Of course if you're trying to achieve a particular special effect, Trace Bitmap can be used just realize the potential file size impact.) Figure 21.5. Using Trace Bitmap on a photograph would require such small values for Threshold and Minimum Area that the image would increase in size.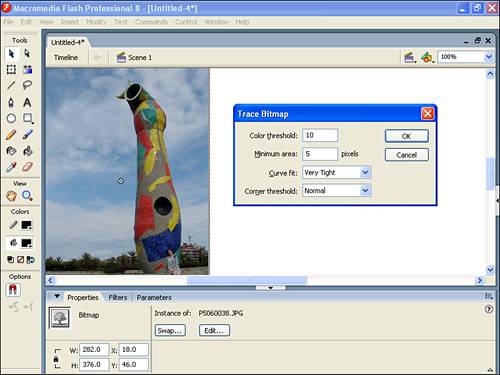 Importing High-Quality Media and Then Compressing ThemAs a bit of a review, I think it's worth mentioning the difference between the bitmap export options. Although it might seem counterintuitive, it's best to start by importing the highest-quality sound, video, and bitmapped graphics possible. This will certainly add to the file size of your source .fla. However, you can let Flash do the compression before publishing your movie. Either through the properties for individual sound and bitmap items in the Library or through the Publish Settings dialog box, you can control how much Flash compresses your media. For example, instead of converting an image into a compressed .jpg before importing it into Flash, try to start with the best-quality uncompressed .bmp or .png file. After it's imported, you can specify how Flash is to compress it upon export. This way, you can always decide how much to compress it. If you start with something that's already compressed (and therefore lower quality), you can't make it any better inside Flash. High-quality sounds should start as .wav or .aif format (MP3s are already compressed). Raster graphics should be .bmp, .png, or .pct format. (Note that .jpg files are always compressed at least a little bit and .gif files always have 256 or fewer colors.) However, if you have a sound or an image that's already compressed (such as an .mp3 or .jpg file) and either you don't have access to a better-quality original or you're confident that the current compression is ideal, there's no need to first covert it to another format. For example, you might have used the Selective JPEG Quality feature in Fireworks to make a great-looking and small JPG. In these cases, just import the image as is, but make sure that Flash doesn't recompress it. For imported compressed images, you see the option Use Imported JPEG Data in the Library item's properties. Using this option prevents Flash from recompressing the file. The only time to recompress an image that's already compressed is when you have no access to the original. Compressing a compressed image will indeed bring the file size down, but the quality will be lower than if you had simply compressed it to the same level once by starting with a high-quality original. Using the Bandwidth ProfilerNow that you understand how to manage file size by compressing audio and bitmaps and using certain drawing techniques, you need to measure the impact of each. Even if you know audio adds to file size, you still might want to use it. Your decision, however, needs to be based on how much file size the audio adds. If it means the user will simply wait a couple extra seconds, adding audio may be worth it. However, if adding a piece of music means the user waits 10 minutes, you probably shouldn't use the music. In order to decide whether a particular media element is worthwhile, you need to know how much it affects file size. The Bandwidth Profiler helps you assess exactly how much each media element adds to a file's size. Basically, you try out a file size reduction technique (such as compression) and then use the Bandwidth Profiler to judge how much the change helped. If you make another change, you use the Bandwidth Profiler again to measure the improvement. The previous sections taught you how to identify ways file sizes grow; this section will teach you how to measure the impact. Turning on the Bandwidth Profiler is easy, but deciphering the data it provides is a bit tricky. The following task introduces you to the basic features of the Bandwidth Profiler. Try It Yourself: Use the Bandwidth Profiler to Judge Download Times In this task you'll learn how the Bandwidth Profiler can help you assess how a movie might play over the Internet. Here are the steps to follow:
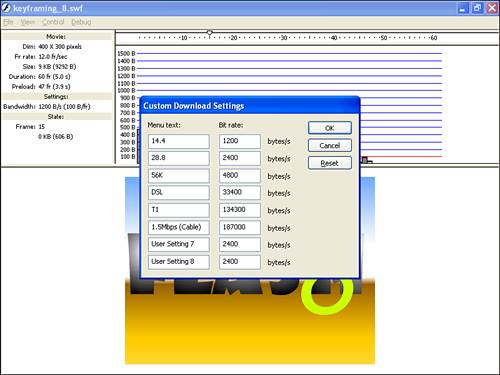
Use the Bandwidth Profiler's Simulate Download option to watch how the movie will play. Analyze the movie frame-by-frame by scrubbing to view which frames are exceeding the red streaming limit. By the way, just because a vertical line is above the red line doesn't necessarily mean playback will pause at that frame. When possible, Flash starts to download frames before they are encountered. For example, several frames might not involve any onscreen changes, but Flash is still downloading. While displaying these frames, Flash can start to download frames from later in the movie. Frames that have no visual changes don't take long to download; therefore, Flash can concentrate on downloading future frames. This behavior is called advance streaming (though, I'd prefer to call it buffering). The Bandwidth Profiler has an option to show such streaming behavior in a graph that is similar to the Frame by Frame Graph view. When you select View, Streaming Graph, you'll still see each frame's vertical box. Basically, each frame is shown as alternating light and dark gray boxes. The red horizontal line represents the maximum data that can be transmitted in the time one frame takes to play (that is, 1/12 second if you have a frame rate of 12 fps). If the first frame (dark gray) can download in less than 1/12 second, you'll see Frame 2's bar in dark gray stacked on top of Frame 1's light gray bar. For example, open the keyframing.fla file again and use Test Movie, select View, Streaming Graph, and select View, Download Settings, 56K. As you click on any of the first several gray or black rectangles, each of the first 13 frames takes 1/12 second or longer to download. But then in the time it takes to play Frame 28 or 29, Flash can download more than two frames (see Figure 21.9). As a result, the entire 60-frame movie is completely downloaded in the time it takes 25 frames to display. (Select View, Show Streaming for a view of this effect in real time.) Figure 21.9. The Streaming Graph view (not Frame by Frame Graph view) displays how quickly Flash will preload upcoming frames.
The Bandwidth Profiler is very useful. However, it doesn't fix problems; it only helps you discover problem areas. Ideally, you should simply avoid making your file too large in the first place. The Bandwidth Profiler is still worth learning to use, but just remember that it's only for identifying problems that could be avoided. The following task steps you through a scenario of using the Bandwidth Profiler to help identify a problem and solve it. Try It Yourself: Reduce a File's Size with the Bandwidth Profiler's Help In this task you'll use the Bandwidth Profiler to help improve a file's size. Follow these steps:
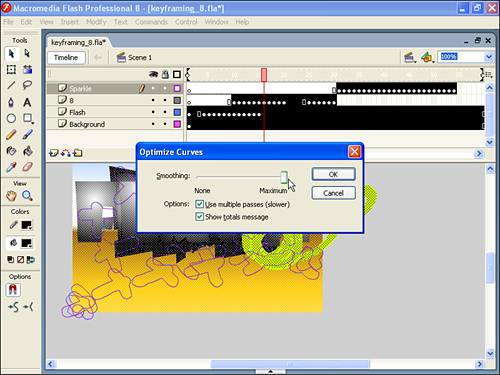
Although the big lesson from this task might be that using Modify, Optimize can often reduce the file size (simplifying shapes), you're still just in the stage of finding problems. For now, just realize that the Bandwidth Profiler helps find the problems, not necessarily fix them. You can find a related feature worth knowing about by selecting File, Publish Settings to open the Publish Settings dialog box, selecting the Flash tab, and clicking the option Generate Size Report, as shown in Figure 21.12. The next time you export the movie (by using Test Movie), you'll see an all-text version of the data from the Bandwidth Profiler appear in the output window. In addition, you'll find a text file (named similarly to your movie's name and in the same folder) with the same contents. This provides a permanent record of the data you find in the Bandwidth Profiler. Figure 21.12. The Publish Settings dialog box option Generate Size Report will export a text version of data gathered from the Bandwidth Profiler.
Finally, the keyframing.fla example still pauses periodically during the first 20 frames when you simulate a 14.4Kbps modem. If your target user would have that type of speed, and you can't find any other way to reduce the file size, you'll have to resort to using a preloader, which will load all or part of the movie to your user's hard drive before playing it. The following task shows a quick way to do that. Try It Yourself: Use a Preloader in the Bandwidth Profiler To get a sense of how the Bandwidth Profiler works, in this task you'll create a basic preloader to pause playback on the first frame of a movie until most of the movie is downloaded. Here are the steps:
The preloader you built in Hour 20, "Designing a Website to Be Modular," was more sophisticated than the preloader you created in the preceding task. However, this was a good opportunity to use the Bandwidth Profiler. Improving the Download ExperienceI've never heard someone say they enjoy waiting for Flash movies to download, so anything you can do to improve the experience is worth considering. For example, in the previous example a user might find something else to do while the movie preloads. In that case, he could actually miss the entire animation if he didn't get back right in time. Perhaps a better design would be to insert a third frame in the Preloader scene (where the user won't reach until it's fully loaded) and a stop() script plus a button labeled Begin. When the user clicks it, only then would he proceed to the main animation. Another idea is to modularize your movie by using LoadMovie and LoadSound (introduced in Hour 20). Sometimes it's fine to keep everything in your main movie and have the user wait for it all (like in the previous task). The advantage here is that after it's all downloaded, there are no more delays. However, when you have a ton of media, it makes more sense to spread out the delay so that every time the user requests an image or sound, only then does he have to wait for it to download. Besides spreading out the delays, some users might not want to see every bit of content, so there's no reason to force them to sit through a download. Both these tips are very general, but you can even steal ideas from real life. Think about those coloring placemats restaurants often give kids. Some Flash sites create a simple puzzle to placate users during the initial download. The point is that, if you make these considerations at the start of your project, you can usually hide or minimize the negative side of slow downloads. |


| < Day Day Up > |
EAN: 2147483647
Pages: 235