Using Flash Inside a Larger Website
| < Day Day Up > |
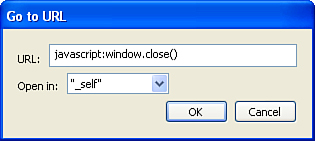
| Although you can create a website entirely in Flash, sometimes it's not necessary or even desirable. Often you'll just want to use Flash to supplement a more conventional website. In the following sections, you'll learn several ways to use Flash within a larger website. This should help spark some ideas that you can use in your own site. Pop-up WindowsYou can supplement a plain HTML website by simply including a link to a Flash web page. Imagine a web page that has text, images, and a simple hyperlink (in HTML, A HREF) that points to a page you created with Flash's Publish command. This is the basic hyperlink you've seen a million times on the Web. Somewhere in your HTML file you include this: <A HREF="published.html">Click for Flash sample</A> This creates a line of hypertext on your website that, when clicked, opens up the HTML file that contains your published Flash movie. You can even make this link cause the Flash site (in this case, published.html) open up in a new (blank) window: <A HREF="published.html" target="_blank">Click for Flash sample</A> If you're creating your web page by using Macromedia Dreamweaver, you simply use the Properties panel to specify the link and target settings, as shown in Figure 19.7. The Link and Target fields are equivalent to the URL and Window fields, respectively, in the getURL parameters of Flash. Figure 19.7. Using Dreamweaver, you can turn text into hypertext via the Properties panel.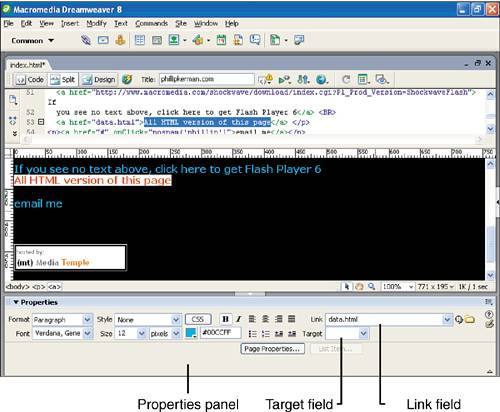 Okay, so that's easy enough. You can add some sophistication to this link from a regular site. The preceding methods simply cause the browser to hyperlink to another page (perhaps in a new, blank window). However, one technique that might be appropriate is to pop up a new browser window that has specific features. For example, the pop-up window can be sized to your specifications instead of being the same size as the current browser window. You can specify other features to remove or disable certain browser attributes (such as resizing, viewing the buttons, and so on). This involves a little JavaScript (which I won't explain in detail but will provide here) attached to a line of hypertext. Here's an example: <A HREF="#" script language="JavaScript" onMouseDown="window.open('animation.html', 'thename', 'width=300,height=335');"> click here!</A> The key portion of this script is window.open(). The first parameter is the filename you want to open (in this case, animation.html). The second parameter is the arbitrary name you're giving this window, and the third parameter is a string full of the features you're including. In this case, only the width and height are specified (in pixels). (You can find more features that can be included here in a good JavaScript reference.) If you want to let the user close the window that has popped up in another way besides using the browser's close button, you can provide some simple JavaScript to perform the task. For example, you can make a Flash animation file called animation.fla, with the movie size set to 300_300, and then publish it to .swf and .html files. Then you can open the HTML file you created (animation.html) by using a text editor (such as Notepad). At the very end of the file are these lines: </OBJECT> </BODY> </HTML> You're simply inserting some JavaScript (to close the window) between </OBJECT> and </BODY>. Here's the result: </OBJECT> <A HREF="#" script language="JavaScript" onMouseDown="window.close();">Close</a> </BODY> </HTML> Note that although the movie is 300x300, the window.open code creates a window that's 300x335 to make room for the hypertext (Close). This shows how a little JavaScript in an HTML file can close a window, but what does it have to do with Flash? Not much, except that it's an effect you may want to try. However, let's now look at a technique that lets you execute JavaScript from inside Flash. For example, what if you want a button created in Flash that executes the window.close() code? There are two basic ways: the "javascript:" method which works when you publish to Flash Player 6 or 7, and the new ExternalInterface object. You can simply use the Go to Web Page behavior and, in the field for the URL parameter, type javascript:window.close() (see Figure 19.8). All you do is start with javascript: and follow with the actual JavaScript code! This technique works pretty well on all the modern browsers. Figure 19.8. You can send code through the Go to Web Page behavior. Just precede the actual code with javascript:.
The new ExternalInterface object approach is much more elegant, but does require a bit of code. The advantages, however, include the fact it's much easier to pass parameters. For example spawning a new window via window.open is very tricky using the javascript: method. To trigger JavaScript directly from inside a Flash 8 .swf you use the call() method but you need to first import the ExternalInterface class. Here's code you can put right on the button instead of the Behavior: on(press){ import flash.external.ExternalInterface; ExternalInterface.call("window.close"); } The window.close() JavaScript is pretty simple it doesn't require any parameters. Where the ExternalInterface becomes easier is when you do need to pass parameters. For example the following code will let the button spawn a new window (like the code I showed earlier, but this code goes inside your Flash movie): on(press){ import flash.external.ExternalInterface; ExternalInterface.call("window.open", "animation.html", "thename", "width=300,height=335"); } One last detail related to pop-up windows: The HTML that the Publish feature creates is solid and works great. However, it's not necessarily what you'll want to use in every case. You'll learn in Hour 24 how to change the exact behavior of Publish. However, there's one tiny adjustment I make almost every time and it's especially applicable to the animation.html file used in the example. I would change the top part of the HTML file (<BODY bgcolor="#FFFFFF">) to this: <BODY bgcolor="#FFFFFF" leftmargin="0" topmargin="0" marginwidth="0" marginheight="0"> This edit simply positions the Flash movie with no margins. Without this adjustment, the 300_300 Flash movie would get cut off in a 300_300 window. (In Hour 24 you'll learn how this edit can be incorporated as the default so you don't have to make the edit by hand every time.) Including Flash Within HTMLThis hour you first learned how to publish a Flash movie (which created the .html and .swf files). Then you learned how to make links that let the user jump out of Flash. Finally, you learned how to make links from a plain HTML page to a Flash page (including popping up a sized window). So far, it might appear that the conventional HTML pages have been kept separate from the Flash pages. Actually, the "all-Flash" page you published was really an HTML page with nothing but Flash on it (no text or images). It's easy, and more practical, to have your HTML host more than just a sole Flash movie. You can have the Flash parts living along with the text and images of your regular HTML page. Here are the three basic approaches:
To add regular HTML to the file that Flash's Publish feature created, first open the .html file with a text editor such as Notepad or Simple Text. Then you need to decide whether you want the content you're adding to go above or below the Flash animation. If you want to put content above the Flash file, simply add it after the <BODY bgcolor="#FFFFFF"> tag and before the <OBJECT classid=...> tag. To add content under the Flash file, insert your content after the </OBJECT> tag but before the </BODY> tag. What you must remember is that everything between the <OBJECT> and </OBJECT> tags specifies details about the Flash file, and you should not edit this. Later, when you learn to extract a portion of this file, you'll be taking everything between <OBJECT... and </OBJECT>, inclusively. Figure 19.9 shown an example of an .html file opened in Notepad. Figure 19.9. You can extract the portion of HTML between <OBJECT... and </OBJECT> to use it elsewhere.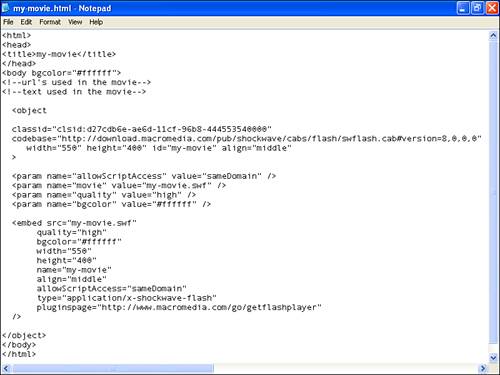 If you're using Dreamweaver, this entire process is extremely simple. All you do is decide where you want to insert the Flash movie and select Insert, Media, Flash (or press the Insert Flash button). The Properties panel lets you specify parameters (almost identical to those in the Flash tab in the Publish Settings dialog box). If you use this method, you don't need to publish the HTML code from inside Flash because this creates the same HTML code that Publish would have otherwise created (but it does so inside the file currently open in Dreamweaver). See Figure 19.10 for an example. Figure 19.10. When you use Dreamweaver to insert Flash, you'll find parameters like those in Flash's Publish feature.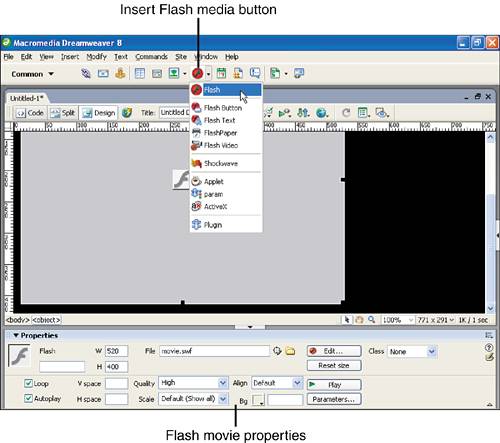 Therefore, just as you can insert images in HTML, you can also insert Flash movies. What's more, the HTML that Publish creates has room for you to make edits and add HTML content (such as text and images). Consider that you can embed Flash .swfs anywhere you can embed images. For example, inside tables or html frames. All in all, you can combine HTML and Flash quite seamlessly. |
| < Day Day Up > |
EAN: 2147483647
Pages: 235