| With radio buttons (like the old mechanical buttons on car radios), you can select only one button at a time. Selecting which radio station to play requires that you pick just one. If you change your mind, that's fine, but you can't play two stations at once. It's important to use radio buttons only for this kind of situation for instance, when the user selects from mutually exclusive choices, such as male and female. On the other hand, check box buttons (for which there's another User Interface component) allow for multiple selections. You always use RadioButton components in groups; for example, two buttons (male and female) in a gender group and three buttons (novice, intermediate, expert) in a skill level group. Like other components, each RadioButton component has a label and a value. Depending on the interaction you're building, you might want to trigger code immediately when the user makes a selection or wait until the user is satisfied with his selection and clicks Continue. The one thing I'd suggest you avoid is proceeding to a new screen immediately after a user clicks. That's because the user might have made a mistake, or might want to change her mind. You'll explore all these details in the following task. Try It Yourself: Use the RadioButton Components In this task, you'll use a radio button to ask the user to specify his skill level (novice, intermediate, or expert). Follow these steps: 1. | In a new file, open the Components panel and, one by one, drag three instance of the RadioButton component onto the Stage.
| 2. | Arrange the three RadioButton component instances vertically. You can use the Align panel (by pressing Ctrl+K) to space out or line up the buttons. Select the top instance and access the Parameters tab in the Properties panel, as shown in Figure 17.5.
Figure 17.5. You populate the three RadioButton component instances one at a time by using the Parameters panel. 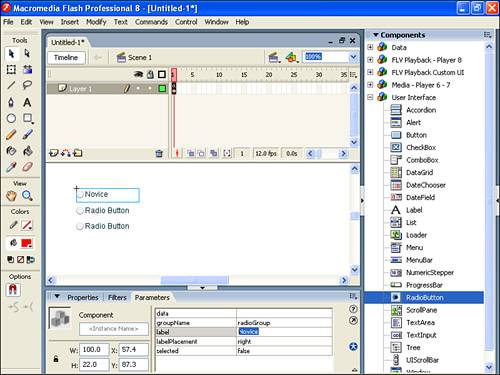
| 3. | Change the value for the label to Novice. Also set the value for the data to novice. Finally, notice the group name radioGroup. Just leave this alone because the other buttons have the same name so only one option in the group can be selected at a time. If you add another group later (say, with Male and Female buttons), you'd want all buttons in the other group to share a different group name (say, genderGroup). Give the first RadioButton component the instance name novice_option. (This is only because later you'll learn how to re-create this whole task entirely in ActionScript.)
| 4. | Change the label, data, and instance name of the second button to Intermediate, intermediate, and intermediate_option, respectively. Set the label, data, and name for the last button to Expert, expert, and expert_option, respectively.
By the Way: Numbers for Data You might prefer using some code system for the different levels (such as 1 for novice, 2 for intermediate, and 3 for expert). In this case, you'd want to set the data values accordingly. Don't do that for this example, but note that using numbers for data is less touchy than using string values. |
| 5. | Notice that unlike with the ComboBox component, each of your RadioButton component instances changes to reflect its current label. That is, you can see the labels Novice, Intermediate, and Expert without even testing the movie. This feature is called Live Preview. You can turn it on and off from the Control menu. Go ahead and test the movie. You'll notice, now, that only one RadioButton component can be set at a time (that is, when you select one, the others deselect).
|
Try It Yourself: Apply the Radio Buttons Although your radio buttons are nice, they don't really do anything. Follow these steps to give the buttons some practical use: 1. | Using the movie from the preceding task, drag a Button component onto the Stage. Use the Parameters tab in the Properties panel to set this button's label to Continue. Give the Button component the instance name continue_button.
| 2. | Make sure the button is on the Stage in Frame 1 (with the three instances of radio buttons). Go to Frame 2 and insert a blank keyframe (by pressing F7). On the screen, create a dynamic text block and give it the instance name message. Go back to Frame 1, and you'll make it so that when the user clicks Proceed, the user's skill level is determined and then the second frame displays an appropriate message.
| 3. | Click Frame 1 and open the Actions panel. Type this code in it:
stop(); continue_button.addEventListener("click",doClick); function doClick(evt){ theMessage="Welcome " + radioGroup.selectedData; nextFrame(); }
Notice that stop() will just prevent the movie from advancing to Frame 2. The second line says that for the continue_btn's press event, you want to execute two lines of code. The first line sets a variable called theMessage. It combines the string "Welcome" with selectedData from radioGroup. The selectedData is the data of the currently selected radio button in that group. Finally, nextFrame() just advances to Frame 2 (where you'll put some more code).
| 4. | Finally, with your variable theMessage assigned with a value, you can go to Frame 2 and populate the text field. Select Frame 2 and type this code into the Actions panel:
message.text=theMessage;
This just says, "set the text property of the message field to equal the value of the variable theMessage."
| 5. | Test your movie!
|
In many ways I wish that components required even less scripting than they do. Even this simple example took a bit of work. And, in fact, there's a few loose ends. For example, test what happens when you press the button before selecting a radio button. One way to address that is to disable the continue button until after the user has made a selection. An easier way is to set a default for the user. That is, use the Parameters panel to set the "selected" parameter for one of the radio buttons to true (say, the novice button). Despite the fact that complex applications take more work, components can save a ton of time. Also, many of the scripting conventions for the various types of components are consistent, so it's not like you have to learn new conventions for each one. |