Programming in Flash
| < Day Day Up > |
| It seems like there's a lot to draggable objects. This hour has included a lot of detail so far because using draggable objects is one of the most advanced features that doesn't require a lot of programming. The term programming gets tossed around a lot, but my definition of programming is using the ActionScript language to make a Flash movie play back differently based on user input, user interaction, timing issues, or data found outside Flash. If you want your movie to play back the same way each time (like a narrative or a cartoon, for example), you don't need to do any programming. Even if you want relatively sophisticated interactivity (buttons, draggable objects, and so on), you can achieve it with basic actions or behaviors. However, for a much more dynamic (changing) movie, you need to do some programming. Fortunately, ActionScript is fairly easy to use. Behaviors insulate you from the actual code. Also, the Actions panel includes helpers such as code hints, code completion, and Script Assist. When you approach the process of programming in small steps, you will probably find it easier than you would imagine after looking at the cryptic code some programmers create. It doesn't have to be difficult. The rest of this hour introduces you to most of the programming capabilities of Flash. An entire book could be devoted to this topic (actually, I've written several), so naturally, it can't be fully covered in just this hour. I'm just going to point the way. If you have little interest in programming, it's safe to skip the rest of this hour. You can always come back later if needed. There's plenty more information in later hours, so only jump ahead to Hour 17, "Using Components." (Don't skip the rest of the book!) VariablesVariables are a safe (yet temporary) place to store information. Imagine each variable as an individual whiteboard. You can write whatever you want on the whiteboard, erase it, and then write something else in its place. Variables are similar. Variables are useful because you can use them to save data while a movie plays. A key concept with variables is that each one has both a name and a value. With a whiteboard, whatever is written on the whiteboard is the current value. If you have several whiteboards maybe one has a phone number, another has an address, and so on you would want to name (or label) the whiteboards so you know which one is which. If you name one phone_number and the other address, you could simply find out the value of phone_number. It would be less complicated than trying to remember which whiteboard is which. Transferring this analogy to real variables, imagine that you have a variable named phone_number whose value is whatever number you put into it. You can do two things with variables:
Notice that I didn't mention that you can create variables. You don't need to take a formal step to create them; they simply exist as soon as you set the value for one. However, the way you create a variable is to start with the keyword var followed by the variable name as in: var myVariableName; In practical terms, common tasks that you'll need variables for might include the following:
In the following task, you'll learn how to use a variable to get a user's name. Try It Yourself: Use a Variable to Get the User's Name This task involves letting the user input data (his or her name), and it also shows how you can monitor the user's input. Here are the steps:
The preceding task lets you experiment with two basic features: controlling variables (by setting values) and controlling the text the user sees in a field. You let the user directly affect text property of the field (by typing right into the input text). The next task shows you how to increment a variable. It's very simple: A variable named count will increase every time the user clicks a button. Then, just to prove it's working, you'll have another button that reveals the current value of count. This task might seem simplistic, but it's very useful. What's more, incrementing variables is so common that you need to know how to do it. Try It Yourself: Increment a Variable This task demonstrates how to increment a variable and then reveal it to the user. Here are the steps:
You might notice that when the Properties panel is set to either Dynamic Text or Input Text, there are a bunch of extra options. Of particular interest is the Embed button (shown in Figure 16.7). When you click this button, you can opt to embed character outlines for any particular glyph (or letter) in your typeface. These options only apply to dynamic text and input text because the actual words and letters that appear may change. Flash needs to know whether you expect the user to have the font installed already. If you use a fancy font that your users don't have (and you leave these buttons deselected), another font will be used as a substitute. The overall look and the spacing may change drastically if you do this. (Of course, it won't be an issue on your machine when you test because you have the font installed.) Figure 16.7. Clicking the Embed button reveals the Character Options dialog box.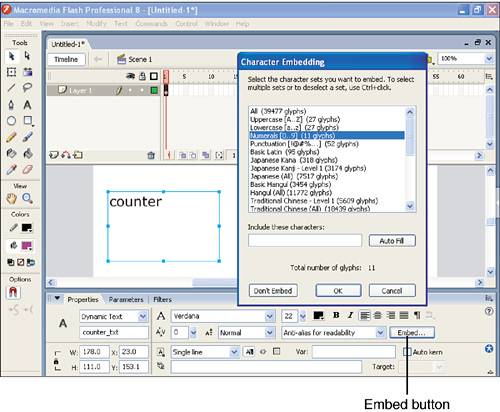 If you're not sure your users have the selected font (the safest bet is that they don't), you can opt to embed the entire font outline (well, uppercase, lowercase, numerals, and punctuation) so it will appear properly, no matter what the contents of the text block may become. This, naturally, adds to the file size significantly. As an alternative, you can even specify just the characters you type into the field under Include These Characters. Including the minimum necessary will help maintain a small file size. PropertiesEvery object changed during authortime. You can think of properties as visual attributes (although some properties are not visible). For example, every object has two position properties (one for x and one for y). Common built-in properties include _x (x position), _y (y position), _alpha (current alpha setting), and _rotation (current rotation of a clip). All the built-in properties are listed in the Properties category of the toolbox list in the Actions panel. Clip instances, button instances, and dynamic or input text objects work differently from other objects in Flash. Not only can you set these objects' properties during authortime in Flash, but through ActionScript you can change them dynamically during runtime, too. For instance, you can effectively move a movie clip instance by changing its _x and _y properties. Setting PropertiesAlthough instances of Graphic symbols can have color styles and other properties changed during authortime, only instances of the three object types (button instance, clip instance, and dynamic or input text) can change during runtime. To change a property of an object with ActionScript, you simply address the object (that is, target it), specify the property, and set it to a new value. The following task shows you just how easy this can be. Try It Yourself: Change the Alpha Property of a Movie Clip Instance In this task you'll change the alpha of a movie clip when the user clicks a button. Here are the steps to follow:
The seemingly cryptic line of code you put into the button in the preceding task (theClip._alpha = 50) is actually pretty simple. It uses "dot syntax." This syntax is a little funky at first, but after you get it, there's no stopping you. It always follows the form object.property. In this case, you want to change the alpha of an instance called theClip. The object is the clip instance, and the property you're changing is _alpha. (Notice that many but not all built-in properties are preceded by an underscore.) Translated, theClip._alpha = 50 means, "theClip's alpha is assigned the value 50." The fact that you're referring to the clip from outside (that is, from the button, which is not inside the movie clip) means you had to address the clip. To be more technical, I should have said the form is path to object.object.property. Say you want to target a clip that itself was inside another clip; you can address the clip in the form theClip.clipInAClip._alpha=50, where clipInAClip is the instance name of the clip inside the movie clip. Notice that addresses and properties are all separated by periods (when speaking, you say "dot," which is why it's called "dot syntax"). Remember from Hour 15, "Using ActionScript and Behaviors to Create Nonlinear Movies," you addressed a clip within a clip to make it stop the same way you're now addressing clips to change their properties. It's not always so tricky. You could change the code to read _alpha=50. Unless the code begins with _root, you can assume that the keyword this is implied in front of any address. That is, _alpha=50 is the same as this._alpha = 50 (which means "this Timeline, you set your alpha to 50"). Go ahead and try it. First, draw a circle or something on the Stage (so you'll see more than just the button and movie clip). Then change the script inside the button to _alpha = 50, test the movie, and notice that everything on the Stage changes! Now go back and cut the button from the main scene and paste it inside the master movie clip. Now when the button is clicked, everything inside the clip instance (including the button) changes to alpha 50. Copy and paste the clip so you have multiple instances of the clip (now with the button inside each one). You'll see that the button only changes the alpha of the instance in which you clicked. This is kind of cool, considering you don't even have to name any instances or specify the clip you're targeting. In conclusion, you can target specific clip instances by name, or (if you omit the target) Flash will consider that an implied this precedes your object. By the way, starting any address with _root (as in _root.clip._alpha = 50) targets the main Timeline, from which you can address any object. This is called an absolute address (as opposed to all the relative addresses we've used so far). Getting PropertiesBesides setting properties (like how you set the alpha of the clip), you can also ascertain that is, get the current value of any property. In fact, you can get the value of any property but set the property of only some (albeit most) properties. For example, you can't set a clip's _totalframes property at runtime. To access a property, you use the same form as in the preceding example (you'll just check it, not change it). For example, say you have a dynamic text block with the instance name message_txt and an action that reads message_txt.text = "The current alpha is " + theClip._alpha + "%" Because theClip._alpha is not within quotation marks, Flash will get the current alpha value of the clip and stick it between the two parts of a string. Then the whole (combined) string is placed in the text property of the message_txt dynamic instance. Access to properties follows the same form whether you're setting the property or getting the property. It's always object.property. Getting a property can be combined with setting a property. In the following task, you'll use two buttons that change the alpha of a clip. One button reduces the alpha, and the other increases it. Obviously, this will require more than just setting the alpha. You can't just set the alpha to "10 less." You have to know "10 less than what." Therefore, you'll first get the current alpha and set the alpha to 10 less than that. (This is easier to understand when you try it.) Try It Yourself: Make Buttons That Increase and Decrease the Alpha Setting of a Clip This task involves both setting and getting properties of a clip. Here are the steps:
|
| < Day Day Up > |
EAN: 2147483647
Pages: 235