| One of the most effective ways to give your users the power to interact is by letting them drag items around the Stage. This is essential for the creation of most games, and it's also a particularly effective teaching method because some people are "tactile" learners (whereas others might be visual or aural learners). For whatever reason, you might want to let your users move items around the Stage. This is simple to do in Flash. There's a slight dilemma, however. In Flash, the simplest way to determine when a user clicks a specific area involves the use of buttons. However, movie clip instances give you a few additional capabilities. The good news is that you can make movie clips respond to events originally designed for buttons (such as press and release). The bottom line is that buttons and movie clips can behave like each other; ultimately however, movie clips can do more than buttons. The time to use a button is primarily when you want different effects for the up, over, and down states. In any event, in this hour you'll use movie clips whenever you can including for the draggable object task that follows. Try It Yourself: Make a Simple Draggable Object In this task you'll create a simple draggable object. Here are the steps to follow: 1. | In a new file, draw a rectangle, select it, and convert it to a symbol. Call the symbol MyClip and make sure its behavior is set to Movie Clip. Also, use the center registration option, as shown in Figure 16.1.
Figure 16.1. When creating the draggable clip, select the center registration option. 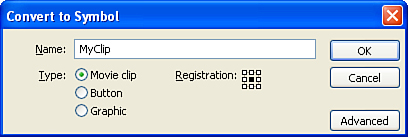
| 2. | Select the clip instance and use the Properties panel to give it the instance name box. Next you'll attach an action to it that effectively says "drag me." Select the box instance and open the Actions panel. Make sure Script Assist is not active and type the following code:
on(press){ startDrag(this); }
This basically says, "When the user clicks this clip, start dragging this object."
| 3. | Test the movie. It should be apparent what else you have to do. As it is now, the clip starts dragging, but you can never let go.
| 4. | To fix the problem, go back to the box instance and add the following code (below the code you already have):
on(release){ stopDrag(); }
If you use Test Movie now, you'll see that it works fine.
|
Interestingly, in the preceding task, you don't need to specify any parameters with stopDrag (the way you do with startDrag) Flash just stops dragging anything. Controlling Drag and Drop The preceding task was fairly simple. There are two refinements that can make it much more interesting. Specifically, you can first constrain the area in which the user is allowed to drag. For example, you should prevent the user from dragging the object offscreen. Second, it would be nice if you could check whether the user dropped the object onto another object. Maybe you want to ask the users to put several objects in order, as Figure 16.2 shows. To do this, at the moment the user lets go, check whether she has dropped the object on the target. In the next task you'll constrain where the object is dragged, and then later you'll calculate where the user drops the object. Try It Yourself: Constrain the Draggable Area In this task you'll constrain the draggable object to a specific rectangle shape. Here are the steps: 1. | The startDrag() action accepts five additional parameters. In addition to the parameter you included that specifies which object to drag, you can also opt for the "lock to center" feature, as well as specify four values for maximum and minimum x and y values inside which the user will be able to drag. Go back to the code on the box instance from the preceding task and edit it so that it reads as follows:
on(press){ startDrag(this, true, 0, 0, 550, 400); } on(release){ stopDrag(); }
Notice that only the startDrag() action is edited. The second parameter (true) says do lock to center, meaning the object's center point will appear where the mouse moves. This option may pose a problem if your object isn't using the center registration, as specified in step 1 in the preceding task. If your object didn't use the center registration when you created it, change the code true to read false. 0, 0, 550, 400 specifies left, top, right, and bottom, respectively. Because the default Stage size is 550x400, this will keep the object on the Stage. If you don't remember which parameter is for which value, press the Show Code Hint button, as shown in Figure 16.3.
Figure 16.3. Pressing the Code Hint button will make re-editing the startDrag() code easier because it reveals the syntax. 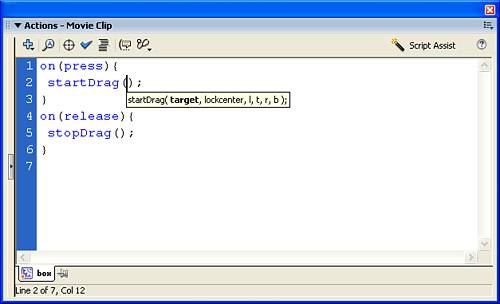
| 2. | Press F12 to see a publish preview. I suggest doing this rather than using Test Movie only because the edges of the Stage will be more apparent. You might notice that although you can't drag the box completely off the Stage, you can drag it so it's hanging halfway off. That's because the coordinate parameters limit the center of the clip's location. Instead of 0 for the left, you should have said "zero plus half the width of this box." You can use ActionScript for this (that is, 0+this._width/2). Alternatively, you can first gather the locations by hand and enter them manually.
| 3. | To manually gather locations, first position the box in each of the four locations (one at a time) by using the Align panel. That is, select the box, make sure To Stage is selected in the Align panel, and then click the top-left button (Align Left Edge), as shown in Figure 16.4.
Figure 16.4. The Align panel can position an object to align perfectly with any edge of the Stage. 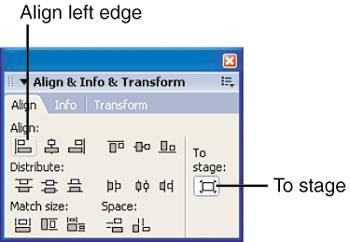
| 4. | From the Info panel determine the locations of the box for each of the four locations (left, top, right, bottom). Write down these locations. Be sure to have the center registration option selected in the Info panel so that it reflects the clip's center location (see Figure 16.5).
Figure 16.5. The Info panel can reflect the top left or center of any object. In this task, use the center option. 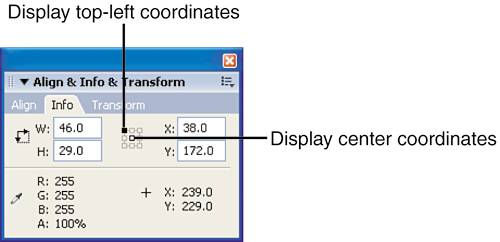
| 5. | Use the numbers you came up with in step 4 to replace just the start drag line of code. Here are the numbers I came up with by using the Align and Info panels:
startDrag(this, true, 50, 25, 500, 375);
My box was 100_50, which accounts for the 50 added to 0 (and subtracted from 550), as well as 25 (added and subtracted appropriately).
| 6. | Because, this hour is about scripting, you can use the following alternative to bypass the manual steps you followed in steps 4 5:
startDrag(this, true, 0+this._width/2, 0+this._height/2, 550-this._width/2, 400-this._height/2);
|
Figure 16.2. Asking the user to place these objects in the correct order is a perfect case for a drag-and-drop interaction. 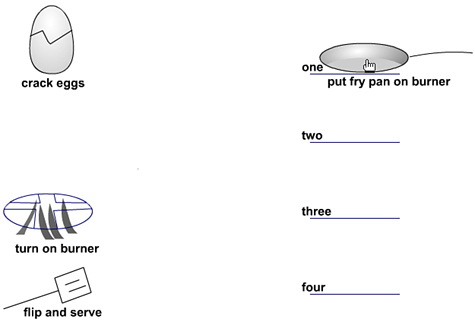
Feel free to experiment using other values besides those shown in the preceding task in the startDrag action's parameters. Now that the user can't drag the box off the Stage, you can add a feature that will check whether the user dropped it on top of the correct target. For example, say you put text inside the clip that said "Oregon" and then you had a map with the outlines of the United States state borders. Depending on whether the user dropped the label on the correct state, you could give him appropriate feedback. The trick is that you need to think about both how to check whether it's right and when to check it. In addition, you have to decide how to respond to the user dropping the box correctly or not. After you got this working for Oregon, you could make 49 more boxes if you wanted! The following task walks you through the steps of doing one of these. Try It Yourself: Ascertain Where an Object Is Dropped For this task, you can add to the same file used in the preceding task. Follow these steps: 1. | Make a clip to serve as a target. Draw any shape, but make sure it's noticeably bigger than your box. Convert it to a movie clip and then give it the instance name correctSpot.
| 2. | Next, you need to determine when to check where the user dropped the box, whether the user dropped it in the right spot, and how to respond in either case. The time to check is right after the user lets go of the object that is, inside the on(release) curly braces. You can add an if statement after stopDrag. To start, edit the code so that it reads as follows:
1 on(release){ 2 stopDrag(); 3 if(correct){ 4 trace("correct"); 5 }else{ 6 trace("wrong"); 7 } 8 }
Lines 3 7 were added. This is the skeleton for an if-else statement. The idea is that normally, every line of code executes (when the release event occurs). You use the if statement and if-else statement when you want to skip certain lines of code. In this case, only line 4 or line 6 will actually execute never both. When you simply want Flash to either execute or not execute some code, you use a plain if statement, which looks like this:
if(condition){ trace("will do this when condition is true"); }
In this example, however, you want Flash to always execute one thing or the other (so you use if-else).
| 3. | Line 3 (if(correct){) won't work as is. This is sort of like pseudo-code because it makes sense when you read it. However, Flash doesn't know what correct means. You need to replace just that word with an expression that results in true or false. The hitTest action will turn into TRue or false if one clip's center is hitting any portion of another clip. Here's what you type in place of correct in line 3:
this.hitTest(_parent.correctSpot)
This is just an expression that's either TRue (if this clip's center is within the area of the correctSpot clip) or false (when this clip's center is not on the correctSpot clip). Unfortunately, you can't just use correctSpot because this code is on the clip. That is, there is no correctSpot clip inside the box. Rather, you use parent because it's up one level. Here's the complete code:
on(release){ stopDrag(); if(this.hitTest(_parent.correctSpot)){ trace("correct"); }else{ trace("wrong"); } }
By the Way: Expressions in ActionScript An expression is like a phrase or partial sentence in English. Expressions can always be evaluated, but they're never complete thoughts or statements. For example, 2+2 is an expression. When evaluated, it turns to 4. In the case of an if statement, you need to write an expression that results in TRue or false. In English you might say, "age is greater than 21." That's just an expression because it has a value (true or false), but by itself it's not a complete statement. if statements often use logical operators (such as > and <) in their expressions. |
| 4. | At this point you can test the movie, and Flash will accurately report correct or wrong, depending on where you drop the box. However, the trace actions will only work while you're testing. You can just snap the box to the center of the correctSpot clip (when it's right) or back to its original location (if it's wrong). First, use the Info panel to determine the box clip's initial x, y location. Edit the on(release) code one last time so that it reads as follows:
on(release){ stopDrag(); if(this.hitTest(_parent.correctSpot)){ this._x=_parent.correctSpot._x; this._y=_parent.correctSpot._y; }else{ this._x=10; this._y=20; } }
You'll want to replace the 10 and 20 in lines 7 and 8 with the x and y values you found for the box clip's initial location. Lines 7 and 8 simply say, "set this clip's x to 10" and "set this clip's y to 20." Lines 4 and 5 say the same thing, but instead of using hard numbers (such as 10 and 20), they say "set this clip's x to the correctSpot clip's x."
|
The last step in the preceding task required that you use a technique that's covered in the next section of this hour how to set properties (such as x and y location) of clips. Actually, after you learn some more techniques, you can come back and decide to give the user different or additional feedback for dropping the box in the right place or the wrong place. |