| Scripting is nothing more than writing instructions. Each instruction tells Flash to do something very specific. For example, "play," "stop," or "set that movie clip's alpha to 50%." By keeping each piece of ActionScript very specific, you can easily piece together more advanced instructions. But at the core, each "sentence" (or line of code) is a single instruction. All your ActionScript is typed into the Actions panel. Open the Actions panel and follow along as we explore. Select Window, Development Panels, Actions (or press F9). Take a quick look at Figure 15.1, and then we'll cover a few more details before you do a few exercises. Figure 15.1. The Actions panel has several components. 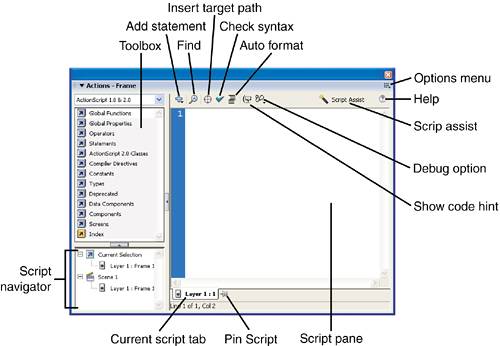
The Actions panel has the following features: Toolbox The Toolbox list provides access to all installed actions. It is organized like folders. Script Category simply narrows the actions listed in the toolbox to ActionScript 1.0 & 2.0 or one of the two FlashLite versions (for delivering Flash to various mobile devices such as cell phones). Leave this on the default ActionScript 1.0 & 2.0. Script pane In the Script pane, your actions will appear in order of execution. Navigator pane In the script navigation pane, you can see all the scripts in your movie. Current Script tab The Current Script tab indicates which script is currently being edited. Figure 15.1 indicates that the script is for Layer 1. Compare this to how the Properties panel shows you the currently selected instance. Pin Script The Pin Scrip button adds a tab for a particular script so that you don't have to first select the object or layer into which you want to add a script. Normally, the Actions panel acts like other panels always reflecting the settings for the currently selected item (in this case, the script for the selected keyframe or object, such as a button). Script Assist When the Script Assist button is pressed you no longer type free-style into the script pane, but rather you make selections from options that will appear above the script pane (for example, as Figure 15.7 shows). This is the return of "Normal Mode" last seen in Flash MX (version 6). Script Assist ensures your scripts are free of syntax errors. Figure 15.7. Script Assist mode reveals an options area above your script where you can make changes to the selected line of code from the available options. 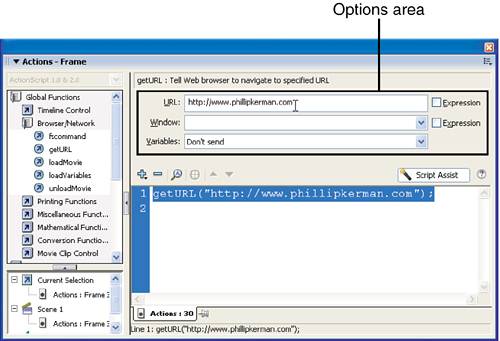
Options menu The options menu (as on any panel) contains additional settings. Preferences such as script font typeface are available. Help button The Help button (also known as the Reference button) provides online help with any selected piece of ActionScript. Options toolbar The Options toolbar includes the following buttons: Add Statement This button, which I call the "plus button" throughout the rest of this book, pops up a menu that provides the same script elements found in the Toolbox. The menu also shows the key combination for each script that has one (see the later tip). Find This button let you search scripts (and optionally replace parts) as you would in a word processing program. Insert Target Path This button helps you address specific objects, such as particular clips. You'll learn that scripts can apply to individual clips (say you want to play or stop just one clip you have to target that particular clip). This button helps you specify a target clip. Check Syntax This button checks that your ActionScript has no syntax errors and displays details (in the Output panel) if not. (This won't guarantee that the movie will behave as you had in mind only that you have no show-stopping errors.) Auto Format This button cleans up your code by adding indentation where appropriate. This makes it much easier to read. Show Code Hint This button re-triggers the code-completion helper that appears as a ToolTip to help you complete ActionScript (when Flash knows what you're about to type). Debug Options This button lets you add and remove breakpoints where you purposefully make Flash pause on a specified line of code so that you can investigate how it's playing (or, most likely, not playing the way you expected). You can also add and remove breakpoints by clicking in the gutter to the left of any line of code. You'll see a red dot appear to the left of the line of code.
Did you Know?: Keyboard Shortcuts for Actions In the Actions panel under the Add Statement (+) button, you'll find key combinations such as Esc+go. This means the action can be inserted by simply pressing the following keys in sequence (not at the same time): Esc, go. If you find yourself inserting the same action repeatedly, you might use this method instead because it's quicker than typing the code manually. |
Syntax is unique to each programming language. Every piece of ActionScript has a very specific syntax that must be followed. As an analogy, consider how every email address has to have the form name@domain.com or it won't work. Flash has no mercy for invalid syntax you'll see errors appear in the Output panel until you resolve the errors. Even after you perfect the script, the movie may not play exactly as you had in mind but syntax errors are show-stoppers because you must correct them. Luckily, there are plenty of ways to ensure that your scripts have perfect syntax. You can easily add an action from the Toolbox by double-clicking or dragging it to the right side of the Actions panel (the Script pane). You can build a complex set of instructions, one line at a time. A statement is a code sentence that uses only words from the ActionScript language. Again, actions are instructions. Flash will follow each line of code in sequence. Some actions are complete pieces of instruction, with no additional modifications on your part. For example, you can add a stop action, and when Flash encounters it, the playback head will stop advancing. However, many actions require that you provide additional details (called parameters). For example, an action such as gotoAndPlay requires that you provide the additional detail about what frame number or frame label you want to go to. Specifying Actions by Using Parameters Now you can try out actions and parameters. You'll see that some actions are quite simple. In the following task is a quick exercise that uses actions and parameters. After you complete it, we'll step back to analyze what you did in the task. Try It Yourself: Make an Action That Loops Part of Your Movie In this task you'll make the last few frames of an animation loop. Here are the steps: 1. | In a new file, use the Text tool to create a text block containing the word Welcome. Make sure the text type is Static. Select the block and convert it to a symbol. Make it a movie clip and name it Welcome Text.
| 2. | Position the movie clip instance in the center of the screen, and insert one keyframe at Frame 20 and another at Frame 30.
| 3. | Move the current-frame marker to Frame 1 and move Welcome Text all the way off the Stage to the left. Set motion tweening for both Frame 1 and Frame 20. In Frame 20, use the Properties panel to make the tween rotate one time clockwise (CW) on its way from Frame 20 to Frame 30. See Hour 8, "Using Motion Tweens to Animate," for a review of this. Test the movie. Notice that the whole movie loops over and over. Instead of leaving the animation as is, you're going to make the rotation part (from Frame 20 to Frame 30) loop forever.
| 4. | You can add actions to any keyframe, but instead of mixing scripts with your animation, you can just make a whole new layer exclusively for actions. Name the single layer you currently have Animation and then choose Insert, Layer and name the new layer Actions. Make sure the current layer is Actions (you'll see a pencil in the layer). Select Frame 30 in your Actions layer, insert a keyframe (by pressing F6), and then access the Actions panel (by pressing F9). Make sure Frame 30 remains selected when you edit the Actions panel by noting that the tab reads "Actions:30" and has the keyframe icon (as shown in Figure 15.2). This confirms the script you're about to write will execute when the playback head reaches Frame 30.
Figure 15.2. The Actions panel is opened right after Frame 30 is selected so that you can set an action to execute when the playback head reaches that frame. 
| 5. | To insert a gotoAndPlay action, select Global Functions, Timeline Control and then double-click gotoAndPlay. You should see a gotoAndPlay action added to your script in the Script pane on the right (see Figure 15.3). Because this action requires parameters, a code hint will appear to help guide you. If it goes away, just click inside the parentheses following gotoAndPlay and press the Show Code Hint button.
Figure 15.3. Right after you insert gotoAndPlay, the Actions panel is populated as shown here. 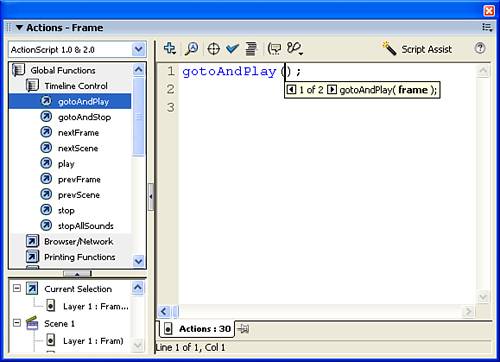
| 6. | You always type any required parameters inside the parenthesis. In this case, type 20 because that's the frame number to which you want to go and play. Therefore, the finished action in the script area should read gotoAndPlay(20); (as shown in Figure 15.4).
Figure 15.4. This is how the complete code looks. Every time the playback head reaches Frame 30, it goes back to Frame 20 and plays. 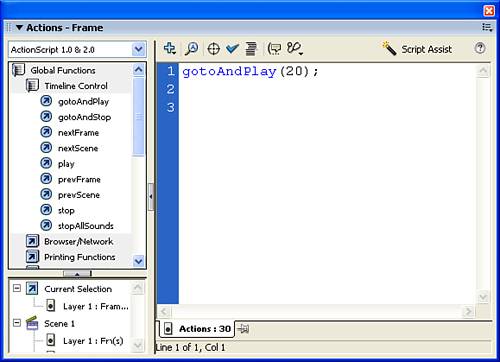
| 7. | Test the movie (don't just play in the authoring environment). It plays once, and then every time it gets to Frame 30, it goes back to Frame 20 and plays again.
|
As easy as the preceding task was, there is one thing in particular that could make it better. Consider the amount of work involved if you changed the location of the keyframes. For example, what if the second keyframe (Frame 20) had to move to Frame 25? Of course, the initial tween would take longer to play, and the rotation would be quicker, but the loop would also stop working properly. To fix it, you would need to remember to edit the action in Frame 30 so that it read gotoAndPlay(25);. You would have to repeat this fix every time you changed the location of the keyframe where the rotation starts. Naturally, there's a better way. Instead of making the destination of gotoAndPlay an explicit frame number, you can change the parameters to make the destination a named frame label, which will be the same for the frame, no matter where it is located in the Timeline. You'll use frame labels in the next task. Try It Yourself: Use a Frame Label as the Destination of a gotoAndPlay action In this task you'll improve the gotoAndPlay action by supplying a frame label instead of a frame number. Here are the steps: 1. | In the file created in the preceding task, click Frame 20 of the Animation layer. In the Properties panel you should see a place where you can type a frame label. Label this frame Loop Start (see Figure 15.5).
Figure 15.5. If you label Frame 20 (via the Properties panel), the destination of the gotoAndPlay action can change from an explicit number (20) to a label name (Loop Start). 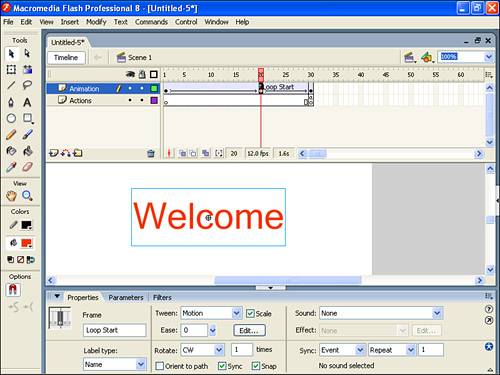
| 2. | Click Frame 30 in the Actions layer and open the Actions panel.
| 3. | You're going to modify the gotoAndPlay line in the Actions panel. Change 20 to "Loop Start" (with the quotation marks). The final script should read gotoAndPlay("Loop Start");, as shown in Figure 15.6.
Figure 15.6. This new version of the gotoAndPlay action is better than the original because the destination is a frame label. 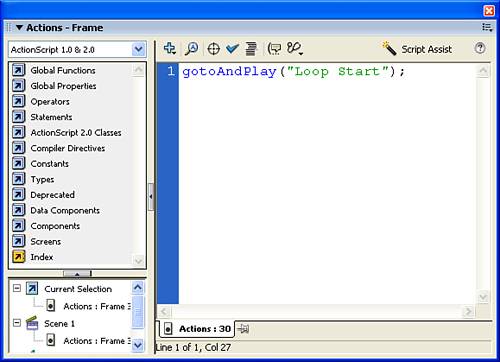
| 4. | Test the movie; it doesn't look any different from the old version to the user. Now go back to the Timeline and click Frame 20, and then click and drag it so Loop Start is now Frame 10.
| 5. | Test the movie again. The animation now loops back to Frame 10, where you moved the Loop Start keyframe. The power of using a label as the destination of the gotoAndPlay action is that it means you can go back and move the location of the Loop Start keyframe to any frame you want, and it still works! (Save this file for the next task.)
|
Using Script Assist If Script Assist truly helps novices write scripts then I suppose I shouldn't have to explain anything here. Interestingly, when Macromedia removed "Normal Mode" (the old name for Script Assist) in the previous version of Flash, an uproar came from many people who were far from novices so, in fact, Script Assist is a perfectly legitimate tool. In my opinion, however, you shouldn't use it exclusively. That is, a great way to work is to toggle Script Assist on and off as needed. For example, if you're not sure how to write a particular script, turn it on in order to help create the script and then turn it off. Here's a quick explanation of how to use Script Assist and then a short task that gives you a better flavor for how it works. When you press the Script Assist button you're taken into a mode where you no long make edits by simply typing into the script area you can't. Once you add scripts (by using the toolbox or plus button) you make changes by editing the options revealed in the section above the script area. That area is only revealed when you're in Script Assist mode (as Figure 15.7 shows). The area above the script only displays options available for the currently selected line of code. That is, while your entire script area could have many lines, only one is selected at a time and that's the one you can edit by changing the options. Additionally, those options vary depending on the script you're editing. The advantage is that these options can guide you through modifying your scripts and will always enforce perfect syntax. In some ways it's restrictive because you may feel like typing into the script area, but you can't you do everything in the options area. Even changing the sequence in which the actions appear (that is, the line order) requires that you select the line then press the "move up" or "move down" arrows. In many ways, Script Assist mode is actually similar to the free-style mode (that is, when the Script Assist button is not pressed in). In both modes you create instructions by adding statements in the toolbox or via the plus button. It's just making edits to the scripts you've added is more structured in Script Assist mode. By the Way: Switching Into Script Assist Mode While I encourage you to toggle between Script Assist and (what I'm calling) free-style mode, you can only enter Script Assist mode when all your syntax is correct. That is, if when not in Script Assist mode you add or edit a script and leave it with a syntax error, you won't be able to enter Script Assist mode. You'll see a warning dialog and a detailed explanation in your Output panel. If you're planning on making lots of changes and you're not sure about the syntax, then only make one change at a time and switch back to Script Assist (or press the Check Syntax button) to confirm you didn't make any errors. Alternatively, I suppose you could try to spend your entire time in Script Assist mode though I think that will prove restrictive. |
The way Script Assist ensures perfect syntax is only half of the benefit. The other way (and in my opinion the more valuable way) Script Assist helps you is by guiding you filling in the scripts. The code hints that appear (when not in Script Assist mode) are similar but quickly disappear and certainly don't enforce the correct syntax. Open up the file you created during the previous task, "Use a Frame Label as the Destination of a gotoAndPlay action," so you can take a quick tour of what I'm talking about. Open the Actions panel and select the keyframe in frame 30 in the layer you named Actions. Switch into Script Assist mode by pressing the Script Assist button. You can see the options area appears above the script area as shown in Figure 15.8. Figure 15.8. You can make changes to an existing script using Script Assist. 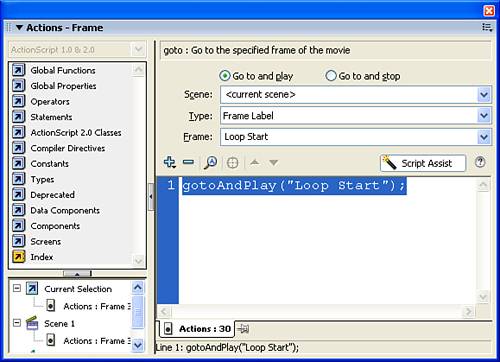
Keep an eye on the actual script (in the script area below) as you explore to the options area. Go ahead and change the option between Go to and stop and Go to and play and watch the script below update. Now, here's a really useful feature: click the down arrow on the right side of the Frame combo box and you'll see a list of all the frame labels in your movie (though, for now, you'll only see "Loop Start" as that's the only one we added. If you had more labels, they'd all be listed here and there would be no way you'll make a typo if you select the label from this menu. In many ways, I think it's hard to try to learn by only using Script Assist mode. However, I will bring your attention to it again later this Hour when you learn about putting actions directly onto buttons (in the section Button Actions). Frame Actions In the previous task you saw how placing one action in a keyframe and changing its parameters makes the playback head jump to a different frame. Step back a second and consider what else you've learned. Actions are instructions that you want Flash to follow. Actions do things. You can modify actions by changing their parameters. This is all good information; however, if actions are instructions, exactly when does Flash follow those instructions? The answer depends on where you put the actions. You can put actions both in keyframes and on any object type, such as button instances, movie clip instances, and components (covered in Hour 17, "Using Components"). In the preceding task you placed an action in a keyframe. In that case, the action was executed (that is, the instruction was followed) when the playback head reached that frame. If you put an action in Frame 10, it would not be followed until the playback head reached Frame 10. With an action in a keyframe, the user doesn't do anything but wait for the playback head to reach the appropriate frame to see the action happen. Although this isn't exactly interactivity, it's quite powerful. For example, often it's useful to place a stop() action in the first frame so that your movie initially appears paused and won't play until a play() action is encountered (perhaps after the user clicks a button). Another example might be when you want to stop in the middle of an animation. All you need is a keyframe and a stop action. There are many more examples of keyframe actions, which are good for when you want something to happen at a certain moment in the animation not just when a user clicks. Notice that in the previous task you simply used frame actions. The actions were executed when the playback head reached that frame. This is just one of the three places you can put actions; you're about to see the other two button actions and movie clip actions. By the Way: Code "on" Buttons I'm about to introduce putting code on objects (starting with buttons) but keep in mind there are two parts: the concept of associating code with buttons and the exact implementation (that is how you physically select the button and then type into the Actions panel). It's actually possible to do the implementation differently… namely, type the code into a keyframe, but refer to a button. I'll show both ways, but regardless of how you do it the concept of associating code with a button is the same. |
Button Actions Putting an action in a keyframe causes the action to execute when that frame is reached. However, putting an action on an instance of a button makes the action execute when the user clicks the button. The decision of whether to put an action in a keyframe or a button is simple. If you want an action to occur when a particular frame is reached, put it in a keyframe. If you want an action to occur when the user acts (for example, when he clicks a button), put the action on an instance of the button. Keyframe actions are pretty straightforward: You just assign them to keyframes. Button actions, however, require that you specify to which mouse event you want the action to respond. Do you want the action to respond when the user presses the button or when the user releases the button? Maybe you want the action to execute when the user rolls over the button. This level of detail gives you the power to make an action perform exactly as you want. Mouse events are specific situations that refer to exactly how the user is to interact with a button. For example, one mouse event is press and another is release. When you specify to which mouse event you want an action to respond, you are specifying exactly when the action is to execute. Only in actions attached to objects do you need this extra level of specificity because actions in keyframes simply execute when the keyframe is reached. All mouse events include the word on followed by the actual event name in parentheses (for example, on(press)). The best way to see how mouse events work is to try it out. In the following task you'll add to the preceding task buttons that let the user stop and continue the animation while it plays. Try It Yourself: Add Buttons to an Animation to Stop and Continue Playback In this task you'll add buttons that let the user stop and continue the animation from the preceding task while it plays. Here are the steps: 1. | Either use the file created in the previous tasks or make a new file with a motion tween over several frames (make sure you can see something moving while the animation plays).
| 2. | Insert a new layer for the buttons. You don't want to place buttons in the layer that has the animation; that would affect the tween. Name the new layer Buttons.
| 3. | Into the new Buttons layer, draw a rectangle that will become a button. Select it, and then convert it to a symbol (by pressing F8). Name it MyButton and make sure the behavior is set to Button.
| 4. | You're going to need two buttons, so either copy and paste the instance that is already on the Stage or drag another instance of the MyButton symbol from the Library onto the Stage in the Buttons layer. Apply a Tint color style to each instance one red (for Stop) and one green (for Play). As you recall, you do so by selecting the button instance on the Stage and using the Properties panel to select Tint from the Color drop-down list and then selecting a color and percentage.
| 5. | Give each button a memorable instance name (say "green" and "red"). Use the Properties panel to set the instance names. This step is only necessary for the upcoming note "Keeping All Code in One Place."
| 6. | Now you need to attach an action to each button individually. Select the red button and access the Actions panel. The tab should read "red" and have an icon of a button. This way you know you're editing the script for that button instance. For this button, make sure the Script Assist is turned off. Click the plus button and select Global Functions, Timeline Control, stop.
| 7. | Unlike a keyframe action, which can appear as a single line of code, a button action requires at least two extra lines of code: one before and one after the main script so that the script is wrapped inside an event. Think of the main script (in this case, stop()) as the meat of a sandwich, but it's not complete without pieces of bread above and below the code. Any code attached to a button has to be surrounded by an on event. Therefore, place your cursor in front of the s in stop and then type the following:
on(press){
Then press Enter.
| 8. | Click after the last line of code (that is, after stop()), press Enter, and type this:
}
The resulting script looks like this:
on(press){ stop(); }
Notice that you should indent the second line for clarity. This is a very good habit to adopt. You can always clean up your code by pressing the Auto Format button in the Actions panel.
| 9. | The preceding steps are painful because they step through every last detail. For the green button let me show you a neat trick that Script Assist supports. Select the green button and open the Actions panel. Confirm that the green button appears in the current script tab at the bottom of the Actions panel. Turn on Script Assist (by clicking the Script Assist button). This time you'll insert a play but because you're in Script Assist mode it will automatically add the mouse event. Click the plus button and select Global Functions, Timeline Control, play.
| 10. | Notice the play() action is added no surprise there. However you should also see the necessary on(release){ code added above (and } below). Click the first line and you can modify exactly which event will trigger the stop (for example, you can change it to on(press)). The nice part about Script Assist is that you see all the available mouse events.
| 11. | Test the movie, and you'll find that when you press the buttons, the movie will play and stop.
|
Did you Know?: What Do You Want to Do, and When Do You Want to Do It? Before you write a script you need an idea. But then, converting the idea into ActionScript can be challenging. I use the following question when helping students write a script: What do you want to do, and when do you want to do it? That is, the "what" could be "stop the movie" and the "when" might be "when the user presses the button." The "what" is always your raw script (such as stop() or play()) and the "when" is tied to where you put the script (for example, on a button if you want it to happen when the user presses or in a keyframe if you want it to happen when the playhead reaches that frame). |
By the Way: Keeping All Code in One Place In many ways, putting code right on buttons (as you did in the preceding task) makes perfect sense. You find the instructions for the actions when you select the buttons, and that gives you a bit of context. However, it can also mean you're running around selecting different instances to reveal their scripts sort of like the card game Concentration. I have mixed feelings about whether this is the best way to learn. In any event, it's not the ultimate way to program. Just so you can see what I'd call a better solution, I'm going to show you an alternative to the preceding task. All you do is make sure you give your buttons instance names (as you did in the preceding task: green and red) and type the following code into the first keyframe of the movie (with Script Assist turned off): red.onPress=function(){ stop(); } green.onPress=function(){ play(); }
Translated, this says that the instance named red shall execute the code stop() when the onPress event occurs. You always leave the word function as is. Notice that onPress in this syntax is equivalent to on(press) when placed right on the button. I'm sure you can guess that the last three lines make the green button trigger the script play() when it gets pressed. From this point forward, if I say "put an action on a button," I mean you can either use on(press) right on the button or .onPress, as shown above. |
Movie Clip Actions This hour you've seen how to place actions in keyframes and on button instances. Most of the actions you'll encounter are likely to fall into one of those two cases. However, there's a third place where you can attach actions: in instances of movie clips. It's a little confusing because, unlike with buttons, you can also put actions on keyframes inside a master movie clip in the Library. However, the rule that you can only put actions in keyframes, button instances, and movie clip instances remains so if you put any actions inside a movie clip, you have to put them in one of those three places (keyframes, nested buttons, or nested clips) inside the clip. We've already discussed putting actions on buttons and in keyframes and those techniques will work inside master movie clips. But now you're going to see how actions can also be placed on instances of movie clips. Actions on movie clips are powerful. It would get complicated to fully explore this feature now, but you can do a task that gives you a taste. Try It Yourself: Place Actions on a Movie Clip Instance This task shows you how to attach actions right onto clip instances. Here are the steps: 1. | Create a movie clip that contains several frames and some kind of animation inside the clip (so you can see whether it's playing). That is, add frames inside of a symbol.
| 2. | Place this movie clip on the Stage and test the movie (to verify that it's animating). Your main Timeline should have only one frame.
| 3. | Back in Flash, select the instance of the movie clip on the Stage and open the Actions panel. (Confirm that you've got the movie clip selected by looking at the current script tab.) Do the next few steps with Script Assist turned off.
| 4. | In the Toolbox insert onClipEvent, which is listed under Global Functions, Movie Clip Control. The code and code hint will appear as shown in Figure 15.9.
Figure 15.9. The skeleton for onClipEvent is similar to that of an on event. 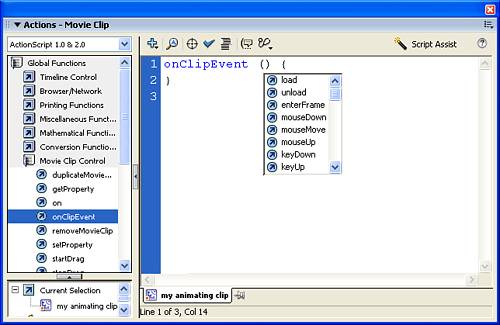
| 5. | Like buttons requiring that you use on events, clips require that you use onClipEvent events. Select (from the code completion popup, it's still visible) or type load. This event will trigger when the clip first loads.
| 6. | Between the two curly braces insert a stop action. The resulting code so far should look like this:
onClipEvent(load){ stop(); }
Feel free to type it by hand, but be sure to type it exactly.
| 7. | You will add two more actions that respond to the mouseDown and mouseUp events. For this example, when the user clicks mouseDown, the movie clip should start to play. When the user stops clicking (that is, when mouseUp occurs), the movie clip should stop. With Script Assist turned off, you need to add this below the closing curly brace. That is, the separate events must appear as independent sandwiches (well, starting and ending curly braces). Just so you can experience Script Assist, turn it back on now. Click the last line in your script (the closing curly brace) and add another onClipEvent (under Global Functions, Movie Clip Control) and it will appear after the code you already have. This time you can select the event MouseDown from the options area as shown in Figure 15.10.
Figure 15.10. By selecting the onMouseDown event, the script that follows will only trigger when the user clicks. 
| 8. | In order to make the Movie Clip stop when the user presses their mouse, add a play() action (from Global Functions, Timeline Control). The play() needs to appear between the two curly braces for your MouseDown event. While in Script Assist mode, actions always get added after the selected line, so you want to select the line with MouseDown (line 4). If the play() happens to get added to the wrong place, you can select that line and use the up or down arrow buttons to move it to the correct place. You can also drag actions from the toolbox.
| 9. | Finally, in order to experience yet another feature of Script Assist mode, try to add a stop() action below all the code you have in place that is, below the last closing curly brace. What happens is the stop() that you add automatically gets surrounded with the required onClipEvent elements. Go ahead and make it so the stop() action triggers when the user does a MouseUp (by clicking the onClipEvent line and selecting the Mouse Up option). The complete script should look like this:
onClipEvent(load){ stop(); } onClipEvent(mouseDown){ play(); } onClipEvent(mouseUp){ stop(); }
| 10. | Test the movie. It's actually pretty sophisticated, despite the simplicity of the script. Go back and reread the script (in the Script area of the Actions panel) attached to the movie clip instance.
|
There are a few important things to note about the preceding task. First, you could have just typed the entire script without ever visiting Script Assist mode I just wanted you to experience the way the options area displays the available settings and how scripts attached to clips (or buttons) always must appear within either an on() event (for buttons) or onClipEvent() event (for clips). Also notice how the movie clip events mouseDown and mouseUp respond to any mouse click not just to clicks on the movie clip itself. If you want something that responds to clicks right on a graphic, use regular buttons (which support the on(press) and on(release) events). Also notice the actions you attach to a movie clip instance apply only to that instance. It might be more explicit if you precede stop() and play() in all cases in the preceding task with this., as in this.stop() and this.play(). This makes more sense when you think about it because it means just that one movie clip will stop or play. You can prove this to yourself several ways. Drag another instance of your movie clip from the Library (and don't attach any actions to this instance). When you test the movie, the stop and play actions apply to (that is, "target") only the clip with the actions attached. Finally, this example shows that you can write code to respond to various events (in this case, load, mouseDown, and mouseUp). For each one, you have the two pieces of bread plus the meat in the middle. What I haven't mentioned yet is that you can stack the sandwich with many layers of meat. That is, for one event, you can trigger several lines of code. For example, when the mouseDown event occurs, you could have a sound start playing in addition to the play() action triggering. As long as you put your code between the two curly braces, one event can trigger as many lines of code as you want. (This is also true with buttons and on events.) The basic things to remember are that just as with buttons, actions on movie clip instances are wrapped inside events. Buttons respond to the on event, whereas movie clips respond to the onClipEvent. Finally, actions attached to movie clip instances affect only the particular instances to which they're attached. |