Applied Examples Using Components
| [ LiB ] |
Applied Examples Using Components
The following examples are intended to review the concepts already covered and point out a few more details. In addition, they should give you an idea of how you can use components in your apps.
Text (Label, TextArea, and TextInput)
These three components are little more than dynamic and input text fields that come in the form of components. However, that little bit of extra makes them worth learning. The three features in particular are as follows :
-
They adopt the text styles defined in the theme or skin defined for all components. This means you can reformat all text using one style definition. This is similar to how we defined our own styles in Chapter 5, "Presenting Data." Doing it with themes and skins is covered later in this chapter.
-
TextArea includes an automatic horizontal or vertical scrollbar when the text grows.
-
Using Flash Pro, you can apply the binding features that link components to data.
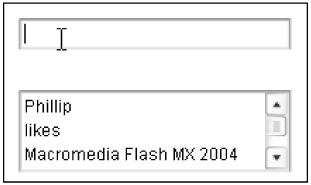
Here's a quick example to make scrolling text. Grab a TextArea and TextInput component and resize them using the FreeTransform tool so that they're wide (not terribly tall, however). Name the TextArea area_txt and the TextInput input_txt . Put the code in Listing 12.3 in the keyframe.
Listing 12.3. Using TextArea and TextInput Components
myListener=new Object(); myListener.enter=function(who){ area_txt.text+=who.target.text+newline; who.target.text=""; } input_txt.addEventListener("enter",myListener); The first thing to notice is that TextInput components have an enter event (when the user clicks Enter). Also, when the area_txt instance gets too much text to display, it should begin to scroll (see Figure 12.5).
Figure 12.5. Both the TextArea and TextInput components enable you to trap events. In addition, the TextArea automatically scrolls .
ComboBox
Although the earlier Jump menu example was useful, here's a slightly more advanced example using the ComboBox. Basically, you need two ComboBoxes (instance names colors_cb and shapes_cb). Also, make a movie clip inside of which you make nine keyframes into which you draw red, green, and blue circles, lines, and squares. Label the keyframes accordingly . So...you'll need a "red_circle", "green_circle", "blue_circle", "red_line" , and so on. Make sure you have an instance of this clip onstage with the instance name content. Finally, put the code in Listing 12.4 into the first keyframe of the main movie:
Listing 12.4. Using Two ComboBoxes
1 navigate=new Object(); 2 navigate.change=function(){ 3 content.gotoAndStop(colors_cb.selectedItem+"_"+ 4 shapes_cb.selectedItem); 5 } 6 colorLabels=["red", "green", "blue"]; 7 shapeLabels=["circle", "line", "square"]; 8 colors_cb.dataProvider=colorLabels; 9 colors_cb.addEventListener("change",navigate); 10 shapes_cb.dataProvider=shapeLabels; 11 shapes_cb.addEventListener("change",navigate); 12 content.stop(); In a way, this code is playing loose with the rules, but because it works I thought it'd be good to leave. First, notice the dataProviders (defined in lines 6 and 7) are not arrays full of objects (each with a label and data ) but rather arrays full of strings. Well, that works okay, but it doesn't give you a chance to embed additional properties for each item. In fact, if you notice in lines 3 and 4, I am grabbing the selectedItem of each ComboBox. Normally, that returns an object from which you would grab the label or data property. In this case, the items are those strings from the dataProvider array.
In many ways, the preceding example is bad because it shows how dataProviders can break the normal mold. However, sometimes you just don't want to stuff your dataProvider full of data. That is, the ComboBox doesn't really need anything more than a few labels. You always have the selectedItem and selectedIndex properties if you need them. Having said all this, do know that one array can be the dataProvider for several different components. So, it's not like you should avoid storing data "in" components via their dataProviders .
Using the List
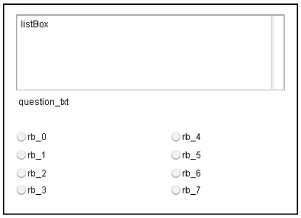
The List component is probably my favorite (second only to the DataGrid, but that's only included in Flash Pro). The List is quite useful for storing data and giving the users access to it. Listing 12.5 gives an example for a survey. You'll need one List component (instance name ListBox), one Label component (instance name question_txt ), and eight RadioButton components (named rb_0 through rb_7). Make all the components pretty wide to accommodate lots of text and lay it out something like that shown in Figure 12.6.
Listing 12.5. Survey Using the List Component
1 questions=[]; 2 questions.push({topic:"Geography", 3 question: "Where are you from?", 4 options:["Oregon", 5 "Washington", 6 "California", 7 "None of these"]}); 8 questions.push({topic:"Software", 9 question: "What software do you use most?", 10 options:["Dreamweaver", 11 "Fireworks", 12 "Flash", 13 "Director"]}); 14 //add a label property 15 for(var i=0;i<questions.length;i++){ 16 questions[i].label=questions[i].topic; 17 } 18 myObj=new Object(); 19 myObj.change=function(me){ 20 //handle situation that they deselected list item 21 if(listBox.selectedItem==undefined) { 22 question_txt.text=""; 23 for(var i=0;i<8;i++){ 24 owner["rb_"+i]._visible=false; 25 } 26 return; 27 } 28 question_txt.text=listBox.selectedItem.question; 29 var options=listBox.selectedItem.options; 30 for(var i=0;i<maxQuestions;i++){ 31 var thisOne=owner["rb_"+i]; 32 thisOne.value=false; 33 thisOne.data=i; 34 thisOne.addEventListener("click",myObj); 35 if(options.length>i){ 36 thisOne._visible=true; 37 thisOne.label=options[i]; 38 if(theirAnswers[listBox.selectedIndex]==i){ 40 thisOne.value=true; 41 } 42 }else{ 43 thisOne._visible=false; 44 } 45 } 46 } 47 myObj.click=function(me){ 48 theirAnswers[listBox.selectedIndex]=me.target.data; 49 } 50 //init 51 var owner=this; 52 var maxQuestions=8; 53 var theirAnswers=[]; 54 //connect 55 listBox.dataProvider=questions; 56 listBox.addEventListener("change", myObj); The first 13 lines just populate the questions array. The for loop on lines 15 through 17 inserts a label property on each object in the questions array. Naturally, I could have used label in place of topic in the original structure, but I wanted to demonstrate that you can just extend your data structure instead of reformatting it.
Line 18 shows how myObj gets a change event defined where most of the work will take place (lines 19 through 46). Real quick: Lines 20 through 27 just bypass the rest of the code if they happen to be de -selecting the List. From there, a lot of data is accessed by using listBox.selectedItem . For example, line 28 grabs the question property for the current item, and line 29 the options property. The for loop on lines 30 through 45 goes through all potential slots for answer to set details for all the RadioButtons. Notice the value is set initially to false (line 32) but if it turns out they've been to this question already and set this option, the RadioButton's value is set to true (line 40). Also notice line 34, where each RadioButton has a click event listener added.
The click event (also part of myObj) is relatively simple. Notice, however, that we set the appropriate slot in theirAnswers to the data in the target of the parameter I used ( me ).
Lines 51 through 56 just set a few initial variables as well as link the listBox instance to a dataProvider ( questions ) and add the change event listener.
Figure 12.6. The List, Label, and eight RadioButton components are all you need for this mini-app.
Advanced Components
By no means have we looked at all the components. The good news is they're very consistent. For example, the idea of a label the user sees and data hidden in an item is used widely. Here are a couple images and ideas about how you can use other ones. There's not enough room to walk through the code for each, but you can find the code for these figures on my website (www.phillipkerman.com/rias). Note that because the license agreement forbids anyone from distributing the source component code, I've only posted the code (not an FLA with the component). Anyway, here are a few of my favorite components.
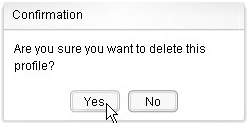
Alert Component: You can invoke Alert dialog boxes using script. Additional options include a way to make the dialog box modal (meaning the user must respond before the rest of the app proceeds).
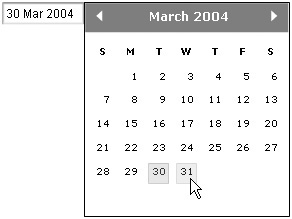
Date Field and Date Chooser Component: You can use this component with no scripting whatsoever. Advanced options include restricting users from selecting certain dates.
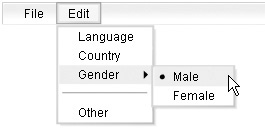
Menubar Component:This component is pretty sweet. You can make hierarchical menus , separators, and even exclusive (radio button type) options. You can use just the pop-up portion (the Menu component) without the horizontal bar.
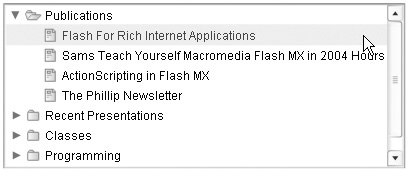
Tree Component:The Tree and XML data were made for each other. You can import XML files to describe the structure or build nodes (think folder) on-the-fly using script inside Flash.
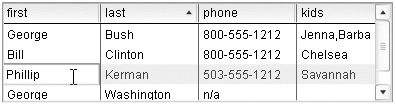
DataGrid Component:This component is the perfect way to visualize all your arrays full of objects. You can even edit entries provided you set the editable property to true
Rest assured that when you have a need for one of these components, they'll save you a ton of time. Also, let me suggest that you don't bang your head too long trying to figure out how to populate them. Some require a particular format. (That is, you may not be able to just take any array and expect it to work as a dataProvider. ) However, if you just take a sample (for instance, the ones you can download from my website) and then try modifying the content, you'll be on your way quickly. Realize that populating a component is only half the process. You also need to figure out how to use itthat is, set properties and trap events.
| [ LiB ] |
EAN: 2147483647
Pages: 120