Foundation Skills
| [ LiB ] |
This section moves from the ground level up through all the standard ways to use components . Basically, the process is you populate them, associate them so that they can trigger your code, and optionally customize their look. For a simple example, consider a button. You'll want to populate its label (so that it reads Click Me, for example), you'll want to link it to your code so that something happens when the user clicks it, and you might even want to change the typeface or highlight the color . You'll learn all of this.
Populating Manually
The basic idea of a component is that it's a movie clip containing code and graphics. With any movie clip, you can set individual properties for each instance onstage through the Properties panel. When the instance is a component, the Properties panel includes an additional tab called Parameters (see Figure 12.1).
Figure 12.1. In addition to the normal settings available for clips, components have the Parameters tab in the Properties panel.

Through this interface, you, the author, can assign initial values for any property you decide to expose. Actually, most components include more properties you can access, but they require scripting (which you'll do in the next section).
Just drag two Button components from the Components panel onto the stage. Select one instance, and through the Properties panel's Parameters tab, change the Button's value for labels. That is, type something other than Button in the labels field. In the Button component's case, it uses LivePreview, so you'll actually see the label you set without testing the movie. (You can turn Live Preview on and off via the Control menu.) To see the button behave like a button, however, you need to test the movie. Feel free to tinker with the other properties exposed in the Parameters tab.
Note
Parameters Versus Properties
Think of them all as properties. It's just that the Properties panel had to have a different name for the additional properties added to a component, so Macromedia called it Parameters . Actually, the property names visible in the Parameters tab (for instance, data or label in Figure 12.1) are not necessarily the same as the property names the component author is using. That is, some components use more presentable names in the Parameters tab than the underlying property names to which they're linked. In addition, you can't just set those property values using script unless the component author designed it that way. (You'll see how to check next.)
Although the Button is a quite useful component, you can't do much using just the Properties panel. Before moving on, however, it might help to look at one that's a bit more exciting. Drag a ComboBox component onstage. To populate this component, click the [] to the right of the labels parameter. Then click again (or click the little magnifier) and you'll see the dialog box from which you can add multiple values (see Figure 12.2).
Figure 12.2. For parameters that accept multiple values, this dialog box is accessible.
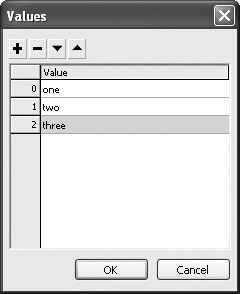
Click the plus button a few times, and then replace each defaultValue with something like "one," "two," "three," and so on. Click OK, and then test the movie. Pretty cool. Almost no work, and you have a sophisticated ComboBox. Naturally, you'll need to read on to learn how to make it do anything.
Populating with Script
It's possible to do everythingand morethat the Parameters tab can do by using script. The first step is to ensure your components have instance names. Then you just use "object dot property" or "object dot method." That is, when you know the supported properties and methods , you can use very standard-looking code.
Using Properties and Methods
Some attributes of components are settable directly through properties. In the case of setting a Button component's label, for example, name the instance my_pb and just use the following:
my_pb.label="Click me";
That is, "instance dot property." (I just happen to know buttons have a label property.)
In the case of the ComboBox, it doesn't actually have a label property. You need to use the addItem() method to populate it. Also, the removeAll() method clears any labels currently in the ComboBox. Consider this simple code for a ComboBox with the instance name my_cb:
my_cb.removeAll(); my_cb.addItem("one"); my_cb.addItem("two"); my_cb.addItem("three"); There's not a whole lot to this except that you'll have to learn what properties and methods are available for the particular component you're using.
Learning Properties and Methods
It's sometimes difficult to see why some cases warrant using a method and others use properties. I think it's easy to understand why removeAll() is a methodit's more of a procedure than a static attribute. (That is what properties are.) It's just that when you can, it's easier to use properties because you can "get" their values using the same syntax you use to "set" their values. This isn't up to you, however; it just depends how the component was designed. Take the ProgressBar component. You may want to say my_bar.value=50 , but you must use my_bar.setProgress(50,100) .
Again, you just need to look up the properties and methods available. In the Help panel, search for the component name (for instance, ComboBox), and then find the following matching categories:
-
ComboBox component
-
Using the ComboBox component
-
Customizing the ComboBox component
-
ComboBox class
Because these four categories show up for most all components, let me explain each one. In 1, you can find what the component is useful for and how the user will interact with it. Under 2, you can find how you can populate via the Properties panel. Under 3, you get details about how to skin the component ( covered later this chapter). Finally, under 4 you can find all the properties and methods accessible to you via ActionScript.
Another "how to help yourself tip": In lieu of designated code hints suffixes (like how I use _pb for Buttons and _cb for ComboBoxes), Flash MX 2004 supports an improved method. At the top of your script, just identify your component instances using the new strict data type casting. For example:
var mybutton:Button;
Then, you'll find anytime you type mybutton. , you'll trigger all the supported properties and methods. Remember to start with var or the preceding technique won't work. Also, you'll need to include the full path to a component's class file (for example, var myCombo:mx.controls.ComboBox ).
Component Data Structure
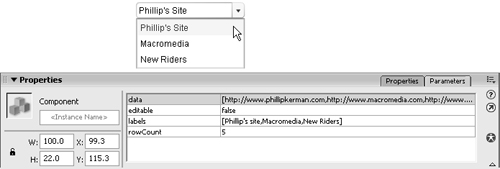
Most of the components support the idea of maintaining both labels and data. This is classic code-data separation. That is, the user sees the label, but deep inside the component there is a corresponding value for the data. For example, Figure 12.3 shows a manually populated ComboBox that displays wordy labels but maintains actual web addresses in the data.
Figure 12.3. Once populated, this ComboBox has three labels and three matching values for data.
The user doesn't need to see the data, but your scripts may need access to it. In this example, the script that triggers when the user selects an item will need to ascertain the corresponding data if you are to navigate to that URL.
Naturally, you can populate a component's data and value via ActionScript. Some components just have one label and one data such as Buttons, CheckBoxes, and RadioButtons. In those, you just set each property directly. For example:
my_button.label="Click me"; my_button.data=101;
You can put anything you want into the data . The idea is that you're the one who can grab the data's value, so put whatever you want. In fact, you can store any data type you want: string, number, array, generic object.
Earlier, I left out the fact addItem() has room for two parameters (one for label , the other for data ). To repeat what Figure 12.3 shows, for example, the all-script version is shown here:
my_cb.removeAll(); my_cb.addItem(" Phillip 's Site", "http://www.phillipkerman.com"); my_cb.addItem("Macromedia", "http://www.macromedia.com"); Notice the first parameter is the label and the second parameter is the data . In fact, you don't have to use this syntax. For one reason, you have to remember the label goes first and the data goes second. A more extensible variation involves providing just one parameternamely, a generic object that contains both a label and a data property. For example:
my_cb.addItem({label:"Macromedia", data:"http://www.macromedia.com"}); You'll see this syntax is nicer because it also provides a way for you to add additional properties that are effectively hidden from the user (but still accessible through code) like the data property.
Visualizing a Button component with a label and data is fairly easy. For multivalue components that support multiple labels with corresponding data (ComboBox, DataGrid, and List), each label/data pair is stored in what can be thought of as a slot of an array. In fact, the array will become what's called a DataProvider, as you'll see next. I still think it's easiest to think of a component's addItem() method as being like and Array's push() . For example, this actually populates the ComboBox as was done earlierbut this time without addItem():
myArray=[]; myArray.push( {label: "Phillip", data: "http://www.phillipkerman.com"}); myArray.push( {label: "Macromedia", data: "http://www.macromedia.com"}); my_cb.dataProvider=myArray; The only twist thrown in is the last line about the ComboBox's dataProvider property (covered next). The part you should really understand, however, is that each item in a multivalue component contains a label and a data property, and all the items are stored in what can be thought of as an array.
dataProvider
On the surface, a dataProvider is just an array that contains generic objects each with a label and a data property. It's actually a special type of array because when you associate a component instance with a dataProvider , the component remains synchronized any time the dataProvider changes. By just saying someInstance.dataProvder= , you'll trigger a bunch of underlying code to keep things synchronized.
It's really as easy as shown earlier, but you should use addItem() rather than push() . Either way will work while populating your array, but after it's been identified as a particular component's dataProvider , you'll have to use addItem() for the component to remain synchronized. So, just think of addItem() the same as push() . Just be sure you're inserting a generic object with label and data properties. There are other useful methodsfor example, addItemAt(1, {label:"l", data:1}) , which inserts this object into index 1. Check out the help on the List class.
Finally, you can definitely store more than just a label and data property. Those are just the ones the component wants. You'll see in the "Applied Examples Using Components" section that follows (see Listing 12.5) that when you build a survey, you'll store additional properties such as the text of the question as well as an array of possible responses. It's really up to you what you store in the dataProvider array.
Ascertaining Values
Although the user sees only the label in a component, you need a way to grab the data as well as any other homemade properties you add. It's pretty simple to get it from a single label/data component such as a Button:
trace("value of button is "+my_pb.value); In the case of multivalue components, you first need to grab the item, and then ascertain the value. For example, the following code first gets the item in the 0 index (of my_cb) and then finds the data property:
trace("first url is "+my_cb.getItemAt(0).data); A few terms are important to understand. First, an item in a component is the entire generic object in that particular slot. So when you have the whole item, you can use dot syntax to grab its data, label , or any other homemade property you stuffed into that slot. There are also two properties to know: selectedIndex and selectedItem . Take the ComboBox. When the user makes a selection, the selectedIndex is the selected slot (0, 1, 2, and so on). However, the selectedItem is the whole generic object from which you can grab properties. Suppose, for instance, that you want a button that will take the user to whichever site he has selected in the ComboBox. Just grab a Button component (named my_pb) and a ComboBox (named my_cb) and put the code in Listing 12.1 in the keyframe.
Listing 12.1. ComboBox Jump Menu
1 var myArray=[]; 2 myArray.addItem({label:"Phillip", data:"http://phillipkerman.com"}); 3 myArray.addItem({label:"Macromedia", data:"http://macromedia.com"}); 4 my_cb.dataProvider=myArray; 5 my_btn.label="Go"; 6 my_btn.onRelease=function(){ 7 getURL(/books/1/478/1/html/2/my_cb.selectedItem.data); 8 } Ignore for the moment how onRelease serendipitously works (because you'll see a better approach next). The main thing to notice is line 7 where my_cb's selectedItem's data property is used to provide the actual string to the getURL() command.
Incidentally, if you want to store any additional properties in the dataProvider , you would have done so in lines 2 and 3. Then, at the place you intend to ascertain those values, just grab the property in the same manner as line 7 grabbed the data .
The key to ascertaining values stored inside a component is just to get a reference to that component instance. In the example above, we just used the instance name. Later, you'll see how to get a reference to the instance that triggered the event (using the target property). In either case, after you have a reference to the component, you get any property inside an index.
Triggering Code
We totally lucked out when the Button component responded to the onRelease eventjust like conventional Flash buttons. That certainly isn't the preferred approach. There are two general ways to handle it now. They both deal with a new set of events specifically supported for particular components. For example, Button components have a click event, and ComboBoxes a change event. In fact, some components have multiple events for which you can trap. For example, ComboBoxes additionally have such properties as "close", " open " , and "scroll" (to name just a few), all of which you can trap. The first step is deciding for which event you plan to have code respond.
The two general ways to trap code are as follows:
-
The on method (much like code you place right on conventional buttons).
-
Use addEventListener() to point to an object that contains definitions as to how to handle one or more events.
The on Method
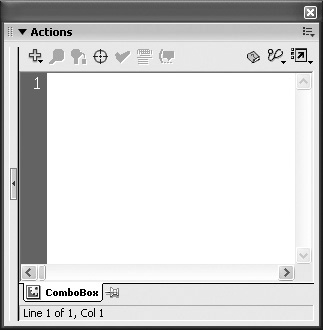
Real quick, let me explain the on method. Even though I don't recommend using it, it's bound to become popular because it's implemented this way when you use behaviors. To make it work, you have to put the code right on the component instance. That is, select the component and open the Actions panel. Ensure you see the movie clip instance icon for the selected component at the bottom of the Actions panel, as Figure 12.4 shows.
Figure 12.4. To explore the built-in "on" events, select a Component and ensure you see its name in the tab at the lower left as shown here.
If you have a Button component selected, you can type this code:
on(click){ trace("You clicked"); } As soon as you type on( , the code completion displays to help you select from the available events for this component. Obviously you'll want to put some more useful code on the component depending on what you want the button to do. One little note, if you want access to the component's properties, be sure to start with this. , as in trace("the label is "+this.label ). That's about it. You just need to find an appropriate event name for the component you select (and behavior you want).
I don't like the on method because you end up with code scattered about (not just in the keyframe). The code-completion help offers a quick reference, however. I suppose the on method is also nice because you don't even have to give your components instance names; without instance names, however, recall that you can't set many properties. I advise you to learn to use addEventListener() .
Using addEventListener()
With addEventListener() , you specify an object that contains properties that match the specified events you want to trap. The function you define gets triggered when the event occurs. Here's the basic form:
1 myObj=new Object(); 2 myObj.event=function(){ 3 //some code 4 } 5 someInstance.addEventListener("event", myObj); Just replace someInstance with your component instance name. Also replace both "event" (the string in line 5) and event (the property in line 2) with the event you're trapping (with, for instance, click or change ). Also, be sure to define your object first before executing the addEventListener() method.
Note
Better Than Flash MX
If you're familiar with the Flash MX methods setChangeHandler() and setClickHandler() , you'll like addEventListener() because it consolidates both of these and makes it much easier. That is, you always use addEventListener() but then you specify a different event, depending what you want to trap.
So, instead of lines 6 through 8 in Listing 12.1, I should have used the following code:
myReaction=new Object(); myReaction.click=function(){ getURL(/books/1/478/1/html/2/my_cb.selectedItem.data); } my_btn.addEventListener("click", myReaction); Although this may seem like more code (okay, this does have two extra lines), it actually starts to consolidate when you have several components triggering the same function. Naturally, if you do add event listeners to several components that all point to the same function, you need a way to sort things out inside the function. That is, if several buttons all point to the myReaction object, inside the myReaction.click function you'll probably want to figure out who triggered it. That comes up next, but first consider this more elaborate variation:
1 myObj=new Object(); 2 myObj.change=function(){ trace("change triggered"); }; 3 myObj.open= function(){ trace("open triggered"); }; 4 myObj.close= function(){ trace("close triggered"); }; 5 my_cb.addEventListener("change", myObj); 6 my_cb.addEventListener("open", myObj); 7 my_cb.addEventListener("close", myObj); Lines 1 through 4 should look pretty familiar despite each one appearing in a single line. The part that I find weird is how the event listener appears both in the string ("change" in line 5) as well as the property name of the object ( change in line 2). I guess my expectation would have been that you could say addEventListener(myObj) and not specify which eventhowever, that's not how it works. You identify the event name in both places.
Let me show how you can redefine how an event is handled. That is, even after you've defined the functions that will trigger for specific events, you can change what happens when, for instance, "change" triggers. For example, later you could add the following code that would redefine how the script reacts to the change event:
myObj.change=function(){trace("something different");}; The idea here is that by storing all your events inside properties of an object (here, myObj ), it's easy to wipe them away or redefine them.
Event Objects
When any component invokes a function identified through addEventListener() , it sends as a single parameter a generic object full of interesting properties. This parameter is called the Event object. For those of you familiar with V1 components, you'll want to know about the target property because this is a reference back to the instance that triggered the function. (This is equivalent to the entire first parameter received by V1 componentshere you just have to use target.) In fact, for anyone the target property is probably the most useful. With it, you can ascertain any property of the component (for instance, its label or data ).
It's easiest to see in a simple example (see Listing 12.2). Suppose you have two instances of the RadioButton component (male_rb and female_rb). Instead of having each one trigger a different function, you can make them point to the same function. Then, when inside the function, you can sort out which button was pressed.
Listing 12.2. Using Event Objects
1 genderObj=new Object(); 2 genderObj.click=function(who){ 3 if(who.target.data==1){ 4 trace("you clicked male"); 5 }else{ 6 trace("you clicked female"); 7 } 8 } 9 male_rb.label="male"; 10 male_rb.data=1; 11 male_rb.addEventListener("click", genderObj); 12 female_rb.label=" female "; 13 female_rb.data=2; 14 female_rb.addEventListener("click", genderObj); The new part here is that line 2 identifies the parameter who . Then, inside the function I can get a handle on the button by saying who.target . In this case, I just grab the data property from the button that's calling it, but I could have grabbed anything (even ascertained or set its _x or _y properties).
The other properties besides target vary depending on the component type. You can search the Help for "event object." Alternatively, you can insert this (now familiar) tracing code between lines 7 and 8:
for(var i in who){ trace(i+":"+who[i]); } That will show you all the properties in the who parameter. In the case of my radio button, this is what I saw in the Output window:
relatedTarget:undefined button:0 metaKey:false shiftKey:false altKey:false ctrlKey:false clientY:3 clientX:29 screenY:100.35 screenX:276.35 detail:undefined view:undefined type:click target:_level0.male_rb
Don't ask me what all those properties arejust learn how to find them and research them.
Now that you have the foundation skills necessary to use components (populating them, ascertaining their values, triggering code, and figuring out who triggered the code), it's time to move on to a few examples.
| [ LiB ] |
EAN: 2147483647
Pages: 120