Data Management Components
| [ LiB ] |
Data Management Components
For me, the inclusion of the six so-called Data components is what justifies Flash MX Professional 2004. Unlike the user interface (UI) components, the Data components have no visual component. Instead, they only help you connect to outside data, manage complex data inside Flash, and gracefully track any subsequent changes to the data (while in Flash) so that updates sent back to the server can be kept to a minimum. Integral supplements to the Data components are the Bindings and Schema tabs in the Component Inspector. The rest of this chapter shows you both the concepts behind the Data components and a clear idea about how to use them.
The Data Component Concept
The six Data components include two each of three general types: connectors, managers, and resolvers (see Figure 7.4).
Figure 7.4. These six Data components give you tons of control.
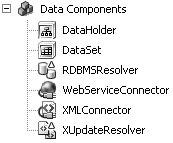
The XML Connector and WebServiceConnector help you import and export XML data or SOAP data, respectively. The DataHolder and DataSet help you maintain and process data while in Flash. Finally, the RDBMSResolver and XUpdateResolver both track changes to your data and prepare "deltaPackets" containing details of just the aspects that change. The two resolvers are identical except that XUpdate uses a standard format, and RDMS uses format more in tune with relational databases. (RDMS stands for relational database management system, which includes such tools as Access or MySQL.)
Depending on your application, you'll drag one or more Data components onstage and effectively snap them together using the Component Inspector. You use this panel like the Parameters tab in the Properties panelto populate and set properties of your component instances. In fact, the Component Inspector includes the standard Parameters tab, but adds two more: Bindings and Schema.
The Bindings and Schema tabs enable you to set even more properties because there are more details to specify. Bindings are how you link two or more components together. For example, you can bind the changing value in a numeric stepper to an array so that the user can select a single index in the array. Binding enables you to synchronize values so that when one changes, the other reflects the change. The Schema tab enables you to view and edit a visualization of the data structure. If your data is a generic object, for example, you can specify the contained properties (which later get bound to other components). Basically, you need a name for anything that gets bound and the Schema tab enables you to map out and name the data. An epiphany of understanding for me came when I realized schema is short for schematic .
The next few sections cover the details in sort of a chronological order based on how you might use the components. First you'll learn how connectors bring outside data into Flash. The first couple of examples actually require you to open the Bindings tab. Then you'll learn the details of binding data to visual components. You'll also need to understand schemas, because you can't bind data unless the schema is known. However, the schema often imports automatically, as in the case of a web service, because a description of its structure is included. In any event, the focus then shifts to the DataHolder and DataSet components because they help manage data as the app runs. Finally, the resolvers deal with tracking changes. Often the last step is figuring out what information you're going to send out of your app, and the resolvers help in this stage.
Even though I've organized this information linearly, when you build an app you'll approach all these topics simultaneously in a more integrated manner. This is comparable to how you might study the different parts of a car (steering wheel, brakes, gas pedal), but when you actually drive you use everything at once.
Connectors
The connectors (XMLConnector and WebServiceConnector) make reading and writing outside data a snap. In the case of reading XML, you just point to the file you plan to import (or the server that will supply it) and then "trigger" the component at runtime. It's the same with the WebServiceConnector: Point to the service, optionally include parameters (because many web services expect a parameter with your request), and then trigger the component. When the data arrives, it will immediately display in any visual components to which you've bound the data. For example, you can have a TextInput component into which the user types a three-letter airport code (say PDX for Portland), that value is bound to the outgoing parameter for a WebServiceConnector (which points to a web service that supplies weather information), and when the results arrive back that data is bound to a TextArea component that displays the current temperature. It's really easy to set up.
The only catchparticularly with the web servicesis that a Flash app running in the browser is restricted from directly accessing a web service hosted on an outside domain. At the end of Chapter 6, you learned a technique that enables you to point to a simple script on your own application server that acts as a proxy for the real web service outside your domain. Just note that the following example will work only while you are authoring or running a SWF on the desktop. (It won't work in a browser unless you set up a proxy script.)
To try it out, place onstage a TextArea component (instance name my_ta ) and a WebServiceConnector (named my_ws ). Select the my_ws instance, open the Component Inspector, and select the Parameters tab. Type the following address into the WSDLURL field:
http://live.capescience.com/wsdl/AirportWeather.wsdl
(I found this public web service at www.xmethods.com where you can find many more.)
After you enter the WSDL address, Flash attempts to parse the information contained. (Go ahead and type that same WSDL into your browser to see how the data is organizedbasically it uses a common format to detail how the web service works.) When the parsing is complete (and provided it was successful), you can click in to the Operation field and see a drop-down list of all the methods available at that web service. Select getTemperature .
Select the Bindings tab and click the Plus button. This particular web service expects one argument. Click the row that reads arg0 : string (shown in Figure 7.5), and then click OK.
Figure 7.5. We will bind a hard-wired value for this web service's parameter.
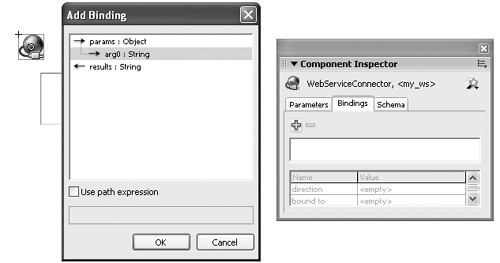
Still in the Bindings tab, make sure the row params.arg0 is selected and click twice in the Value field for bound to . The Bound To dialog box appears, from which you can identify from where the value (for this parameter) will come. Check the box Use Constant Value and type KPDX into the field (the real airport code for Portland), and then click OK. Again, click the plus button in the Bindings tab. This time select Results. Now click twice in the Bound To field (for the row results ), and we'll bind the value returned to our text area. In the Bound To dialog box, click TextArea <my_ta> on the left pane. The Schema Location pane shows text : String . In this case, the TextArea has only one property to which we can bind the data ( otherwise you might see more in the right-side pane). Click OK. Notice that when you click the two rows now populated in the Bindings tab ( params.arg0 and results ) that params.arg0' s direction is "in" and results is "out" . That is, value KPDX comes into this component and the results go out (in this case, to the TextArea). Finally, to invoke the WebServiceConnector, place this script in frame 1 of the movie: my_ws.trigger(); . Test the movie and you'll see the temperature at my home. Pretty cool. All we did was specify the address of the web service and the particular method we intended to trigger. Of course, we also had to specify a parameter and then bind the results to an onscreen TextArea. It turns out setting up the bindings is way more involved than getting the connector to work.
The XMLConnector is simpler in some ways because you can use it to just import data if you want. Here's a real quick example. Make a copy of the ActionsPanel.xml document that's inside the ActionsPanel folder inside the First Run folder adjacent to your installed version of Flash. Put the copy in a new folder. Make a new Flash document and save it in the same folder. In the Flash document, drag a Tree component (instance name my_tree ) and an XMLConnector (instance name my_xc ). Select the my_xc instance and select the Parameter tab. Set the value for URL to ActionsPanel.xml and set the direction to receive. (You can use send/receive for an application server providing data in XML, but here we're just reading a static fileyou can't write to it.) Now select the Bindings tab and click the plus button. Select the row that reads results : XML and click OK. Click twice in the Bound to Value column, and then select Tree, <my_tree> in the pane on the left. Click OK. Finally, you need to trigger the connector. Type this code in the first frame of the document: my_xc.trigger(); .
This XML example just takes the whole XML document and dumps it into the Tree component. This is not a typical need. More likely you'll want to import XML and then display only part at a time. For example, in Chapter 6 we imported the content for a quiz and displayed one question at a time. You can certainly do this with the XMLConnector, but it involves the Schema tab and much more binding. We'll look at those both next. So far you've mainly seen how the XML and web service connectors will import data from an outside source. Next you'll see more about what you can with the data after it arrives into Flash.
Bindings and Schema
Bindings are how you link a property in one component to a property in another. These properties can be visual (such as the text of a TextArea) or they can be variables contained in a complex data structure (say the firstname of the first record in a array full of generic objects). The schema is a map of data properties contained in a component. The TextArea maintains several properties (such as font color , _x, _width ), but has just one data property ( text ), so its schema is very simple. For a web service that returns a query (array full of generic objects), the schema is a bit more involved. You always need a schema before you can start binding data values because those values have to have a name. The schema puts names on the data properties.
Here's an analogy. The red wagon my daughter got for her birthday included a set of directions. The schema, if you will, was a picture with the items labeled: 4 wheels, 8 long screws, 4 short screws , 2 axels, and 4 sides to the wagon. They could have called the axels "bars" for all that mattered, but when it came to the directions they just needed to use a name consistent with the original picture.
When you're designing an app that displays dynamic data, you won't know the exact values displayed but you need a handle on what sorts of values to expect. The schema puts structure and labels on that data. There are three primary ways to create a schema: automatically from a WSDL, automatically from a sample XML template, or manually. A web services WSDL file will provide the schema of both the values it expects you to send as well as the values it returns. You really can't modify these yourself. For XML, you can import a sample (either the actual XML or a file that contains the same structure of the actual XML). This technique involves a bit of developer intervention to make sure you do it correctly. But, again, you can't decide to change the schema inside Flash to something that doesn't match the actual XML. Finally, there are occasions when you'll want to define a schema by hand. Mainly this is to extend and add custom properties to components. This applies more to components that handle data once inside Flashprimarily the DataHolder, which you can structure however you want.
The schema definition is basically a copy of what you see when you added a binding. For example, Figure 7.6 shows the schema that was automatically generated for the weather web service example from earlier (using a WSDLURL of http://live.capescience.com/wsdl/AirportWeather.wsdl ).
Figure 7.6. This relatively simple schema is created when Flash parses the WSDL.
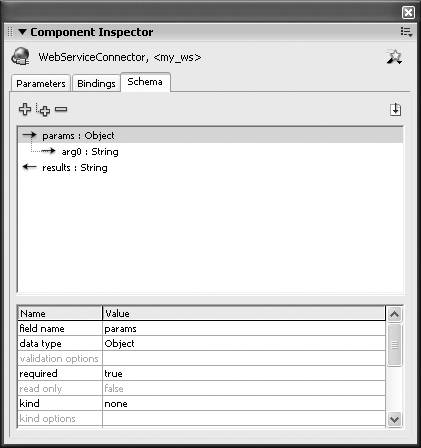
Notice that the main window of the Schema panel includes three "bindable" properties: params, params.arg0 (that is, arg0 nested in params ), and results . This schema was produced automatically. When you select any one row, you'll see additional details below where you can modify things such as the names and data type. Because the web service often needs or returns specifically named properties, you probably don't want to change them here. (I'll come back to the settings for kind, formatter, and encoder laterbut realize these let you further define how data is messaged on its way into or out of the component.)
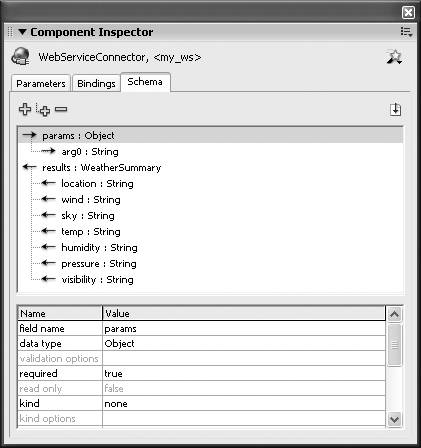
To see the power of a WSDL to declare its own schema, go back to the Parameters tab and change the operation to getSummary (another available method in the weather web service). Return to the Schema tab and notice the results now include seven separate properties (see Figure 7.7).
Figure 7.7. Because the selected operation (that is, the method) is more complex, this schema displays all the subproperties that get returned in the results.
At this point, you can bind just the humidity to the TextArea. Click the Bindings tab, select the row results, and then click the minus button. Click the plus button, and this time select Humidity (under Results, just like in the schema). Then click the Bound To field twice and point to the my_ta TextArea. We had to remove the old binding because you can only modify the settings in the bottom panenot the bindings themselves . I find myself frequently removing bindings and adding new ones in this manner. Also, if you had removed the destination for that binding (the TextArea that is), the binding would have been removed automatically.
The second way you can define a schema is by loading a representative XML sample or the actual XML file. The point is, it's not the values in the XML but the names of the tags that matter. In the preceding example, we just dumped the entire ActionsPanel.xml data into the Tree component. If you'd rather display just part of the data, you need to bind specific properties from the schema.
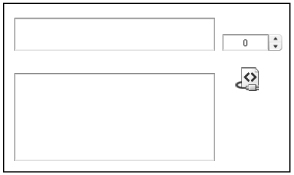
Here's a slightly involved exercise using that same ActionsPanel.xml source file. Start a new file and drag onstage two TextArea components (with instance names title_ta and body_ta ), one NumericStepper (instance name myns ), and one XMLConnector (named my_xc ) as shown in Figure 7.8. Save this file adjacent to your copy of the ActionsPanel.xml file. Select the my_xc instance and use the Parameters tab to set the URL to "ActionsPanel.xml" and the direction to receive .
Figure 7.8. This example steps through values in the ActionsPanel.xml with these four components.
To import the XML schema, select the Schema tab and first make sure you select the row results : XML . That is, you want to describe the form of the data coming into the component, not the structure of the data going out. Then click the button Import Schema from a Sample XML File and point to the ActionsPanel.xml file. You may need to refresh by clicking the stage and then reselecting the my_xc instance, but ultimately you'll see a pretty gnarly schema that's only partially shown in Figure 7.9.
Figure 7.9. Flash created this schema by parsing an XML file.
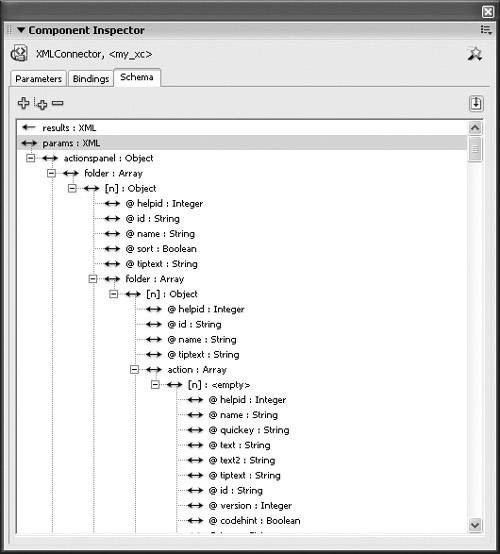
If you had designed this structure, it would be easier to dig into. In this case, I suggest you start by collapsing the hierarchy (click the little box to the left of the first nesting under results ). There are two nested properties: folder and a deprecate . Because folder is an array of objects, you see [n]:Object , under which you'll find six more properties (including one that is an array full of more stuff). For this example, give the user a way to step through each item in the top-level folder property and view the name and tiptext for each. All you have to do is bind those properties.
Select the Bindings tab and click the plus button. You'll see the same hierarchy you imported. Select the row @name:string (under the Object inside the folder property). Click OK. Set direction to out (because the value is going to go out of this component). Click twice on the Bound To value, and then bind to the title_ta TextArea component and click OK. Now, because the name property is nested inside an array, you'll notice the last row Index[0] defaults to . Instead of always displaying the index, you can bind that value to the NumericStepper instance. Click twice on the value column for Index[0] . This time the Bound To dialog box is mostly grayed outonly because the default is hard-wired as the constant value. Uncheck the Use Constant Value box and select the NumericStepper instance listed on the left. Before you click OK, notice this component's schema has only one property ( value ), but this time its data type is Number . That makes sense, but it's the first one that's not a string.
Back at the Bindings tab, you can bind the tiptext property to the other TextArea ( body_ta ). Click the plus sign, pick tiptext , set direction to out , bound to the body_ta instance, and set the Index[0] to use your NumericStepper's value. Finally, add this code to the first keyframe:
my_xc.trigger();
As you click the NumericStepper , you'll see a different excerpt of data from the entire XML file. The numeric stepper's default maximum value is 10, so with this data when you go past 7 you'll see undefined onscreen. The following script sets up an event listener that triggers when the XML is fully loaded, and then sets the ns instance's maximum property:
function resultsLoaded(me) { ns.maximum=me.target.results.firstChild.firstChild.childNodes.length; } my_xc.addEventListener("result", resultsLoaded); Sure, I had to dig to figure out how far down into child nodes I had to go. Just be sure to put this code above the trigger. Note that result is just one of the events for which you can listen.
Note
Learning All the Component Event Listeners
Here's a trick to learn which events a particular component can listen for. Select the component instance, open the Actions panel, and type on( . The code hints then appear listing all event names. Erase the code and then use the addEventListener() method as shown in the preceding code.
There are actually many more features of the Bindings and Schema tabs. You'll learn about additional ways to control the format and presentation of data in the "Formatting Data" section later in this chapter. For now you definitely have the basics. One potentially confusing issue is that for any binding you'll always have two sides: one property in one component bound to another property in another component. You'll see the two views of the same binding when you select either end. That is, you might select a WebServiceConnector and see how property from its results is bound to a TextArea component. In that case, you'll also be able to select the TextArea instance and see that it is bound to the WebServiceConnector. Editing either end will affect the other.
The tricky part is designing or studying the schema and then deciding how you're going to bind data.
DataHolder Component
The DataHolder is just a convenient way to store data while keeping it available for binding with any other components. In fact, any data-aware component includes properties to which you can bind other components' properties. Consider how the TextArea component has a text property that you can bind to. However, all components (except the DataHolder) are limited to a predetermined list of available properties, or in the case of the XMLConnector and WSDLConnector, limited to the properties contained in the remote source. The DataHolder is completely customizable. You can add properties as you see fit and structure the schema however you want.
I see the primary benefit for the DataHolder as sort of a repository where data from several different components can all be managed in one place. The only hassle with the DataHolder is that you must define the schema manually. Remember I said that in addition to importing an XML template or letting the WSDL define a schema, you could do it manually. The idea with the DataHolder is you can design the data however you want.
Instead of individually mapping several values returned from, say, a web service call, you can just copy the entire results to a DataHolder and pull out just the parts you need. Although the DataHolder is never absolutely necessary, it's often convenient as a sort of go-between. Complex data comes into Flash, gets sent to the DataHolder, and then the values appear in visual components.
Another primary benefit of a DataHolder is that you can access deeply nested data directly. Earlier the code to set the NumericStepper's maximum value included this gem:
results.firstChild.firstChild.childNodes.length
It's possible to just map the entire node to a property in a DataHolder, say records , and then use the following:
myDataHolder.records.length
(This solution is shown in example files you can download for this chapter at www.phillipkerman.com/rias.)
Creating your own schema is like designing any data structure. It's up to you. By default, the structure for a DataHolder has one property, called data , that behaves as a generic object. Not only can you change this name, change it to another data type, or remove it entirely, you also can add more properties at either the same top level ( myDataHolder.someProperty ) or nested under other properties ( myDataHolder.data.someSubProperty ). How you design the structure is up to you. The Schema panel can take a little bit of practice (see Figure 7.10). Here are a few comments:
-
Insert new top-level properties by clicking the leftmost plus button. That's how I added topLevelProp in the figure.
-
Insert subproperties by first selecting the row under which you want the subproperty to appear and then pressing the second plus button. I added subProp by first selecting topLevelProp . You'll notice @ symbols in front of properties (which also have their storage type set to attribute ).
-
Some data types preclude you from adding subproperties. For example, an object can have a subproperty, but a string can't. Normally the buttons will disable accordingly , but you can still create illogical structures. Just don't approach it haphazardly.
-
When structuring an array, the first subproperty should have the name [n] . Notice that's how the myArray is structured. The idea is that myArray is an array full of objects, each with a first, last , and phone property.
-
When accessing property names in your code, they are case sensitive.
Figure 7.10. For some components, you have to create your own schema manually.
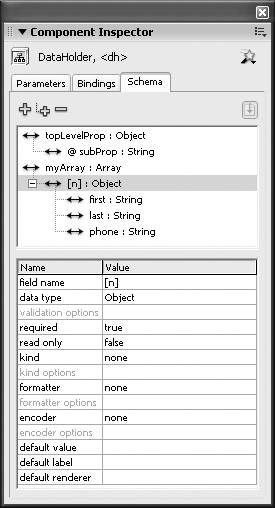
In the following example, I use a DataHolder instance (named dh ) configured as shown in Figure 7.10. Realize that the data that populates the DataHolder can come from anywhere . That is, you can bind to a DataHolder the results of a XML or web service connector, the data returned from a Remoting call, or data you type in manually. To simplify things, just use this code in the first keyframe:
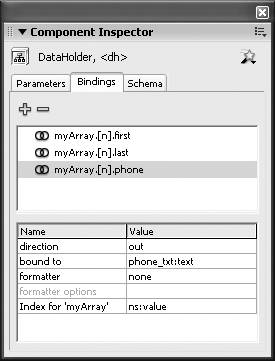
contacts=[]; contacts.push( {first:" Phillip ", last: "Kerman",phone:"503-555-1212"}); contacts.push( {first:"George", last: "Bush",phone:"800-555-1212"}); contacts.push( {first:"Bill", last: "Clinton",phone:"888-555-1212"}); dh.myArray=contacts; That last line just populates the myArray property that was already structured in the dh instance. Now just add three Label components ( first_txt, last_txt , and phone_txt ), plus a NumericStepper (instance name ns ). Back on the DataHolder, select the Bindings tab. Then click the plus button, select first : String , and then click the Bound To field and point to first_txt . Finally, click the value for Index[0] and point to the NumericStepper . Repeat this for all three properties so that the Bindings tab looks like Figure 7.11.
Figure 7.11. The DataHolder should look like this after you've created the three similar bindings.
Incidentally, you'll see in the Formatting Data section that instead of wiring up three bindings to three separate Label components, you can instead use Compose String to populate a single Label however you want.
One thing to take away from this exercise is that you can store your own variables in a DataHolder and then bind them to components. Had the data arrived from an XML or web service connector, however, there is no apparent reason why you would need to add the extra step of the DataHolder because you can bind directly from those connectors. In those cases, you still might want to use a DataHolder to, say, bind a deeply nested value to a property up toward the surface of a DataHolder. It's often easier to access data in your own customized structure you create for a DataHolder.
DataSet Component
The DataSet component is creepy the way it monitors every change to a set of data. Macromedia calls it a facade because it does its thing without really getting in the way. It's like the DataHolder because you can stick it between the source data and the presentation, but you don't need to create your own schema. The DataSet has a property called items , which is where you store an array of your dataalso called the collection . (It has other properties, but inside of items is where you store your set of data.) Each slot of the items record contains what's called a transfer object . When the DataSet is involved, you can step through the data, index and search data, sort it, and even track changes, so it's easy to maintain updates.
Iterating Data
Although your DataSet's collection (that is items property) is an entire array, you can have only one selection at a time. In the simplest sense, you iterate through the data by changing the current selection. For the following examples, assume you have a DataSet instance named ds and this code is placed in the first keyframe:
contacts = []; contacts.push({first:"Phillip", last:"Kerman", phone:"503-555-1212"}); contacts.push({first: "George", last:"Bush", phone:"800-555-1212"}); contacts.push({first: "Bill", last:"Clinton", phone:"888-555-1212"}); ds.items = contacts; Again, you can bind any array to the DataSet instance's items property.
After this DataSet is populated, you can step the selection by using ds.next() and ds.previous() . At any time, you can grab the value of the current selection using ds.currentItem . For example, the following code could get triggered by a "next" button:
trace("old first name was " + ds.currentItem.first); ds.next(); trace("current first name is "+ ds.currentItem.first); Besides stepping through the transfer objects (that is, the data in your DataSet), you can modify or add more objects. For example:
ds.addItem({first:"George",last:"Washington",phone:"na"}) You might think you can just do contacts.push() . However, for the DataSet to track changes, you need to use addItem() . The same restriction applies to changing the contents of a component's DataProvider.
Sorting and Searching
Sorting and searching a DataSet collection is based on the array object's methods. However, DataSets use indexes to speed searches. For example, the first time you perform a particular sort (say, alphabetic by last name in descending order), all the items in the collection are given special tags that speed subsequent sorts. This is like how search engines can appear to search through every item on the Internet in a matter of milliseconds . The second search relies on information saved from the preceding search.
Apparently the way DataSets are sorted, searched, and indexed is based on Java standards. However, several details really threw me. Let me report the following about sorting (say, with a DataSet instance ds):
-
You should give each sort that you perform a unique string name so that you don't keep redefining the same sort.
-
Avoiding doubled sorts is so important that there's a method ds.hasSort() that will return true if a sort is found (matching the value you pass as a parameter).
-
When you say ds.addSort() , not only will Flash add the details of the sort (and its given name) to your DataSet, it also will immediately perform the sort.
-
To retrigger a sort, just use useSort() (and provide the name you gave originally as the parameter).
Here's a quick look at the syntax:
ds.addSort("mySortName", ["first"]); The name for this sort will be "mySortName" and it will sort based on the field named first . Notice the second parameter is an array containing string versions of the field names. In this case, I just have one field, but it's still an array. In many ways, the addSort() method is similar to sortOn() (covered in Chapter 5, "Presenting Data"). You can even provide a third parameter such as Array.CASEINSENSITIVE or Array.DESCENDING . But do notice the first parameter is the name for this sort.
Later you can include code, such as the following, that ensures you're not performing the same sort twice:
if(ds.hasSort("mySortName"){ ds.useSort("mySortName"); }else{ ds.addSort("mySortName", ["first"]); } The idea is that you can create as many unique sorts as you want, but you just don't want to redefine the same sort twice. In addition, there's a ds.removeSort() if you know you won't be using the sort again, or you don't want to bother checking every time with hasSort() .
It makes sense that performing a sort will affect the current item. After all, items reorder when you perform a sort. The way it works with sorting is your selectedIndex doesn't change, just the value of the item in that index. In the case of searching, however, the index where the item is found becomes the selectedIndex value.
The detail about searching that freaks me out is that before searching for a matching value in a certain field, you must first perform a sort that includes that field. If you don't really want to change the entire DataSet's order, you just sort it anyway, do your search, and then sort it back the way it was.
When you perform a search (for example, ds.find() ), the found object becomes the currentItem . Of course, you can use this to grab any property you want. You also can use ds.getItemId() to save a unique reference to transfer an object (that is, the item). The ID won't change even if the DataSet is sorted. Incidentally, the ID returned is a string. Realize you might quickly do a sort on one property (because you have to before searching), search for a specific value of that property, save off the found object or find its index, and then re-sort the data back to where it was. If there's a visual component onstage, the user won't see any change.
The code for a search can start to look pretty convoluted with all the extra sorting going on. You can definitely consolidate this code to something more generic (see Listing 7.2). To make this code work, you need that contacts array declared and associated with the ds instance's items . In addition, you need two buttons ( firstname_btn and lastname_btn ) plus a TextInput component ( input_txt ). If you want a visual, just add a DataGrid component. You'll need to manually bind the DataSet items to a DataGrid instance's dataProvider as well.
Listing 7.2. Searching for Transfer Objects in a DataSet's Collection
//put contacts declaration here 1 ds.addSort( "default", ["first"]); 2 3 firstname_btn.onPress=function(){ 4 if (ds.hasSort("firstNameSort")) { 5 ds.useSort("firstNameSort"); 6 } else { 7 ds.addSort( "firstNameSort", ["first"]) 8 } 9 if(!ds.find([input_txt.text])){ 10 trace("no find"); 11 }else{ 12 trace ("Found "+ds.currentItem.first + " " + 13 ds.currentItem.last); 14 trace("Position in this sort "+ ds.selectedIndex); 15 trace("ID: "+ds.getItemId()); 16 } 17 ds.useSort("default"); 18 } 19 20 lastname_btn.onPress=function(){ 21 if (ds.hasSort("lastNameSort")) { 22 ds.useSort("lastNameSort"); 23 } else { 24 ds.addSort( "lastNameSort", ["last"]) 25 } 26 if(!ds.find([input_txt.text])){ 27 trace("no find"); 28 }else{ 29 trace ("Found "+ds.currentItem.first + " " + 30 ds.currentItem.last); 31 trace("Position in this sort "+ ds.selectedIndex); 32 trace("ID: "+ds.getItemId()); 33 } 34 ds.useSort("default"); 35 } Notice that I perform a sort initially (called "default") just so that I can restore it after either search. Lines 4 through 8 just ensure the same sort isn't added twice. Then line 9 performs the find() . In fact, find() returns either true or false , so I use the if statement to see whether no match was found. When there is a match, just do some trace() gymnastics in lines 12 through 15 to show ways to access the found object. Finally, line 17 puts things back the way they were (with the default sort). Lines 20 through 35 are the same thing, but it sorts first by the last property (as in last name).
Like most of this chapter, if you see something that looks pretty cool, realize there's a lot more in the documentation. The idea here is to get a handle on what's possible.
Saving
You'll find the DataSet has several other useful features. It just takes a bit of digging. However, one is just too good not to cover here. The methods saveToSharedObj() and loadFromSharedObj() make saving and restoring a DataSet's entire collection super easy. The following simple example should blow you away.
We'll take the code for populating contacts array and assign it to the DataSet's items . Not only do you need to bind the DataSet's items to the DataGrid's dataProvider , but also set the DataGrid's editable to true , and then add two buttons( save_btn and restore_btn ) plus this code:
//put contacts declaration here save_btn.onPress=function(){ ds.saveToSharedObj("testSO") } restore_btn.onPress=function(){ ds.loadFromSharedObj("testSO") } Go ahead and make some edits to the fields in the DataGrid, and then click the Save button. Quit and come back later, and then click the Restore button. (By the way, there are manual methods to edit items in a DataSetthe DataGrid just makes it easy.) Please don't hate me for making you study local shared objects in Chapter 6. After all, now you really appreciate how useful this is. Remember there are many more methods in the DataSet documentation that I haven't covered.
Resolvers
The idea of resolvers is that you want to track changes to data, not the entire set of data. For example, the preceding example saved the whole DataSet to a LocalShared object. Even if you didn't make any changes or made very few, the whole set was saved. This is not an issue for LocalShared object files, but it adds unnecessarily to network traffic. If a user makes a few changes to some data that's downloaded, there's no need to upload the whole set of data again. You only need to send the bits the user changed (and what the user changed them to).
Note
Resolvers Don't Actually Save Data
Resolvers prepare data so that you can send it to your server where it can get processed . You'll see that resolvers just create an update packet containing a complete description of what has changed. But you still need to do some work on the server side to parse this data and then, presumably, update a database.
These two resolvers work in conjunction with the DataSet component to do just that. The XUpdateResolver uses a standard format to represent changes. It only applies to XML structured data, so you want to be careful not to make it try to resolve changes to arrays or generic objects. The benefit, however, is that it uses a standard language that several server-side databases support. The other, RDBMSResolver, is especially designed to describe changes to data in the form common to relational databases.
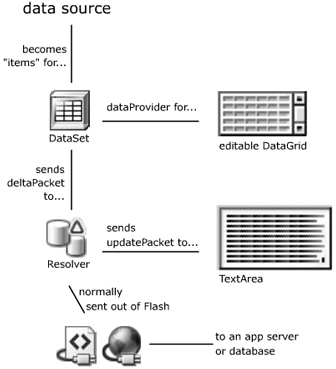
Both resolvers operate on the same principal. The DataSet actually tracks changes as they're made (either by the user interacting with an editable component that's bound to a value, or by any script that changes an object in the DataSet). Then, when you trigger the ds.applyUpdates() , a consolidated description of everything that changed gets packed up in a deltaPacket . The deltaPacket is bound to a resolver that uses the deltaPacket received to set its updatePacket property. The deltaPacket is an XML string that conforms to a known structure. The logical continuation is that you pass the deltaPacket back to your server. Because it's XML, you can bind the deltaPacket to an XMLConnector, which sends it to the server. Your server script will have to sort through the XML it receives and react accordingly (perhaps updating a database, for example). Finally, the server should send back an XML string that contains information as to whether the changes were successful. There are standard forms for this response. The results passed back to Flash can tie back into your resolver through its updateResults property. Believe it or not, this whole process not only makes the system much more efficient, but it can actually simplify things. Figure 7.12 shows a diagram of the entire sequence.
Figure 7.12. Data is fed into the DataSet, which displays in the DataGrid. The DataSet also monitors changes and will send a deltaPacket to the Resolver which, in our examples, will just display in a TextArea (though normally sent out to your database through a Connector if you want).
It's interesting to view the actual deltaPacket . Obviously, you'll have to study it further before you can write a server-side method that can parse through it. I should say, however, that it's not just some wacky homemade format that Macromedia came up with on a whim. There are volumes of information on the XUpdate standard and the corresponding XPath language, for example. In any event, it's easy to see the packets inside Flash as this quick exercise shows.
Take the contacts data script, DataSet instance, and editable DataGrid all used in the example from the "Saving" section earlier in this chapter. Add a button ( update_btn ), two TextArea components ( x_txt and rd_txt ), one XUpdateResolver ( x ), and one RDBMSResolver ( rd ). There's only a tiny bit of code to add; the main work is just setting a few bindings. First select the ds instance's Bindings tab and notice it should already be binding its dataProvider to the DataGrid instance. We'll add two more similar bindingsbut to send the deltaPacket to the two resolvers. Click the plus sign, select deltaPacket:Object , click OK, click twice in the Bound To field, select the instance XUpdateResolver listed on the left, and make sure deltaPacket is selected in the pane on the right. Repeat these steps, but in the Bound To dialog box select RDBMSResolver.
Next you can bind the updatePackets to the two text fields. Select the XUpdateResolver instance and click the plus button in its Bindings tab. Select xupdatePacket , then OK. Click twice in the Bound To field and point to the x_txt TextArea, and then click OK. The encoder uses the XPath language to specify how the changed data will appear. For now select the x instance's Schema tab, click deltaPacket, find the encoder row, and select DatasetDeltaToXUpdateDelta. Finally, click the encoder options and type items in the "rowNodeKey" dialog box that appears.
The RDBMSResolver is a bit easier. Select the rd instance, press the plus sign, and select updatePacket . Click Bound To and point to the rd_txt TextArea. Talk about connecting the dots!
Finally, put this code in the first keyframe:
update_btn.onPress=function(){ ds.applyUpdates(); } Test the application and make just one simple edit through the DataGridmaybe change "Kerman" to "Kermanator" . Press Enter to save it, and then click the Update button. The two TextArea components will fill with a bunch of details about what got changed (see Figure 7.13).
Figure 7.13. The update packets for one simple change are shown here (XUpdate is on top and RDBMS below).
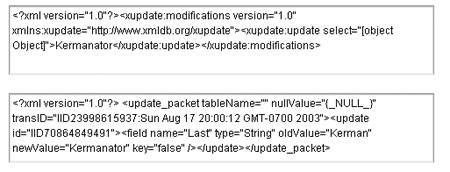
Notice that the XUpdateResolver's update packet shown in Figure 7.13 doesn't have enough detail to see exactly which row was editedthat record needs a unique identifier. For example, if you assume every record in the contacts array will have a unique phone number, you can use that as the identifier. If not, you need to add another fieldperhaps id . To see what a legitimate XUpdate update packet should look like, go back and edit the encoder option for the x instance's deltaPacket (currently set to items ) to read:
items[@phone='?phone']
The resulting update packets will always surround changes tags that identify the phone number. (For more on this format, research XPath expressions.) The point here is that the update packet we create must clearly identify what all has changed.
Note that we used both the XUpdate and RDBMS resolvers just to see how their update packets compared. You really only need one. Choosing one over the other has to do with several factors. XUpdate is a standard for XML. In fact, you only want to use XUpdate if the data is pure XML. Also because it's a standard, you will find server-side databases that support XUpdate directly. RDBMS is geared more for data in relational databases. Put simply, relational databases can include the same value in several places without actually making copies. If you designed the database, you should know whether it's relational.
Although update packets appear verbose and do require some parsing on the server side, they're actually very efficient. Consider that your DataSet may be much larger than this example. When you feel like packing up the changes made and sending it to the server, the deltaPacket creates the most condensed packet that also includes sufficient details for the server-side method to respond as necessary.
Formatting Data
So far, the only settings discussed for the attributes in the Schema tab have been field name and data type. Four options in particularvalidation, kind, encoder, and formattercontrol how the values for your properties are handled: how the values are treated when they arrive at the component, how they're passed on to other components, and how they're presented in visual components. Consider how clay comes from the earth, gets processed somehow into artist's clay, then artists shape it and harden it, and then its covered with glaze. The point is that the same exact raw material is treated and presented differently at the different stages.
Here's a quick rundown of the four options:
-
Validation provides a way for you to check whether a particular value matches its designated data type. When it doesn't, an event is fired so that you can react accordingly. An interesting fact is that you'll find several unique data types such as SocialSecurity and PhoneNumber . In addition, you can even create your own data types to validate data.
-
Kind is the raw data type at the core of the component. It's the form in which the data is stored inside the component (not how it's accessed by any ActionScript or other bound component). It's safe to say, you don't often need to modify this.
-
Encoding is how data transforms. Encoding comes up when the original data isn't in the form that you need somewhere elsefor instance, if you want to take a NumericStepper's value (a number) and send it to a TextArea. In that case, the encoding process effectively puts quotation marks around the number. Similarly, if the user is typing a string into a TextInput component and you've bound that value to a NumericStepper's number, the encoder also converts the string to a number (by effectively using the Number() function). The point is the data may get encoded in either direction. The two advanced encoders have to do with converting.
-
Formatters are probably the most fun. They let you step in and perform any sort of manipulation before the data is presented. You'll see in the next section that this is how we can take a generic object with several properties and format it however we want for display in a TextArea.
We'll look at two formatter options (Compose String and Rearrange Fields) as well as some validation tricks.
Compose String
Instead of just binding a property's raw value directly to another component property's value, the Compose String formatter enables you to send any value you want by combining hard-wired strings with variables. Although it doesn't look like this, it's equivalent to something like this:
my_txt.text="The user's name is "+ item.first + item.last;
With the preceding code, I'm creating a string by combining some hard-wired words with the value of some properties. When using the Compose String option the syntax uses < and > to surround values like this:
The user's name is <first> <last>
A couple assumptions are made here. First, this string needs to be bound to another component (say a TextArea's text ). Also, you need to have access to both the first and last properties. You should recall, however, that when setting up a binding you can pick one property (say first or last ). However, in this case you need to pick a property that itself is an object with those two properties.
Here's a quick example. Way back when you first looked at the DataHolder component, I made you bind three properties to three separate Label components. It was a pain because not only did you have to do it three times, you also were grabbing the NumericStepper's value you had to bind. You could have used one Label. Just grab one TextArea ( composed_txt ), a NumericStepper ( ns ), and a DataHolder ( dh ) Put this familiar code in the first keyframe:
contacts=[]; contacts.push( {first:"Phillip", last: "Kerman",phone:"503-555-1212"}); contacts.push( {first:"George", last: "Bush",phone:"800-555-1212"}); contacts.push( {first:"Bill", last: "Clinton",phone:"888-555-1212"}); dh.myArray=contacts; You also need to create the dh instance's schema (or use the earlier example). Figure 7.10 shows how it should be structured. (Remember the [n] for the name right inside the array.)
Finally, you can do one binding from the DataHolder to the TextArea. In the Bindings tab for the dh instance, click the plus button, select [n]:Object (not any deeper), and then click Bound To and point to the composed_txt instance. Set direction to out . Finally, change formatter to Compose String. Then, click in to the value for formatter options. Type the following text:
<first> <last> (phone <phone>)
You can test it now and see the formatted string "Phillip Kerman ((503) 555-1212)" in the TextArea.
Rearrange Fields
The Compose String example bound a property containing several subproperties to the text property of a TextArea. The composed string extracted just the elements needed and some hard-wired text. Rearrange Fields is a similar formatter because it takes a property (containing subproperties) and binds it to a componentbut this time the destination property has one or more subproperties itself. The idea is that you say "this value from my originating property goes to that value in the destination." Rearrange Fields provides a way to map subproperties in the origin to subproperties in the destination.
It's probably easier than it sounds. However, the main requirement is that both components have subproperties. That is, you don't use Rearrange Fields when binding to a TextArea because a TextArea has just one property. Generally, it works great with any component that has a dataProvider or any for which the schema includes a property with subproperties.
This example populates a ComboBox with a customized presentation of the contacts data. You can use the same DataHolder and initial contacts array definition from the preceding example. Drag a ComboBox onstage and name it cb . Then select the Bindings tab in the DataHolder, and click myArray : Array (you don't want to go any deeper), and then click OK. Click bound to and point to the cb instance and make sure dataProvider is selected on the right side. Then click OK. Change the formatter to Rearrange Fields. Click the formatter options value and type the following:
label='<first> <last>'
This code says the label property in the destination should equal a string that combines two values. In a way, the right side of this expression is like the Compose String option because you can insert spaces or other hard-wired strings (outside the <>) . When you test the movie, you should see the ComboBox populate with all the names (first and last).
Just to prove you can really rearrange fields, change the formatter options used to read as follows :
label='<first> <last>';data=.
This way the ComboBox will still display the same labels, but by using the period you've stuck the entire object (all three properties) into the ComboBox's value property.
Now, instead of extracting that value by using the ComboBox's change event, you can bind it to a Label component. Drag a Label component onstage and name it currentPhone_txt . Go to the ComboBox's Bindings tab and click the plus button, select selectedItem , click OK, click Bound To, and then select currentPhone_txt . (You can test it now and see [object Object] appear in the text field.) For fun, reselect the value binding and change the formatter to Compose String and use the following for the formatter options:
phone: <data.phone>
It's pretty cool when you get all the links working. I recommend approaching your projects by first designing how you want it to run in the end. Then work backward figuring out the data structures and the bindings.
Validation
Every property in your schema has a single expected data type. These include the standards (such as number, string, array, and object) but also additional ones such as social security number. Developers can even create their own data types, too.
Note
Custom Validate Scripts
The best way to learn how to write a custom validate script is by snooping through the ones used for the build in data types. In the First Run folder adjacent to Flash, find the files in the folder path Classes\mx\data\types . Chapter 13, "Building a Code Library," covers classes in general, but you can find a couple of example custom classes from my web site, too:
www.phillipkerman.com/rias.
To get you started, here are a few rules and a simple example. Your custom validation class must extend the class mx.data.binding.CustomValidator . Also, it needs to include a validate() method (which overrides the CustomValidator's method of the same name). Finally, when there's an error, you can trigger the CustomValidator's validationError() . Here's an example validation class that only considers "13" as valid:
class Favorite extends mx.data.binding.CustomValidator { function Favorite () {} function validate (param){ if ( param!=13 ){ this.validationError ( "not favorite number" ); } } } You can set up an event handler to notify you any time a mismatch occurs. Actually, you need both a target component for which you'll ensure a valid value, and another component with a property bound to that target. Here's the code to trap either event (valid or not):
function validFunction() { trace('this is valid'); } function invalidFunction() { trace('this is invalid'); } my_txt.addEventListener('valid', validFunction); my_txt.addEventListener('invalid', invalidFunction); In Chapter 12, "Components," you'll learn more about this syntax. Now drag out a TextArea component (instance name my_txt )and you can add a value to it that will either be valid or invalid. Drag a NumericStepper and name it ns . From the NumericStepper's Bindings tab, click the plus button, select value, click OK, and then click Bound To and point to the my_txt instance's text property. Now, go to the Schema tab for the my_txt instance. Change the data type to Number, and then click the value for validation options. Enter 5 for Min and 8 for Max. (Incidentally, you can use XML to UI to create dialog boxes like this when you make a custom validate class.) Now when you test the movie, the Output window should fill with your two strings regarding validity. Obviously, you'll have to write your own code to respond to invalid numbers . Do notice that there's nothing wrong with having an invalid number in the my_txt . Flash triggers the invalid event, but it's up to you to respond appropriately.
Also, note that the previous code only works when the TextArea is bound to another component. If you just want a TextArea (and nothing else) you can always use a DataHolder and bind to the TextArea's text property.
Additional Details
Believe it or not, this chapter covers fewer topics than I had considered . I think it's enough to give you a great start. However, there are a few more comments that I just have to make.
Manual Scripts
You saw at the beginning of this chapter that Remoting requires you to send requests and handle results returned entirely in script. Don't forget that you can tie the results from a Remoting call to the DataHolder or DataSet components and you'll get all the advanced features such as binding. You just have to map data types appropriately.
Of course, you can replace both the XMLConnector and the WebServiceConnector using script, too. In Chapter 6, you saw how to both send and load using the LoadVars object and the XML object. For web services, you can use the following template (which should look similar to the Remoting code discussed earlier). Important note: To use the code in Listing 7.3, you must have a WebServiceConnector somewhere in your file (even if just in the library).
Listing 7.3. Web Services from ActionScipt
myWSDL= "http://www.domain.com/some.wsdl"; myService = new mx.services.WebService(myWSDL); var myCallback = myService.myMethod("param1", "param2"); myCallback.onResult = function(data){ trace("result is "+ data); } myCallback.onFault = function(fault) { trace("error " + fault); } This really is like Remoting. The benefits of doing this with the connector include that it's easier to handle errors and your results are immediately available to be bound. However, this relatively simple code is out in the open and you don't need to do all that mousing around setting up the components. Having said that, it's also possible to set up binding entirely in script. I suppose the main reason to point out the preceding code is to demonstrate how its similarity means you can leverage knowledge gathered in other places.
Debugging
One huge advantage of Flash Remoting is both the NetConnection Debugger and the Service Browser. The Debugger in particular is great because it will display every outgoing and incoming message. This can save a lot of time troubleshooting situations where the data is arriving but you're not using it properly. Just realize that if you installed the Remoting components, these two panels will show up under Window, Other Panels.
For Debugging the Data components, you can add the following code at the top of your script:
_global.__dataLogger=new mx.data.binding.Log();
With that in place, you'll see a ton of trace statements while the movie plays. To use script to stop the debugging, use _global.__dataLogger=null; . (Notice the double underscore in front of dataLogger. )
Proxy Script
There's good reason behind the Flash security restrictions. When you visit a web site, the SWF downloads to your machine and therefore is inside any firewall you might have. You don't want the Flash Player to let that SWF read and write to domains other than where it originated (namely, the domain inside your firewall). There are more details to this limit, but it's real easy to see how this prevents you from directly linking to outside web services.
Note
Macromedia Central Supports Web Services Directly
SWFs running in the Macromedia Central environment don't have the same restriction of reaching out to web services. They are effectively running on your desktop. Therefore, you can consume web services without any issue. Also, despite the fact that Central 1.0 supports Flash Player 6 features, it actually has a couple of extrasnamely, direct support for SOAP. It uses practically the same syntax as shown in the "Manual Scripts" section earlier in this chapter.
While it makes sense that the Flash player can't reach out to other domains, it makes using public web services difficult. In fact, the weather examples in this chapter will work when you test the movie, but not in a browser. Basically, you need a proxy scriptthat is, a method on your server that you call as if it were the outside web service. This proxy script has one job: to channel your requests out to the other domain and relay the results.
It's relatively simple to write such a method. For example, you can take a ColdFusion component that invokes a web service call at a particular remote web service and just point to this CFC as a proxy. (In ColdFusion, if you just add "?WSDL" after the URL it will make the CFC behave as a web service.) This is just one solution. The bottom line is you need to go through your own application server to reach out to other domains. In Chapter 6, this was done to make the Amazon.com example work, using the Macromedia proxy script (which should be updated for Flash MX 2004 by the time you read this; check out TechNote 16520 by typing that number into the Search field at www.macromedia.com).
| [ LiB ] |
EAN: 2147483647
Pages: 120