Workshop Chapter 10. Creating Timers
| | CONTENTS | |
- Creating a Digital Timer
- Creating an Analog Timer
- Creating a Countdown Timer
- Summary
Using Flash's getTimer() function the way we did in Workshop Chapter 9, "Creating a ToolTip Component," is quite common. We saved the current getTimer() in a variable, and then kept checking to see whether "enough" time elapsed by rechecking getTimer() and comparing that to the variable we saved at the start. In this workshop chapter, we'll make several timers that the user can start, stop, and pause. To give the timers their functionality, we'll save the current getTimer() when the user starts the timer. Then, in every enterFrame event, we'll see how many milliseconds have elapsed since the start. We can then easily convert this value into hours, minutes, seconds, and even fractions of seconds.
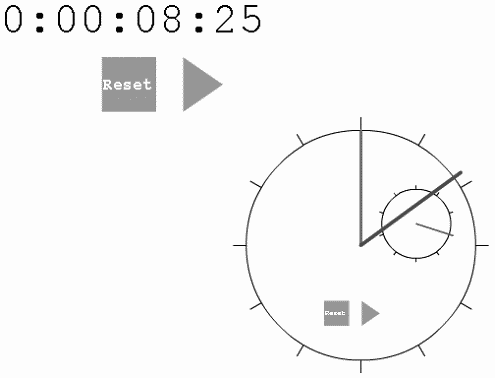
This workshop chapter should teach two concepts in particular: how to translate numbers between different formats (milliseconds into hours, for example) and how to use getTimer() in conjunction with the enterFrame event. In the end, of course, we'll have a digital timer (see Figure W10.1). You'll also see how easy it is to convert the timer to an analog timer. Finally, in the third section of this workshop chapter, we'll build a timer that counts down.
Figure W10.1. The digital timer (left) and the analog timer (right) use the same code base.
Creating a Digital Timer
Here are the steps to follow to create a digital timer:
-
Create a new Movie Clip symbol called Timer. Basically, we want to make a clip that we can place in any other movie.
-
Inside Timer (where you'll stay for the rest of this workshop chapter), create a Dynamic Text field with an instance name of display. Make the field wide enough to accommodate about 10 characters based on whichever size of font you use. I recommend the font _typewriter or another monospace font because fonts that have variable widths make the timer jump around as it keeps changing.
-
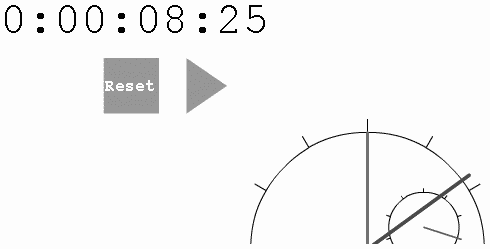
Draw a small box for the Stop button and draw a triangle for the Play button, and leave them as shapes (see Figure W10.2).
Figure W10.2. The square will become the Stop button and the triangle will become the Play button.
-
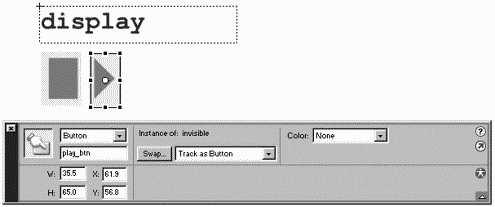
Draw a square shape that will become an invisible button. Make it an invisible button by first converting it to a button and then moving the square shape (from the Up frame of the button) to the Hit frame of the button. Come back to the Timer clip and create two instances of the invisible button. Place them on top of the square (for Stop) and triangle (for Play). Finally, give the two invisible button instances names of stop_btn and play_btn, respectively (see Figure W10.3).
Figure W10.3. Invisible buttons (stop_btn and play_btn) are placed on top of plain shapes.
-
Now we can spend some time in the frame script for the Timer symbol. First, let's just try to make the display update as the movie plays. Type the following code into the frame script:
this.onEnterFrame=function(){ display.text=getTimer(); }Naturally, this lacks several features, but it succeeds in continuing to change the display field's text property. Because I know we'll want Timer to turn on and off, we'll be assigning the onEnterFrame callback to null (when we want it to stop). It will be slightly easier if we change the preceding code to point to a function (rather than defining it inline, as shown).
-
Change the code to read
this.onEnterFrame=updateTimer; function updateTimer(){ display.text=getTimer(); }This is really the same thing, but this way it will be easy to change the updateTimer() function as we have a lot to do there.
-
Rather than walking through how to revise the updateTimer() function, just use this code as-is and I'll explain it below:
1 function updateTimer () { 2 elapsedTime = getTimer(); 3 // hours: 4 var elapsedH = Math.floor(elapsedTime/3600000); 5 var remaining = elapsedTime-(elapsedH*3600000); 6 // minutes: 7 var elapsedM = Math.floor(remaining/60000); 8 remaining = remaining-(elapsedM*60000); 9 if (elapsedM<10) { 10 elapsedM = "0"+elapsedM; 11 } 12 // seconds: 13 var elapsedS = Math.floor(remaining/1000); 14 remaining = remaining-(elapsedS*1000); 15 if (elapsedS<10) { 16 elapsedS = "0"+elapsedS; 17 } 18 // hundredths: 19 var elapsedFractions = Math.floor(remaining/10); 20 if (elapsedFractions<10) { 21 elapsedFractions = "0"+elapsedFractions; 22 } 23 // build the nice display string: 24 display.text=elapsedH+":"+elapsedM+":"+elapsedS+":""+elapsedFractions; 25 }This code looks much worse that it is. Line 2 places the elapsed milliseconds (getTimer()) into our elapsedTime variable. (Actually, we'll come back to adjust this line later.) Then, line 4 calculates the full hours that have elapsed by placing into the variable elapsedH just the integer portion of elapsedTime divided by 3600000 (the number of milliseconds in an hour). Then we have to calculate the remaining milliseconds. Suppose that 2 hours and 10 minutes have passed. If you know that there have been 2 whole hours, you need only the remaining 10 minutes' worth of milliseconds to calculate the remainder. The remaining=elapsedTime - (elapsedH*3600000) statement in line 5 subtracts the total number of hours just calculated (elapsedH) multiplied by the number of milliseconds in an hour from the original elapsedTime. For the remaining values elapsedM, elapsedS, and elapsedFractions first we calculate how many full minutes or seconds or fractions remain, and then we subtract that number of milliseconds from the remaining variable so that each subsequently smaller value is based on what's leftover. In addition, on lines 9, 15, and 20, we check each value; if the value is less than 10, we insert a 0 in front of the value. (By the way, you could probably figure out a way to use the % modulo operator to calculate the remaining variable in all the preceding cases.) Finally, a nice string is fashioned with colons in line 25, where the display field's text property is assigned.
Timer should work pretty well at this point. However, it starts timing from the start only. Let's write some callback functions for the onPress events for the two buttons.
-
To let the user control things with the buttons, cut the line of code added in step 6 (this.onEnterFrame=updateTimer) and in its place type this code:
play_btn.onPress=function() { this.onEnterFrame=updateTimer; }The idea is that when the user clicks the button play_btn, the onEnterFrame callback will point to the updateTimer function. However, it fails because this is the button itself. You must change it to read:
play_btn.onPress=function() { _parent.onEnterFrame=updateTimer; } -
Next, let's get the Stop button working:
stop_btn.onPress=function() { _parent.onEnterFrame=null; display.text="0:00:00:00" }Notice that the second line will make the display appear cleared when the user presses the Stop button. (Otherwise, the Stop button would behave more like a Pause button.) It works pretty well now except when the user first clicks the Play button, Timer shows how much time has elapsed since the beginning of the movie not from the time the button was pressed. (You can test the movie and wait a few seconds before pressing Play to see what I mean.)
-
The problem with the updateTimer() function is that it reports the elapsed time from the start of the movie. We want to know how much time has passed since the Play button was pressed. All we need to do is store in a variable the time at which the Play button is pressed and subtract that from the calculations in updateTimer(). There are two steps: First, change the onPress callback for the play_btn button to read as follows:
play_btn.onPress=function() { startTime=getTimer()-elapsedTime; _parent.onEnterFrame=updateTimer; } -
Next, change the first line of code inside the updateTimer() function (that currently reads elapsedTime = getTimer()) to read as follows:
elapsedTime = getTimer()-startTime;
Now the updateDisplay() function will base its calculations on the amount of time that has passed since the user pressed the Play button. It's still not finished, though. Now the Stop button fails to start things over. That is, if the user clicks Play, then Stop, then Play again, the timer appears to pick up from when the Stop button was pressed. To remedy that, add this line of code to the Stop button's callback:
elapsedTime=0;
Okay, it finally works without fail. But I want more features! We basically had a "pause" feature by mistake, so it'd be nice if the user could pause and then resume. All we need to do is make a new button and use the pause code placed on the Stop button by mistake. Let's do that.
-
Create a new shape for the Pause button and place an instance of the invisible button on top of it. Give the invisible button an instance name of pause_btn. Finally, place this code in the frame script:
pause_btn.onPress=function() { _parent.onEnterFrame=null; }Pretty simple, eh? At this point, I think a usability issue is worth addressing. I don't think the user should be able to pause unless Timer is currently timing, or play unless Timer is currently paused or stopped. It's really quite easy. We'll put both blocks of the code from the Pause and Play buttons into one button. We'll need a variable to tell us whether Timer currently paused so that we know which block to execute. We'll get to the graphics in a second, but first let's just trash the Pause button and make the Play button really a Play/Pause button.
-
Trash the invisible pause_btn instance and remove the callback for pause_btn's onPress event. Here is the revised code for the play_btn's callback:
1 play_btn.onPress=function() { 2 paused=!paused; 3 if (paused){ 4 _parent.onEnterFrame=null; 5 }else{ 6 _parent.onEnterFrame=updateTimer; 7 startTime=getTimer()-elapsedTime; 8 } 9 }This code reflects both the Pause button's code (line 4) and the Play button's code (lines 6 and 7). They just appear exclusively based on the value of the variable paused. I just made up the paused variable, so we have not only to toggle its value every time the user presses Play/Pause (line 2), but we need to set it to true both initially and any time user presses the Stop button.
-
Instead of having the same code in two places (namely, everything the Stop button does), let's take the code from the Stop button and put it in a function that we can also call at the start of the movie. Change the stop_btn's onPress callback to read:
stop_btn.onPress=function() { init(); }Then create the init() function as follows:
function init(){ display.text="0:00:00:00" elapsedTime=0; _parent.onEnterFrame=null; paused=true; }This is the same as before, with the addition of the paused variable.
-
Finally, let's trigger the init() function at the very start. Outside of any functions, just type the following:
init();
-
Now we just have to make the Pause/Play button look like it's toggling. Select the triangle shape (not the Play button) and convert it to a Movie Clip. Double-click this new clip and insert a new keyframe in frame 2. Draw two vertical rectangles for the Pause button's look. Go back to the Timer clip and give the instance of this new symbol the name pp (for "Pause/Play").
-
Finally, add the following line of code to the init() function:
pp.gotoAndStop(1);
This way, the clip will appear to be stopped on frame 1 initially (and any time the user presses the Stop button).
-
Finally (and I promise this is the last "finally"), place the following line of code in front of everything else inside the play_btn's onPress callback:
pp.gotoAndStop(1+paused);
The idea is that when the user presses Play, if paused is true, the pp clip will jump to frame 2 (true is evaluated as 1). Otherwise, the clip jumps to frame 1. You could certainly write a more verbose solution involving an if statement, if you wanted.
It's really done. The scripting turned out to be relatively easy compared to how cool the result looks. You'll be thrilled to learn that you can use the bulk of this code in the following section of this workshop chapter, "Creating an Analog Timer."
If you want a challenging exercise, try adding a "lap" function. Like a stopwatch, the lap() function would enable the user to click to stop the display from changing, but the timing would continue in the background. When the user clicked to proceed, the display would catch up and keep displaying the elapsed time since the user originally clicked to play. I added that feature to the downloadable version of this file (at www.phillipkerman.com/actionscripting/) so that you can see one possible solution.
Creating an Analog Timer
Turning the digital timer you just made into an analog timer is little more than adding a few graphics. In addition to a few clips (for the arms of the clock's face), we'll need to translate the values calculated in the updateTimer() into degrees of rotation. It's an easy task! We'll use the Sound object for some "clicking" sound effects.
-
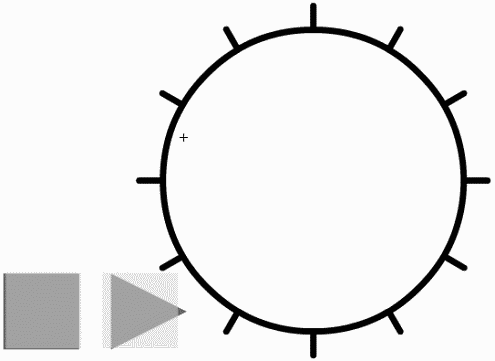
Let's start by drawing some graphics in the Timer symbol. Delete the display text field. For the clock's face, draw a large circle with no fill. If you want "hash marks" at 30-degree increments (see Figure W10.4), you can add them, but it is not necessary. Convert the entire shape to a Movie Clip called Face (Be sure to use the center registration option.)
Figure W10.4. The circle that will become the stopwatch face can include hash marks every 30 degrees.
-
While still inside the Timer symbol, draw a vertical line with a thick stroke. Convert the line to a Movie Clip called Hand but this time, select the bottom-middle option for registration (see Figure W10.5).
Figure W10.5. The bottom-middle registration point will make the hand rotate like a regular clock hand.

-
Make a total of four instances of the Hand symbol. Give them instances names of h, m, s, and f, respectively.
-
Snap the bottom of the h clip to the center of the instance of the Face symbol. Adjust the clip's length by scaling it so that it's a little longer than the radius of the instance of Face. In order not to accidentally move this instance, send it to the back by choosing Modify, Arrange, Send to Back.
-
Snap the bottom of the m clip to the center of the instance of Face and adjust the length of the clip so that it's about the same length as the radius of the instance of the Face symbol. Use the Properties panel to tint this instance so that you can keep the different hands straight. Send this clip to the back.
-
Snap the s clip to Face in the same way as you did the m clip and send it to the back.
-
Rather than snapping the f clip to the center of the instance of the Face symbol, first make a copy of the Face symbol. Reduce the scale of this copy and place it on top of the larger instance of Face (see Figure W10.6).
Figure W10.6. The fractional seconds will be displayed on the smaller instance of the Face symbol.
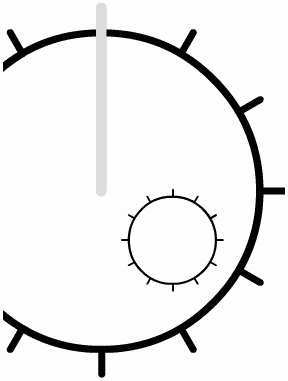
Believe it or not, we're almost done. We're done building all the graphics; we just need to translate the values calculated in the updateTimer() function to _rotation values for the various hand clips.
-
Inside the updateTimer() function, remove or comment out each if statement. Remember that these if statements add a 0 in front of values less than 10. We'll need numbers, not strings, to calculate the rotation for the clock face. Remove or comment out the following parts of the updateTimer() function:
if (elapsedM<10) { elapsedM = "0"+elapsedM; } if (elapsedS<10) { elapsedS = "0"+elapsedS; } if (elapsedFractions<10) { elapsedFractions = "0"+elapsedFractions; } -
Also, in the updateTimer() function, remove the line where display is assigned and replace it with these three lines:
h._rotation=elapsedH*30; m._rotation=elapsedM*6; s._rotation=elapsedS*6; f._rotation= elapsedFractions*3.6;
We multiply minutes and seconds by 6 based on the fact that there are 60 of each per 360 degrees: 360/60 is 6. Try the what-if number 30 for minutes: 30*6 is 180, and that's exactly how many degrees we need the minute hand to rotate on the circle of the clock. Because one revolution should equal 12 hours, I divided 360 by 12 to get 30 (that is, how many degrees per hour). In the case of fractions that are 1/100 of a second, consider that we want the f hand to go 360 degrees every second. Every 1/100 of a second must be multiplied by 3.6 or 360/100 because it takes 100 hundredths to make a whole second, or a whole circle in this case.
//
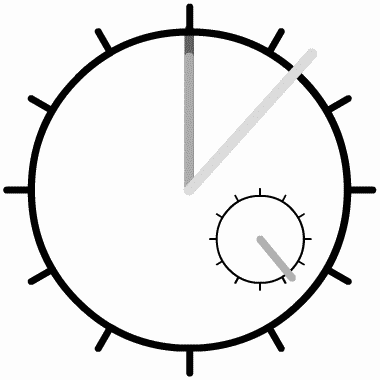
At this point, the movie works pretty well, but I know that on fancy stopwatches, the fractional second hand precisely displays a round fractional number. On the small clock face, the hand we've built for fractional seconds appears accurately, but the hand can often appear in odd locations, such as between hash marks. Start and pause the timer a few times to see what I mean (see Figure W10.7). We can't just change the hash marks because we'd need 100 marks around the circle. Even if we did, the hand wouldn't touch each one because screen updates won't appear that frequently. Even if you cranked the frame rate up to 100 fps, it still wouldn't work.
Figure W10.7. The fractional seconds displayed don't always correspond to the hash marks on the small clock face.
-
To address the fractional seconds issue, change the line in the updateTimer() function that assigns the f clip's _rotation to read as follows:
f._rotation= Math.round(elapsedFractions/10) * 36;
With this version of the formula, we'll always find the closest tenth of a second and set the rotation to 36 times that tenth because there are 10 36-degree units in a circle. The only problem now is that your hash marks may not represent tenths of a second. You can either make another version of the Face symbol and move the hash marks to every 36 degrees, or change the expression to this version:
f._rotation= Math.floor(elapsedFractions*.12) *30;
This version first calculates a round number of one-twelfth seconds and then multiplies by 30, which is the number of degrees in the hash marks added in step 1 to match our standard clocks with 12 hours per revolution.
-
One last touch is to modify the init() function to look like this:
function init(){ h._rotation=0; m._rotation=0; s._rotation=0; f._rotation=0; elapsedTime=0; _parent.onEnterFrame=null; paused=true; }To make things interesting, let's add some audio for the seconds and fractional seconds. To do these next steps, you'll need one very short sound clip such as a click sound. (I included one in the downloadable version of this workshop available at www.phillipkerman.com/actionscripting/.)
-
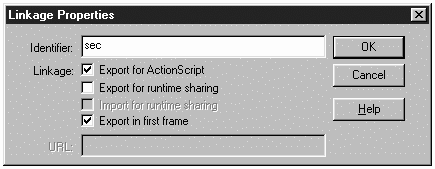
We can use the Sound object to make the click sound play once every second. Import a short sound and give it a linkage identifier name of sec as you learned to do in Chapter 12, "Objects" (see Figure W10.8).
Figure W10.8. To play the sound using scripting, we have to set its linkage.
-
Inside the init() function, add these lines of code:
sec=new Sound(this); sec.attachSound("sec");Notice that these statements won't actually start the sound; they just place the sound inside the variable called sec. The fact that we're attaching the sound to the this clip means that you can have multiple instances of the Timer clip, each of which can maintain its own sound.
-
Anywhere inside the updateTimer() function after you set elapsedS, place the following if statement:
if (elapsedS<>lastS){ sec.start(); lastS=elapsedS; }This statement uses the start() method on the sec instance of the Sound object. It does not call start() every time the updateTimer() function executes because updateTimer() executes many times a second based on the enterFrame event. As long as elapsedS is not equal to lastS (another variable we are introducing), start() starts the sound. It then sets lastS to the value of elapsedS so that the next time this function executes, it will again be able to compare the new elapsedS and see whether it's truly a new value. Depending on your frame rate, the updateTimer() function will be executed many times per second.
At this point, you could take another, even shorter sound and follow steps 12 14 to make it play 10 times a second, or whatever the fractional display is displaying. However, I think this is a good example of where "faking it" is perfectly acceptable and more believable. We don't really have to make a sound play every tenth of a second. Instead, we can just record a loop that plays 10 clicks per second. Then, whenever the timer is running, we'll make that loop play; when the timer is stopped, we'll stop the sound. You just need a nice looping sound that makes 10 clicks a second when it's playing.
-
Import the looping sound and give it an identifier name of loopingClick in the same way you named the sound in step 12.
-
In the init() function, add the following three lines:
loop=new Sound(this); loop.attachSound("loopingClick"); loop.stop();This code simply creates another instance of the Sound object in the variable called loop. The reason we stop it at the end is that the Stop button also triggers the init() function (and we'll want the sound to stop then).
-
Now all we have to do make the looping sound start and stop when the user plays or pauses. Change the play_btn's onPress callback to read as follows:
1 play_btn.onPress=function() { 2 paused=!paused; 3 if (paused){ 4 _parent.onEnterFrame=null; 5 _parent.loop.stop(); 6 }else{ 7 _parent.onEnterFrame=updateTimer; 8 startTime=getTimer()-elapsedTime; 9 _parent.loop.start(0,9999999); 10 } 11 }Notice line 9, where the sound starts (and loops many times) and line 5, where the sound stops.
That's it. It's kind of amazing that the fake way of just starting or stopping a loop is more believable than forcing Flash to carefully play a click sound for every fraction of a second. If you don't believe me, try it out. Just follow the steps to make the sec Sound object play, but do it for fractions of seconds, which is related to the elapsedFractions variable.
Creating a Countdown Timer
Whereas the analog timer built upon code created in the digital timer section, the countdown timer is more like the horizontal slider we made back in Workshop Chapter 3, "Creating a Horizontal Slider." Because it uses getTimer(),however, I figured it fits well in this chapter.
The countdown timer will act like a kitchen timer: simply start it timing and it will go off after the elapsed time has expired. In this exercise, a filled rectangle will empty a little bit at a time until it's totally empty, and then a sound will play and another function will get invoked. After getting the main functionality working, you can add refined graphics to make any effect you want for example, an hourglass effect (see Figure W10.9).
Figure W10.9. Although we don't walk through all the steps to make the hourglass timer, you'll be able to figure it out after doing this exercise.

Follow these steps to create a countdown timer:
-
In a new file, draw a wide rectangle (with both a fill and a pretty thick stroke). Select everything and convert it to a Movie Clip called Timer. Double-click to edit Timer and then select just the fill and convert it to a Movie Clip symbol called Strip. Name the layer Frame.
-
Select the instance of the Strip symbol, cut it, insert a new layer, and then select Edit, Paste in Place. Name this instance bar. Name this new layer Strip and lock it so that it doesn't get messed up during the next few steps.
-
Create a third layer and Paste in Place again to create another instance of the Strip symbol. Name this new layer Mask, set the layer properties to Mask, and lock that layer, too.
-
Arrange the layers so that Frame is on top, Mask is in the middle, and the original Strip layer is under Mask (see Figure W10.10). Make sure that the Strip layer's properties are set to Masked.
Figure W10.10. The arrangement of layers is shown here.

//
The Mask layer will reveal the bar only in the area currently covered. So, if we move the bar, the bar will be hidden. The Frame layer provides an outline so that the user can see the whole size of the timer bar. You could build a simpler arrangement by foregoing the mask and changing the bar instance's _xscale (rather than its _x coordinate, as we're about to do). The masking technique is easier for irregular shapes, such as the hourglass that you'll see at the end.
-
Click the Frame layer (to make it active) and create a button. Give the instance the name of start_btn.
-
Now we can put some code in the frame script of this layer (where we'll stay for the rest of the workshop chapter). Begin with a few variables that will help to calculate percentages:
howLong=10; max = bar._x; min = max - bar._width; total = max-min; bar._x = max;
The first line hard-wires a value for howLong. We'll remove this line when we convert the Timer clip to a component. The variable max just contains the end point (or "maximum") for the bar instance. The min variable is where the bar is positioned when all the way to the left (that is, where it is now max minus its width). The total variable is the difference. Finally, the last line places the bar instance in its minimum position initially.
-
Now, to add the callback function so that the button will commence a timing function, we'll write
start_btn.onPress=function(){countDown()}This triggers the countDown() function when the button is pressed.
-
Now for the countdown() function:
1 function countDown(){ 2 var totalTime = howLong*1000; 3 var startTime = getTimer(); 4 this.onEnterFrame=function(){ 5 percent = (getTimer()-startTime)/totalTime; 6 bar._x = max-(percent*total); 7 if (percent>1) { 8 this.onEnterFrame=null; 9 } 10 } 11 }Line 2 creates the totalTime variable based on howLong (which is represented in seconds) multiplied by 1000 because getTimer() uses milliseconds. Line 3 saves the current time in startTime. You see startTime again in line 5, which calculates percent by taking the elapsed time (getTimer() minus startTime) divided by totalTime. Notice that in line 4 the onEnterFrame callback is assigned for this timeline (the Timer's). That callback's definition isn't finished until line 10. What's sort of weird is that we're replacing the same onEnterFrame callback inside the if statement on line 8. Anyway, everything between lines 4 and 10 happens repeatedly (every enterFrame). Line 5 calculates percent (really a number between 0 and 1). Then line 6 positions the bar instance at its max minus the percent times total. Finally, if, in line 7, percent is higher than 1,we clear out the onEnterFrame callback so that it stops working. Line 8 is also where we'll put code that gets triggered once when time's up.
The timer should work pretty well now. There are countless enhancements that we can add but let's just add two: First, we'll a sound effect when the time is up, and then we'll turn the whole thing into a component so that the using author can specify both a total time and a function to trigger when the time is up.
-
To add a sound effect, drag into your movie's Library the "Smack" sound from the Sounds library (Window, Common Libraries, Sound). Set the linkage for the sound to "smack." Then, type the following code within the if statement of the callback function defined in step 8 (above or below line 8):
s=new Sound(); s.attachSound("smack"); s.start();Now the sound effect plays once when the timer finishes.
-
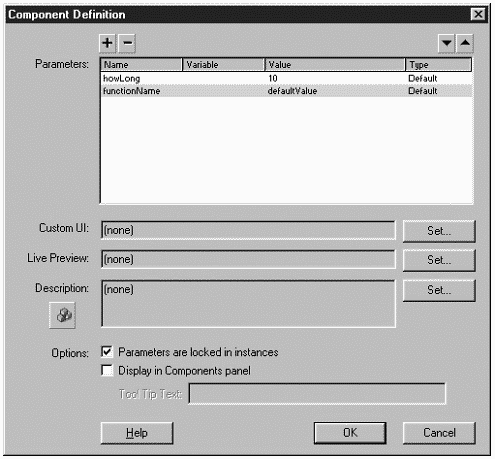
To convert this into a component, just select Timer in the Library and access the Component Definition option. Click the plus button twice and replace one "varName" with howLong and the other with functionName. It makes sense to provide a default value for howLong as well. When you click OK, the dialog box should look something like Figure W10.11.
Figure W10.11. The completed Component Definition dialog box gives the using author two variables to assign.
-
Then go into the master symbol for Timer and comment out the very first line of code, where howLong was initialized way back in step 6. We don't need to assign this value because the using author will.
-
Finally, in the onEnterFrame callback (anywhere near where you made the sound effect play), add this line of code:
_parent[functionName]();
This simply executes a function in the main timeline based on a string name provided in the variable functionName. (We first discussed this trick in Workshop Chapter 3.)
That's it. The using author should be able to place instances of this component in any movie and specify both a howLong parameter and a functionName.
There are a lot of variations you can try out. For example, you can show the user the number of seconds remaining by placing a text field (say, with an instance name of display_txt) and adding the following code right after you set bar's _x (in the callback):
display_txt.text=Math.floor(howLong+1-(howLong*percent));
You can also make the bar fill the frame by changing the one line that sets bar's _x to read:
bar._x = min+(percent*total);
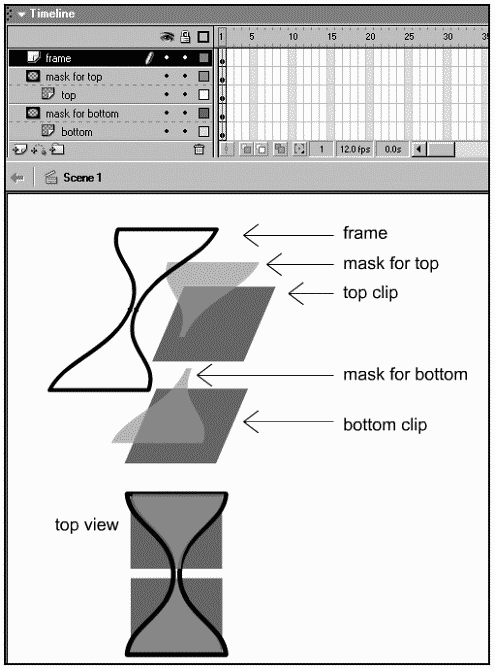
For both enhancements, you'll want to modify or add to the initialization scripts (the code placed right in the frame in step 6). The fact that you can make the bar fill the frame just as easily as making it empty the frame means you can do the hourglass example I mentioned before. Just have two bars with different instance names, in different layers, with different masks. Then, when you set one bar's _x to fill the frame, set the other one to empty the frame. Figure W10.12 shows the basic arrangement of layers, but you'll have to figure out how to program it on you own. (Or, download the finished piece from my web site: www.phillipkerman.com/actionscripting.)
Figure W10.12. The work involved to make an hourglass timer is all in the layers and masks.
Summary
This was a pretty fun (triple) workshop that extended the use of our getTimer() function. You lucked out in the analog timer section; calculating the angles for the Hand instances was fairly straightforward. In Workshop Chapter 11, "Using Math to Create a Circular Slider," and to a lesser degree in Workshop Chapter 12, "Developing Time-Based Animations," you'll have to calculate angles based on trigonometry and the related issues of degrees versus radians which are discussed in Chapter 5, "Programming Structures."
Naturally, there's a ton more you can do with getTimer().
| | CONTENTS | |