Workshop Chapter 9. Creating a ToolTip Component
| | CONTENTS | |
In Workshop Chapter 2, "Creating Custom Cursors," you learned how to position a clip instance precisely where the mouse moved. You also learned how to turn a clip instance into a component. This workshop chapter is similar to that one in that we're going to move an instance to the mouse location, but it will be a text field rather than a cursor graphic. The result is a feature commonly known as a tooltip.
No doubt you've encountered tooltips in many software applications, including Flash. In this workshop chapter, we'll add several features to our tooltip, including those common to system-level tooltips plus a few extra features that will make our tooltip unique. Naturally, the exact feature set for each instance of our component will be adjustable through the Parameters tab in the Properties panel.
Like most workshop chapters, this one starts off really easy and builds in complexity as we add specific features. Here are the steps:
-
Create a Dynamic Text field containing the text "test." Give it an instance name of tip.
-
Draw a square shape, select it, and then convert it to a Movie Clip symbol. Give the instance of the square shape left behind an instance name of hotspot. After we finish building the component, the using author will resize hotspot on top of the area for which he wants a tooltip to appear. Change the alpha of the hotspot instance (using the Properties panel) to something semi-transparent to make it easier for the using author to position on top of other objects.
-
Select both tip and hotspot and convert to a Movie Clip symbol. Name the symbol "ToolTip Component."
-
Double-click to edit the inside of the ToolTip Component symbol. Type this beginning code in the first frame:
this.onRollOver=function(){ this.tip._x=_xmouse; this.tip._y=_ymouse; } this.onRollOut=function(){ this.tip._x=-5000; }Now any time the user rolls over an instance of this symbol, the tip instance appears at the mouse location. When the user rolls out, it moves offscreen.
-
To modify what's "hot" (that is, which shape triggers the rollover), add the following line underneath the existing code:
this.hitArea=this.hotspot;
This line of code specifies the hitArea to be the shape that triggers the rollover (with the instance name hotspot).
-
Finally, in order for shape to be visible only when authoring, add this line of code:
this.hotspot._visible=false;
It still works, but the user won't see that shape.
//
At this point you can test the ToolTip Component symbol. (Just pretend that the word "test" can be changed it's dynamic text, after all.) I've found two significant issues with what we have thus far:
-
When the user resizes an instance of the ToolTip Component symbol, the text gets scaled as well.
-
The onRollOver and onRollOut events will interfere with the code assigned to other buttons in the same area (that is, you can't place the component on top of buttons).
Naturally, there are a few other minor things, but these two issues will require a significant overhaul. In addition, I'd prefer to use the TextField and TextFormat objects (to create and format text on-the-fly) so that the using author can specify any attribute of the ToolTip Component symbol that she prefers.
-
-
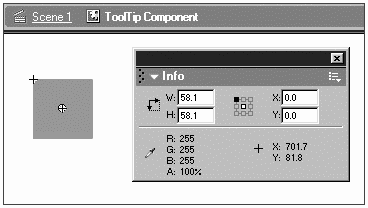
Trashing time. Delete the text instance inside the ToolTip Component symbol and remove all the code from the frame. Also, let's position the hotspot instance so that its top-left corner is centered inside the clip. (Just use the Info panel's top-left option and type 0 and 0 for x and y respectively see Figure W9.1.) This way, the using author can resize by dragging the right or bottom of the clip, and it will grow in just one direction at a time.
Figure W9.1. Placing the hotspot instance in this location makes scaling easier.

-
The first thing I'd like to build is an alternative to the rollOver and rollOff mouse events (because they'll conflict with other buttons). Instead, we can make an onMouseMove callback that checks whether the coordinates of the mouse are in the area of the hotspot clip. Because I think a custom class might be appropriate, we'll start building on top of the basic skeleton for classes. First, give the ToolTip Component symbol a linkage identifier of tooltip (through the Library item's Linkage option), and then type the following code into the first frame:
#initclip function TipClass(){} TipClass.prototype=new MovieClip(); Object.registerClass("tooltip", TipClass); #endinitclipThis is pretty much the minimum code necessary to make a custom class (in this case one called TipClass). The remainder of the code that we'll write for this entire workshop will go after the first three lines and before the last two.
-
Now for the alternative to onRollOver and onRollOut. First, we need to gather the coordinates of the hotspot instance, so type this onLoad callback for the class:
TipClass.prototype.onLoad=function(){ this.bounds=this.hotspot.getBounds(_root); //this.hotspot._visible=false; }This just stores in the variable bounds the coordinates of the hotspot symbol (in relation to the main _root timeline). Later, when we use _xmouse, we'll just use the same coordinate space (_root._xmouse, that is). By the way, we'll come back to add more to the onLoad callback (including un-commenting the last line).
-
Now create another callback, this time for onMouseMove:
1 TipClass.prototype.onMouseMove=function(){ 2 if(_root._xmouse>this.bounds.xMin && 3 _root._xmouse<this.bounds.xMax && 4 _root._ymouse>this.bounds.yMin && 5 _root._ymouse<this.bounds.yMax){ 6 if (this.wasOff){ 7 this.wasOff=false; 8 trace("rolled on "+this._name); 9 } 10 }else{ 11 if (!this.wasOff){ 12 this.wasOff=true; 13 trace("rolled off"); 14 } 15 } 16 }Notice that lines 2 5 are just and extension of the if statement's condition (spread out for readability). The wasOff variable is simply there as a flag. That is, if the user rolls into the area and then keeps moving the mouse (within the hotspot), we don't want this script to keep thinking that she's rolling on. The user can rollOver only once until she rollOffs again. So, after you know whether she's in the space, you can check to see whether she used to be out of the area. Anyway, you can test this with a couple of instances on the Stage. Give them different instance names, and the Output window will display accurate information as you roll on and off the shape.
-
Instead of displaying the (yet-to-be-created) ToolTip Component text right when the user rolls over the hotspot, it would be nice to have a short delay. That is, most tooltips don't appear until your cursor has been hovering over an area for a second or so. The approach we'll take is to assign an onEnterFrame callback function (that keeps checking the time) when the user rolls over. (We'll clear that callback when the user rolls out.) We'll just change the two lines of code that have trace statements in the preceding onMouseMove callback. Replace line 8 with the following two lines:
this.expiration=getTimer()+1000; this.onEnterFrame=check;
Also, change line 13 to
this.onEnterFrame=null;
Basically, a new variable expiration will contain a time 1 second later than when the user rolls over. Also, the check function will start executing every enterFrame. We'll define check next. For readability, I decided not to define the function "inline" (where the word check appears) but I could have.
-
Here's the code for the check function:
function check(){ if (getTimer()>this.expiration){ trace("show time"); this.onEnterFrame=false; } }Obviously, we'll change the trace statement later so that it actually shows the ToolTip Component text. Notice that once the if statement is true,we clear the onEnterFrame callback because we don't need to keep checking if it's time to show the text. (You can learn more about getTimer() in Chapter 4, "Basic Programming in Flash.")
We're pretty much done with the triggers. There are a few more touches, but we'll move on to displaying the text and then come back to fix an issues that may arise. (You know something's bound to come up.)
//
When creating the actual TextField object, we have options as to where to put it. Originally, I tried to create a TextField object inside the ToolTip Component symbol, but I ran into a few problems related to scaling. I had to un-scale the text proportionally to how much the symbol had been scaled and then calculate the position (for the text) based on the cursor location in the main timeline. These problems were not impossible to overcome, but the main reason I'm going to suggest the following method (putting the new text field in the main timeline) is that in the end, we'll have only one text field. The file could get bogged down if a using author places many instances of this symbol in his movie. It just makes sense to have one text field. After all, the user should be able to see only one tip at a time.
-
To create a TextField object, place the following code in place of the trace statement in the check function (that currently reads: trace("show time")):
1 //make Text field: 2 _root.createTextField("tip",1,0,0,0,0); 3 _root.tip.background=true; 4 _root.tip.autoSize=true; 5 _root.tip.selectable=false 6 _root.tip.backgroundColor=0xFFFF00;//hw 7 _root.tip.text="this is a tip";//hw 8 9 //format 10 var format=new TextFormat(); 11 format.font="_typewriter"; //hw 12 format.color=0xFF0000;//hw 13 format.size=18;//hw 14 15 //apply 16 _root.tip.setTextFormat(format); 17 18 //position 19 _root.tip._x=_root._xmouse+10; 20 _root.tip._y=_root._ymouse+10;Basically, this code creates a TextField object in the main timeline called tip. It sets a few properties and then creates a format object to apply to the field. Then it positions it in the location of the mouse. The lines ending //hw, which currently are hard-wired, will be replaced with variables by the using author (as they populate this component after it's a component). Notice the last four parameters in the createTextField() command are all 0. (They're supposed to define the location and size of the TextField object). This doesn't matter, however, because in line 4 the autoSize property effectively overrides those settings. (Chapter 10, "Keyboard Access and Modifying Onscreen Text," covers the rest of the code.)
This should work pretty well if you test it out. All we need to do now is come up with variable names to replace the hard-wired values (lines 6, 7, 11, 12, and 13). Then, we'll turn this into a component so that the using author can specify how he wants it to appear.
-
Change lines 6, 7, 11, 12, and 13 of the preceding script to read as follows:
6 _root.tip.backgroundColor=this.backcolor; 7 _root.tip.text=this.tipText; 11 format.font=this.fontface; 12 format.color=this.forecolor; 13 format.size=this.fontsize;
This just replaces the hard-wired values with variables to which we'll give the using author access.
-
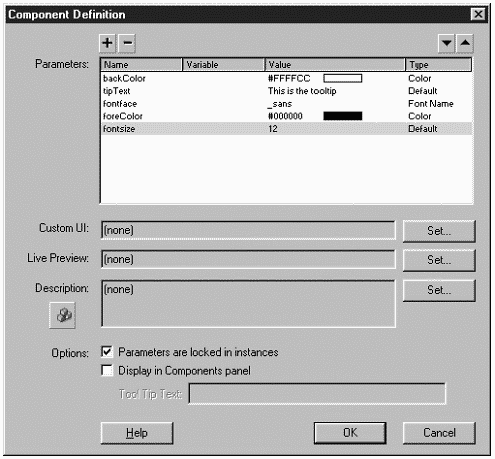
To give the using author access to these variables (and to turn this into a component), select the ToolTip Component symbol in the Library and access the Component Definition dialog box (from the Options menu). All you have to do is press the plus button (in the upper-left corner) five times, and then replace each "varName" with one of the five preceding variables.
In the case of backcolor and forecolor, set the Type to Color. Change fontface's Type to Font Name. The results should resemble Figure W9.2. Be sure to come up with reasonable default values (for example, make sure that forecolor and backcolor provide a good contrast).
Figure W9.2. The five parameters in this component use a variety of type choices.

-
It works great, but there are two minor things worth fixing. Remember, to edit the component, you'll have to select Edit, Edit in Place (not just double-click it). Anyway, uncomment the line in the onLoad callback to appear as follows:
this.hotspot._visible=false;
This just makes the hotspot instance disappear when the movie runs.
-
Finally, add one more callback to the class definition:
TipClass.prototype.onMouseDown=function(){ _root.tip._x=-90000 }Like "real" tooltips, ours will now disappear when the user clicks.
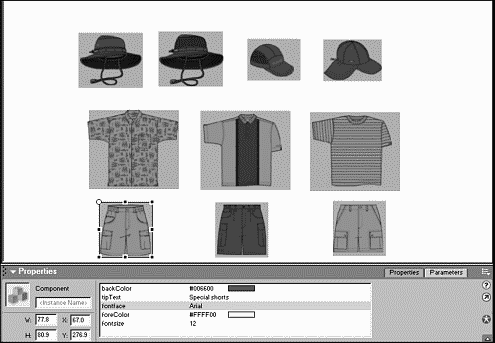
That's it! At this point, you should be able to place the ToolTip Component on top of any element in any movie and even stretch it from the right or the bottom to cover areas of different sizes (see Figure W9.3). You can even come up with a variable to replace the 1000 (used when assigning a value to expiration in the onMouseMove callback). That way you can give the using author access to how much of a delay she wants until the clip appears.
Figure W9.3. Our handy ToolTip Component will work great in any movie you make.

I can safely say that the TextField and TextFormat objects not only made this workshop better than what was possible in Flash 5, but it's much easier too. For example, the same basic exercise in the first edition of this book was twice as long! (Don't worry; I made up for it by having longer chapters in the "Foundation" section.)
| | CONTENTS | |