Workshop Chapter 2. Creating Custom Cursors
| | CONTENTS | |
Flash lets you make fairly sophisticated buttons with very little effort. However, despite the new control to turn off the hand cursor (myButton.useHandCursor =false), you really just have two options for cursors: the hand or no hand. In this workshop chapter, you'll learn how to create custom cursors. Custom cursors not only tell users that a button is clickable, they also provide clues about the type of button users are presented with. A custom cursor can tell users whether they're supposed to drag the button or just slide it to the left or right.
This workshop chapter shows you how to make a custom cursor in just a few steps. Then, the workshop takes what you built and creates a component so that you can incorporate cursors in any movie you make. Finally, the workshop guides you through the steps to create a custom UI (User Interface).
-
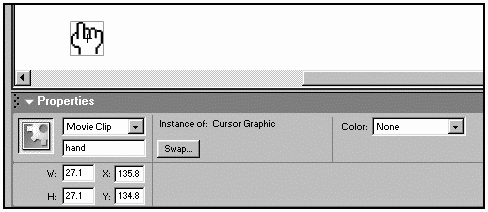
To start, we need a Movie Clip that contains the graphics for your cursor. Just draw something and convert it to a Movie Clip symbol named "Cursor Graphic" (see Figure W2.1). In this figure, the symbol is a hand with a pointing finger. Give the instance on the Stage an instance name of "hand".
Figure W2.1. Any graphic you place in a Movie Clip can become a cursor.
-
Now we're going to write a script that we'll attach to the hand instance on the Stage. On the mouseMove event, we want the script to position the clip at the same point as the mouse. Although there's a property called _xmouse that can help us out in this script, it's important to understand that this property returns the location of the cursor relative to a particular timeline. For example, if your cursor is at the top-left corner of the Stage, _xmouse has an _xmouse and _ymouse of 0 (relative to the Stage). Relative to a clip whose center point is 0x, 0y, the cursor may be something quite different. So the script we write says to "set the location of this clip to the location of the cursor within the main timeline":
onClipEvent (mouseMove) { _x=_root._xmouse; _y=_root._ymouse; updateAfterEvent(); }Notice that I included an updateAfterEvent(), which is best understood by testing what happens without this line (the clip won't play as smoothly).
-
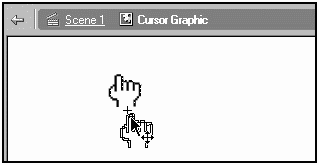
Notice that the center of the hand instance coincides perfectly with the user's mouse. If you want to adjust the location of the cursor symbol, edit the master version of the symbol and move all the contents to a different location relative to the center (see Figure W2.2). The center will still coincide with the user's mouse, but the graphics contained in the clip will appear in an offset location.
Figure W2.2. Moving the Movie Clip's contents relative to the center (the plus sign) affects where the graphic appears.
In a minute, we'll use Mouse.hide() to make the user's cursor disappear. The drawback to having a cursor present all the time in Flash is that the cursor remains onscreen when the user moves the mouse out of Flash's window. We want to make the custom cursor appear only when the user places the mouse pointer over an object (a button or a draggable item) and then restore the original cursor when the user rolls off the object. Although that may sound like a single action, it's really two: In addition to hiding and restoring the cursor, you must make sure that the hand instance is displayed or hidden accordingly. We'll do all that through a function.
-
Draw a square (with no stroke) and convert it to a Movie Clip called "Hot Area." You can set the clip's alpha so that it appears to be semitransparent. Also, give it an instance name of "hot." We will use this shape to define the area in which the cursor will appear. An invisible button (discussed in Chapter 1, "Flash Basics") would be a convenient solution because it has built-in mouse events for rollOver and rollOut (the events we'd like to trap). However, if we ever place an invisible button on top of another button, the script for the button underneath will be ignored. Because we'd like to be able to use this component anywhere (including on top of other buttons), we'll use the instance of hot to define what area is "hot" the area where the cursor should change. (By the way, even if we use a Movie Clip instead of a button, as soon as we assign an onRollOver or onRollOut callback, the clip can't be used on top of actual buttons.) Because we want both the hot area and the hand to stick together and we're eventually going to make this a component, select both the hot instance and the hand instance, choose Insert, Convert to Symbol, call the symbol "Cursor Clip," and then select the Movie Clip behavior.
-
If we test the movie, we'll find that it's broken; the hand instance doesn't match the cursor. That's because the instance of hand is now inside another clip. The script attached to the hand instance (_x=_root._xmouse) is wrong now; we actually want _x to be assigned to the _xmouse within the Cursor Clip symbol. To fix the problem, we could simply replace _root with _parent in the code attached to the instance of Cursor Clip symbol. Instead of fixing the code, however, I think we should move it to the first frame of the Cursor Clip symbol where we can consolidate other code as well. While we're moving code, we can call a function that we're about to write that will hide or reveal the cursor when the mouse is over the hot clip. The function, which we'll call check(), will also reside in the first frame of the Cursor Clip symbol. Therefore, remove all the code attached to the instance hot and type the following (similar) code in the first frame of the Cursor Clip symbol:
hot.onMouseMove=function() { check(); this._x = _xmouse; this._y = _ymouse; updateAfterEvent(); }The only thing that sort of freaks me out here is that the lines referring to this._x and this._y are addressing the hot instance. However, the lack of addresses in front of check(), _xmouse, and _ymouse naturally addresses the timeline of the Cursor Clip symbol that is, the timeline where this code is placed. Normally, having no address is the same as saying "this" but not with callbacks.
-
Let's write the check() function. We can do it in steps. The pseudo-code is simply this: "If the mouse is on top of the hot clip, hide the real mouse and make the hand clip visible; otherwise, reveal the real mouse and make the hand clip invisible." That's a lot to dive right into. Let's worry about how to determine whether the mouse is on top of the hot instance last. Here's a start for our check() function that resides in the first keyframe of the Cursor Clip symbol:
check(); function check(){ onHot=true; if (onHot){ Mouse.hide(); hand._visible = true; }else{ Mouse.show(); hand._visible = false; } }The first line calls the function so that we start checking even before the mouse starts moving. The function itself either hides the mouse Mouse.hide() is a built-in function and sets the _visible property of the hand instance to true, or shows the mouse using Mouse.show() and makes the hand instance invisible. This script is entirely dependent on the value of onHot, which must be replaced with an actual expression that results in true or false, depending on whether the mouse is on the hot instance. Notice that the hard-wired line onHot=true causes the condition to be true always. We can test it now and if it works, change that line to read onHot=false. This is a great way to make sure that this part of our script works before we add complexity.
-
There happens to be a built-in Movie Clip method called hitTest(). Although we'll use hitTest() in Workshop Chapter 6, "Working with Odd-Shaped Clickable Areas," we won't use it now. It's a shame we can't use the method because hitTest() can easily tell us when the mouse is on top of the hot instance. We can't use that method because we need to make the hot instance invisible, and hitTest() doesn't work with invisible clips.
Instead, we'll first gather information about the size and location of hot, store it in a variable, and then make hot invisible. (By the way, hitTest() will work with clips set to _alpha 0, so we could do that, but we'll use a different solution anyway.)
The good news is that we get to explore another method: getBounds(). This method returns a rectangle of any given clip instance. Because there isn't a "rectangle" data type, getBounds() returns a generic object with four properties: xMax, xMin, yMax, and yMin. The coordinate values for the four extremes are relative to the timeline you provide as a parameter. Within the Cursor Clip symbol, the coordinates of hot are different than the coordinates of hot within the main _root timeline. Type the following script directly above the check() function in the first frame of Cursor Clip symbol:
rect=hot.getBounds(this); hot._visible=false;
The variable rect contains the coordinates of hot relative to the current timeline (Cursor Clip). For example, rect.xMax contains the coordinate of the left side of the hot instance (as measured within the Cursor Clip symbol). The second line of code makes the hot instance invisible because we want it to disappear as soon as the movie plays.
-
Now we can finish the check() function. Remove the line onHot=true from the script that we wrote in step 6, and then replace the if statement's onHot condition with the following expression:
_xmouse>rect.xMin&&_xmouse<rect.xMax&&_ymouse>rect.yMin&&_ymouse <rect.yMax
This expression says that if _xmouse is greater than the xMin of rect and less than xMax and if _ymouse is greater than yMin and less than yMax, then the mouse is within the rectangle defined by the hot instance. This statement doesn't look pretty, but it works perfectly.
-
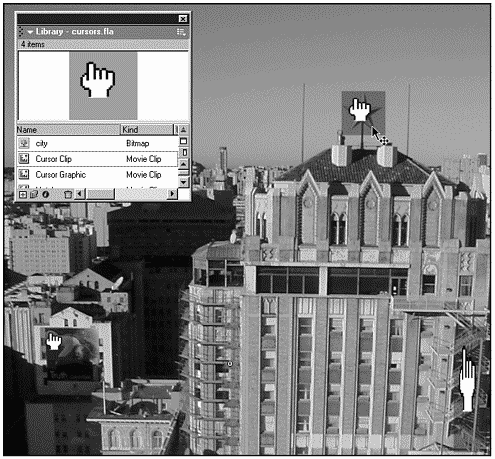
At this point, we can drag instances of Cursor Clip into any movie, placing the semitransparent shape from the hot instance wherever we want a cursor to appear (see Figure W2.3). If we resize any instance of Cursor Clip, however, (for example, if we have a larger or smaller area over which we want the cursor to appear), the Cursor Graphic clip will resize accordingly because it's inside the Cursor Clip we resized. This is not just annoying the Cursor Clip isn't very useful unless we're allowed to resize it as needed.
Figure W2.3. You can use several copies of the clip to create cursors in different areas.
-
Let's think about what we need to do to resolve the resizing issue. Basically, we want the hand instance to resize itself in inverse proportion to the scale of the clip in which it resides. For example, if the instance of Cursor Clip on the Stage is resized to be really big, we want the hand instance to compensate by resizing itself really small, and vice versa. The problem is a lot easier to solve when thought of it in those terms. We can add the following code to the first frame of Cursor Clip above the check() function:
hand._xscale=(100/this._xscale) * 100; hand._yscale=(100/this._yscale) * 100;
The way this code sets hand's scale to the inverse of the Cursor Clip's scale is based on the fact that no scaling has an _xscale and _yscale of 100. Let's try some "what-if" numbers to see how this formula works: If _xscale of Cursor Clip is 100, we want hand._xscale to be 100 as well. ((100/100) * 100 equals 100.) If Cursor Clip is scaled down by 50 percent, we want hand to be 200 percent. ((100/50)*100 equals 200.)
-
The Cursor Clip appears to work great. Now is a good time to test it in a real-life situation. You may notice that if you place more than one instance of the Cursor Clip in a movie, only one will actually hide the cursor (although it blinks). The problem is that our script says, "Hide the cursor," but another instance of the Cursor Clip has code that says, "If you're not within my rectangle, show the cursor." Because the instances are in different areas, you will indeed be outside one clip's rectangle when you're within another's. We have to add a script that lets each clip reveal the cursor only once. In the current script, we are repeatedly hiding or showing the mouse. If we restore the cursor with Mouse.show() once (only when exiting a clip's rectangle), the problem will be resolved. Again, it would be more convenient if we were using the mouse event rollOut, but we're not.
To fix this bug, we'll use a custom variable we'll call flag. Programmers commonly need a variable that is switched on or off once or infrequently, and they call it a "flag." Think of the flag on some mailboxes that indicates whether you have outgoing mail. As soon as the mail carrier takes the mail, the flag goes down. The flag is a toggle for an event that occurs infrequently; the flag should not constantly go up and down. Outside of our check() function, we need a script that initializes flag to false (flag=false) so that flag is false at the start. Also, in place of where Mouse.show() is used in the false condition part of the check() function, we need an if statement such as the following:
if (!flag){ Mouse.show(); flag=true }With the preceding code, only if flag is false will the mouse be shown. Then we set flag to true so that it won't happen again until flag is false once more.
Finally, we must reset flag to false any time the cursor is indeed within this clip's rectangle. So right before the else in the true condition of check(),we add the line flag=false. Here's the finished script for the frame inside Cursor Clip:
hand.onMouseMove=function() { check(); this._x = _xmouse; this._y = _ymouse; updateAfterEvent(); } this.rect=hot.getBounds(this); hot._visible=false; hand._xscale=(100/this._xscale) * 100; hand._yscale=(100/this._yscale) * 100; flag=false; check(); function check(){ if (_xmouse>rect.xMin&&_xmouse<rect.xMax&&_ymouse>rect.yMin&&_ymouse<rect.yMax){ Mouse.hide(); hand._visible = true; flag=false }else{ if(!flag){ flag=true; Mouse.show(); hand._visible = false; } } } Now the script is quite solid. As long as you place the Cursor Clip symbol on top of buttons, the button scripts will execute, and you'll see only the custom cursor graphic. You can do some other refinements, such as positioning the hot instance within Cursor Clip so that its top-left corner is centered. With this adjustment, when the author scales Cursor Clip, it appears to stretch to the right and down rather than scaling equally in all directions the way a clip with its contents centered will. Maybe you can think of more refinements; we're about to do many in the next section.
Now let's convert the Cursor Clip symbol into a component that enables the author using the clip to select from a variety of cursors. Keep in mind that we made the cursor in just two steps it took several more steps to make the cursor really useful. The state it's in now is totally usable it's complete. Converting the cursor into an adaptable component will take more work. In a real project, this investment is worth the additional time only if you can use the component many times. Of course, it's worth the time now because we're learning.
-
First, save what you've created so far (call it symbol_version.fla), and then do a Save As so that you can start with the component (call the file component_version.fla). Then, go inside the Cursor Clip symbol and delete the hand instance.
-
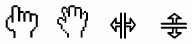
We need a few cursors from which the using author can select. I created four: finger, grab, left-right, and up-down (see Figure W2.4). Make four unique Movie Clips now, even if that means that you just draw something quickly.
Figure W2.4. We'll give the using author a choice of cursors.
At this point, you shouldn't have any instances of the Movie Clips (finger, grab, left-right, or up-down) anywhere on the Stage. Inside Cursor Clip there's just the hot instance and code in the first frame. If you ever want to use the component we're building in other projects, or if you want to share the component, you're going to want to know about a great trick that ensures that all the necessary pieces (including the four cursors we just made) are copied into other movies. Inside the Cursor Clip, make a Guide layer and place one instance of each clip on that layer. Even though objects in a Guide layer are not exported with the movie (and are not visible while you're working), placing objects in a Guide layer ensures that they are copied whenever you drag Cursor Clip into another movie. You can call the Guide layer "Just so they get copied."
-
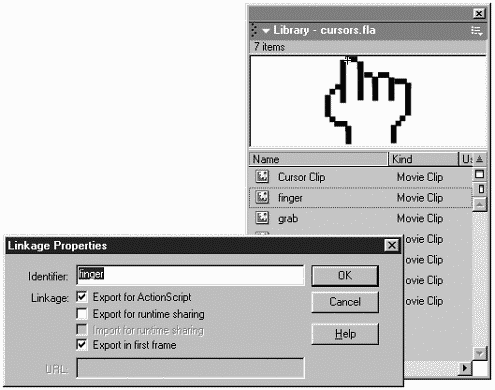
We're going to use attachMovie() to create the hand instance. In order for attachMovie() to work, each cursor must have a unique identifier name. Individually set the linkage for each cursor in the Library (finger, grab, left-right, and up-down). In the Linkage setting, select the Export for ActionScript option and give it an identifier name identical to the symbol name (see Figure W2.5). We select this option not so much because we need to export the clips (which will happen), but because attachMovie() requires an identifier name.
Figure W2.5. To use attachMovie(), each clip must have an identifier name.
-
Now we can write the script that decides which of the four cursors to use. The using author will ultimately specify this by setting a value for a variable. We can use the custom variable pointerName that we'll hard-wire at first and then have the using author specify using the Clip Parameters panel. Instead of trying to do it all in one step, we'll first try to make the variable work with a hard-wired script. At the beginning of the first frame in Cursor Clip (above all other code), add the following two lines:
pointerName="grab"; this.attachMovie( pointerName, "hand", 1 );
The first line hard-wires pointerName. The second line (including the four cursors we just made) "attaches" a new clip instance called hand. Basically, this just replaces the one we just deleted with one of the four cursor choices. Test it out!
-
Next, we just have to remove or comment out the line in which we hard-wired pointerName and make the using author set this for us. Type // in front of the first line we added in step 4 so that it will be ignored. From the Library, select Component Definition for the Cursor Clip symbol.
-
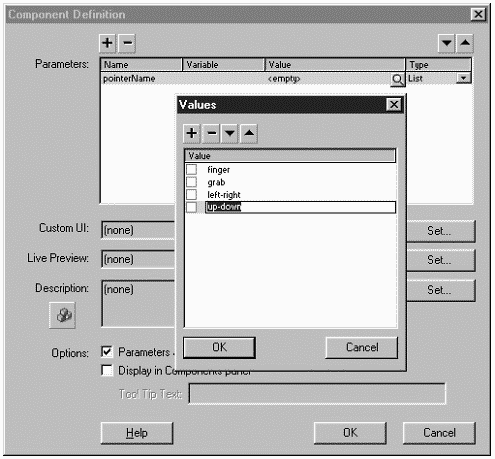
Click the plus sign in the upper-left corner of the Component Definition dialog box, and then double-click varName to select it. Type pointerName. Instead of making the author remember the names of the four possible cursor choices, let's use the List data type (double-click Default under the Type column and select List). After selecting List, you should be able to double-click under the Value column and populate the list. Add the four names given as identifiers in step 3: finger, grab, left-right, and up-down (see Figure W2.6).
Figure W2.6. The List data type enables the using author to select from a predefined list of cursor types.
It's done! Yep, that was a lot of work, but check it out. Drag an instance of Cursor Clip which is now a component into any movie you have. Using the Parameters tab in the Properties panel, select the cursor of your choice. Use as many cursors as you want and mix and match the cursor choices. You can even resize the Cursor Clip, and the cursor won't get all whacked out of scale.
This particular component is a good candidate for either a custom UI or a Live Preview movie (or both). For example, instead of making the using author select from a list of cursor names, you can show pictures of the cursors. You also can use a Live Preview movie to show the current cursor choice. Generally, the purpose of a Live Preview movie is to show the content that will be presented (without requiring a test movie). The following steps show how to extend this component to include a custom UI.
//In addition to a tiny bit of math and some addressing issues, most of this workshop chapter involves Flash features namely, the _xmouse and _ymouse properties, the Mouse.hide() and Mouse.show() functions, the getBounds() and attachMovie() Movie Clip methods, as well as components. We covered components in Chapter 15, "Components," but this is your first chance to make something practical. We'll make more components in upcoming workshop chapters, including the Workshop Chapter 3, "Creating a Horizontal Slider." Remember that there are usually two steps involved: First make the clip work, even if it's hard-wired, and then convert it to a component. |
We need to build a Flash movie that lets the using author select from the different cursor choices. Specifically, we want the user to set the value for pointerName. When this Flash movie is finished, we can export it as an .swf and use it in place of the Parameters tab in the Properties panel.
-
Leave open the file you used to create the Cursor Clip component and make sure that the Library is open. Start a new file by pressing Ctrl+N. Drag an instance of Cursor Clip into the new file. Save the original file as cursorSC.fla and then close it. Save the new file as ui.fla in the same folder as cursorSC.fla. The ui.fla file has four buttons, one for each of the four cursor choices. Ultimately, we'll use our plain Cursor Clip component on top of those buttons. For now, delete the instance of the Cursor Clip. (Don't worry; it's safe in the Library of the new file.) Set the dimensions for ui.fla to 406X72 (through Modify, Document). This size will match the space provided in the Properties panel. As you learned in Chapter 15, custom UIs require at least one frame to initialize. Therefore, create a keyframe at frame 2 and create four horizontally aligned buttons as graphically as you want (see Figure W2.7).
Figure W2.7. The custom UI has four buttons that won't appear until frame 2.

-
On each button, place a version of this script:
on (release) { selectPointer(1); }For each button, change the parameter to read 1, 2, 3, or 4.
-
Draw some kind of highlight that will be used to indicate which cursor is currently selected. A simple orange square just bigger than the buttons will work fine. Convert this highlight graphic to a Movie Clip and name the instance on the Stage highlight.
-
Now we can write the selectPointer() function that the act of selecting each button invokes. The function sets pointerName and moves the _highlight instance. To complete this function, we need something that translates the number (provided in the parameter sent when selectPointer() is invoked) to a name (which is needed in our component for the value of pointerName). Yay! It's time for an array like the one you remember from Chapter 11, "Arrays." In the keyframe at frame 2, start with this script:
stop(); names=["finger","grab","left-right","up-down"];
The first line prevents us from looping back to frame 1. The names array makes it easy to find any particular name. For example, if we want to know the name for the second pointerName, we just find the value in index 1.
-
We might as well make an array to contain the four locations for the highlight instance. You can position the highlight instance by hand in each spot and note the Info panel's x coordinate to acquire the clip's center. After you gather the values, leave highlight's vertical position so that it matches the buttons, but move it either to the left or right, way off the Stage. In frame 2, add this line of code below what you've got so far:
locs=[35, 88.3, 141.6, 194.9];
Use whichever values you found for your highlight instance. For example, 35 is the location in my movie when the highlight instance surrounds the first button. Because the vertical location is the same for all the buttons, the script has to change only the highlight's _x property.
-
Now for the function. The previous two lines just sit in a keyframe script, so they execute only when that frame is reached. We want the selectPointer() function to move the highlight and store the value for pointerName. To make it easier when we get to making this custom UI restore old values, it's best to also store a value for pointerNumber. You'll see why this is important in step 8, when we make this custom UI restore the old settings. Here's the selectPointer() function:
function selectPointer(whichOne){ highlight._x=locs[whichOne -1]; xch.pointerName=names[whichOne -1]; xch.pointerNum=whichOne; }The first line in the function is the easiest: It just sets the _x property of highlight to the value found in the appropriate index of the locs array. Similarly, the second line sets the value of pointerName to the appropriate name. Actually, it looks like I'm setting the value of pointerName inside a clip instance or generic object variable called xch. Yep, custom UIs must store all the variables you want to be variables of the component in a clip as properties of a generic object you call xch. Finally, xch.pointerNum is saved for later.
-
Normally, you can't start referring to or setting properties in a generic object variable if it's undefined (which it will be the way it is now). However, once this movie becomes the custom UI, it will work fine as is. My natural tendency is to place the following error correction script above the function:
if (xch==undefined){ xch=new Object(); }Basically, if the variable is undefined, it gets initialized as a generic object. For good practice, you should place the preceding code above the function.
-
To visually display a previously selected value for pointerNum, place the following script at the bottom of frame 2, below the selectPointer() function:
selectPointer(xch.pointerNum);
This line invokes the selectPointer() function the first time frame 2 is reached and supplies as a parameter the value of pointerNum currently stored in the xch variable. The statement makes sense only if xch.pointerNum has a value, which it will when the using author has previously chosen a cursor. Note that the statement doesn't cause any problems if this value is undefined, which it will be the first time.
-
Finally, go ahead and drag the Cursor Clip component on top of the four buttons. Use the Parameters tab in the Properties panel to choose an appropriate cursor. Don't get confused here! There's certainly no requirement that you use a plain non-custom UI component while you're producing the UI. I just thought it would be cool to put our component to the test. This custom UI can have any element you want; simply setting the value for pointerName is enough.
-
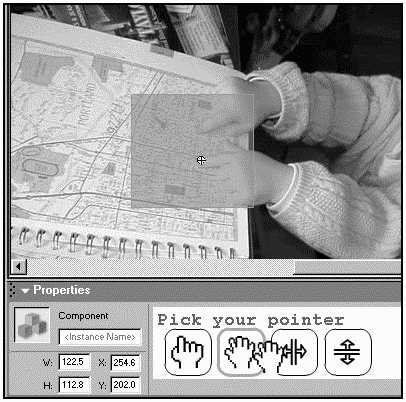
Save the file, and then export an .swf by selecting Control, Test Movie. Close this file so that nothing gets mixed up and reopen customSC.fla. Select Cursor Clip from the Library window and then select Component Definition. Click the top Set button (adjacent to "Custom UI"), select "Custom UI in External File" and "Display in Property Inspector," and then type the name of the movie we just exported in this case, ui.swf and click OK (see Figure W2.8) Now you can drag instances of the finished Cursor Clip component, and for each one use the Parameters tab of the Properties panel to select the cursor of your choice (see Figure W2.9).
Figure W2.8. Here are the settings to link to a custom UI.
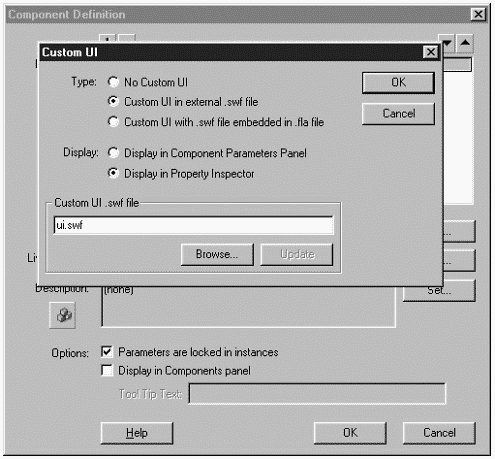
Figure W2.9. When completed, our component uses a custom UI.
This workshop chapter shows that you can take a task that's easy to program and refine it with a ton of work to make it something really usable. Please realize that the purpose of this workshop chapter was not just to make a cursor component, but to explore and learn.
| | CONTENTS | |
- Integration Strategies and Tactics for Information Technology Governance
- Linking the IT Balanced Scorecard to the Business Objectives at a Major Canadian Financial Group
- Measuring and Managing E-Business Initiatives Through the Balanced Scorecard
- Measuring ROI in E-Commerce Applications: Analysis to Action
- Managing IT Functions