Section 17.3. Tricks with Tables
17.3. Tricks with TablesBy design, tables let authors create appealing, accessible tables of information. But the table tags also can be exploited to create innovative, attractive page designs that are otherwise unattainable in standard HTML and XHTML. 17.3.1. Multicolumn PagesOne very common and popular page-layout element missing from HTML and XHTML is multiple columns of text. Here's a tip on how to use tables to achieve that effect. [*]
17.3.1.1. Basic multicolumn layoutThe basic two-column layout using <table> has a single table row with three data cells : one each for the columns of text and an intervening empty cell to more attractively separate the two columns. We've also added a large cellspacing attribute value to create additional intervening space between the columns. The following example HTML table is an excellent template for a simple two-column text layout: <table border=0 cellspacing=7> <tr> <td>Copy for column 1... <td><br> <td>Copy for column 2... </table> See Figure 17-1 for the results. Figure 17-1. A simple two-column layout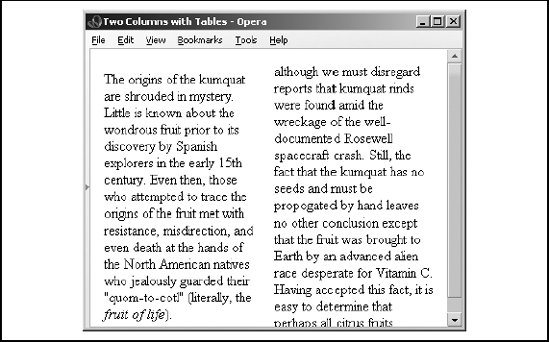 The one thing the browsers won't do is automatically balance the text in the columns, resulting in adjacent columns of approximately the same length. You'll have to experiment with your document, manually shifting text from one column to another until you achieve a nicely balanced page. Keep in mind, though, that users may resize their display windows , and the columns' contents will shift accordingly . So don't spend a lot of time getting the last sentences of each column to line up exactly; they're bound to be skewed in other browser-window widths. Of course, you can easily convert the example layout to three or more columns by dividing the text among more cells in the table. But keep in mind that pages with more than three columns may prove difficult to read on small displays, where the actual column width might be quite small. 17.3.1.2. Straddle headsThe basic multicolumn format is just the start. By adding cells that span across the columns, you create headlines. Similarly, you can make figures span across more than one column: simply add the colspan attribute to the cell containing the headline or figure. Figure 17-2 shows an attractive three-column layout with straddle heads and a spanning figure, created from the following HTML source with table tags: Figure 17-2. Fancy straddle heads and spanning figures with HTML table tags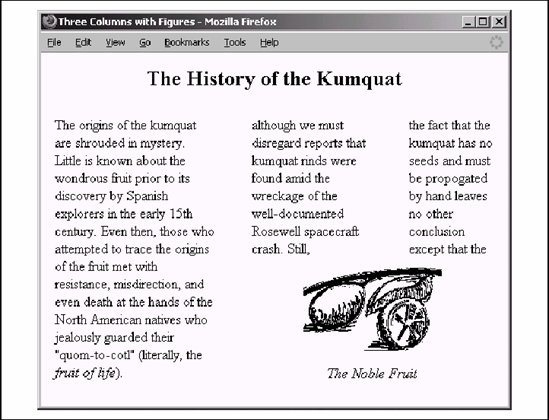 <table border=0 cellspacing=7> <tr> <th colspan=5><h2>The History of the Kumquat</h2> <tr valign=top> <td rowspan=2>Copy for column 1... <td rowspan=2 width=24><br> <td>Copy for column 2... <td width=24><br> <td>Copy for column 3... <tr> <td colspan=3 align=center><img src="pics/fruit.gif"> <p> <i>The Noble Fruit</i> </table> To achieve this nice layout, we used the colspan attribute on the cell in the first row to span all five table columns (three with copy and the two intercolumn spaces). We used the rowspan attribute on the first column and its adjacent column spacer to extend the columns down beside the figure. The figure's cell has a colspan attribute so that the contents span the other two columns and intervening spaces. 17.3.2. Side HeadsThe only text-heading features available in HTML and XHTML are the <h1> tHRough <h6> tags. These tags are always embedded in the text flow, separating adjacent paragraphs of text. Through multiple columns, you can achieve an alternative style that places headings into a separate side column, running vertically alongside the document text. Figure 17-3 shows you a fairly fancy pair of side heads, the result of the following bit of source XHTML table code: Figure 17-3. Table tags created these side heads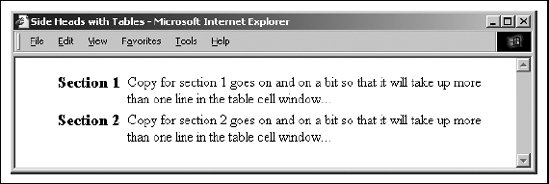 <table> <tr> <th width="20%" align="right"> <h3>Section 1</h3></th> <td></td> <td> Copy for section 1 goes on and on a bit so that it will take up more than one line in the table cell window... </td> </tr> <tr> <th align="right"> <h3>Section 2</h3></th> <td></td> <td> Copy for section 2 goes on and on a bit so that it will take up more than one line in the table cell window...</td> </tr> </table> Notice how we created reasonably attractive side heads set off from the left margin of the browser window by adjusting the first header cell's width and right-justifying the cell contents. Just as in our multicolumn layout, the example side-head layout uses an empty column to create a space between the narrow left column containing the heading and the wider right column containing the text associated with that heading. It's best to specify that column's width as a percentage of the table width instead of explicitly in numbers of pixels, to make sure that the heading column scales to fit both wide and narrow display windows. 17.3.3. Better Forms LayoutOf all the features in HTML and XHTML, forms cry out for better layout control. Unlike other structured elements, forms look best when rendered in a fixed layout with precise margins and vertical alignment of elements. However, except for carefully planned, <pre> -formatted form segments, the standards just don't give us any special tools to better control forms layout. You can accomplish a lot with stylesheets, but that gets complicated quickly. Instead, tables provide easy forms layout. 17.3.3.1. Basic forms layoutYour forms almost always look better and are easier for your readers to follow if you use a table to structure and align the elements. For example, you might use a vertical alignment to your forms, with field labels to the left and their respective form elements aligned to an adjacent vertical margin on the right. Don't try that with just standard HTML or XHTML. Rather, prepare a form that contains a two-column table. The following HTML source does just that, as shown in Figure 17-4: Figure 17-4. Align your forms nicely with tables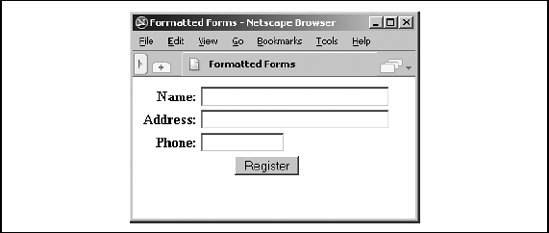 <form method=post action="http:/cgi-bin/process"> <table> <tr> <th align=right>Name: <td><input type=text size=32> <tr> <th align=right>Address: <td><input type=text size=32> <tr> <th align=right>Phone: <td><input type=text size=12> <tr> <td colspan=2 align=center> <input type=submit value="Register"> </table> </form> Of course, more complex form layouts can be managed with tables, too. We recommend that you first sketch the form layout on paper and plan how various combinations of table elements, including row- and column-straddled table cells, might be used to affect the layout. 17.3.3.2. Building forms with nested tablesAs we mentioned earlier, you can place a table inside a cell in another table. While this alone can lead to some elaborate table designs, nested tables also are useful for managing a subset of form elements within the larger table containing the entire form. The best application for using a nested table in a form is for laying out checkboxes and radio buttons . For example, insert the following row containing a table into the form table in the previous example. It creates a checkbox with four choices: <tr> <th align=right valign=top>Preferences: <td> <table> <tr> <td><input type=checkbox name=pref>Lemons <td><input type=checkbox name=pref>Limes <tr> <td><input type=checkbox name=pref>Oranges <td><input type=checkbox name=pref>Kumquats </table> Figure 17-5 shows you how this nested table attractively formats the checkboxes, which browsers would otherwise render on a single line and not well aligned. Figure 17-5. Nesting tables to format elements of a form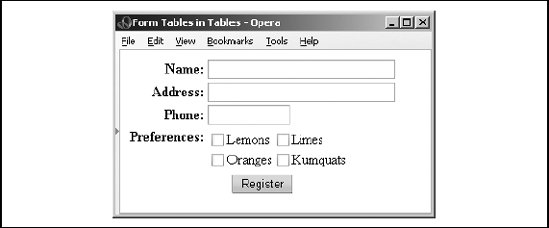 |
EAN: 2147483647
Pages: 189
- ERP System Acquisition: A Process Model and Results From an Austrian Survey
- Enterprise Application Integration: New Solutions for a Solved Problem or a Challenging Research Field?
- Data Mining for Business Process Reengineering
- Relevance and Micro-Relevance for the Professional as Determinants of IT-Diffusion and IT-Use in Healthcare
- Development of Interactive Web Sites to Enhance Police/Community Relations