| FIRST WE'LL TACKLE JUST WHAT CHANNELS ARE, WHY THEY MATTER, AND HOW TO CREATE YOUR OWN Color images you see in Photoshop are primarily made up of three color channels: a Red channel, a Green channel, and a Blue channel. I say primarily, because most of us work in RGB color mode, which is the standard mode for most images, and the standard mode for color monitors. If most of your work is going to an actual printing press (where people with large tattoos get ink on their hands), then you might spend some of your time in CMYK mode (which has four color channels), but since most of us work primarily in RGB, most of this book will assume you're in RGB. This particular chapter starts at square one, so I'm assuming at this point that you don't know anything about channels, so we're going to start by looking at the color channels, learning the most essential keyboard shortcuts, and some of the things we can do in the Channels palette. Step 1. | OPENING THE CHANNELS PALETTE
I know, I know, this seems pretty basic, but if you don't have the Channels palette already open, this has to be Step One (well, open a photo first, then this is Step One). By default, Photoshop nests the Channels palette alongside the Layers palette, so if you bring up the Layers palette, the Channels palette will appear in the tab right next to it. This is actually pretty handy since there's no keyboard shortcut to bring up the Channels palette, but there is one for Layers, so you can use the Layers shortcut to get you within one click of the Channels palette. Just press F7 on your keyboard, the Layers palette will appear, and then click on the Channels tab (as shown here).
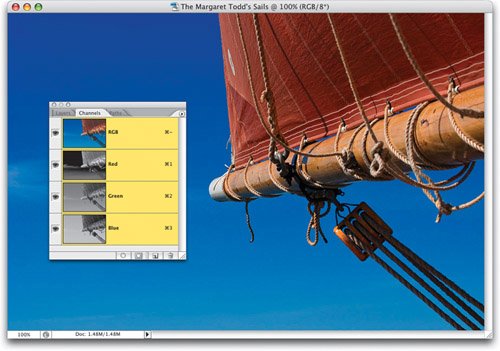 ©SCOTT KELBY | | | Step 2. | SEEING INDIVIDUAL CHANNELS
When you open the Channels palette, all the channels appear highlighted. That's because by default all three channels (and the RGB composite of them) are active. Essentially, you're seeing what happens when you combine the Red channel, the Green channel, and the Blue channel. You get a full-color RGB image, and that's what we see most of the time in Photoshop. However, you can see individual color channels by clicking directly on a channel in the Channels palette (as shown here) and just that channel is displayed. The channels are displayed in grayscale by default, but you can change that (as you'll see in the next step).
 | Step 3. | SEEING YOUR CHANNELS IN COLOR
If you'd prefer to see your color channels in their respective colors (red, green, and blue), rather than grayscale, you just have to change a simple preference setting. Press Command-K (PC: Control-K) to bring up Photoshop's Preferences. Then from the pop-up menu at the top left, choose Display & Cursors to bring up those preferences. When the Display & Cursors Preferences appear, under the Display section, turn on the checkbox for Color Channels in Color (as shown here), and click OK. Now, your grayscale channels will be displayed in color. Even if you don't want this permanently, go ahead and turn this on now, because we need it turned on for the next step.
 | | | Step 4. | SEEING COLOR CHANNELS VS. GRAYSCALE CHANNELS
Here's a side-by-side example of what the channels look like in the Channels palette when viewed in color vs. grayscale.
 | Step 5. | SEEING YOUR PHOTO'S CHANNELS IN COLOR
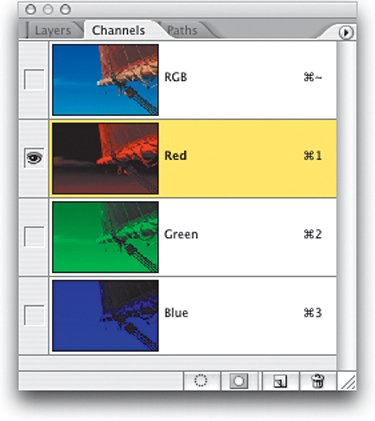
It's not just the Channels palette that gets changed, it also affects how your image is displayed when you're viewing individual channels. Click on the Green channel (in the Channels palette) and you'll see that your onscreen representation of this channel isn't grayscale anymorenow it's green (as shown here). Because we can do this, this gives us a great opportunity to do a quick exercise that will help you understand how RGB images are made up of color channels. So far, we've clicked on the Green channel, and as you can see the image looks pretty green. In the next step, we'll add another channel, and you'll see how two channels combine to bring more color.
 | | | Step 6. | VIEWING TWO CHANNELS AT ONCE
Now, you're not going to change channels, you're just going to make another channel visible, so go to the Channels palette and click in the first column to the left of the Red channel. This makes the channel visible, and a little Eye icon appears in that column, letting you know that channel is now visible. See how it brought the red into the sails (the ship actually had red sails by the way), and how it brought some red into the mast and ropes as well? By viewing these two channels, you can see that when combined, they made up part of the sky, most of the rope, mast, and sails, but the rest of the sky is still missing.
 | Step 7. | VIEWING ALL THREE CHANNELS AT ONCE
Now, click in the first column beside the Blue channel to make it visible and you see what happens when you combine red, green, and blue channelsyou get a full-color RGB image (like the one shown here). You can see (by looking at the photo) that the Blue channel included some of the colors in the rope and mast as well. Now, hide the Green channel by clicking on the little Eye icon, and you'll see what the image would look like if you combined just the Red and Blue channels.
 | | | Step 8. | THIS ONE BREAKS THE RULES FOR SHOWING COLOR
This is going to sound kind of weird and contrary to your preferences, but it's actually good. Start by pressing Command-K (PC: Control-K) to bring up Photoshop's Preferences again. Go to the Display & Cursors Preferences (yes, again) and now turn off the checkbox for Color Channels in Color, then click OK. Now, go back to the Channels palette and click on the Blue channel (as shown here). It displays onscreen in grayscale, right?
 | Step 9. | COLOR CHANNELS SHOW IN COLOR WHEN COMBINED
Now in the Channels palette, turn on the Eye icon beside the Red channel (don't change channels, just make the Red channel visible). Lookthe two visible channels now display onscreen in color, even though individual channels display in grayscale. Pretty handy, eh? So, since this feature exists, should you turn on the Color Channels in Color preference or not? Personally, I recommend leaving the channels in their default grayscale, because those bright colors can really be distracting when you're trying to make precise adjustments (as you'll see later in this book), but you can choose whichever you're most comfortable with.
 | | | Step 10. | KEYBOARD SHORTCUTS FOR VIEWING INDIVIDUAL CHANNELS
All right, so far you've learned the slow way of viewing individual channels, but before we go any further, you need to learn the shortcuts. Luckily, they don't make keyboard shortcuts much easier than these. To see the Red channel, press Command-1 (PC: Control-1). To see the Green channel, press Command-2 (PC: Control-2). Any guesses on the shortcut for the Blue channel? Right (or duh, depending on what kind of day you're having), it's Command-3 (PC: Control-3). To return to seeing the full RGB image (in other words, all channels are turned on), press Command-~ (PC: Control-~). Note: That symbol (the Tilde key) is located right above the Tab key on your keyboard.
 | Step 11. | KEYBOARD SHORTCUTS FOR VIEWING EXTRA CHANNELS
If you add additional channels (and you willit's pretty much what the rest of this book is all about), then you'll want to know the shortcut to see them, too. Let's go ahead and create a new blank channeljust click on the Create New Channel icon (it looks like the Create a New Layer icon) at the bottom of the Channels palette (your image will turn black, as shown here, because by default new channels appear in black). If you look in the Channels palette, you'll see a new channel at the bottom of the stack of channels named Alpha 1 (that's Adobe's default name for new channelsAlpha 1). I love that nameit sounds so Battlestar Galactica.
 | | | Step 12. | JUMP BACK TO YOUR COMPOSITE CHANNEL, THEN STRAIGHT TO ALPHA 1
Now, press Command-~ (PC: Control-~) to return to the RGB Composite channel (so you see your color photo again, as shown here). Now, to jump directly to your new Alpha channel (the one filled with black), just press Command-4 (PC: Control-4). Go ahead and toggle through your individual color channels and your new channel: Press Command-1 (PC: Control-1), then Command (PC: Control)-2, -3, then -4 to see your new Alpha channel (which is still black, and it'll stay completely black until we do something to it, like paint on it in white).
 | Step 13. | ADD A SECOND ALPHA CHANNEL AND USE COMMAND-5 (PC: CONTROL-5) TO JUMP DIRECTLY TO IT
Now let's add another new channel, so click on the Create New Channel icon again (as shown here). Jump back to the RGB Composite by pressing Command-~ (PC: Control-~), then to view just the second Alpha channel, press Command-5 (PC: Control-5). See where this is going? Your next channel would be 6, your next 7, and so on. Now, what if you're going to a printing press using CMYK mode? Then Command (PC: Control)-1 thru -4 will display your individual CMYK channels, and the first additional channel you add will start at Command-5 (PC: Control-5), because in CMYK you have four color channels. If you press Command-4 (PC: Control-4) in CMYK, you'll see the Black channel, not an Alpha channel.
 |
|