Configuring Photoshop for Adobe RGB (1998)
|
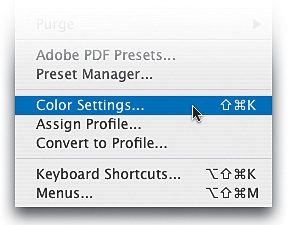
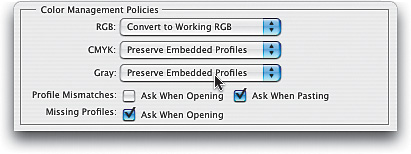
| Once you've got your camera set to the right color space, it's time to set up Photoshop that way too. Back in Photoshop 5.5, when Adobe (and the world) were totally absorbed with Web design, they switched the color space from Monitor RGB to sRGB (which some pros refer to as "stupid RGB"). It was great for graphics that were destined for the Web. At that time, digital photography hadn't caught hold like it has today, so it seemed like the right thing to do, and at that time, it probably was. However, now we have to change the color space to something that's more appropriate for photography: Adobe RGB (1998). Step OneBefore we do this, I just want to reiterate that you only want to make this change if your final print will be output to your own color inkjet. If you're sending your images out to an outside lab for prints, you should probably stay in sRGBboth in the camera and in Photoshopbecause most labs are set up to handle sRGB files. Your best bet: Ask your lab which color space they prefer. Okay, now on to Photoshop: Go under the Edit menu and choose Color Settings. Step TwoThis brings up the Color Settings dialog. By default, it uses the settings called North America General Purpose 2. Now, does anything about the term "General Purpose" sound like that's a good space for photographers? Didn't think so. The tip-off is that under Working Spaces, the RGB space is set to sRGB IEC61966-2.1 (which is the longhand technical name for what we simply call sRGB). In short, you don't want to use this group of settings. 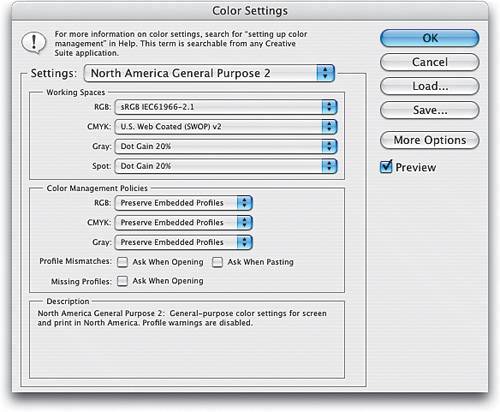 Step ThreeTo get a preset group of settings that's better for photographers, from the Settings pop-up menu, choose North America Prepress 2. This automatically changes your RGB working space to Adobe RGB (1998) and sets up the appropriate warning dialogs to help you keep your color management plan in action when opening photos from outside sources or other cameras. Don't let it throw you that we're using prepress settings herethey work great for color inkjet printing because it uses Adobe RGB (1998) and because it turns on warnings for you, so you can deal with photos that you open with different or missing color profiles (more on this later).  Step FourBefore you click OK, just for fun, temporarily change the Settings pop-up menu to North America Web/Internet and you'll see that the RGB working space changes back to sRGB, because sRGB is best suited for Web design. Makes you stop and think, doesn't it? Now, switch back to North American Prepress 2, click OK, and Photoshop is configured with Adobe RGB (1998) as your working RGB space. Note: If you're actually going to a printing press, where your final output is in the limited color range of CMYK, many pros prefer to use the ColorMatch RGB workspace (which you choose from the RGB Working Spaces pop-up menu) rather than Adobe RGB (1998), because it's closer to the range of colors that CMYK printing presses use.  Step FiveOne of the benefits of choosing North America Prepress 2 is that it turns on warnings (for example, it looks for a profile mismatch) and gives you the opportunity to fix it. For example, if you set your camera to shoot in Adobe RGB 1998, and Photoshop is set that same way too, they match, so it's smooth sail-ingno warnings appear. However, if you open a photo you took six months ago, it will probably be in sRGB, and that doesn't match your Photoshop workspace (it's a mismatch). So, I recommend that you reopen the Color Settings dialog, go under Color Management Policies, and change your default setting (from the RGB pop-up menu) to Convert to Working RGB. Then, for Profile Mismatches, turn off the Ask When Opening checkbox. That way, your old photos will automatically update to match your current working space when you re-open them in Photoshop. Step SixOkay, so what if a friend emails you a photo, you open it in Photoshop, and the photo doesn't have any color profile at all? Well, once that photo is open in Photoshop CS2, you can convert that "untagged" image to Adobe RGB (1998) by going under the Edit menu and choosing Assign Profile. When the Assign Profile dialog appears, click on the Profile radio button, ensure Adobe RGB (1998) is selected in the pop-up menu, and then click OK. 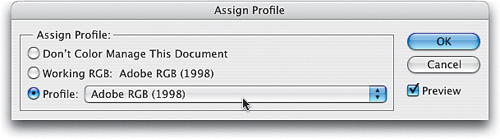 |
|
EAN: N/A
Pages: 187