Fixing (Or Creating) Edge Vignetting
|
If you're looking at a photo and the corners of the photo appear darker, that's lens vignetting. This is either a problem or a cool effect, depending on how you view it. Generally, I look at it this wayif it's just the corners, and they're just a little bit dark, that's a problem and I fix it. However, sometimes I want to focus the viewer's attention on a particular area, so I create a vignette, but I expand it significantly beyond the corners so it looks like an intentional effect, not a lens problem. Here's how to fix (or create) vignettes: Step OneIn the RAW photo shown here, you can see the hard areas in the corners (the vignetting I was talking about). This vignetting is normally caused by the camera's lens, so don't blame yourself (unless you bought a really cheap lensthen feel free to give yourself as much grief as you can bear). 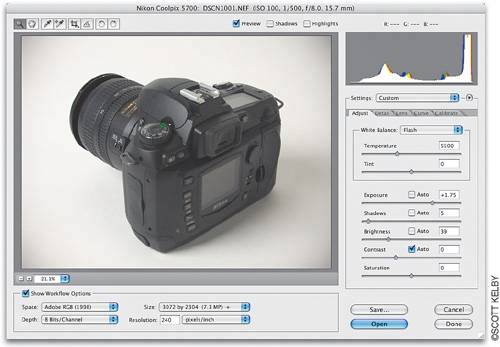 Step TwoTo remove this vignetting from the corners, click on the Lens tab (along the right of the Camera Raw dialog) to bring up the Vignetting options. Click on the Amount slider and drag it to the right until the vignetting disappears (dragging to the right essentially brightens the corners, which hides the vignetting). Once you begin moving the Amount slider, the Midpoint slider beneath it becomes available. That slider determines how wide the vignetting repair extends into your photo (in other words, how far out from the corners your repair extends), so drag it to the right for even more lightening. 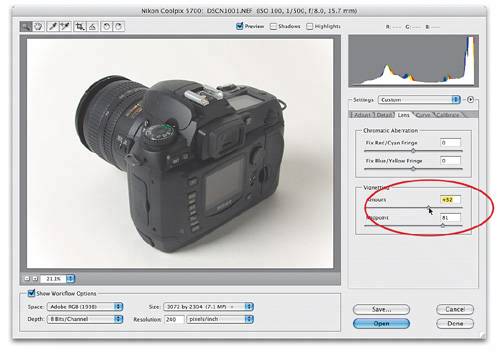 Step ThreeNow for the opposite: adding vignetting to focus attention (by the way, in the Photographic Special Effects chapter, I also show you how to get the same effect outside of Camera Raw). This time, in the Vignetting section, drag the Amount slider to the left, and as you drag you'll start to see vignetting appear in the corners of your photo. But since it's just in the corners, it looks like the bad kind of vignetting, not the good kind, so you'll need to go on to the next step. 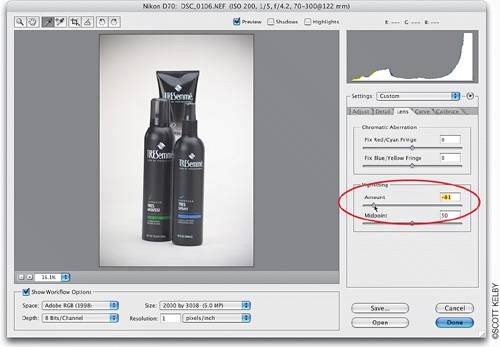 Step FourTo make the vignetting look more like a soft spotlight falling on your subject, drag the Midpoint slider to the left, which increases the size of the vignetting and creates a soft, pleasing effect. That's ithow to get rid of 'em and how to add 'em. Two for the price of one! 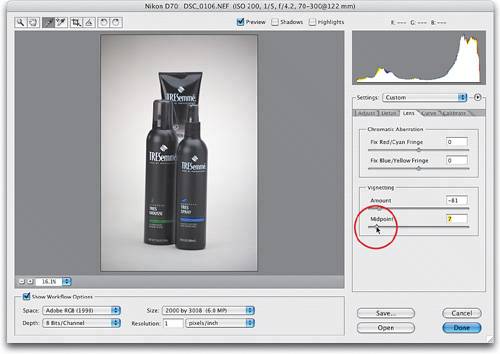 |

|
EAN: N/A
Pages: 187
- ERP Systems Impact on Organizations
- Enterprise Application Integration: New Solutions for a Solved Problem or a Challenging Research Field?
- Distributed Data Warehouse for Geo-spatial Services
- Relevance and Micro-Relevance for the Professional as Determinants of IT-Diffusion and IT-Use in Healthcare
- Development of Interactive Web Sites to Enhance Police/Community Relations