Saving Raw Files in Adobe s Digital Negative (DNG) Format
|
Saving Raw Files in Adobe's Digital Negative (DNG) FormatAt this point in time, there's a concern with the RAW file format because there's not a single, universal format for RAW imagesevery digital camera manufacturer has its own. That may not seem like a problem, but what happens if one of these camera companies stops developing or supporting a format and switches to something else? Seriously, what if in a few years from now there was no easy way to open your saved RAW files? Adobe recognized this problem and created the Digital Negative (DNG) format for long-term archival of RAW images. Step OneAs of the writing of this book, no major digital camera manufacturer has built in the ability to save RAW files in Adobe's DNG format (although we believe it's only a matter of time before they do); so for now what you can do is save your RAW file to Adobe DNG from right within the Camera Raw dialog, which you do by hitting the Save button. This brings up the Save Options dialog, and at the bottom of the dialog is where you choose your file format. To save in DNG, choose Digital Negative from the Format pop-up menu. Step TwoYou have some additional options: You can choose to embed the original RAW file into your DNG (making the file larger, but your original is embedded for safekeeping in case you ever need to extract itand if you have the hard disk [or CD space]go for it!). There's a compression option (and it's "lossless," meaning you don't lose quality like you do with JPEG compression). You can also choose to include a JPEG preview with your DNG file. That's itclick Save and you've got a DNG archival-quality file that can be opened by Photoshop (or the free DNG utility from Adobe). 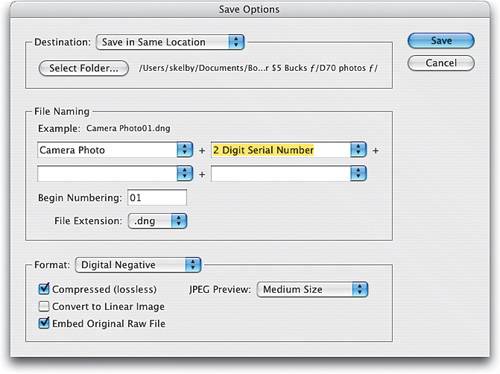 |
|
EAN: N/A
Pages: 187