Camera Raw Essentials
|
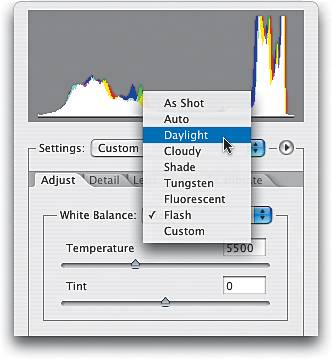
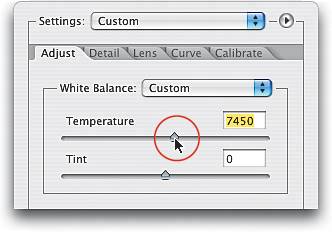
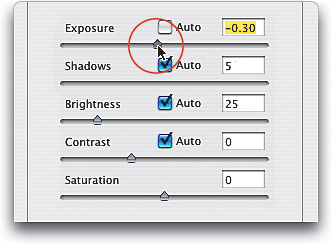
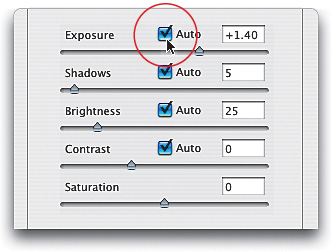
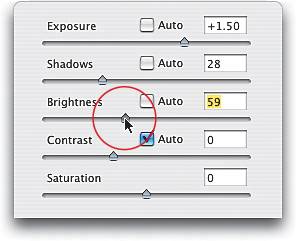
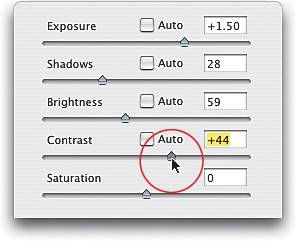
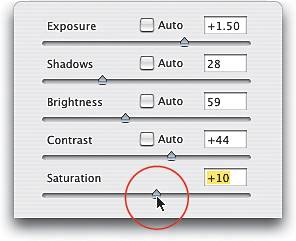
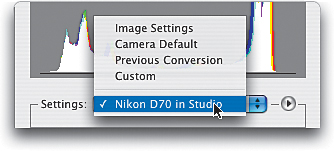
| If you take a photo with a traditional film camera and send the film to a lab for processing, they produce an original print from the negative you gave them (and the negative remains intact). Well, Photoshop's Camera Raw lets you be the lab, by letting you import an unprocessed RAW original (your "digital negative") and process it yourself, just like the lab. You can adjust everythingfrom exposure to white balance and moreto create your own original print to open in Photoshop, while the RAW file remains intact. Of course, the first step is shooting in RAW mode (luckily almost all of today's digital cameras can shoot in RAW mode). Step OneYou can open a Camera Raw image in several waysright from within the Adobe Bridge by either double-clicking on a RAW image or pressing Command-R (PC: Control-R) with the image selected, or you can also open it using the standard Open command from Photoshop CS2's File menu. Regardless, a RAW image automatically opens in the Camera Raw interface (shown in the next step). 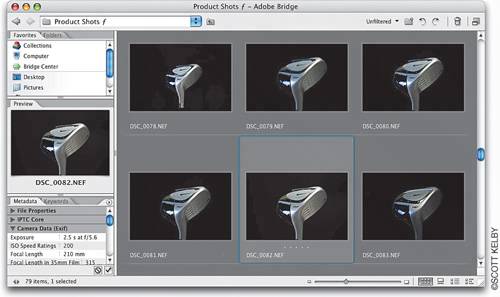 Step TwoIf you want to open multiple RAW photos from the Bridge, Command-click (PC: Control-click) on all the images you want to open in Camera Raw; then, once they're selected, double-click on any one of the selected photos. The photo you double-clicked on will appear in the preview window ready for editing, and the other photos you selected will appear along the left side of the Camera Raw dialog. To edit one of the images listed on the side, just click once on the one you want to edit. 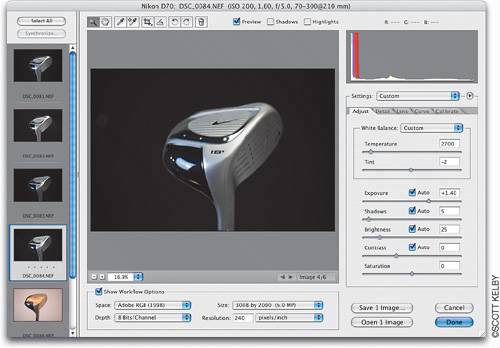 Step ThreeTo take advantage of that large preview area, here are some quick preview shortcuts: There's a Zoom tool that works just like the one in Photoshop. If you double-click on it (in the top-left corner above the preview), it zooms up to a 100% view. When you're zoomed in tight, press-and-hold the Spacebar on your keyboard to get the Hand tool, then just click-and-drag in the preview window to move around the image. To quickly fit your entire photo in the preview area, double-click on the Hand tool above the preview or press Command-0 (zero) (PC: Control-0). You can also press Command-+ (Plus key) (PC: Control-+) to zoom in and Command-- (Minus key) (PC: Control--) to zoom out. Also, you can rotate a photo left or right by pressing L or R, respectively. 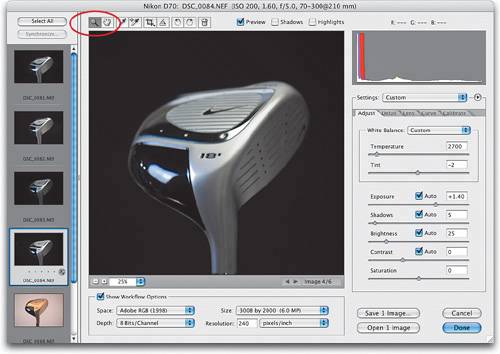 Step FourYou do your photo processing in the right column of the Camera Raw interface. There are five "tabs" with different sets of controls under each, but all the basic essential adjustments are found under the Adjust tab (make sure it's visible by clicking on its tab). Tip I'm sure you've noticed that the Auto checkboxes are "on" by default, but if you really want to turn them off for good, here's what you do: Open a RAW file, turn off all the Auto checkboxes, and then go to the Settings flyout menu (it's the right-facing arrow to the right of the Settings pop-up menu) and choose Save New Camera Raw Defaults. Now, when you open a RAW image, all the Auto checkboxes will be off by default.  Step FiveWe'll start by looking at the White Balance setting. When you open a photo in Camera Raw, Photoshop looks at the White Balance setting that was used when the photo was taken, and it displays that setting in the White Balance pop-up menu. If the white balance looks good to you, you can leave it set as-is. If the white balance was set correctly (or if you just want to see if you can come up with a setting that looks better to you), you can apply a preset setting by choosing one from the White Balance pop-up menu. When you choose a new white balance, the preview updates so you can see how this new setting will affect your photo. Step SixBesides using these default White Balance settings, you can tweak them manually to create your own custom white balance. You do this using the Temperature and Tint sliders. To make your white balance more blue, drag the Temperature slider to the left. To add more yellow, drag it to the right. The Tint slider basically does the same thing, just with different colors: dragging to the left brings more green into your photo and dragging to the right brings in more red. By using these two sliders, you can pretty much create whatever white balance situation you prefer (this is totally a personal preference thing). Step SevenThere's another way to set your white balance: use the White Balance tool (found at the top of the Camera Raw dialogit looks like the regular Eyedropper tool). You just press the letter I to get that tool, then click it once in a neutral area of your photo (you don't want to click in a perfectly white area with no detail; you want an area that's off-white or light gray with some detail). 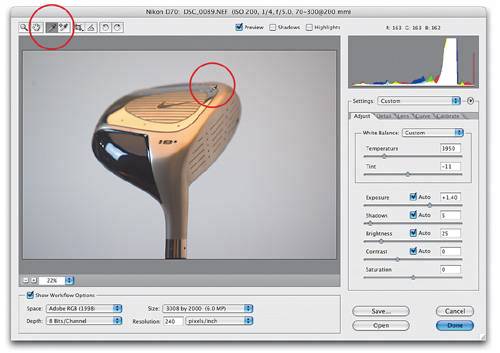 Tip To help you find this neutral color in your images, I've included a black/gray/white swatch card for you in the back of this book (it's perforated so you can tear it out). Just put this card into your RAW shot, take the shot, and when you open the RAW file in Camera Raw, you can then click the White Balance tool on the neutral gray swatch on the swatch card. When you're done, just crop the card out of the image. (See Chapter 6 for more information on how to use this handy card.) Step EightNow let's move on to your tonal adjustments (which are located just below the White Balance section). The top slider (and probably the most widely used slider in all of Camera Raw) is for adjusting the exposure of your photo (you can increase the exposure up to four f-stops and decrease it up to two f-stops. So, an Exposure slider setting of +1.50 would be an increase of a stop and a half). One way to make this adjustment is to "eye" it: Just drag the slider, then look at the preview to see how your image looks. But there are some other features to help you make more informed exposure decisions. Step NineTo get some help with setting your exposure, there's now an Auto checkbox in CS2 that will attempt to automatically set the exposure for you. It often does a pretty darn good job, so it's worth seeing how it looks (you can see an instant preview as soon as you click the checkbox on/off). Leaving the Auto Exposure checkbox on increased the Exposure to +1.40 for this image. If that doesn't look good to you, there's another popular way to set the right exposure.... Step Ten (Exposure)The method I use to set the exposure is to have Camera Raw tell me how far I can go (either increasing or decreasing the Exposure setting), so I get the best possible exposure, without clipping off any highlights or shadows. To do this, press-and-hold the Option (PC: Alt) key and click on the Exposure slider (by the way, moving a slider automatically turns off the Auto checkbox for that slider). When you do this, the screen will turn black. If anything shows up in white (or red, green, or blue), that's a warning that the highlights are clipping (basically, that means there will be no detail in that area, which may actually be okayclipping areas like a bright reflection on a car's bumper or the center of the sun isn't a problem). So, as long as important areas aren't clipped off, I keep clicking-and-dragging to the right (with Option/Alt held down) until some real clipping starts to appear. In this case, I pushed it to +1.50, whereas Auto only went to +1.40. I can go with that or something less, but if I push it any further, I'm going to lose important detail. 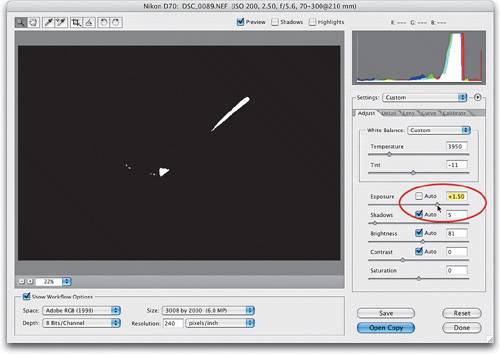 Step Eleven (Shadows)Now that your Exposure is set (and you protected your highlights from clipping), what about the shadows? Well, there's a slider for that tooit's called (surprisingly enough) the Shadows slider. Sliding it to the right increases the shadows in your photo. Again, there's an Auto checkbox (and you should give that a try), but you can also use the Option-drag (PC: Alt-drag) trick on the Shadows slider. This time, the preview will show shadow areas (with no detail) in pure black (meaning these areas are getting clippedwhite areas are not clipped). If you see other colors (like red, green, or blue), they're getting clipped a bit too, but not as significantly as the overall shadows, so I'm not as concerned about a little bit of clipping in color. If there's significant clipping, drag to the left to reduce the amount of shadows. If not, drag to the right until you start getting some clipping. 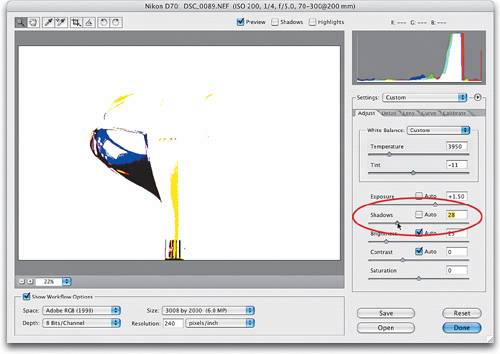 Tip In CS2, Adobe added a very helpful feature to keep you from clipping either your highlights or shadows. At the top of the Camera Raw dialog, there are two checkboxes: one for highlights, one for shadows. When you turn them on, anytime highlight areas start getting clipped (regardless of which slider you're using), the clipped areas will appear in solid red, while clipped shadow areas will appear in blue, giving you an instant visual warning exactly where clipping is occurring. Not bad, eh? 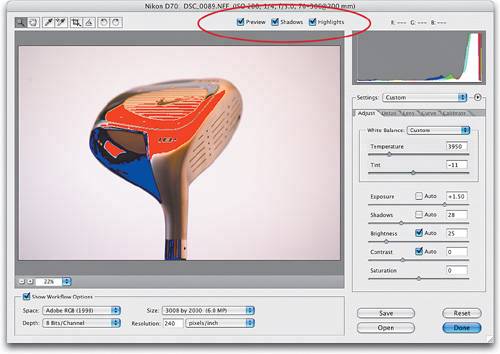 Step Twelve (Brightness)The next adjustment slider down is Brightness. Since you've already adjusted the highlights (with Exposure) and shadows (with the Shadows slider), the Brightness slider adjusts everything else (I always relate this slider to the midtones slider in the Levels dialog, so that might help in understanding how this slider differs from Exposure or Shadows). There is an Auto checkbox for Brightness, but I'm not too crazy about this particular Auto setting, as it seems (to me anyway) to give the photo a flat look, but heythat's just me. Turn Auto on/off and see if you agreeor just drag the slider to the right (above 50) to lighten the midtones or to the left (below 50) to darken them. Step Thirteen (Contrast)The Contrast slider does pretty much what you'd expect it toadds or reduces contrast (depending on which way you drag it). If you drag to the right, it increases the contrast in the image (so you can imagine you'll probably be dragging right most of the time), or if you want to reduce the contrast in your image (making it look flat), drag to the left. There's also an Auto checkbox here, but to me it never seems to add enough contrast, so I usually wind up adjusting this one myself while looking at the preview (and the histogram) as a guide. Step Fourteen (Saturation)The Saturation slider makes the colors in your RAW photo either more saturated and colorful (by dragging to the right) or less saturated and flat (by dragging to the left). This is my least-used slider in Camera Raw, as I normally wait until I'm in Photoshop, because I view adding saturation as a special effect, and not generally something I do when I'm just trying to create a nicely exposed, well-balanced image. In fact, I only adjust this setting if some of the other changes I made in Camera Raw make my colors look flat. Otherwise, I ignore that slider, but that's just me; if you want more saturated photos, go for it (I won't tell anybody). By the way, there's no Auto checkbox for Saturation. I call that an act of mercy. Step FifteenLet's say that you've got a studio set up, so you have pretty controlled lighting. If that's the case, you might want to save these correction settings (for this particular camera, used in this particular lighting situation). That way, the next time you're processing images taken with this camera in your studio, you can quickly call up these same settings. To do this, just click on the right-facing arrow to the right of the Settings pop-up menu and choose Save Settings from the flyout menu that appears. Give your settings a descriptive name, and then click Save. Now this group of settings will appear in the Settings pop-up menu. 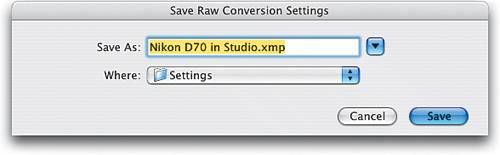 |
|
EAN: N/A
Pages: 187