Removing Blemishes
|
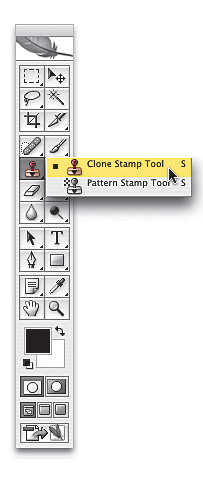
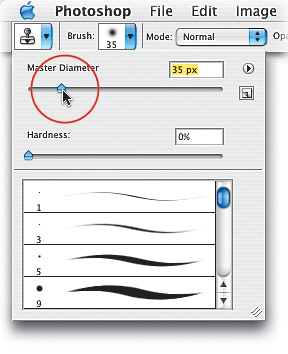
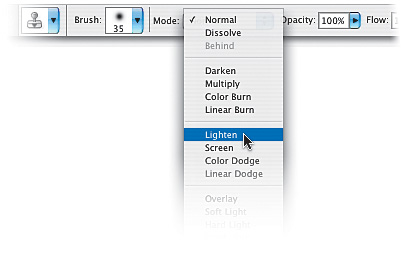
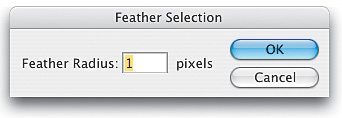
| When it comes to removing blemishes, acne, or any other imperfections on the skin, our goal is to maintain as much of the original skin texture as possible. That way, our retouch doesn't look pasty and obvious. Here are three techniques that work pretty nicely, and when you have all of these methods in your retouching arsenal, if one doesn't carry out the repair the way you'd hoped, you can try the second, or even the third. Method OneThe Clone Stamp ToolStep OneOpen a photo containing some skin imperfections you want to remove (in this example, we're going to remove the mole on her left cheek).  Step TwoPress the letter S to get the Clone Stamp tool from the Toolbox. In the Options Bar, click on the thumbnail to the right of the word "Brush," and in the Brush Picker, choose a soft-edged brush that's slightly larger than the blemish you want to remove. You can use the Master Diameter slider at the top of the Brush Picker to dial in on the size you need. Once you're working, if you need to quickly adjust the brush size up or down, use the Bracket keys on your keyboard: The Left Bracket key makes your brush smaller; the Right Bracket makes it larger. Step ThreeIn the Options Bar, change the Mode pop-up menu for the Clone Stamp tool to Lighten. With its Mode set to Lighten, the Clone Stamp will affect only pixels that are darker than the sampled area. This means the lighter pixels (the regular flesh tone) will pretty much stay intact, while only the darker pixels (the blemish) will be affected. Step FourFind an area right near the blemish that's pretty clean (no visible spots, blemishes, etc.), press-and-hold the Option (PC: Alt) key, and click once. This samples the skin from that area. Try to make sure this sample area is very near the blemish so the skin tones will match. If you move too far away, you risk having your results appear in a slightly different color, which is a dead giveaway you've done a repair.  Step FiveMove your cursor directly over the blemish and click once. Don't paint! Just click. One click will do itit will remove the blemish instantly, while leaving the skin texture intact. But what if the blemish is lighter than the skin, rather than darker? Simply change the Mode to Darken instead of Lightenit's that easy. On to Method 2.  Method TwoThe Spot Healing BrushStep OneYou can also use the Spot Healing Brush tool to remove blemishes effectively and quickly. (Notice I said "Spot" Healing Brush. A tutorial is coming up soon about the regular Healing Brush, which works better on large areas.) So, press J to get the tool from the Toolbox. 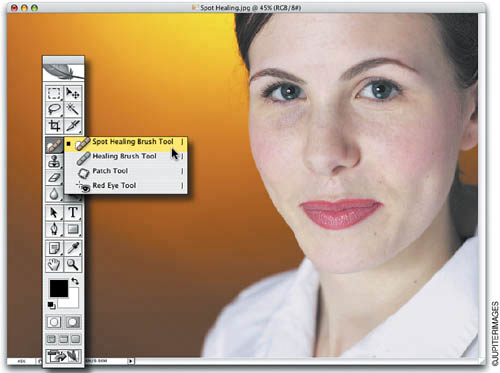 Step TwoJust like the Clone Stamp tool, the key thing to remember when using the Spot Healing Brush for repairing blemishes is to choose a brush size that's just slightly larger than the blemish you're trying to remove. In the Options Bar, click on the thumbnail to the right of the word "Brush," and choose the size you need using the Diameter slider. (Note: The default for the Spot Healing Brush is a hard edge, and that's fineit works great that way.) However, unlike the Clone Stamp stool, you don't need to sample an area before clicking. You just click on a blemish and it's gone, so start clicking (here I clicked on all the visible moles on her face and neck). Now for Method 3.... 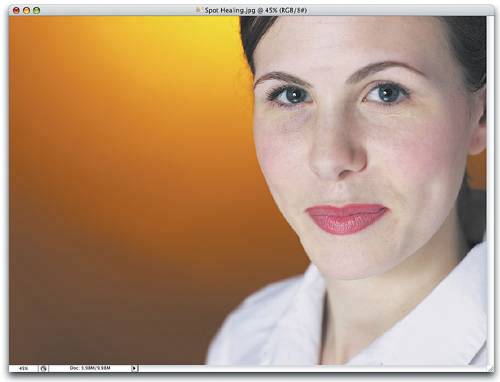 Method ThreeThe Lasso ToolStep OnePress L to switch to the Lasso tool. Find a clean area (no blemishes, spots, etc.) near the blemish that you want to remove (in this case, it's a mole on her right cheek). In this clean area, use the Lasso tool to make a selection that is slightly larger than the blemish.  Step TwoAfter your selection is in place, go under the Select menu and choose Feather. When the Feather Selection dialog appears, enter 1 pixel as your Feather Radius and click OK. Feathering blurs the edges of our selected area, which will help hide the traces of our retouch. Feathering (softening) the edges of a selection is a very important part of facial retouching, and you'll do this quite a bit to "hide your tracks," so to speak. Step ThreeNow that you've softened the edges of the selection, hold Option-Command (PC: Alt-Control), and you'll see your cursor change into two arrowheadsa white one with a black one overlapping it. This is telling you that you're about to copy the selected area. Click within your selection and drag this clean skin area right over the blemish to completely cover it. 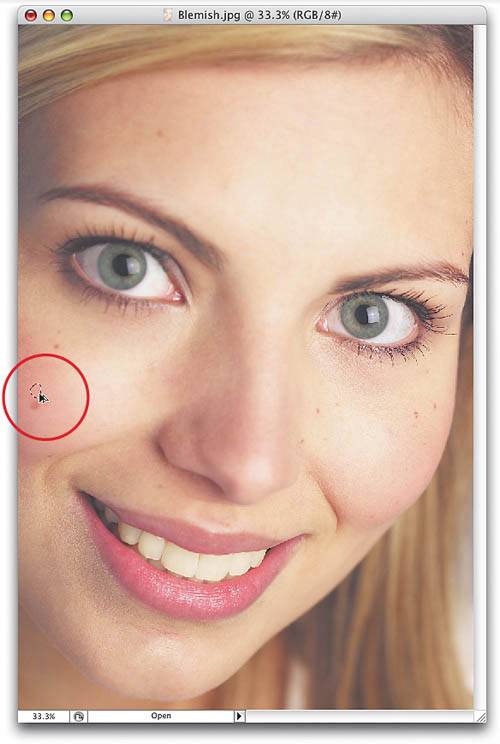 Step FourWhen the clean area covers the blemish, release the keys (and the mouse button, of course) and press Command-D (PC: Control-D) to deselect. As you can see, the blemish is gone. Best of all, because you dragged skin over from a nearby area, the full skin texture is perfectly intact, making your repair nearly impossible to detect. 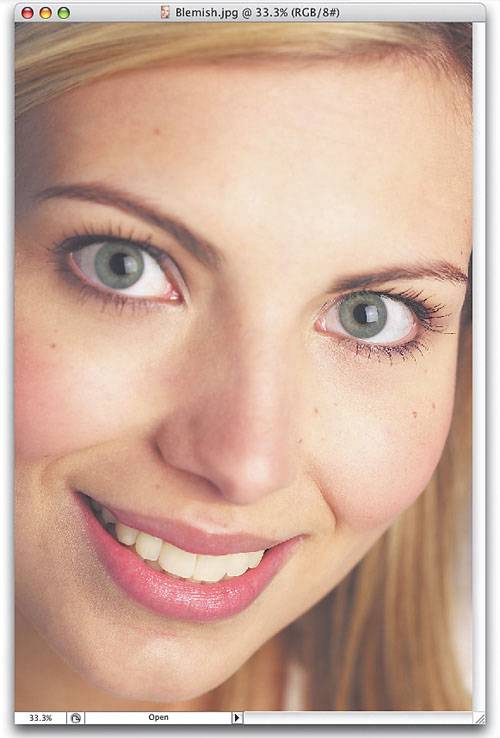 |
|
EAN: N/A
Pages: 187