One-Click Sorting by Using Collections
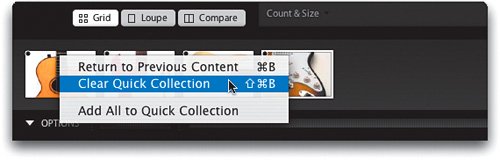
| When you're sorting your photos, there are going to be plenty of times where you just want to focus on a particular group of images. Maybe it's all your best shots from a shoot, or maybe it's all your black-and-white shots, or maybe you want to decide which photos you want print. Luckily, you can make all of these groups of photos just one click away by using collections (which are there every time you fire up Lightroom) or Quick Collections, which are temporary collections you use just when you need them. Step OneAnother way to quickly separate out your best photos is to create a Quick Collection of just those photos. Here's how it's done: As you're looking at your photos (in any viewGrid, Loupe, or Compare), when you come across one you like, just press the B key on your keyboard and that photo is added to your Quick Collection (it's like flagging your best photos). If you have the Quick Collection Marker checkbox turned on in the View Options panel, you'll see a black dot appear in the upper-left corner of your thumbnail (circled here in red) to let you know that it was added to your Quick Collection. 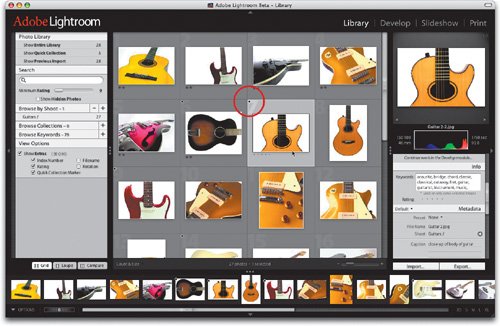 Step TwoNow, to see just the photos you've flagged, click on Show Quick Collection (as shown here), which appears in the Photo Library panel on the top-left side of the Lightroom window (or just press Command-B). To remove a photo from your Quick Collection, just click on the little black dot again, or click on the photo and press the letter B again, or just click on the photo and press the Delete key on your keyboard (don't worry, this only deletes the photo from this Quick Collectionnot from your Library of photos). 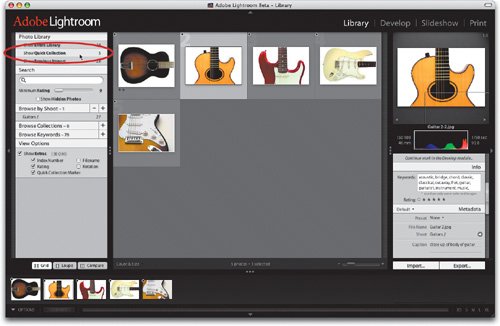 Step ThreeQuick Collections are great for helping you quickly rate your best photos. Now that your best photos from your shoot are in this Quick Collection, you can instantly give them all a 5-star rating by simply pressing Command-A to select all the photos, then pressing the number 5 to assign a 5-star rating to them all. Another cool thing about using Quick Collections is that once you've got one, you can create an instant slide show of just those photos by going under the Library menu and choosing Impromptu Slideshow. In just seconds, you'll see a full-screen slide show with transitions (to cancel this slide show, press the Esc key). 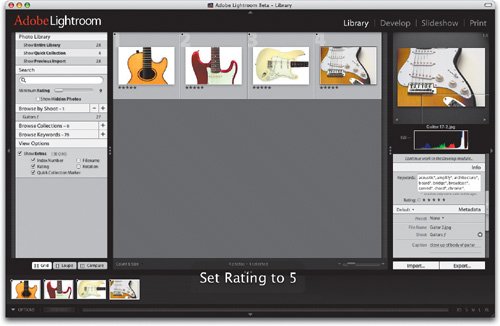 Step FourOnce you've used the trick above to quickly rate your best photos, you can then clear your temporary Quick Collection (so you can use it later for sorting other photos). You can do this by either clicking on Options, in the bottom-left corner of Lightroom's window, and choosing Clear Quick Collection from the pop-up menu, or just pressing Command-Shift-B. You can also use the Options pop-up menu to add photos to your Quick Collection, but using the keyboard shortcuts is just so much faster. Step FiveQuick Collections are temporary collectionsjust a tool to help you temporarily sort your images or to make an impromptu slide show. But if you've come up with a Quick Collection that you'd like to keep for future reference, just transfer it to a regular collection so it's always just one click away. Here's how: Go to the Browse Collections panel (it's in the group of panels on the left side of Lightroom) and click on the large + (plus sign), as shown here circled in red. This brings up the Create Collection dialog where you can name your new collection (as shown). Enter a name and click the Create button. 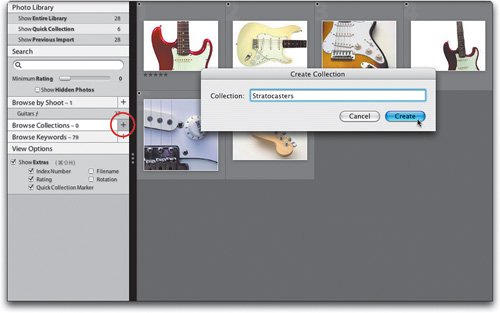 Step SixNow, if you're not still viewing it, press Command-B to jump back to your Quick Collection. Press Command-A (the shortcut for Select All) to select all the photos in your Quick Collection. Next, click-and-drag on any one of those photos and they all drag together as a group (you'll see a tiny thumbnail appear as you drag that shows a stack of photos, as shown here circled in red). Click-and-drag this group of photos over to the Browse Collections panel and drop (release the mouse button) them right on the collection you created in the previous step. 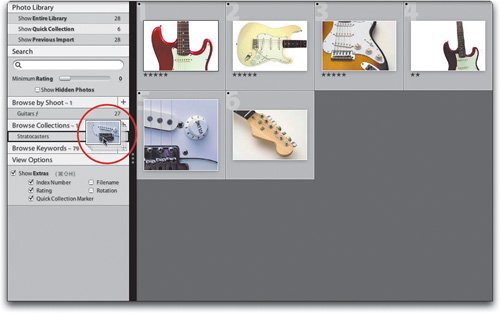 Step SevenNow, just to make sure that the transfer from your Quick Collection to a permanent collection worked, it's not a bad idea to quickly click on Show Entire Library in the Photo Library panel (so you see all your photos). Then, in the Browse Collections panel, click on your new collection (as shown here), just to make sure your photos really made it in there. I know, it's kind of paranoid, but just because you're paranoid doesn't mean they're not out to get you. But I digress. Once you've confirmed that your photos made it into your new collection, you can clear out the Quick Collection by pressing Command-Shift-B or by choosing Clear Quick Collection from the Options pop-up menu on the bottom left of the Lightroom window. 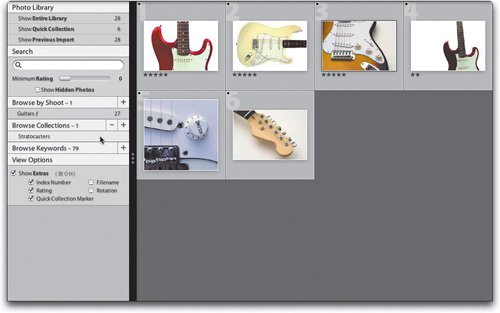 Step EightThere are a few things you'll want to know about collections. First, as long as you're in the Grid view, you can add photos to your collection by just dragging-and-dropping them right onto your collection. To remove a photo from your collection, click on it and press the Delete key. This only removes the photo from your collectionnot from your main Library. If you do, in fact, want to remove a photo both from the collection and from your Library (meaning you're going to move the photo to the Trash and delete it for good), then press Command-Delete. You'll get a warning dialog (as shown here) just to let you know this photo is really going away for good. To delete a collection, click on the collection, and then click the (minus sign) on the right side of the Browse Collections panel. To rename a collection, just double-click directly on its name in the Browse Collections panel. 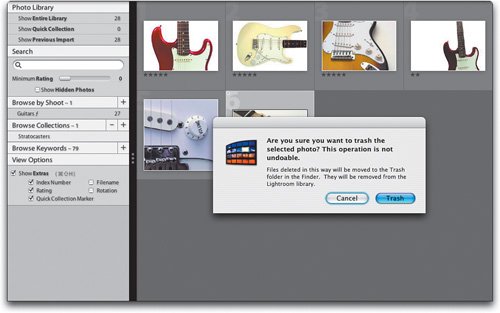 |
EAN: N/A
Pages: 71