Staying Organized by Assigning Keywords
| One of the biggest challenges in managing thousands of images is finding the exact photo (or photos) right when you need it. Luckily, you can stay totally organized, and find the right photos fast, by simply applying keywords to your photos. It takes just a small amount of time up front, but it can save you hours every week and potentially extend your life by several years by removing a special level of frustration and stress that appears after searching for hours to find a photo you know is in there...somewhere. Ask your doctor. Step OneTo create a keyword, go to the Browse Keywords panel (on the left side of Lightroom's window) and click on the large + (plus sign), as shown here. This brings up the Create Keyword dialog where you can type in the keyword you want to assign to one or more photos in your Library, then click the Create button to create this keyword. 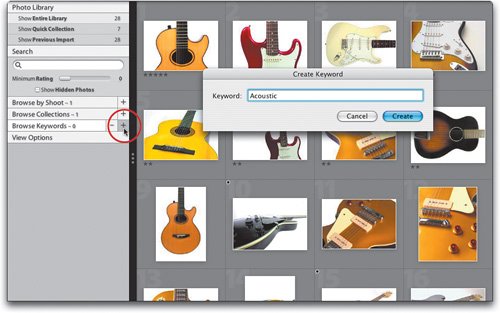 Step TwoYou can assign a keyword to a photo in the same way you add a photo to a collection. In Grid view, just drag-and-drop a photo from the Preview area right onto the keyword you want assigned to it in the Browse Keywords panel (as shown here). You can do the same select-multiple-photos-and-drag-and-drop trick as you did with collections. 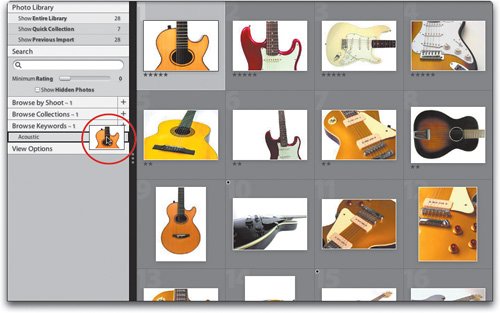 Step ThreeUnlike collections, there's another way to assign keywords and you might actually like this way better (I certainly do). Instead of dragging the photos to the Browse Keywords panel and trying to hit that thin little panel, you can actually drag the keyword itself and drop it on your photos, as shown here (a thick black border appears around your thumbnail letting you know you've targeted that photo). I like this method better because thumbnails make a much larger and easier target to hit. You can still select multiple photos (Command-click on them) and drag-and-drop the keyword on any selected photo, and they'll all be tagged with that keyword. 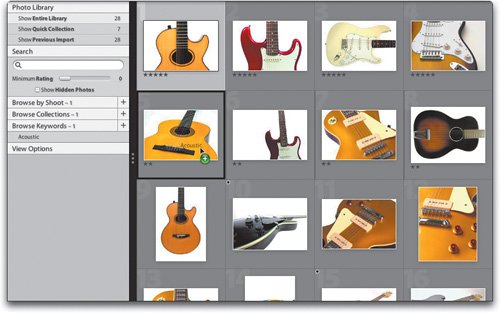 Step FourNow when you want to instantly see the photos that are tagged with a particular keyword, just click on that keyword. In the example shown here, I clicked on Acoustic and now only the guitars labeled acoustic in my Library appear.  Step FiveOf course, the real strength of keywords is when you add more than just one, so you can quickly drill down and find just the photos you're looking for. For example, here I've added 10 more keywords, and dragged-and-dropped them on the appropriate photos. So, if for example, I wanted to see just my bass guitars, I'd click on the Bass Guitars keyword (as shown here) and instantly all my bass guitars, and only my bass guitars, are displayed. Even better, since you can assign multiple keywords to photos, my first bass guitar images show up not only under Bass Guitars, but also under Black Guitars and Flat Views. 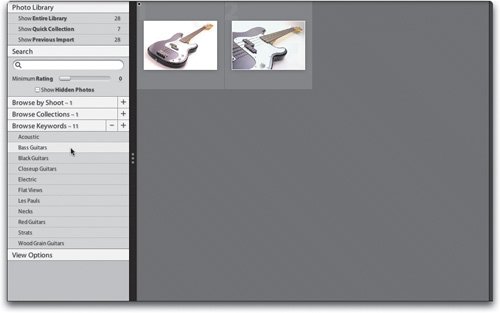 Step SixAnother advantage of creating and assigning keywords is that now you can search your entire library by simply typing in a name. For example, want to find all the guitars that are red? Go to the Search panel (shown circled here) and just type in "red." Now every red guitar shows up instantly. This keywording is great for tagging photos of family members (for example, my son is named Jordan, so I can instantly find every photo of Jordan just by typing his name in the Search field). 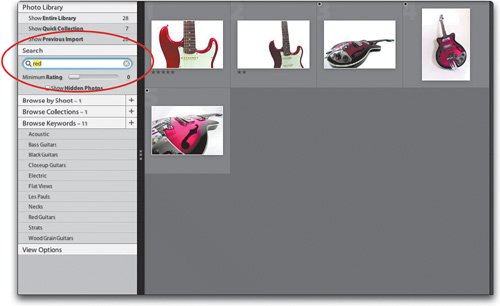 Step SevenJust a reminder, you can save yourself some time by assigning some of your keywords when you first import your photos. For example, if you were importing a shoot of just one guitar, you could automatically tag all those shots with descriptive keywords from right within Lightroom's Import Photos dialog (shown here). There's a Keywords field for typing in the keywords you want (it's circled here in red). Just type in your desired keywords, separated by a comma, and once they're imported those keywords will be added to your Browse Keywords panel to make sorting easy, plus you can use the Search field to find images tagged with those keywords. 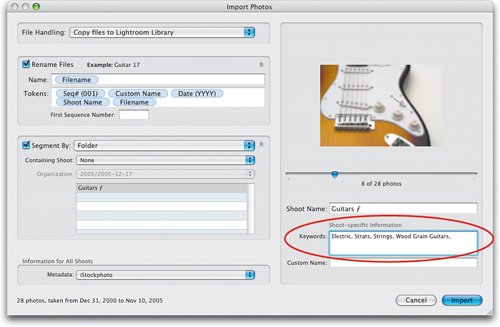 Step EightTo see the keywords you have assigned to a photo, just go to the Info panel, on the right side of Lightroom's interface under the Histogram (you may have to scroll the panels down a bit to reveal the Info panel). In the Info panel, you'll see a field that not only lists the keywords assigned to the currently selected photo, you can also add additional keywords by just clicking in the Keywords field (shown circled in red) and typing in your desired keywords. Also, keywords that you enter in this field are automatically added to the Browse Keywords panel. Once you get in the habit of adding keywords to photos, you'll be amazed at how quickly you can get right to the photo (or photos) you're looking for. 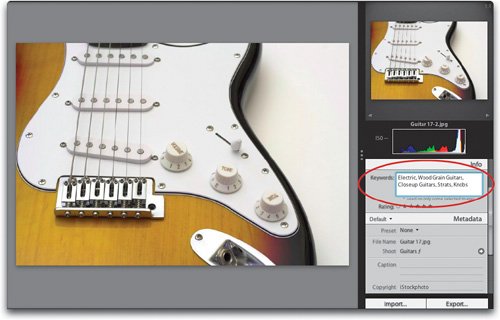 |
EAN: N/A
Pages: 71
- Chapter I e-Search: A Conceptual Framework of Online Consumer Behavior
- Chapter II Information Search on the Internet: A Causal Model
- Chapter III Two Models of Online Patronage: Why Do Consumers Shop on the Internet?
- Chapter XII Web Design and E-Commerce
- Chapter XVI Turning Web Surfers into Loyal Customers: Cognitive Lock-In Through Interface Design and Web Site Usability