| Generator comes with a nice selection of predefined objects, including objects for creating charts and lists and for inserting graphics. Figure 4.17 shows some of the Generator objects that you can use in the Generator Objects palette. Figure 4.17. The Generator Objects palette.  Note Objects in the Generator Objects palette are sorted alphabetically . It would seem more logical to group them by functionall the inserts together, all the charts together, and so on. Although alphabetizing might not seem to make a lot of sense, there is a reason for it. The Generator template definition files are stored in a Template directory in the Flash 5/Generator directory. Flash 5 simply reads what is in that directory to populate the Generator Objects palette. Thus, the objects appear on the palette in alphabetical order. It is possible to sort the Generator objects in a more efficient manner. You can rename the objects in the Templates folder in the application directory or you can add new folders to the directory and move the objects into the folders. The new folder names appear as additional category names just click the drop-down arrow where it says Common at the top of the palette to see the additional categories.
Inserting a Graphic in a Generator Template With Generator you can easily insert a variety of media into a template, from GIFs to Flash movies to sound files. In the next exercise, you insert a Flash movie into your banner ad. The Insert Flash Movie object has four settings that you can change. If you are running Generator 2 Enterprise Edition, you have a fifth setting for the Cache. The settings are as follows : -
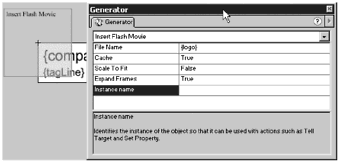
File Name . The path to the Flash movie you want to insert. -
Cache. This is available in Generator 2 Enterprise Edition only. You can set this to True if you want to cache the file when it is first requested . -
Scale to Fit. If this is set to True, the Flash movie you insert scales to fit the size of the placeholder on the Stage. -
Expand Frames. Setting this to True expands the timeline that contains the inserted movie so that the whole movie can play. -
Instance Name. If you need to manipulate the movie using ActionScript, you must assign it an Instance name. In the next exercise, you practice using the Insert Flash Movie Generator object. Exercise 4.10 Inserting a Flash Movie into a Generator Template In this exercise, you use the Insert Flash Movie object to add a Flash movie containing a company logo to your banner. After you insert the movie and modify its settings, you nest the Insert Flash Movie object inside another movie clip so that you can apply symbol commands to it. In addition, of course, you'll be making changes to your data source. -
Continue working with banner9.fla or load it from the CD-ROM. Open the Generator Objects palette if it isn't already open (Window > Generator Objects). -
Add a new layer and name it Logo. -
With the Logo layer selected, drag a copy of the Insert Flash Movie object onto the Stage and position it so that the crosshairs line up with the upper-left corner of the Stage. -
On the Generator panel, make the following changes: File Name: {logo} Cache (Generator 2 EE only) : True Scale to Fit: False Expand Frames: True You'll notice that instead of typing in a filename, you're passing a Generator variable. You put the actual filename in your data source. (See Figure 4.18.) Figure 4.18. The Insert Flash Movie object with its settings filled in.  -
Open your data source, data.txt, and add the following line: logo, figleaf.swf -
Copy figleaf.swf from the Chapter_04/Assets folder to the same folder to which you've been saving your files. -
Save your file as banner10.fla and test your movie. At this point, the logo is offset up and to the left. (See Figure 4.19.) You can change this by using the symbol commands. Just remember, you have to nest the object in a symbol to get this to work. Figure 4.19. The logo is offset up and to the left.  Exercise 4.11 Nesting a Generator Object in a Symbol Next you nest the Insert Flash Movie object you just created in a symbol and apply symbol commands to it. -
Continue working in banner10.fla or load it from the CD-ROM. -
Select the Insert Flash Movie object on the Stage and nest it in a movie clip (Insert > Convert to Symbol). Name it transform_logo. -
With the new transform_logo symbol selected, open the Generator panel (Window > Panels > Generator), choose the Transform symbol command, and make the following changes: X Offset: {logo_xoffset} Y Offset: {logo_yoffset} -
Save your file as banner11.fla. -
Open your data source, data.txt, and add the following lines: logo_xoffset, 30 logo_yoffset, 30 How do you know to offset the movie by 30 pixels in both directions? In this case, the Flash movie being imported is 60x60 pixels. You're just centering it on the left side of the Stage. (See Figure 4.20.) Figure 4.20. The logo is correctly positioned after using the Transform command.  -
Save your data source and test your movie. Your banner ad is starting to look interesting. You're not limited to using Generator to insert graphics, however; you also can use it to insert charts, tickers, and scrolling lists (and that's not all). In the next section, you give your ad a little more punch by adding an interactive scrolling ticker. Adding a Ticker Object A ticker is nothing more than a scrolling list of information. You'll be creating a simple ticker that scrolls in a continuous loop. Each line of the ticker has some information about what the company does. The settings that you can change for the ticker are as follows: -
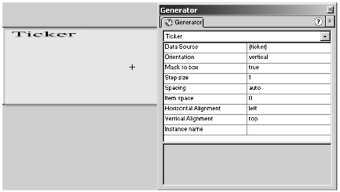
Data Source. Tickers require their own data source. You'll be adding a second data source to your banner ad. -
Orientation. You can choose to have the ticker scroll horizontally or vertically. -
Mask to box. If you want your ticker to fit inside the confines of the Ticker object you create on the Stage, you should set this to True. -
Step size. You can control how rapidly your ticker scrolls. A Step size of 14 pixels per frame (4 is the default) is easiest for the eye to follow. Much above that and even Evelyn Wood graduates have problems keeping up. Tip The maximum number you can enter for Step size seems to be 297.At 298, the ticker stops scrolling on all the machines on which I've tested it. Flash lets you enter negative numbers , but they're not recognized when you publish your template, and Generator theoretically assigns the default value of 4. In testing, what you see is a speed slightly slower than the speed you get when you enter 1.
-
Spacing. This should be set to Auto if you want each item in the list to take up as much space as it needs. You also have the option of setting the Spacing to Fixed. In this case, each item takes up the same amount of space. The amount of space for each item is determined by the Item Space setting. -
Item Space. This setting is not intuitively obvious. If your Spacing is set to Auto, this determines the number of pixels between each item in the list. If your Spacing is set to fixed, this determines the number of pixels occupied by each item. -
Horizontal Alignment and Vertical Alignment. These settings define how items in the ticker are aligned and are determined by the registration point of the symbol being used. You set these values to Left and Right because the symbols you are using have their registration points in the upper-left corner. Tip I almost always use a Horizontal Alignment of Left and a Vertical Alignment of Top. That's because I usually set up my symbols so that the registration point is in the upper-left corner. I already know that the registration point for the Stage is the upper-left corner. If all my objects are set up the same way, it makes positioning them a lot simpler.
-
Instance name. If you need to control your ticker using ActionScript, you must give it a unique instance name. In the next exercise, you add a vertically scrolling ticker to your banner ad. Exercise 4.12 Adding a Ticker This is the last step in building your banner ad. You'll add a ticker to the banner that automatically scrolls information about the company. -
Continue working in banner11.fla or load it from the CD-ROM. -
Open the Generator Objects palette if it isn't already open (Window > Generator Objects). -
Add a new layer and name it Ticker. -
With the Ticker layer selected, drag a copy of the Ticker object onto the Stage. -
Use the Info panel (Window > Panels > Info ) to change the width of the ticker to 150 and the height to 60. Position the ticker on the right side of the Stage. -
On the Generator panel (shown in Figure 4.21), make the following changes: Data source: {ticker} Orientation: Vertical Mask to box: True Step size: 1 Spacing: Auto Item space: Horizontal Alignment: Left Vertical Alignment: Top Figure 4.21. The Ticker object and its Generator panel settings.  -
Save your file as banner12.fla. -
Open your data source, data.txt, and add the following line: ticker, ticker.txt -
Save your data source. The data source for the Ticker object is a little different from the data sources you've worked with until now. Rather than requiring a name/value pair, the Ticker object requires, but is not limited to, only one fielda Clip. A Clip is nothing more than a symbol in the Library. The Clip can contain a movie, a button, a Generator text variable, or some combination thereof. The Clip is repeated for each row in the data source. The Clip symbol doesn't have to be on the Stage; it just has to exist in the Library. Exercise 4.13 Creating the Ticker Clip For your ticker clip, you start by creating the Clip in the Library. After the Clip is set up, you build the data source. -
Continue in banner12.fla or load it from the CD-ROM. Create a new symbol (Insert > New Symbol) called Ticker. Give it movie clip behavior. -
Select the Text tool and open the Character panel. Change the following settings on the Character panel: Font: GillSans, Arial or Helvetica Size: 10 Color: Black -
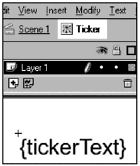
Add a Generator text variable {tickerText} to the Stage. Align the upper-left corner of the text box with the movie clip crosshairs. (See Figure 4.22.) Figure 4.22. The Ticker clip.  -
Return to the main timeline and save your movie as banner13.fla. Now that you have created a Clip for your ticker, you need to create a data source. Exercise 4.14 Creating the Ticker Data Source Creating the data source is very quick. -
Open your text editor of choice and enter the following information: clip, tickerText ticker, Flash Development ticker, Generator Solutions ticker, Cold Fusion Applications ticker, Branding -
Save your file as ticker.txt. -
Return to Flash and test your movie. (See Figures 4.23 and 4.24.) Figure 4.23. The completed banner ad in the authoring environment.  Figure 4.24. The completed banner ad after being processed by Generator.  Take a look at what you just entered. Clip is the only required column. The value you are using for Clip is the name of the symbol you created in the Libraryticker. Inside the ticker there is a variable called tickerText. Notice that tickerText is the name of the second column in your data source. You use the second column to pass values to the tickerText variable. You now have a fully functional, if simple, banner ad. You can change almost every aspect of the ad by making alterations to two text files: data.txt and ticker.txt. Theoretically, you could get away with never changing the actual Flash file itself. You could make additional enhancements to the ad by setting up a button inside the Ticker clip (in a layer beneath the tickerText variable). You could pass a variable that contained a URL and have the button link the appropriate section of the company's Web site. In fact, you start a new exercise series in the next section in which you do just that, but with a pie chart instead of a banner ad.  |

