Generator Variables
Generator VariablesEnough talk about what Generator does; it's time to actually do something. In the first exercise for this chapter, you add a Generator variable to a Flash movie. Generator variables should not contain any special characters or spaces and must be enclosed in curly braces. For example, {myVariable} is an acceptable Generator variable; however, {my Variable} and {$myVariable} are not. Warning I've found that although it's bad form, you actually can put spaces and special characters in the variable names . However, be aware that if you do use spaces or special characters, you're setting yourself up for a fall. Many middleware programs choke on variables that contain spaces and reserved characters. My advice? Just do it right from the start. Note For those of you who have never done any programming, I realize that I just said a scary word: variable. What is a variable? A variable is nothing more than a placeholder for information. Think of it as a container into which you put information. You can take information out of the container and use it, or you can replace it altogether with something new. Don't let the jargon scare you; just keep on going and you'll see how simple it really is. After you add a Generator variable, you need to set up a data source to provide a value for it when the template is processed . You can use a wide variety of data sources with Generator:
In this chapter, you work with the first two types of data sources. You start with a native data source and then use an external comma-delimited data source file. In Chapter 28, you incorporate middleware (ColdFusion, ASP, Perl, and so on) with Generator. Generator Text VariablesNow that you know the basics, it's time to create your first Generator template. You start by creating a template for a simple banner ad. Exercise 4.1 Adding Generator Text Variables Building a customizable banner ad using Flash and Generator gives you the chance to experiment with using Generator variables, objects, and a variety of data sources. In this exercise, you create two Generator variables for your ad and apply some simple transformations. In the next section, you use some of the predefined Generator objects to add a little more pizzazz to your ad.
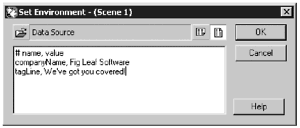
You have your first two Generator variables on the Stage in the two text boxes you just added. But right now, they're simply placeholders; you haven't passed any information to them. The names of the variables are companyName and tagLine. Tip When you are working with Generator variables in text boxes, always make sure that there is enough room in the text box for the value you are trying to pass in. In other words, if you create a Generator variable with a short name and then pass a long string of text to it, you get unexpected results. To extend the text field, use the Text tool to select the text box. Grab the handle that appears on the right side of the text box and drag it to the right to increase the available space for text. Do not use the Scale tool to do this. All you'll be doing in that case is scaling whatever text replaces the variable. It won't be pretty. Adding a Data SourceIt's now time for your first data source. You want to pass values to the two variables you just placed on the Stage. For this example, the quickest and easiest way to do this is to use a native data source that you set up inside Flash. To set up a native data source in Flash, enter your data directly into the Generator Environment Variable dialog box. Because you also can enter the path to a data source in the dialog box, you need to let Generator know that this is going to be a native data source. To do that, you have to start the first line of the data source with a pound (#) sign. For the variables you already added, Generator needs to have information passed to it in name/value pairs. The first line of the data source defines the format of the data. In this case, the format has two columns , called "name" and "value," which are separated by a comma and a space. The lines that follow the first line of the data source contain the actual data. The name column has the names of the variables you are using, and the value column has the values being passed to the variables. Exercise 4.2 Adding a Data Source For this stage of the project, you still should be working in the banner1.fla file or you can use the banner1.fla file from Chapter 4/Assets folder on the CD-ROM.
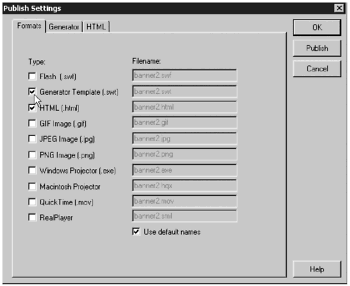
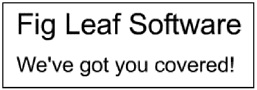
You should be seeing a pattern here. You're setting up name/value pairs. The name of the first variable is companyNameexactly what you just typed on the Stage. The value being passed into the companyName variable is "Fig Leaf Software." That means that "Fig Leaf Software" is going to replace the variable on the Stage when you test your movie. Obviously, the tagLine variable will be replaced by "We've got you covered!" Note You need only precede the first line with the # sign when you are setting up a native data source. Exercise 4.3 Changing the Publish Settings There's one more step you need to complete before you can test your movie. You need to let Flash know that this is not just a regular Flash movie, but a Generator template. Forgetting to do this is the most common mistake you will make when working with Generator templates. Fortunately, it's also the easiest mistake to fix.
Tip If your text variable names are displayed when you test your movie, you probably forgot to make your movie a Generator template in Publish Settings. When in doubt, check your Publish Settings! The Generator Template option is automatically selected when you add one of the predefined Generator objects to the Stage. Reserved Characters in GeneratorAs long as you are using name/value pairs, you can pass as many different variables as you need to your Generator template. In the example in the last exercise, you passed simple strings of characters into your variables. As a general practice, it's a good idea to enclose strings of information in quotes to make sure that Generator interprets them correctly. It's essential to do so if you need to include a comma in your string of text. Commas are reserved by Generator to indicate the end of a column in a row of data. If, however, the comma is in a quoted string, the comma is interpreted as a literal comma. Hard returns also are reserved by Generator to indicate the end of a row of data. If you need to format your text with line breaks, you need to use the \r\n\ character sequence. Curly braces indicate a variable to Generator. It tries to fill the variable with the appropriate value. If you need to display the curly braces, just double them up. A quick word of warning: This doesn't work if you are typing your data directly into the Set Environment dialog box. Tip If you want to show the curly braces when you are entering data into the Set Environment window, try putting two curly braces in front of the variable name and three curly braces after the variable name. Makes sense, right? Quotes are reserved for the enclosure of strings of information. If you need to have a quote appear in your text, you must escape the quote with a backslash. Backslashes also have to be escaped in the same way, if you want them to appear. Note If Generator does not receive a value for a variable on the Stage, it doesn't give you an error message on the screen; it simply leaves the variable blank. |
EAN: 2147483647
Pages: 257