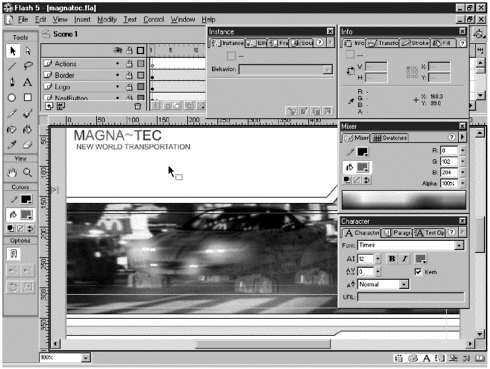
| As mentioned, the change in the Flash 5 interface is significant and can take a little getting used to if you're already comfortable in the Flash 3 or 4 authoring environments. When you launch Flash 5 for the first time, it opens with the familiar Main menu, Drawing toolbar, and timeline. The default panel layout (which contains the Info , Character, Mixer, and Instance panel sets) that opens is new to Flash 5. (See Figure 1.8.) Figure 1.8. The default layout for Flash 5 includes the Main menu, the Drawing toolbar, the timeline, and the four default panel sets. Panel sets are new to Flash 5 and are used to set properties.  Tip A quick note about panels: They are terrific , but there are a lot of them! If you find your workspace getting too cluttered, just press the Tab key. That'll hide the panels until you need them again. When you need them back, just press the Tab key again.
You'll become very familiar with panels as you work in Flash 5. You have tothat's where you set most of the properties for the drawing tools and the objects on the Stage. You also use panels to set up your ActionScripts. You'll spend a fair amount of time working with the panels in Chapter 3, so for now, take a look at the additional toolbars you can use: -
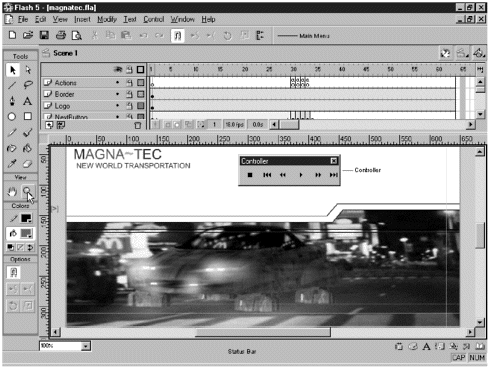
Main/Standard toolbar (Windows only). This toolbar displays icons for some of the common Windows and Flash commands. (See Figure 1.91.9.) Figure 1.9. There are three additional toolbars available for you to use. Unfortunately, the Main/Standard and Status toolbars are Windows-only. Both Windows and Macintosh users can take advantage of the Controller toolbar.  -
Status toolbar (Windows only). This toolbar appears at the bottom of the Flash application window and displays text-based information about the icons in the application window, the menu commands, and the current status of the Caps Lock and Num Lock keys. (See Figure 1.9.) If you're new to Flash, this can be useful to have open . -
Controller toolbar. You use this toolbar to control the playback of your Flash moviesboth in the authoring and test modes. (See Figure 1.91.9.) You have the option to Stop, Rewind, Step Back, Play, Step Forward, and Go To End. All toolbars, with the exception of the Main menu and Status toolbars, can be either docked to the application window or undocked and moved independently of each other. Exercise 1.1 Working with the Toolbars You'll start by adding in the additional toolbars one by one so that you can get a feel for their functionality. After the toolbars are added, you can practice docking and undocking them until you have them where you want them. Steps 1 and 2 pertain to Windows users only. As a side note, all the commands on the two Windows-only toolbars can be accessed from the Main menu on either a Macintosh or a Windows-based machine. If you're using a Macintosh, you can go ahead and skip to Step 3. -
Open the Main/Standard toolbar (Windows onlysorry Mac users!) by choosing Window > Toolbars > Main from the Main menu. The Main/Standard toolbar shows up directly beneath the Main menu. The icons on the left are the standard icons you should be accustomed to from almost any Windows application (New, Open, Save, Print, Print Preview, Cut, Copy, Paste, Undo, and Redo). The icons on the right (Snap to Objects, Smooth, Straighten, Rotate, Scale, and Align) are Flash-specific. -
Open the Status toolbar (Windows only again) by choosing Window > Toolbars > Status. The Status toolbar opens up at the very bottom of the application window. It's a fairly nondescript gray bar until you start mousing over icons in the other toolbars or over the submenus of the Main menu. If the Caps Lock or Num Lock keys are in use, CAP and NUM will be displayed on the far right side of the toolbar. The Status toolbar can't be undocked. -
Open the Controller toolbar by choosing Window > Toolbars > Controller. The Controller toolbar opens as a free-floating (undocked) toolbar. You use the controls on this toolbar to control the movie playback in both the authoring and test mode. From left to right, the controls are Stop, Rewind, Step Back (one frame at a time), Play, Step Forward, and Go To End. -
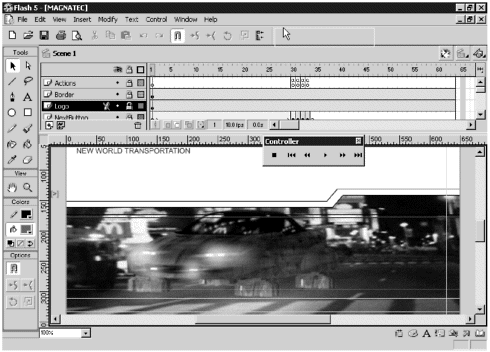
To dock either the Main/Standard or Controller toolbar, click the toolbar and drag it to one of the edges of the application window. (See Figure 1.10.) Both toolbars can be docked to any edge of the window. The toolbar will change to a horizontal or vertical configuration, as appropriate. To undock a toolbar, click it and drag it away from the edge of a window. If the toolbar attempts to dock to the edge, but you don't want it to, hold down the Control key while you drag. Figure 1.10. You can click a toolbar anywhere that it doesn't have a selectable icon and drag it to dock or undock it.  As you work with Flash, you'll need to decide what configuration is most comfortable for you. If you're lucky enough to have multiple monitors and supporting graphics card, you could even have your toolbars on one screen and your Stage on another. Note The Drawing toolbar and the timeline also can be either docked or undocked.
 |
