Adding Custom Effects
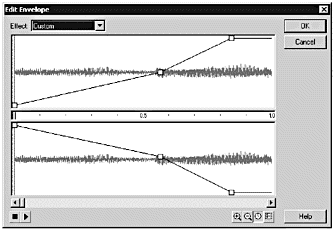
| Generally speaking, you want to do as much of your sound editing as possible before you import a sound into Flash. However, within Flash, you can modify your existing sounds to a certain extent. In the Sound panel, you'll notice an Edit button. This button is active if you have a sound selected in the Sound pop-up menu. Click this button to open the Edit Envelope dialog box. You use the Edit Envelope to control the volume of the sound. The Edit Envelope consists of three windows :
Each channel has an Envelope line that appears at the top of the Channel window. The open square on the Envelope line is an Envelope handle and enables you to control the volume of the sound. If you drag an Envelope handle down, it brings the volume down. Dragging the handle up increases the volume. The top of the window is full volume and the bottom of window is no volume. You can add up to seven additional (for a total of eight) Envelope handles by simply clicking anywhere on the Envelope line. When you add an Envelope handle in one channel, a handle is automatically inserted in the other channel. To remove a handle, drag it out of the window. You can use the Envelope handles to create custom fade-ins and fade-outs. As you saw earlier, dragging both the left and right channel handles to the bottom of their respective windows completely mutes a sound. Tip When you're trying to remove an Envelope handle, you can drag it out of the Channel window in any direction. Dragging to the top or bottom of the window usually is the fastest way to delete a handle. The Timeline window has two controls: Time In and Time Out. You use these controls to establish the starting and stopping points of the sound. You can use the In and Out controls to extract unnecessary dead areas at the beginning or end of a sound clip, or just to remove parts of the sound you don't want to use. Tip Be careful when you use the Time In and Time Out controls especially when you're trying to synchronize loops that have been recorded at a specific number of beats per minute.You can easily mess up your synchronization this way. In the upper-left corner, above the left channel window, you'll see the familiar Effect drop-down menu (see Figure 13.6). These are the same effects to which you have access on the Sound panel. Figure 13.6. You use the Envelope handles in the Edit Envelope dialog box to control the volume and sound effects, such as fade-in and fade-out. In the lower-left corner, below the Right Channel window, are the Play (triangle) and Stop (square) buttons . As you use the Envelope handles to manipulate your sound, it's always a good idea to test and make sure you're getting the effect you want. In the lower-right corner are the Zoom In, Zoom Out, Seconds, and Frames buttons. Use the Zoom In and Zoom Out buttons to change the view of the sound. Use the Seconds and Frames buttons to switch the view of the timeline back and forth between seconds and frames. Tip When you are working on modifying effects in the Edit Envelope dialog box, it's usually easier to precisely place effects when you view the timeline in terms of seconds. That's it. That's the extent to which you can modify sounds inside Flash. It's not a lot to work with, but you can get some interesting effects this way. Take a few minutes to work through the next exercise. Be creative! Make this sound clip your own. Exercise 13.3 Customizing a Layered Soundtrack Rule number one: There is no such thing as a bad sound clip, only a bad sound clip editor. Okay, rule number one isn't true. Sometimes, however, you just have to work with what you're given, so you might as well learn how to make the best of it. Remember that all these sounds are recorded at the same number of beats per minute. When you edit them, it'll be easiest to determine the in and out points of the sounds if you view them in terms of seconds rather than in terms of frames.
From here on out, it's up to you. You can add or remove sounds anywhere along the track by using Envelope handles. You can choose to fade loops in and out or you can bring them in abruptly. Just remember that you have only eight handles to work with and bringing in a sound abruptly costs you two of those handles. Here's one possible scenario for adding in the additional sounds:
When you're happy with your soundtrack, save it. Next you take a look at how compression affects your sound and file size on export. |
EAN: 2147483647
Pages: 257
- Chapter I e-Search: A Conceptual Framework of Online Consumer Behavior
- Chapter V Consumer Complaint Behavior in the Online Environment
- Chapter IX Extrinsic Plus Intrinsic Human Factors Influencing the Web Usage
- Chapter XII Web Design and E-Commerce
- Chapter XVI Turning Web Surfers into Loyal Customers: Cognitive Lock-In Through Interface Design and Web Site Usability