Tracing and Lighting in 3-D Planes


One of the great things about Flash is its capability to translate reality into vector format. If you can photograph or render it, you can use it with Flash. Whether you're working on an animation background that needs a certain perspective or just a static image, sometimes you're better off tracing an image and then simplifying and altering it as you go. It may be a little more time-consuming than importing a hefty bitmap, but the convincing and unified environment that you create will be well worth the effort.

How you trace an image is certainly important to defining the form of your subject, but the most critical part of creating a realistic image lies in your choice of fills. Fills reflect the light source in the scene. I can't over- emphasize the importance of lighting in a scene, especially when you're dealing with 3-D objects and environments. Consistent lighting is the glue that holds the whole thing together; it fools your brain into accepting a two-dimensional scene as three-dimensional.

Preparing a File for Tracing

Before you trace your image, you must prepare the file for the job. No matter what the file's contents, however, the process is the same every time. One standard technique works for both animated and static subjects, for photos or computer-generated imagery. The steps are simple:

  1. Process your image in your photo-editing software. You might want to increase the contrast and sharpen it to help delineate the edges.

  2. Export the image as a JPEG. It's perfectly okay to keep the quality high; you'll be deleting the image when you're done with it, so it won't add to your file size .

  3. Import the JPEG into Flash. Position it and scale it.

  4. Embed the JPEG in a graphic or movie clip symbol. After you do that, you can use the Effects panel to control the symbol's alpha transparency. That'll just make it easier for you to see what you're doing.

    Tip

    One thing you can do to make your life easier when you begin a tracing project like this is to use a high-contrast color, such as red, for drawing your lines. This way you can clearly see what you've done, and you can always change the color later.

  5. Add a new layer and trace your image.

While you trace, do your best to make sure that your lines join to form enclosed spaces. If you don't get them perfect, don't worryyou can fix them as you go along.

After tracing, you're ready to " shade " the image. Make sure that your Paint Bucket is set to fill large gaps. If a space won't fill, check the integrity of the lines and repair any gaps. Keep your light source in mind as you fill the spaces.

Obviously, tracing boxy or linear shapes is easier than trying to trace very curvy or organic shapes. The shading is also more complex on curvilinear shapes . But you can get good results with either. To start off slowly, try tracing over a simple city scene in the next example.

Getting Some Perspective

This first exercise is simple and geared toward getting you to understand how to treat lighting and perspective. A little practice never hurts. This is the first of the standalone exercises. Just because the exercise ends, that doesn't mean your work is done. As you work through this exercise, try to think about how you can extend it for even more interesting effects.

Exercise 12.1 Tracing an Image

Here you'll work with box-shaped buildings that are easy to trace. In addition, the buildings ' very clear-cut surfaces make dealing with light sources more obvious and systematic. You'll appreciate that in the next exercise.

  1. Create and save a new Flash movie with a width of 480 and height of 360.

  2. Import the city.jpg file from the Chapter_12/Assets/Tracing folder on the CD, and align it on the Stage.

  3. Give Layer 1 the name Tracing Image.

  4. Select the JPEG on the Tracing Image layer, and embed it in a graphic symbol (F8) named trace.

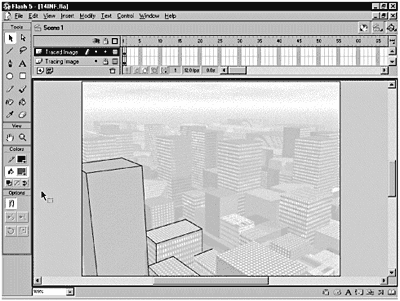
  5. Use the Effects panel to lower the alpha transparency of the trace graphic symbol to a point at which you can still see the shapes clearly, but the image is faded enough that any lines you draw over it will be clear (about 30%). Lock the Tracing Image layer. (See Figure 12.1.)

    Figure 12.1. By embedding your JPEG in a graphic clip, you can use the Effects panel to reduce the alpha transparency to make it easier to see the effects of your tracing.

    graphics/12fig01.gif

  6. Add a new layer to the top of the stack and name it Traced Image.

  7. Create a bounding box that will form the border of the final traced image. Using the Rectangle tool, draw a rectangle with no fill and black stroke on the Stage. Resize (Window > Panels > Info) it to 480x360, and use the Align panel to center it on the Stage.

  8. Time for the tedious part: drawing your building outlines. Set the Line tool's Stroke height at 1, and practice drawing your shapes for a while.

If you get heartily bored, you can cheat and open city.fla from the CD and continue working with that. I won't tell.

Tip

You want your lines to snap together so that you'll be able to fill the shapes that you create with the Paint Bucket. But you'll probably find that having Snap to Objects (View > Snap to Objects) on all the time is pretty annoying. To get around that, just toggle it off and on as you need it: Ctrl+Shift+/.


Exercise 12.2 Lighting the Traced Image

You'll use a single imaginary light source that shines on the top-right of the city. For the purposes of shading, this means that the tops and fronts of the buildings are lighter-colored, while the sides are slightly darker and shaded. Use the basic Flash grayscale colors in the default color palette; you don't need to worry about complex color gradients here. Just follow the lighting system exactly from building to building.

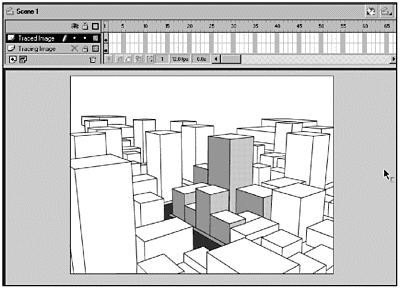
  1. Select the Paint Bucket tool. You're best off sticking with the simple Web-safe grays in the Flash color palette. (See Figure 12.2.) Use the following scheme for coloring in your buildings:

    Building top: White (#FFFFFF)

    Building right side: Light Gray (#CCCCCC)

    Building left side: Medium Gray (#999999)

    Street: Dark Gray (#333333)

    Figure 12.2. Using different shades of gray for the different sides of the buildings begins to give you a real three-dimensional effect.

    graphics/12fig02.gif

    Tip

    Make sure that your Paint Bucket is set to fill large gaps. If a space won't fill, check the integrity of the lines and repair any gaps. This is easiest to do if you turn on Snap to Objects (View > Snap to Objects).

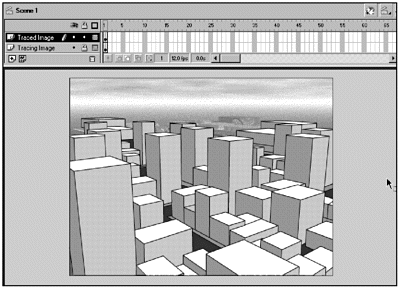
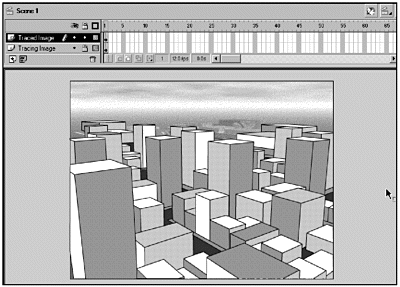
  2. When you are finished shading your buildings, check your results against city_final.fla in the Chapter_12/Assets/Tracing folder on the CD. (See Figure 12.3.) In that same folder, you'll find a file called city_bad.fla that gives you an example of shading gone bad. (See Figure 12.4.)

    Figure 12.3. The tracing project in its final stage has an effective and cohesive three-dimensional feel because the lighting of the scene has been taken into effect.

    graphics/12fig03.gif

    Figure 12.4. This is an example of lighting gone bad. When you look at it, it just feels wrong.

    graphics/12fig04.gif

  3. When you're finished, delete the Tracing Image layer, and delete city.JPEG and Trace symbol from the Library.

  4. Save your file using File > Save As, and give your file a new name.

    Why? Flash has an interesting quirk: It reports your file size as if that big JPEG was still in there, even if you've deleted it from the Stage and Library. Saving your file with a new name fixes that problem.

So now you've gotten a taste of creating a 3-D effect the old-fashioned wayby hand-tracing. What else could you do to this file? An obvious bit of pizzazz that you could add would be to split the buildings onto layers use the street as the demarcation line. Then you can have an animated car or people moving between your new 3-D buildings.

Now it's time to step up a bit and look at some of the other approaches that you can use with incorporating 3-D into Flash.


Inside Flash
Inside Flash MX (2nd Edition) (Inside (New Riders))
ISBN: 0735712549
EAN: 2147483647
Year: 2005
Pages: 257
Authors: Jody Keating

flylib.com © 2008-2017.
If you may any questions please contact us: flylib@qtcs.net