7.2 Step-by-Step Procedures
With the fundamentals of Windows XP's networking features out of the way, we can now concentrate on the actual procedures used to accomplish several different tasks.
As explained earlier in this chapter, Windows is really only concerned with the connections directly attached to the computer, so building a network or connecting a computer to the Internet essentially involves hooking things up and then configuring the connections in the Network Connections window for each computer involved.
The Network Setup WizardThe first page of the Network Setup Wizard explains that the wizard will set up a network for you, help you set up Internet connection sharing, install a firewall, and share files and printers. In fact, it will do none of these things; rather, it will simply ensure that some of the necessary protocols are installed and properly configured for the type of network to which you are attaching your computer. In most cases, the Network Setup Wizard is not needed. However, if you're running into trouble configuring your network, it can't hurt to try it and see if it catches something you may've forgotten. Just answer the questions the best you can, and don't be afraid to choose Other on the "Select a connection method" page if the first two don't apply to your setup. Note that if the Network Setup Wizard prompts you to create a setup disk for use on other computers, choose Just finish the wizard, as it will be of no use. |
7.2.1 Building a Peer-to-Peer Workgroup
A peer-to-peer workgroup is comprised of two or more computers and the necessary networking hardware to connect them. Or, in broader terms:
-
At least two computers, each presumably running Windows XP. Naturally, you can connect an XP system to one running any other networkable operating system (Windows 9x/Me, Windows NT/2000, Mac, Linux, FreeBSD, BeOS, Unix, etc.), for the purposes of this book, we'll assume both machines are running Windows XP.

Note that a system running Windows XP Home Edition will be able to connect to a maximum of five computers in a workgroup. This arbitrary limitation is not present in Windows XP Professional, Windows 2000, Windows Me, Windows 9x, or Windows NT.
-
At least one Ethernet adapter installed in each computer. NICs are cheap and readily available, and are even built into most modern systems (anything capable of running XP, anyway).
If you're not sure what to get, just purchase a standard, plug-and-play 10/100 Ethernet adapter with an RJ45 connector. If you have a desktop system, get a PCI card; if you have a laptop, get a CardBus adapter. USB-to-Ethernet adapters are also available, and while they're easier to install (you wouldn't have to take your desktop apart), they tend to be slower and more temperamental than the aforementioned types.
-
Lastly, you'll need a hub (or switch) and two category-5 patch Ethernet cables. Alternately, you can use just a single category-5 crossover Ethernet cable and skip the hub, but this will limit your network to only two computers. Figure 7-1 shows a workgroup of four computers connected to a hub (or switch), and Figure 7-2 shows a simpler, hubless LAN with only two systems. An alternative to the cables and hub is wireless equipment, discussed in Section 7.1.2, earlier this chapter.
Once you have all of the components, you can begin with the following procedure. Naturally, different types of hardware will require a modified procedure, but the methodology is the same.
-
Plan your network by drawing a quick diagram similar to the ones shown in figures in this chapter.
-
Install a network adapter in each computer, according to the instructions that accompany your hardware.
A connection icon labeled Local Area Connection should appear in your Network Connections window for each installed adapter. See Section 7.1.3, earlier in this chapter, for details on working with these connections, checking their status, and so-on. If the icons don't show up, make sure Windows recognizes your network cards in Device Manager, as explained in Chapter 6, and doesn't report any problems with the devices.
-
Next, hook up your cables. Nearly all network adapters, hubs, and switches have lights next to their RJ45 ports. When a cable is properly plugged in to both ends, the lights goes on. If the lights don't go on, you're either using the wrong type of cable, you've plugged the cable into the wrong port, or the cable is defective. Until the lights are lit, don't go any further. Hint: Use a different color cable for each computer to make troubleshooting easier. See the discussion of cabling, earlier in this chapter, for more information on the types of cables you'll need.
-
Go to Control Panel
 System, choose the Computer Name tab, and click Network ID to run the Network Identification Wizard.
 -
Click Next on the first page, choose This computer is for home use and not part of a business network and click Next, and then click Finish.
-
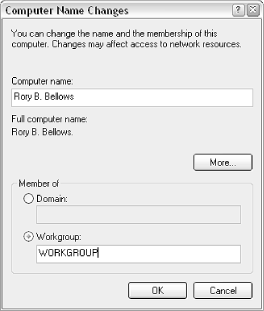
Next, click Change to open the Computer Name Changes window, as shown in Figure 7-8, and enter something for both the Computer name and Workgroup. The name you give to your workgroup should be the same for all computers on your local network, but the computer name must be different for each computer.
Figure 7-8. You'll need to open the Computer Name Changes dialog to identify your computer on your network.
-
Click OK when you're done; if Windows informs you that you need to restart your computer, do so now. Repeat steps 4-6 for the other computers on your network.
-
Your connection should now be active. Double-click the LAN or High-speed icon corresponding to the connection to your workgroup to display that connection's Status window, from where you can determine the IP address of your computer. See Section 7.1.3, earlier this chapter, for an explanation of IP addresses, as well as how and when to set them manually.
-
The quickest way to test your connection is to use the Ping utility, which essentially sends small packets of information to another computer on your network, and reports on its success (if any).
Go to Start
Run, and type ping address, where address is the IP address of the other computer the one in which you're trying to connect. For example, from the computer at 192.168.0.2, you would type: ping 192.168.0.1
If the network is working, the Ping transaction will be successful, and you'll get a result that looks like this:
Pinging 192.168.0.1 with 32 bytes of data: Reply from 192.168.0.1: bytes=32 time=24ms TTL=53 Reply from 192.168.0.1: bytes=32 time=16ms TTL=53
If you have more than two computers, you'll want to ping them all since the test only covers the specific machines involved. On the other hand, if you get this result:
Pinging 192.168.0.1 with 32 bytes of data: Request timed out. Request timed out.
it means that Ping never got a response from the other computer. A failed ping can mean that the connection to the computer you're using it's not working, the connection to the computer you're pinging is not working, or there's some other problem with the network.
-
If your network is functioning, you can proceed to set up the various services you need, such as file and printer sharing (described in Chapter 8) and Internet Connection Sharing (described later in this chapter). Otherwise, look through the checklist in the following section for possible solutions to the problem you're having.
7.2.1.1 Troubleshooting a workgroup connection
The following tips should help you get around most of the common hurdles you'll encounter when setting up a LAN:
-
Heed the advice at the beginning of Chapter 6: restarting your computer will fix 99% of all problems. This is never more true than when diagnosing a networking problem.
-
Run the Network Setup Wizard, as described earlier in this chapter. While this step isn't always required, it does occasionally fix errant settings that otherwise would prevent a network from working properly.
-
Try replacing one or more of the cables, especially if they're old or their connectors are worn.
-
Make sure the appropriate lights are lit. See "Planning your Network" for description of the way lights work on network devices.
When you transfer data across a network connection, each network card and the hub (if you have one) should have an "activity" light that flashes. Some devices have separate lights for receiving and transmitting data, while others have only a single light for all incoming and outgoing communication. Activity lights tend to flash intermittently and irregularly; if they flash regularly, it could be a sign of a problem with one of the devices.
-
Windows XP is designed to implement most changes to the network without restarting. However, if you encounter problems, try restarting one or all of your machines to force them to recognize a newly-configured network.
-
Make sure no two computers on your network are attempting to use the same Computer name or IP address.
-
Make sure you have the latest drivers for your NIC (network adapter); check with the manufacturer for details. Note that hubs, routers, and switches typically don't require any special drivers, but it would not be unusual for such device to require updated firmware for compatibility with Windows XP. See Chapter 6 for more information on firmware.
-
Right-click the connection icon in the Network Connections window corresponding to your Ethernet adapter, and select Repair. Note that this feature essentially reinstalls drivers, but doesn't necessarily investigate other sources of problems.
-
Some problems are caused by improper hardware settings, usually attributed to the network card itself. Open Device Manager (discussed in Chapter 6), double-click the icon for your Ethernet adapter, and choose the Advanced tab. Choose a property in the list on the left and configure the selected property on the right. Try not to fuss with any settings you don't understand.
If your network card has more than one type of connector (commonly called a combo card), only one connector will be in use at any given time. The Windows default for this setting may be "autodetect," which may impair performance or even cause the device to stop working. Change this option so that it matches the connector you're using: for example, choose "coaxial" for round, 10base-2 cables and RJ-45 for the more common 10base-T cables.
Another commonly misconfigured setting is the choice between full-duplex, half-duplex, and autodetection. Full-duplex is a connection where information can flow in both directions simultaneously; half-duplex only allows unidirectional communication. The wrong setting can cause a network connection to malfunction or just operate very slowly, especially with older adapters. Try experimenting with different settings.
-
If you know the network cards are functioning properly and the network cable is connected properly, try using the diagnostic software that comes with many network cards (contact the manufacturer of your adapter for more information) to test the card and the connection. If the diagnostic software reports no problems, odds are that the problem lies elsewhere.
-
If the Ping test described above is successful, then your network is working. Other problems you may be having, such as not being able to "see" other computers in Explorer, are not necessarily the result of a network problem that can be solved here. For more information on shared resources, see Chapter 8.
7.2.2 Connecting to the Internet
Although connecting to the Internet is really not any different than connecting to a workgroup, at least as far as Windows is concerned, you'll typically encounter different types of problems. The procedure to initiate an Internet connection varies with the type of connection you wish to establish:
-
DSL, cable, T1, or other high-speed connection with a static IP address (no username and password)
-
DSL, cable, or other high-speed connection via PPPoE (username and password required)
-
Connection provided by a router or another computer via Internet Connection Sharing
-
Dial-up connection, including analog modems over standard phone lines
If your connection doesn't fit neatly into one of the above categories, your setup may still be similar to one of the following sections anyway. Otherwise, you'll need to contact your service provider for specific instructions and software for Windows XP. Details on each of these connection types are as follows:
7.2.2.1 DSL, cable, or other high-speed connection with a static IP address
High-speed connections with static IP addresses are probably the easiest of the aforementioned connections to set up in Windows XP.
A static IP address means you have the same IP address every time you start your computer. If you're not sure if you have such a connection, check to see if your connection requires a username and password to log on; if so, you most likely have a PPPoE connection, described in the next section. Otherwise, proceed with these steps:
-
Connect your network adapter directly to the device that supplies your Internet connection, whether it's a DSL adapter, a cable modem, or an Ethernet outlet in your wall.
-
Open the Network Connections window, locate the connection icon corresponding to the network adapter plugged into your Internet connection, and rename it "Internet Connection." Then, right-click the newly named Internet Connection icon and select Properties.
-
Under the General tab, make sure only the following entries are enabled (checked):
-
Client for Microsoft Networks
-
Internet Protocol (TCP/IP)
If there are any other entries here, clear their checkmarks.
-
-
Highlight Internet Protocol (TCP/IP) and click Properties. Click the Use the following IP address option and enter the IP address, subnet mask, default gateway, and preferred (primary) DNS server and alternate (secondary) DNS server addresses provided by your Internet service provider.
-
Click OK, and then click OK again; the change should take effect immediately. Test your connection by loading a web page or using Ping (as described in the previous section).
|

7.2.2.2 DSL, cable, or other high-speed connection via PPPoE
PPPoE is used to establish temporary, dynamic-IP connections over high-speed Internet connections. If your Internet connection has a dynamic IP address, it means your Internet service provider assigns you a different IP address every time you connect to the Internet. The PPPoE (Point-to-Point Protocol over Ethernet) protocol facilitates this connection by sending your username and password to your provider.
|
One of the differences between this type of connection and the static IP connection discussed in the previous section is that PPPoE connections must be initiated every time you start Windows or every time you wish to use the Internet, which is somewhat like using old-fashioned Dial-up connections (discussed in a subsequent section). Such connections are automatically disconnected when you shut down Windows.
|
Here's how to set up a PPPoE connection in Windows XP:
-
If you have PPPoE software (such as Enternet 300) installed, remove it from your system now. This is typically accomplished by going to Control Panel
Add or Remove Programs. Refer to the documentation that came with said software for details. -
Open the Network Connection Wizard, as explained in Section 7.1.3, earlier in this chapter.
-
Click Next to skip the introductory page, choose the Connect to the Internet option, and then click Next again.
-
Choose the Set up my connection manually option, and click Next.
-
Choose the Connect using a broadband connection that requires a user name and password option, and click Next.
-
Type a name for this connection and click Next. A good choice is the name of your ISP, or just "DSL" or "cable."
-
Enter your username and password, choose the desired options underneath (if you're not sure, turn them all on), and click Next.
-
Click Finish to complete the wizard.
-
To start the connection, double-click the icon you just created in the Network Connections folder. If you elected to create a desktop shortcut in the wizard, double-click the desktop icon.
-
By default, a Connect dialog will appear at this point. Click Connect to initiate the connection.
Here are some tips for working with PPPoE connections.
-
To skip the Connect dialog, right-click the connection and select Properties (or click the Properties in the Connect window itself), choose the Options tab, and turn off the Prompt for name and password, certificate, etc. option.
-
To have Windows connect automatically whenever the connection is needed, first right-click the connection icon and select Set as Default Connection. Then, go to Control Panel
Internet Options Connections tab, and select the Always dial my default connection option. -
To have Windows connect automatically when you first start your computer, place a shortcut to the connection in your Startup folder. You'll also need to make sure that the Prompt for name and password, certificate, etc. option is turned off, as described earlier.
-
If you need to make several, similar PPPoE connections, you can save time by right-clicking the connection you just created and selecting Create Copy. Then, right-click the newly copied connection and select Properties to modify it.
-
If you're having trouble getting your new PPPoE connection to work, check your DSL or cable modem first to see if the correct lights are lit (refer to your documentation). Sometimes, turning off the adapter, waiting several minutes, and then turning it back on solves the problem.
-
If you're using PPPoE in conjunction with Internet Connection Sharing, discussed later in this chapter, and you've found that some web pages won't load on the client computers, see Section 7.2.4, later in this chapter.
7.2.2.3 Connection provided by a router or another computer via Internet Connection Sharing
If you're using Internet Connection Sharing, described later in this chapter, the setup for the clients (all the computers on your network, other than the one with the physical Internet connection) is a snap. This procedure is also appropriate if you're using a router to share an Internet connection.
This procedure assumes you've already set up the aforementioned shared Internet connection, as well as a properly-functioning peer-to-peer workgroup, as described in Section 7.2.1, earlier in this chapter.
Follow these steps to connect a computer to an existing shared Internet connection:
-
Open the Network Connections window, right-click the connection icon corresponding to the network adapter plugged into your workgroup, and select Properties.
-
Under the General tab, make sure at least the following entries are enabled (checked):
-
Client for Microsoft Networks
-
Internet Protocol (TCP/IP)
Any other protocols and services enabled here should be left alone, as they may be needed for other purposes.
-
-
Highlight Internet Protocol (TCP/IP) and click Properties.
-
If you're not using fixed IP addresses on your LAN (which will be the most common case), select both the Obtain an IP address automatically and Obtain DNS server address automatically options, and click OK. Skip the next two steps, and proceed directly to step 7.
-
Otherwise, if you've set up your network with fixed IP addresses such as 192.168.0.1, 192.168.0.1, and so on (explained in Section 7.1.2, earlier in this chapter), select the Use the following IP address option and enter the IP address you wish to assign the machine.
-
Type 255.255.255.0 for the subnet mask.
-
For the gateway, type the IP address of the computer hosting the shared Internet connection. If you're using a router to share your Internet connection, type the IP address of the router (refer to the instructions that came with the router for possible exceptions).
-
Lastly, type the Preferred (primary) DNS server and Alternate (secondary) DNS server addresses provided by your Internet service provider. Click OK when you're done.
-
Click OK, and then click OK again; the change should take effect immediately. Test your connection by loading a web page or using Ping (as described at the beginning of this chapter).
-
If the connection doesn't work at this point, open the Network Setup Wizard, as described earlier in this chapter. Click Next on the first two pages, and choose the This computer connects to the Internet through another computer and click Next on the third page. Depending on your network configuration, the remaining pages will vary here; answer the questions the best you can and complete the wizard.
-
If you're able to view some web sites but not others, and you're connecting to a shared Internet connection facilitated by PPPoE (described in the previous section), you may have to change the MTU setting. See Section 7.2.4, later in this chapter.
7.2.2.4 Dial-up connection, including analog modems over standard phone lines
Of the connection types listed here, Dial-up is the least expensive and probably still the most common. All you need is an ordinary analog modem, a standard telephone line, and a Dial-up account with an Internet service provider. You can have as many Dial-up connections configured at one time as you like, especially useful if you travel; just repeat these steps for each subsequent connection.
-
Open the Network Connection Wizard, as explained in Section 7.1.3, earlier in this chapter.
-
Click Next to skip the introductory page, choose the Connect to the Internet option, and then click Next again.
-
Choose the Set up my connection manually option, and click Next.
-
Choose the Connect using a dial-up modem option, and click Next.
-
Type a name for this connection and click Next. A good choice is the name of your ISP, or just "Analog." If you're setting up multiple Dial-up connections, choose descriptive names, such as "On the road" and "At home."
-
Enter the phone number for the connection, obtained by your service provider, and click Next.
If your ISP provides two or more phone numbers, you have the option of creating multiple connections (one for each phone number), or creating a single connection that cycles through a list of phone numbers until a connection is established. If you choose the latter, you'll have the opportunity to enter additional phone numbers for the connection at the end of the procedure.
-
Enter your username and password, choose the desired options underneath (if you're not sure, turn them all on), and click Next.
-
Click Finish to complete the wizard.
-
To start the connection, double-click the icon you just created in the Network Connections folder. If you elected to create a desktop shortcut in the wizard, double-click the desktop icon.
-
By default, a Connect dialog will appear at this point. Click Dial to initiate the connection.
Here are some tips for working with Dial-up connections.
-
To skip the Connect dialog, right-click the connection and select Properties (or click the Properties in the Connect window itself), choose the Options tab, and turn off the Prompt for name and password, certificate, etc. option.
-
To have Windows connect automatically whenever the connection is needed, first right-click the connection icon and select Set as Default Connection. Then, go to Control Panel
Internet Options Connections tab, and select the Always dial my default connection option. -
To have Windows connect automatically when you first start your computer, place a shortcut to the connection in your Startup folder. You'll also need to make sure that the Prompt for name and password, certificate, etc. option is turned off, as described above.
-
If you need to make several, similar Dial-up connections, you can save time by right-clicking the connection you just created and selecting Create Copy. Then, right-click the newly-copied connection and select Properties to modify it.
-
To enter additional phone numbers for this connection (as opposed to making several separate connections), right-click the new connection icon, select Properties, choose the General tab, and click Alternates. Use the up and down arrow buttons to the right to change the priority of each phone number entered; numbers appearing higher on the list will be dialed first. Make sure to turn on the If number fails, try next number option.
-
If you're using America Online, MSN, or some other proprietary service, these instructions may not apply to you. Contact your service provider for setup instructions for Windows XP.
7.2.3 Sharing an Internet Connection
Naturally, it doesn't make much sense to invest in a separate Internet connection for each computer in your home or office. Instead, you can use one of several different methods to share a single Internet connection among any number of separate computers.
The first solution utilizes the Internet Connection Sharing feature built into Windows XP. If you used the ICS feature found in Windows 98 Second Edition or Windows Me, you'll find that the system in XP makes a lot more sense and is much easier to set up. The advantage to ICS is that it is free; no addition software or hardware is required, but it does have its limitations. Alternatives to ICS are discussed subsequently.
7.2.3.1 Setting up Internet Connection Sharing
ICS is a system by which a single computer with an Internet connection acts as a gateway, allowing all other computers in the workgroup to use its connection to access the Internet. The computer that is connected directly to the Internet is called the host; all the other computers are called clients.
In order to get ICS to work, you'll need the following:
-
At least two computers, each with an Ethernet adapter properly installed and functioning. ICS can be used with both conventional and wireless networks.
It is assumed you've already set up your local network, as described in Section 7.2.1, earlier in this chapter. Your Internet connection can be shared with as many clients as your LAN will support.
-
One of the computers must have an Internet connection properly set up, as described in Section 7.2.2, earlier in this chapter.
You do not need a special type of Internet connection, nor do you need to pay your Internet service provider extra fees to use Internet Connection Sharing. The whole point of ICS is to take a connection intended for a single computer and share it with several other machines.
-
There is no minimum connection speed, but you should keep in mind that when two users are downloading using the shared connection simultaneously (the worst-case scenario), each user will experience half of the original performance. In other words, you probably don't want to bother sharing a 14.4k analog modem connection; see the discussion of "Bandwidth" at the beginning of this chapter, and Section 7.2.5, later in this chapter, for more information.
-
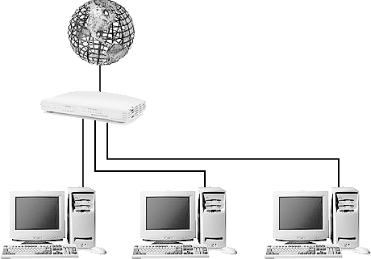
If you're sharing a DSL, cable modem, or other high-speed, Ethernet-based Internet connection, the computer with the Internet connection must have two Ethernet cards installed. See Figure 7-2 for a diagram of this setup.
|
The first step in setting up ICS is to configure the host, the computer with the Internet connection that will be shared.
-
Open the Network Connections window. If you haven't already done so, select Details from the View menu.
-
Here, you should have at least two connections listed: one for your Internet Connection, and one for the Ethernet adapter connected to your LAN. If they're not there, your network is not ready. See the tips above for what you need, and try again.
For clarity, I recommend renaming the two connections to "Internet Connection" and "Local Area Connection," respectively, as illustrated by Figure 7-5.
-
Right-click the connection icon corresponding to your Internet connection, and select Properties. In most cases, it will be the Ethernet adapter connected to your Internet connection device.
However, if you're using a DSL or cable connection that requires a login with a username or password, the icon to use is the Broadband connection icon corresponding to your PPPoE connection. See Section 7.2.2, earlier in this chapter, for further instructions.
-
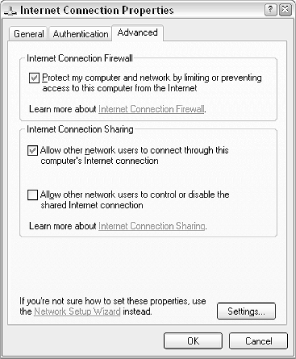
Choose the Advanced tab, and turn on the Allow other network users to connect through this computer's Internet connection option, as shown in Figure 7-9.
(For more information on the Firewall option shown here, see Section 7.3.2, later in this chapter.)
-
Click OK when you're done. Verify that Internet Connection Sharing is enabled; it should say "Enabled, Shared" in in the Type column of the Network Connections window, as shown in the example in Figure 7-5.
-
That's it! The change will take effect immediately. Verify that the Internet connection still works on the host by attempting to open a web page. If the Internet connection doesn't work on the host, it definitely won't work on any of the clients.
Figure 7-9. Any Internet connection can be shared with other computers in your workgroup.
The next step is to configure each of the client computers to use the shared connection. The only requirements of the client machines are that they are running an operating system that supports networking and that their network connections are properly set up. The clients can be running Windows 2000, Windows Me, Windows 9x, Windows NT, Windows 3.x for Workgroups, or even MacOS, Unix, Linux, or FreeBSD.
See Section 7.2.2, earlier in this chapter, and follow the instructions in Section 7.2.2.3. Do this for each "client" machine on your network. While the instructions are specific to Windows XP, the settings explained therein can be adapted to any OS; refer to your operating system's documentation for more information.
7.2.3.2 Troubleshooting Internet Connection Sharing
Here are some tips that should help you fix the problems you might encounter with ICS:
-
If the Internet is accessible by one client machine, it should work for them all. If none of the clients work, the problem is most likely with the host; if some of the clients work and others don't, it's a problem with the clients that don't work.
-
ICS works over existing network connections, so those connections must be functioning before ICS will operate. Refer to Section 7.2.1, earlier in this chapter, for further troubleshooting details.
-
Check to see if you have any firewall software installed on the host or clients that might be interfering with the connection. The Internet Connection Firewall included with Windows XP (discussed later in this chapter) won't interfere with ICS, however.
-
The IP address of the host on the workgroup must be set to 192.168.0.1, or ICS won't work. Among other things, this means that no other computers can be using that address. If you can't get ICS to work with the default Windows XP configuration, try assigning a fixed IP address to each of your clients, as described in Section 7.1.3, earlier in this chapter.
-
If you're experiencing poor performance, it's important to realize that whatever bandwidth is available though a given Internet connection will be shared among all of the computers actively using the connection. The worst-case scenario is when two or more users simultaneously download large amounts of data; in this case, they would each receive only a portion of the total connection bandwidth. Bandwidth sharing is dynamic, though, so most of the time you shouldn't notice much of a decrease in speed.
-
If you're using special connection software for use with your DSL or cable (such as Efficient Networks' NTS Enternet 300 software), it's best to remove it and use Windows XP's built-in support for PPPoE (described earlier in this chapter).
-
If you're using PPPoE and find that you can access some websites but not others from the client machines, see Section 7.2.4, later in this chapter.
7.2.3.3 Alternatives to Internet Connection Sharing
The Internet Connection Sharing feature built-into Windows XP has it's limitations. For example, the host computer must be on and connected to the Internet for the other computers to have Internet access. If this "host" computer crashes or is shut down, Internet access will be cut off for the whole workgroup. This may be a small price to pay, considering that ICS is free, simple, and pretty convenient, but if you don't want your network's Internet connection to rely on any single computer, you may wish to consider the following alternatives to see if they make sense for you.
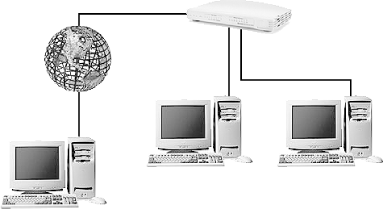
Figure 7-10. Instead of connecting a single computer to the Internet and then sharing the connection, a router allows you to plug an Internet connection directly into your LAN.
- Use a router
-
A router works similarly to a hub or switch, both discussed at the beginning of this chapter, except that it will also be capable of sharing a single Internet connection with all members of your workgroup. Figure 7-10 illustrates a workgroup connected to the Internet with a router.
The advantage of a router over ICS is that no single computer must be on for the other computers to have Internet access. But the disadvantages include the added cost, a more complicated setup, and support for only certain types of high-speed Internet connections.
If you're looking for a router, make sure to get one that supports both DSL and cable connections, as well as PPPoE connections (if that's what your service provider uses). Some routers connect between to your hub and DSL or cable modem, while others integrate one or both of these functions; Figure 7-10 shows a combination router and hub. Some routers even have built-in support for wireless connections and even print servers. Although such mega-combo devices can be inticing, you're asking for trouble by trying to stuff too much functionality in a single package.
Refer to the documentation that comes with the router for basic setup instructions, and see the Section 7.2.2.3 section, earlier in this chapter, for instructions on connecting a Windows XP system to a router.
- Use multiple IP addresses
-
Some ISPs may provide, at extra cost, multiple IP addresses, with the specific intent that Internet access be provided for more than one computer. Since each computer has its own true IP address, there's no need for any "sharing" software or hardware. Instead, your hub or switch is plugged directly into your Internet device (DSL, cable, T1, or whatever), and each computer will effectively have its own Internet connection.
Refer to the instructions in the Section 7.2.2.1 section, earlier in this chapter, to set up each of your computers to access the Internet.
The advantages of multiple IP addresses over ICS or using a router, as described earlier, is that the setup is very easy, and no additional hardware or software is required. The downside is that Internet connections with multiple IP addresses are often much more expensive than standard Internet connections. In fact, the added monthly cost will most likely quickly exceed the one-time cost of a router.
7.2.4 Fix Your Shared Internet Connection with a New MTU
There are some circumstances when a shared Internet connection doesn't quite work as its supposed to. The problem, where some web pages load and some do not, affects client computers that access a shared Internet connection facilitated by PPPoE.
Although all web sites will be accessible on the host computer, certain web sites will never load successfully from any of the client machines. If you don't know what "hosts" or "clients" are with regard to Internet Connection Sharing, you'll want to review the previous section before you proceed. Also, see Section 7.2.2.2, earlier in this chapter for more information on PPPoE connections. Note that this applies to Windows XP's built-in PPPoE support, as well as PPPoE provided by third-party software and even some routers.
The following solution is intended to fix this specific problem.
-
Sit down in front of one of your client machines, and type the following:
PING -f -l 1500 192.168.0.1
-
This assumes that 192.168.0.1 is the IP address of the host computer (or router); substitute the correct address if it's different. If you don't know the IP address of the host computer, open a Command Prompt window (cmd.exe) on the host, and type ipconfig at the prompt. (If a router is providing your Internet connection, consult the router documentation for details on obtaining its IP address.)
-
You'll probably get an error message indicating that it must be fragmented. (If not, then this solution doesn't apply to you.) Next, type the following:
ping -f -l 1492 192.168.0.1
If that results in the same error message, try this instead:
ping -f -l 1480 192.168.0.1
If you still get an error, try:
ping -f -l 1454 xxx.xxx.xxx.xxx
The numbers in each of these examples (1500, 1492, 1480, and 1454) are values for the MTU (Maximum Transmission Unit). Continue issuing this command with lower and lower MTU numbers until you get normal ping responses instead of an error message. The highest MTU value that does not result in an error is the correct one for your network. It's not unheard of for an MTU as low as 576 to be required, although Microsoft recommends no value smaller than 1400 for Windows XP.
-
Once you've found an MTU that works for you, open the Registry Editor (see Chapter 3) on the client machine.
-
Expand the branches to HKEY_LOCAL_MACHINE\SYSTEM\CurrentControlSet\Services\Tcpip\Parameters\Interfaces.
There should be several subkeys under the Interfaces key; most likely, you'll find three. View each key's contents, and find the one that corresponds to your primary network adapter; it will be the one with more values than the other two, and will have an IP address value set to the IP address of the machine.
-
Once you've found the correct subkey, create a new DWORD value in it by selecting New and then DWORD Value from the Edit menu. Name the value MTU.
-
Double-click the new value, choose the Decimal option, type the MTU value you earlier in this procedure, and click OK.
-
Close the Registry Editor when you're done; you'll need to restart Windows for this change take effect.
-
Repeat steps 3-7 for each client machine on your network (but not the host).
In most cases, this should solve the problem. However, on some systems, you may need to set the MTU in another registry location as well. If you've found that a lower MTU value is what you need, but the above procedure didn't work, try this as well:
-
Navigate to HKEY_LOCAL_MACHINE\System\CurrentControlSet\Services\Ndiswan\Parameters\Protocols\0. If any keys in this Registry path aren't there, just create them by going to Edit
New Key. -
Once you're in the key, create a new DWORD value called ProtocolType and give it a Decimal value of 2048.
-
Then, create a new DWORD value called PPPProtocolType and give it a Decimal value of 33.
-
Finally, create a new DWORD value called ProtocolMTU and give it a Decimal value of the MTU you determined above.
-
Close the Registry Editor and restart your system when you're done.
7.2.5 Test Your Throughput
Throughput is the practical measurement of bandwidth: the quantity of data you can transmit over a connection in a given period of time.
Now, most types of connections are classified for their bandwidth (discussed at the beginning of this chapter); a 33.6 Kbps modem is so-named, because at its best, it can transmit and receive 33,600 bits per second. Because there are eight bits to the byte, this connection would give us a theoretical throughput of 4.2 kilobytes per second.
In reality, however, you're not likely to see a throughput any faster than about 3.6 Kbps with the connection in this example. That's a difference of about 14%; a file that you would expect to take a minute to download will actually take about 70 seconds. The reason for this discrepancy is that there are other things that get transfered along with your data; error correction and lost packets because of noise on the line can make the actual throughput lower as well. Unfortunately, most of the factors that contribute to the actual throughput are beyond our control.
Faster connections, such as DSL, cable, and T1 connections, are also rated similarly and suffer the same throttling effect, but generally, these connections are fast enough that the discrepancy is not noticeable.
Among the factors within our control are the hardware and software we use and various settings and conditions in which we work (line quality, distance from your ISP, etc.). So it is often advantageous to test the throughput under different conditions and with different equipment so that you can achieve the best performance.
The simplest way to measure the throughput is to transfer a binary file (such as a .jpg or .zip file) from your computer to another location and then back again, recording the time it takes to complete the transfer each way. Just divide the file size by the transfer time to get the throughput, typically in kilobytes per second.
Note that we test the "upload" as well as the "download" speed. Many types of connections are asynchronous; 56 K modems, for example, download at around 53.2 Kbps, but upload at only 33.6 Kbps. Likewise, a midrange DSL connection might be rated at 384 Kbps download and 128 Kbps upload. Note also that you wouldn't want to use ASCII files (such as plain-text files and web pages) to test the throughput, because compression will yield uncharacteristic results.
Average throughputs for common connection speeds are shown in Table 7-1.
| Connection Method | Ideal Throughput (Kbps) |
|---|---|
| 14.4 Kbps modem | 1.6 down, 1.6 up |
| 28.8 Kbps modem | 3.2 down, 3.2 up |
| 33.6 Kbps modem | 3.6 down, 3.6 up |
| 56 Kbps modem | 5.4 down, 3.6 up |
| ISDN (dual channel, 128 Kbps) | 14 down, 14 up |
| Cable Modem (~800 Kbps synchronous) | 84 down, 84 up |
| DSL (asynchronous 1.2 Mbps/384 Kbps) | 128 down, 42 up |
| T1, fast DSL (1.5 Mbps) | 160 down, 160 up |
Note that you shouldn't fret if your throughput doesn't exactly match the values in the table they're only examples. If you find that you're getting substantially slower performance, however, you should test your equipment and cabling and see if there's any software that could be interfering with the connection. For example, a noisy phone line is the most common cause of poor performance of a Dial-up connection. For DSL or cable, try turning off your modem for a minute or two, and then turning it back on.
Another way to test the actual bandwidth of your connection is to visit one of the many bandwidth-testing web sites:
-
http://bandwidthplace.com/speedtest/
-
http://www.dslreports.com/stest
-
http://tech.msn.com/internet/speedtest.asp
In addition to calculating your bandwidth and reporting the results, these services typically ask for your zip code and connection type to compile statistics on typical connection speeds in your area.
See Chapter 5 for solutions on improving overall system performance, some of which will also have a noticeable impact on your connection speed as well.
Throttling Quality of ServiceThe Quality of Service (QoS) Packet Scheduler is a service included with Windows XP Professional that, when connected to a QoS-enabled network, reserves about 20% of your bandwidth for certain applications. Since this could mean that a rather large amount of your precious bandwidth is being wasted, you may wish to throttle or disable it. Note that this does not apply to Windows XP Home Edition or any computer connected to a network that does not use the QOS service.
Note that disabling the QOS Packet Scheduler (by unchecking the QoS Packet Scheduler option in General tab of the Properties sheet for your network connection) won't accomplish this. |
7.2.6 Virtual Private Networking
Virtual Private Networking (VPN) is a system whereby a workgroup of two or more computers can be connected by an Internet connection rather than a physical cable. In theory, VPN provides the security and privacy of a closed environment, without the astronomical cost of a private wide-area network.
The technology used in Virtual Private Networking either the Point-to-Point Tunneling Protocol (PPTP) or the Layer Two Tunneling Protocol (L2TP) allows you to create a private "tunnel" across the Internet connection. With a VPN, you can accomplish tasks previously available only over a LAN, such as file and printer sharing, user authentication, and even networked games. Figure 7-11 illustrates a typical scenario with a tunnel connecting a single computer to a remote workgroup.
Figure 7-11. Form a virtual private workgroup through a tunnel across the Internet.
The significant hurdle involved in setting up the VPN feature included in Windows XP is that a tunnel server is required to complete the virtual workgroup. Although VPN has been marketed as a feature of Windows XP, Windows XP cannot be configured as a tunnel server; therefore, a VPN cannot be achieved with Windows XP systems alone. This means that at least one of the computers involved must be running the Server or Advanced Server editions of Windows 2000, Windows NT 4.0, or a subseqent server edition of Windows (such as .NET Server).
The following process briefly shows how to set up a simple VPN workgroup. Select the procedure following depending on the operating system you're using for the tunnel server: Part 1a for Windows 2000 or Part 1b for Windows NT. In many cases, a network administrator will be responsible for setting up the tunnel server. Then, Part 2 shows how to then configure a Windows XP machine as a VPN client.
7.2.6.1 Part 1a: set up the tunnel server (Windows 2000 Server/Advanced Server only)
Here are instructions on setting up a tunnel server in Windows 2000, required before you can initiate a VPN connection with a Windows XP client. See part 1b, which follows, for similar instructions for Windows NT 4.0.
-
Log in as the Administrator.
-
Double-click the Network and Dial-Up Connections icon in Control Panel, and then double-click the Make New Connection icon. Note that all of the settings in this cumbersome wizard can be adjusted later by double-clicking on the Incoming Connections icon you're creating.
-
Click Next, select Accept incoming connections, and click Next again.
-
Place a check mark next to the network adapter that you use to accept incoming VPN connections, and click Next.
-
Select Allow virtual private connections, and click Next.
-
You'll then be presented with a list of configured users place a check mark next to each username to whom you wish to grant VPN access, and click Next.
-
The next step allows you to choose which services, clients, and protocols are allowed with incoming VPN connections. These are the same components you'd use when building a workgroup (see Section 7.2.1, earlier in this chapter, for details).
-
Click Next and then Finish when you're done.
7.2.6.2 Part 1b: set up the tunnel server (Windows NT 4.0 Server/Advanced Server only)
Here are instructions on setting up a tunnel server in Windows NT 4.0, required before you can initiate a VPN connection with a Windows XP client. See part 1a, above, for similar instructions for Windows 2000.
-
Log in as the Administrator.
-
Double-click the Network icon in Control Panel, and choose the Protocols tab.
-
Click Add, select Point To Point Tunneling Protocol from the list, and click OK. When asked how many simultaneous VPNs you want the server to support, choose a nice, big, healthy number, and click OK.
-
Next, you'll need to add one or more the VPN devices to Remote Access Service (RAS): choose the Services tab and select Remote Access Service.
-
Click Properties, and then click Add.
-
From the RAS Capable Devices list, select a VPN device, and click OK. Once all the VPN devices have been added, select a VPN port, and click Configure. Check the Receive calls only option, and click OK.
Repeat this step for each VPN device you've selected. You'll have to restart Windows NT when you're done.
7.2.6.3 Part 2: set up the VPN client (Windows XP)
Although there only needs to be one VPN tunnel server, you can have as many clients as you like (that is, until you reach the limit specified in the tunnel server's configuration). Here's how to set up a Windows XP machine as a VPN client:
-
Open the New Connection Wizard, as described in Section 7.1.3, earlier in this chapter.
-
Click Next on the first page. Select Connect to the network at my workplace on the second page, and then click Next.
-
Choose Virtual Private Network connection, and click Next.
-
Next, choose a name for the new connection (it can be anything you want), type it into the Company Name field, and click Next.
-
Since VPN relies on an existing Internet connection, you have the option at this point of automatically connecting to the Internet before initiating this VPN connection. If you're using a high-speed Internet connection that is always on, choose Do not dial the initial connection here. If, however, you're using a PPPoE connection or analog Dial-up connection that must be dialed to connect (as described in Section 7.2.2, earlier in this chapter), choose Automatically dial this initial connection and then select the desired connection from the list. Click Next when you're done.
-
The next page is where you specify the network name or IP address of the tunnel server to which you want to connect. If you didn't set up the tunnel server yourself, you'll have to obtain the address from your network administrator.
-
Click Next and then Finish when you're done.
-
To initiate a VPN connection, double-click the new VPN connection icon, enter your user name and password, and click Connect. As soon as you're connected, you should have access to the additional resources shared on the remote network; see Chapter 8 for details on accessing remote resources.
Note that in previous versions of Windows, it was necessary to "join" a domain (by going to Control Panel ![]() System
System ![]() Computer Name tab
Computer Name tab![]() Change) before you could connect to it with VPN. In most cases in Windows XP, this is no longer necessary; check with your system administrator for details.
Change) before you could connect to it with VPN. In most cases in Windows XP, this is no longer necessary; check with your system administrator for details.
For additional tips for working with VPN connections, such as how to bypass the Connect dialog, see Section 7.2.2.2 in the Section 7.2.2 section, earlier in this chapter.
7.2.7 Accessing an FTP Site in Explorer
For years, FTP has been the quickest and most efficient way to move files from one machine to another across the Internet. Whether you're downloading drivers from a manufacturer's FTP site or uploading HTML files to a web server, FTP is often the preferred transfer method.
To access an FTP server, either to upload or download, you need an FTP application. Windows XP actually comes with three such applications:
-
FTP, a traditional, command-line-based FTP client (ftp.exe)
-
Internet Explorer (iexplore.exe) or any web browser, for that matter supports downloading files from FTP servers. Just go to an address like this: ftp://ftp.mozilla.org/pub/mozilla/releases/mozilla1.0/mozilla-win32-1.0-installer.exe to download the specified file from the specified server.
-
Windows Explorer[1] (explorer.exe) allows you to view any web site as though it were just another folder and is explained in the rest of this section.
[1] Microsoft and others might contend that Windows Explorer and Internet Explorer are actually the same program. Personally, I find this to be a matter of semantics, and for the purposes of this solution, and since both applications have different interfaces, it makes more sense to think of them as distinct and separate applications.
Understanding Anonymous FTPIf you have a personal account on the server to which you're connecting, you'll need to specify your username and password in order to gain access to your personal files. However, many FTP servers also provide "anonymous" access to a special, public folder; to login to this public folder, you just type anonymous for the username and an email address (or nothing) for the password. When you use a web browser to download from an FTP server, as described earlier, it's usually done through an anonymous account. Note that not all hosts are FTP servers, and not all FTP servers allow anonymous access. |
Here are three different ways to hooking up to an FTP site in Explorer:
7.2.7.1 Solution 1: open a temporary FTP folder
This procedure is the quick-and-dirty way to open an FTP folder in Explorer:
-
Open Windows Explorer (explorer.exe).
-
If the Address Bar is not currently visible, go to View
Toolbars Address Bar. -
Type an address into the Address Bar, like this:
ftp://host.com
where host.com is the name of the FTP server. Note the syntax, similar to web page addresses. Press Enter to log in.
Since we're not specifying a username or password here, Explorer assumes we want anonymous access. If the specified server does not provide anonymous access, you'll see an error like this:
- Windows cannot access this folder . . . User anonymous unknown.
-
If you do indeed have an account on the server, select Logon As from the File menu, type your username and password, and then click Log On.
See the next solution for a way to specify the username and (optionally) the password right in the address so that you don't have to deal with the Log On As dialog.
-
As soon as you're logged in, you'll see a standard folder and file listing. You can rename, drag-drop, or even delete files and folders, just as though they were on your own hard disk.
The connection will remain active as long as you use it, but will likely become disconnected if left idle for more than a few minutes. It will also be disconnected when you shut down Windows, but it won't be automatically connected when Windows starts.
-
When you're done, you can make an Internet Shortcut to this location, using the same method as you would for a web page. However, if Internet Explorer is not your default FTP client (see Section 4.3 in Chapter 4), it won't work is expected. See the next solution for a more robust and permanent way to hookup an FTP site to Explorer.
7.2.7.2 Solution 2: create a more permanent "place" in My Network Places
If you'd like to set up a more permanent FTP connection to use again and again, follow these steps:
-
Open My Network Places by double-clicking the icon on your desktop or by navigating to it in Explorer.
-
If you have the common tasks pane enabled (Tools
Folder Options General tab), click Add a network place in the Network Tasks box. Otherwise, simply double-click the Add Network Place icon.
-
When the Add Network Place Wizard appears, click Next to skip the intro page.
-
On the second page, you'll be given a choice of service providers. Make sure you select Choose another network location here, and click Next.
-
Next, you'll be prompted for the Internet or network address of the FTP server. If you're connecting to an anonymous FTP site, type:
ftp://host.com
where host.com is the address (or IP address) of the FTP server (see Solution 1, earlier). Or, if you want to log into a personal FTP account, type:
ftp://username@host.com
Finally, if you want to log into a personal FTP account, but do not wish to be prompted for a password, you can specify it here, like this:
ftp://username:password@host.com
Click Next when you're done.
-
If you didn't specify a username in the address you typed in the previous step, you'll be prompted for one now. Turn off the Log on anonymously option if you wish to specify a username now; otherwise, leave it enabled and click Next.
-
On the last page, you'll be asked to type a name for this connection, which will also be name of the folder as it appears in Explorer. The name can be anything you want, but it has to conform to Windows' file naming rules (e.g., no slashes, double-quotation marks, etc.).
-
Click Next and then Finish to create the connection.
-
If successful, you'll see the new entry in your My Network Places folder. Just open it to connect to the FTP site.
Note that Windows provides no simple mechanism of changing the location or other properties of an FTP folder, which means that you'll have to delete and recreate an FTP folder in order to modify it. See Solution 3, below, for a workaround.
-
The connection created in this solution is simply a folder or, more precisely, a Folder Shortcut (discussed later), located in your \Documents and Settings\{username}\NetHood folder. If you'd prefer that the FTP folder be located elsewhere, open Explorer, and move the folder to another location on your hard disk.
7.2.7.3 Solution 3: another way to create an FTP folder
The functionality that allows you to link up a folder to an FTP site, as explained in Solution 2, earlier, is essentially that of Folder Shortcuts, as seen in Section 4.4.2. This next solution has essentially the same result, but shows how to create such a folder manually. This can be useful, for example, when the Add Network Place wizard (which can be unreliable) doesn't work. It also lets you modify the location of an FTP folder without having to delete and recreate it. Finally, it can be used in conjunction with a WSH script to automate the creation of FTP folders.
-
Start by following the instructions for making a Folder Shortcut in Section 4.4.2. (You can also use the example WSH script in Section 9.16.6, although it will have to be altered slightly to accommodate FTP shortcuts.)
-
When it comes time to make the shortcut to a folder, though, make an Internet Shortcut to an FTP site instead. Open your favorite web browser any web browser capable of making Internet Shortcuts will do and type the URL address of any valid FTP server, as explained in either of the previous solutions in this topic.
-
Once the page loads successfully, create an Internet Shortcut, and name it target.
Because Internet Shortcuts use the extension .url (which is not shown) and we need the extension to be .lnk (also not shown), we must rename the file. And because Windows will not let you change the filename extension when the extension isn't visible, you'll need to do it from the Command Prompt.
-
Open a Command Prompt window (cmd.exe), and type the following:
cd foldername
where foldername is the full path of the folder containing the target shortcut.
Hint: to save typing, type only cd, followed by a space, and then drag-drop the folder icon (or even the shortcut itself) right onto the Command Prompt window, and the full path will be typed for you. (If you dragged the shortcut, you'll have to remove the shortcut filename, target.url, before you press Enter.)
-
Then, use the ren command to rename the file, like this:
ren target.url target.lnk
-
Leave the prompt window open, if needed, for the rest of the solution in Section 4.4.2.
7.2.7.4 Notes
-
Regardless of the solution you use, the resulting FTP connection will remain active as long as you use it, but will likely become disconnected if left idle for more than a few minutes. It will also be disconnected when you shut down Windows. In either case, Windows will automatically reconnect as soon as you attempt to use the folder. Note that there's no way to manually disconnect an FTP folder (unless you delete it).
-
You can access files contained in an FTP folder (created in either Solution 2 or Solution 3) from any 32-bit Windows application, and even save files there as well.
-
Create a standard Windows shortcut to a subfolder of an FTP folder (created in either Solution 2 or Solution 3), and place it in your Send To folder (typically \Documents and Settings\{username}\SendTo). That way, you can right-click one or more files or folders, and use the Send To menu to quickly copy the selected items to the FTP location.
-
The FTP protocol does not use encryption or any other method of security, which not only means that your data will not be transferred securely, but your username and password will also not be encrypted when you log in. More secure alternatives include Web Folders, described next, Virtual Private Networking, described earlier in this chapter, or a program that supports SCP (Secure Copy Protocol).
-
Windows also supports a protocol called Web Folders, which works very similarly to the FTP folders feature described here. Although Web Folders also support encryption, very few servers support the WebDAV (Web Distributed Authoring and Versioning) protocol, which means you'll most likely want to stick with FTP or SCP (see Table 7-2).
-
There are other programs you can use for transferring files (FTP and otherwise), any of which may be more or less convenient than Explorer, depending on your needs. See Table 7-2 for a list of alternatives.
| Product name | Notes |
|---|---|
| Creative Element Power Tools http://www.creativelement.com | Comes with a context-menu add-on that allows you to right-click any number of files, select FTP To, and quickly transfer them to a custom FTP location. |
| WS_FTP http://www.ipswitch.com | Although it's a rather old-school implementation of FTP, it's side-by-side layout can be extremely convenient for those who use FTP frequently. |
| SSH Secure Shell http://www.ssh.com | A secure terminal (replacement for Telnet), which also comes with an SCP (secure copy) client. |
| WinSCP http://winscp.vse.cz | An implementation of SCP, it uses a convenient side-by-side layout similar to WS_FTP. |
7.2.8 Controlling Another Computer Remotely(Just Like in the Movies)
A network is good for much more than simply transferring data. Although Windows does let you transfer files to and from other computers in Explorer (see Chapter 8), it's a far cry from actually sitting in front of the remote computer.
One of the severe limitations of the Windows platform is that only one simultaneous user is allowed to operate the computer at any given time. Unix, on the other hand, allows many simultaneous remote users (even in addition to a user sitting right at the workstation), each with their own graphical X-Windows terminal connection.
Enter the new Remote Desktop feature in Windows XP. Although it still does not allow more than one simultaneous user per machine, it does allow you to view the desktop of another Windows XP computer on your network or over the Internet, just as though you were sitting in front of it.
There are almost limitless uses to this technology; a few examples include:
-
Do you travel frequently, yet prefer to use a desktop (non-portable) computer at home? Rather than duplicating all your programs, documents, and settings on a laptop, or trying to carry all your files and programs with you to use on someone else's computer, just use Remote Desktop to connect to your home computer from the road, and check your email, fax, etc., as though you were sitting at your own desk.
-
Do you need to access your work documents and programs while you're at home, or access your home documents and programs while you're at work? Use Remote Desktop to bridge the link and stop worrying carrying so much stuff back and forth to work every day.
-
Are you the person family members and friends call with their computer problems? Instead of spending hours on the phone, trying to explain to them how to fix their computers, just connect with Remote Desktop and fix the problem yourself in minutes.
-
Do you administer several computers in different locations? Rather than having to go to the other side of the building (or the other side of the state) to access a computer, use Remote Desktop and get it done in half the time.
Well, now that I've essentially given you a commercial for Remote Desktop, I'll tell you some of the disadvantages. First of all, while both Windows XP Home and Professional editions can be Remote Desktop "servers," only XP Professional can be used as a "client" to access remote computers. And although you can use Remote Desktop with some previous versions of Windows, you'll need a different program (like VNC, discussed below) to remotely access Mac and Unix machines.
You'll also need a relatively fast connection to use remote control software like Remote Desktop, since a lot of data is transferred to update the screen image. For example, a direct Ethernet (LAN) connection will provide nearly instantaneous responsiveness, while a DSL or cable connection will be a little more sluggish. Don't even bother on an analog (Dial-up) connection, though.
Overall, the technology included with Windows XP is pretty good. It's not entirely new, however: the same feature, called Terminal Services, is included in Windows 2000. It's also not your only choice; see the discussion of alternatives at the end of this section for more information.
Here's how to use the Remote Desktop feature built-into Windows XP.
7.2.8.1 Part 1: enable the Remote Desktop server
Allowing others to connect to a computer with Remote Desktop is easy. The following steps can be used to set up your own computer for being accessed remotely or can be read over the phone to the owner of a computer you wish to access remotely.
-
Go to Control Panel
System Remote tab. -
Turn on the Allow users to connect remotely to this computer option.
-
By default, all users currently configured on the machine can connect to it remotely. If you wish to restrict access to only certain users, click Select Remote Users. See Chapter 8 for more information on user accounts.
-
Also available in this window is the Remote Assistance option; see the Remote Assistance sidebar for details.
-
Click OK when you're done.
Using Remote AssistanceThe Remote Assistance feature is optional, but can make it easier for less experienced users to transmit the required information to the person who will be accessing their computer remotely, including the IP address and user account. Turn on the Allow Remote Assistance invitations to be sent from this computer option, and then click the Remote Assistance link in this window to open the Remote Assistance dialog (or launch rcimlby -launchra). Here, you have the option of using Windows Messenger (MSN or .NET passport account required) or your default email program (set in Control Panel Since these "invitations" can be a security hazard, there are two safeguards in place to automatically disable the feature after a specified amount of time. In the Remote tab of the System Properties dialog, click Advanced to disable the feature completely after a few days. Plus, when sending an invitation, you can configure it only to expire an hour or two after being sent. |
7.2.8.2 Part 2: connect to a remote computer
Once you've set up a machine to accept remote connections, follow these steps to connect to that computer remotely:
-
Start Remote Destkop Connection (mstsc.exe).
-
The default Remote Desktop Connection dialog is very simple, with only a single field. This typically will not be adequate, however, so click Options to display the full dialog, shown in Figure 7-12.
Figure 7-12. Use Remote Desktop Connection to initiate a connection to another computer and view and interact with its desktop as though you were sitting in front of it.
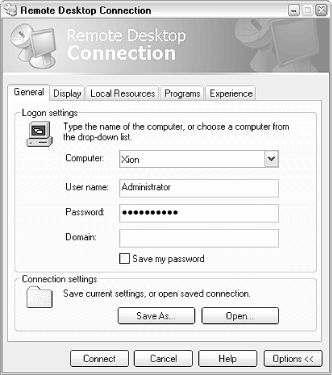
-
If you're connecting to another computer in your workgroup, type the name of the computer in the Computer field, or, if you're connecting to another computer on the Internet, type it's IP address here.
-
Next, type the User name and Password of a valid user account on the remote computer. The Domain field is only used if you're connecting to a computer in a Windows NT/2000 domain; leave it blank otherwise.
-
If you're connecting to someone else's computer, you'll have to get their IP address, plus the username and password of an account on their computer (see Chapter 8).
The easiest way to get someone else's IP address is to ask them to visit http://www.annoyances.org/ip, and then have them read or email the numbers on the page. This is usually easier than the other methods, such as using the Network Connections window or typing ipconfig at the Command Prompt.
Finally, you can have the remote user send you an invitation using Remote Assistance, described in the Using Remote Assistance sidebar. When you receive your invitation via email, it will come with a file attachment, rcBuddy.MsRcIncident, which can be double-clicked to initiate a connection to the sender's computer.
-
The rest of the options in this dialog are optional. The settings in the Display and Experience tabs deal with performance issues, and the Programs tab lets you start programs on the remote computer automatically. The Local Resources tab has similar options, plus a Local devices section, which lets you share remote drives, printers, and even serial ports.
-
If you plan on reconnecting to the remote computer at a later time, click Save As to create an .rdp file with all the information in this dialog. You can subsequently double-click the file to initiate a connection, or right-click and select Edit to modify its properties.
Keep in mind that many user's Internet connections use dynamic-IP addresses, explained earlier in this chapter, which would mean that saving someone's IP address would be pointless.
-
Click Connect to initiate a connection to the remote computer. If all is well, a window will appear with an image of the desktop of the remote computer. You can interact with this desktop by pointing, clicking, and dragging, just like you were sitting in front of it.
-
Simply close the window or go to Start
Disconnect (in the Remote Desktop window, not in your own Start Menu) to close the connection.
7.2.8.3 Notes
-
Since Windows can only have one user logged in at a time, as mentioned at the beginning of this section, the user currently logged into the remote computer will be automatically logged out to make way for the remote connection. This poses a significant problem if you wish to use the remote computer with its owner watching. VNC, described below, overcomes this limitation.
-
You'll see in the final step above that a new item will appear in the remote computer's Start Menu, Disconnect. This take the place of the Shut Down (or Turn off Computer) command normally found here. A consequence of this is that there's no obvious way to shut down a remote computer; this is obviously done intentionally, since a shut-down computer will not accept remote connections. To shut down a remote computer, open a Command Prompt window (cmd.exe), and type:
shutdown -s -t 5
where 5 is the number of seconds to wait before shutting down; specify 0 here to shut down immediately.
-
It's helpful to have the resolution of the remote desktop lower than the resolution of the local desktop. That way, you'll be able to see the entire remote desktop and still be able to use the local computer's desktop. For example, if you're using a computer with a display resolution of 1280 X 1024, set the remote desktop to no more than 1024 X 768. Use the Display tab of the Remote Desktop Connection dialog to set the desktop size; note that this setting will have no affect on the remote computer's normal desktop size.
7.2.8.4 Alternates to Remote Desktop Connection
Remote Desktop Connection is not you're only choice when it comes to controlling a computer remotely. Since it's built into Windows XP, though, it's obviously a very convenient and cost-effective solution; if you want more flexibility or if you want to control (or be controlled by) a system running a different operating system, you may wish to use a different program.
Although there are several commercial alternatives available, my favorite is a free program called VNC. Made by AT&T Laboratories, Cambridge, it can be downloaded from http://www.uk.research.att.com/vnc/. Among other things, VNC has the advantage of a very small "viewer" executable. That is, the client software, used on the remote system to access the host, is only a single file, small enough to fit on a floppy this makes it easy to carry it around with you, running it on any machine you find with an Internet connection.
VNC also works on any version of Windows, Macintosh, UNIX, Linux, or FreeBSD, in addition to good ol' Windows XP. Someone has even made a Palm-based client (http://www.btinternet.com/~harakan/PalmVNC/), allowing you to control a remote computer from an Internet-enabled handheld device!
Otherwise, the system requirements are the same as Remote Desktop, described earlier in this section. You'll still need the remote computer's IP address, and some way of logging into the remote computer. VNC has it's own user-authentication system, while others such as pcAnywhere (http://www.symantec.com) use Windows' user accounts.
Windows XP's Remote Desktop feature, when enabled, will remain enabled even if the computer is restarted. But third-party programs must be specially-configured to start automatically with Windows, in case the computer crashes or the power goes out. If the software you're using has an option to be started as a "service" (accessible in services.msc), that will be much better option than adding it to your Start Menu's Startup folder. (VNC has such an option.)
|
7.2.9 Managing the Nameserver Cache
As mentioned a few times elsewhere in this chapter, a nameserver is a machine that translates IP addresses to domain names and back again. For example, when you type http://www.oreilly.com into your web browser's address bar, Windows sends a request to your service provider's nameserver, and the nameserver responds with something like 209.204.146.22, and your browser can contact the web server and download the requested page.
Each time such a DNS (Domain Naming System) lookup is performed, the information is stored in the DNS cache so Windows doesn't have to query the nameserver every time you access a page on that site. The DNS cache is emptied when you shut down Windows.
The following solutions allow you to change the way Windows interacts with its DNS cache, and will affect all applications that access the Internet (not just your web browser).
7.2.9.1 Part 1: increase the size of the DNS cache
A larger DNS cache will mean fewer trips to the nameserver, and faster overal performance:
-
Open the Registry Editor (see Chapter 3).
-
Expand the branches to HKEY_LOCAL_MACHINE\SYSTEM\CurrentControlSet\Services\Dnscache\Parameters.
-
Add the following four DWORD values by going to Edit
New DWORD Value. Then, enter the numeric values specified by double-clicking and selecting the Decimal option: -
CacheHashTableBucketSize, set to 1
-
CacheHashTableSize, set tot 384
-
MaxCacheEntryTtlLimit, set to 64000
-
MaxSOACacheEntryTtlLimit, set to 301
Remember, these are Decimal values (not Hexadecimal values).
-
-
Close the Registry Editor when you're done. You'll have to restart Windows for this change to take effect.
7.2.9.2 Part 2: add a permanent entry to the DNS cache
When you add a permanent entry to the DNS cache, it will always override the information provided by the nameserver. Here are a few reasons why you might want to do this:
-
If a nameserver gives the wrong address for a domain or provides no information at all, you can still access the domain if it's listed as a permanent entry.
-
A permanent entry with intentionally incorrect information will block requests sent to the corresponding servers. This can be an effective way to prevent some web sites from tracking you, some "spyware" software from recording your personal information, and even stop some pop-up ads when you visit web pages. A list of known "tracking" hosts can be downloaded from http://www.accs-net.com/hosts/.
-
If you frequently access a particular server, and you know its IP address isn't likely to change anytime soon, you can add a permanent entry to eliminate the initial delay as Windows looks it up. For example, add an entry for your mail server to decrease the time it takes to check for mail.
-
If you frequently access a remote server without a domain name (rather only by its IP address), you configure a custom domain name, for your use only, to be used as a kind of "shortcut" to the server.
|
Here's how to create and modify the list of permanent DNS entries:
-
Open Explorer, and navigate to the \windows\system32\drivers\etc folder.
-
Look for a file called hosts (no filename extension). If it's not there, create it by going to File
New Text Document, and typing hosts for the filename. -
The hosts file is just a plain-text file; open it in your favorite text editor (or Notepad).
-
A standard entry looks like this:
207.46.230.218 www.microsoft.com
The first part is the IP address, and the second part (separated by a tab or several spaces) is the domain name.
Keep in mind that variations, such as www.microsoft.com and microsoft.com, aren't necessarily the same server, and represent different DNS entries. You'll need to add a separate hosts entry for each variation if you want to access them all, like this:
207.46.230.218 www.microsoft.com 207.46.230.218 microsoft.com
Using this syntax, add an entry for each domain you wish to hard-code into Windows' DNS table. Note that these addresses affect your machine only; other machines, such as those in your workgroup or others on the Internet, will not be affected.
-
You may also see some lines that begin with the # character. These are comments, and are ignored by Windows.
-
Save the hosts file when you're done. The change should take effect immediately.
EAN: 2147483647
Pages: 78