Section 4.3. File Types: The Link Between Documents and Applications
|
4.3. File Types: The Link Between Documents and ApplicationsThe term file types describes the collection of associations between documents and the applications that use them. The most apparent use of this feature is that, for example, Windows knows to run Notepad when you double-click on a text document in Explorer (proof that Windows XP is not truly object oriented). True object-oriented design dictates that objects (in this case, files and folders) be aware of their own traits. This design is only mimicked in Windows XP. Instead of each file knowing which application is used to edit it, Windows determines how to handle a file based solely on the filename extension. This design has advantages and disadvantages, but Microsoft's decision to hide filename extensions, the basis for file associations, only makes the whole system more difficult to understand and master. It all starts with file extensions, the letters (usually three) that follow the period in most filenames. For example, the extension of the file Readme.txt is .txt, signifying a plain-text file; the extension of Resume.wpd is .wpd, signifying a document created in WordPerfect. By default, Windows hides the extensions of registered file types in Explorer and on the desktop, but it's best to have them displayed. File extensions not only allow you to easily determine what kind of file a certain file is (because icons are almost never descriptive enough), but also allow you to change Windows's perception of the type of a file by simply renaming the extension. Note that changing a file's extension doesn't actually change the contents or the format of the file, only how Windows interacts with it. To display your file extensions, open Folder Options in Control Panel (or from Explorer's Tools menu), choose the View tab, and turn off the Hide extensions for known file types option. Click OK when you're done. By hiding file extensions, Microsoft hoped to make Windows easier to usea plan that backfired for several reasons. Because only the extensions of registered files are hidden, the extensions of files that aren't yet in the File Types database are still shown. What's even more confusing is that, when an application finally claims a certain file type, it can appear to the inexperienced user as though all of the old files of that type have been renamed. It also creates a "knowledge gap" between those who understand file types and those who don't; try telling someone whose computer still has hidden extensions to find Readme.txt in a directory full of files. Other problems have arisen, such as trying to differentiate Excel.exe and Excel.xls in Explorer when the extensions are hidden; one file is an application and the other is a document, but they may be otherwise indistinguishable. 4.3.1. Customize Context MenusA context menu (sometimes called a shortcut menu) is the little menu that appears when you use the right mouse button to click on a file, folder, application titlebar, or nearly any other object on the screen. Most of the time, this menu includes a list of actions appropriate to the object you've clicked. In other words, the options available depend on the context. The context menu for files, the most commonly used and customized context menu, depends upon the type of file selected, which is determined by the filename extension. For example, all text files (with the .txt extension) will have the same context menu, regardless of what they contain or which application was used to create them. (This is why Windows gives you a stern warning when you try to change a file's extension.) In addition to the standard context menu items, such as Copy, Paste, Delete, Rename, and Properties, you'll usually see Open, Print, and Print To (at the top of the list), which represent customizable actions that can be performed with the selected file. Each of these actions is linked to an application: if you right-click on a .txt file and select Open, Windows will launch Notepad (by default) and instruct it to open the selected file. Customizing this association between the document type and the applications installed on your computer is what this section is about. The default actionthe action that is carried out when a file of a given type is double-clickedappears in bold text in the context menu. If a file type is not registered with Windows, double-clicking on a file of that type will open the Open With dialog box, allowing you to choose an associated application on the spot. The exception to this occurs when a file type has been registered, yet has no actions associated with it (useful if you want to identify a file type, but not necessarily open it ).[3] In this case, nothing will happen when the file is double-clicked.
The default action is also what can cause the most controversy. Say you have grown accustomed to double-clicking .html files on your hard disk and having them opened in Netscape Navigator (in other words, Netscape is the default application for that file type). One day, out of necessity or obligation or whatever, you install one of Microsoft's updates to Windows, which happens to contain a new version of Internet Explorer. Unless you're careful to choose the correct advanced options, suddenly, and without warning, all of your .html associations are changed, making Internet Explorer the default application. Although the most obvious reason to customize a file's context menu is to control the default action, what makes context menus so useful is that you can assign as many different actions as you like to any given file type. In the case of .html files, for example, you could add an Edit action to open your favorite web page editor, a View with Netscape action, and a View with Internet Explorer actionall in addition to the default action. It's possible to add, remove, or modify context menu items for nearly any file type. The File Types window, shown in Figure 4-7, is the only dedicated tool provided by Microsoft to manage file associations in Windows; it has been somewhat improved in Windows XP from previous versions. Some thought has been given to both experienced and novice users, although it still lacks the streamlining and advanced functionality such an important feature deserves. Figure 4-7. The File Types tool has been significantly improved in Windows XP from previous versions, although it has some very annoying quirks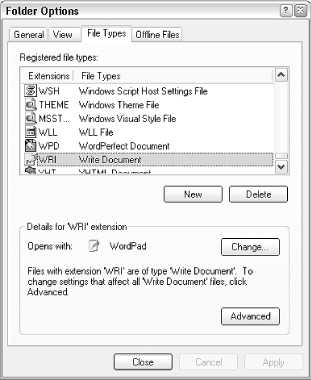 For the most flexibility in customizing context menus, you'll want to see how file associations are actually stored in the Registry, as described later in this chapter. 4.3.1.1 Use file types to add, remove, or edit context menus
4.3.1.2 Link a filename extension to an existing file typeSometimes two filename extensions share the same file typethat way, you don't have to go to the trouble of creating and modifying a separate set of actions for each extension. In cases where two file formats are similar enough to warrant file-type sharing, such as .jpg and .jpeg files, or even .jpg and .gif files, follow the upcoming steps. To see a list of all the extensions owned by a given file type, sort the Registered file types list by file-type description by clicking on the respective column header. Note that it's possible for two different file types with a different set of actions to have the same description, which would unfortunately make then indistinguishable in this view.
4.3.1.3 Choose a file-type association on the flyIf you have double-clicked on a file with an extension that has not yet been registered, you may have seen the dialog box shown in Figure 4-9, which is Windows's way of asking what to do with the selected file. Here, you have two choices:
Figure 4-9. Double-click a file of an unknown type (unfamiliar filename extension), and Windows will display this dialog asking what to do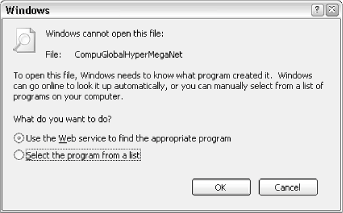 This is the same box that appears if you open the File Types window, select a file type from the list, and click Change. To get this window for an already registered file type without having to open the File Types window first, follow these steps:
This is a quick way to not only create new file types on the fly, but change an existing file type without having to return to the File Types window. It's important to realize, however, that when you change an existing file type's default action using this method, Windows XP considers the change to be tentative, and displays different controls the next time you view the file type. See the following topic, "What to do when the Advanced button is missing," for details. 4.3.1.4 What to do when the Advanced button is missingOccasionally, the Advanced button in the File Types window will be replaced with a Restore button for a given file type. This is the result of a new built-in mechanism for restoring file types that have been overwritten with the "Choose a file-type association on the fly" procedure, explained earlier in this section. Unfortunately, this mechanism doesn't work very well and ends up causing more frustration than if it were not present at all. The problem is that if the Restore button is present, there's no way to edit a file type without first completely reverting it to its earlier configuration. The cause of this problem is the way file-type information is stored in the Registry when the default action is modified by using Open Withinstead of overwriting the existing file-type data (explained in detail in Section 4.3.2, later in this chapter), the new association is written to this Registry location instead: HKEY_CURRENT_USER\Software\Microsoft\Windows\CurrentVersion\ Explorer\FileExts\{your file extension}So, for example, if you're editing the .asp file type, and the Registry key, HKEY_CURRENT_USER\Software\Microsoft\Windows\CurrentVersion\Explorer\FileExts\.asp, exists, the File Types window will display the Restore button. If you delete the key, the Restore button will go away, but the new file- type data will be lost as well. Since it would be too much trouble to move the relevant Registry data to its more permanent location, there's unfortunately no practical way to get the Advanced button back without first reverting the file type. Let's hope Microsoft fixes this in the next version. 4.3.2. Understanding File TypesAll active file-type associations are stored in the Registry. Understanding the structure of file-type data can be very helpful in not only fixing problems, but performing advanced techniques (illustrated later in this chapter). Examples include backing up your file types and modifying otherwise inaccessible file types, such as drives and folders. The HKEY_CLASSES_ROOT branch of the Registry stores information on all your file types. File-extension keys (preceded by periods) are listed first on the tree, followed by the actual file-type keys. The first Registry keys, named for file extensions, typically only contain pointers to other keys, which then describe the file types. For example, if you navigate to the key HKEY_CLASSES_ROOT\.txt (note that the period is included here), you'll notice that there's not a lot of information there. The important (and often sole) piece of information is the (default) value, which is set to the name of another key, located lower down the tree.[6] In the case of .txt, the (default) value contains only the text txtfile (see Figure 4-10). This, in effect, is a reference to HKEY_CLASSES_ROOT\txtfile, which is the key that contains the actual information for the file type, as shown in Figure 4-11.
Figure 4-10. The Registry key named for the filename extension contains a pointer to another Registry key (see Figure 4-11)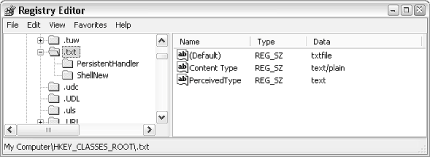 All of the details of this file type are stored in the txtfile branch, such as the formal name shown in the Type column in Explorer (in this case, "Text File"), the icon used for all files of this type, and the applications used to open the file. Many different extension keys can point to this branch, so a single file type like txtfile can have many filename extensions associated with it. This architecture can make it a little tricky to understand the way file types are stored in the Registry, but it does afford a fairly flexible system of file associations. Figure 4-11. The second Registry key contains the file-type information; several file-extension keys can point to this key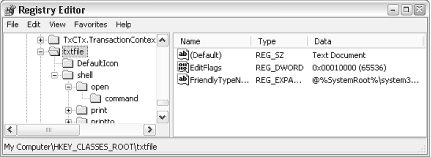 The structures shown in Figure 4-10 and Figure 4-11 illustrate the two Registry branches that make up a typical file type. File types can be created by application installers, through changes made in the File Types window (explained earlier in this section), or even manually by editing the Registry directly. A bunch of file types are also set up automatically when Windows is first installed. First, a key is created that is named for each extension associated with the file type (usually only one, for starters).[7] The (default) value of this key contains the name of the file-type Registry key; it does not contain the full Registry path, however, nor does it contain the formal name of the file type (shown in Explorer). For example, put txtfile here and not Text File. The Content Type value shown in Figure 4-10 may appear for some file types, but it is not necessary for normal operation.
A key called ShellNew may also appear underneath the file-extension key. The existence of this key tells Windows to include the extension in Explorer's New menu (discussed earlier in this chapter), allowing the user to create a new, empty file of that type without having to open an application. The reason that the ShellNew key is located underneath the extension key and not the file-type key (discussed later in this section) is that a file type may have more than one extension, and Windows needs to know which extension to use when creating a new file. The ShellNew key is usually empty, although there may be a value called FileName that points to a template file, a file on your hard disk that Windows will use to create a new, blank document (stored, by default, in \Documents and Settings\{username}\Templates). In most cases, the FileName value is omitted, and Windows will create a zero-byte (empty) file with the appropriate extension. Most of a file type's definition is located in the main file-type key, the name of which is specified in each of the extension keys listed earlier. In Figure 4-11, the txtfile key contains the rest of the settings for the Text File file type. First of all, the (default) value in this key specifies the formal, aesthetic name of the file typethe text that appears in the File Types dialog box in Explorer and in the Type column in Explorer's Details view (e.g., "Text File"). If the value named AlwaysShowExt is present in this key, the extension for this file type will be displayed in Explorer, even if the user has elected to hide extensions for file types that are registered (a setting described at the beginning of this section). A related value, NeverShowExt, appears in a few file-type keys, such as those for Windows Shortcuts (.lnk files), Internet Shortcuts (.url files), and Explorer Commands (.scf files), and means that the extensions for these types are never shown, even if the user has elected to show all extensions. Simply delete the NeverShowExt value to instruct Explorer to show the filename extension for the corresponding file type. You may also see a binary or DWORD value entitled EditFlags, which tells Windows what is allowed and what is not allowed in the File Types window. See Table 4-1 for some of the possible values and their meanings. Feel free to change or simply remove this value to allow changes to a particular File Type. Unfortunately, these restrictions only apply to the File Types window and don't prevent other applications from changing your file types.
In the file-type key are three or four independent subkeys. DefaultIcon contains only the (default) value, set to the filename of the file containing the icon used for the file type. Icons are specified by filename and icon index, separated by a comma; for example, c:\windows\system32\shell32.dll,152 specifies the 153rd icon in the shell32.dll file. The file that is specified can be any .ico or .bmp file, as well as an .exe or .dll file containing one or more icons. To use the first icon in the file, omit the number or specify 0 (zero); use 1 (one) for the second icon, and so on. The easiest way to choose an icon is with the File Types dialog box in Explorer, which will allow you to browse and choose icons without typing or guesswork.
Most of the meat of the file type is stored in the shell key. Its subkeys define the actions, or what happens when a file of this type is double-clicked and which commands appear in the file type's context menu (explained earlier in this section). Underneath shell is a separate key for each command shown in the context menu; that is, when you right-click on a file of this type, these are the commands that will appear at the top of the list. Most file types have an Open command (with a key of the same name). You may also see Edit, Print, PrintTo, Play, and View here. You can add, remove, or change any of these commands you wish. In each one of these keys is a key called command. Each command key's (default) value is set to the application filename used to carry out the respective command. Figure 4-10 and Figure 4-11 illustrate this particular structure. For example, if Notepad is associated with the Open command for text files, the contents of HKEY_CLASSES_ROOT\txtfile\shell\open\command will be: Notepad.exe "%1" Now, the "%1" (including the quotation marks) is very important%1 is where Windows substitutes the full path and filename of the clicked file, and the quotation marks are necessary in case there are any spaces in the filename of the clicked file. So, if you were to right-click on any file with the .txt extension (say, c:\documents\my file.txt) and select Open from the context menu that appears (see Figure 4-12), Windows would carry out the command: Notepad "c:\documents\my file.txt" which will launch Notepad and instruct it to open the document. Figure 4-12. A context menu for the bitmap file type shows the default Preview option, as well as the extra Edit and Power Rename... options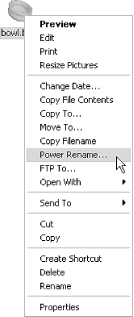 While there can be several available commands for any given file type, only one of the commands will ever appear in bold. This command is called the default and is the one that Windows uses when you double-click on a file instead of right-clicking. Usually, Open is the default, but any existing command can be set as the default.[9] To make a different command the default, specify the name of the command in the (default) value of the shell key. For example, if a file type contains Open, Edit, and Print, and you type edit in shell's (default) value, the Edit command will appear bold in the file type's context menu, and Edit will be the command carried out when you double-click the file. If the (default) value is empty, the Open command (if present) is assumed to be the default.
The shellex key contains references to shell extensions, programs designed to work especially with context menus. These are never shown in the File Types window but are nonetheless very important, and it can be very handy to be able to modify or remove them. For example, the Power Rename command shown in Figure 4-12 is a shell extension. Unless you're able to write and compile DLLs, however, you won't be able to create new shellex entries. However, you can remove some unwanted context menu commands and extra tabs in property sheets of certain file types by removing the corresponding shell extension keys here. I don't have to tell you that it's a good idea to back up any file-type key with a Registry patch before you make any changes. You might also see a key named CLSID in various parts of file-type keys; these are merely pointers to registered application components. To find out what a particular entry means, copy the CLSID code to the clipboard (hit F2 to rename, Ctrl-C to copy, and then ESC to abort the renaming process), and then search the Registry for other references to it. Lastly, you may see a ddeexec key, which contains DDE commands and associated data. DDE, discussed earlier in this section, is used to communicate with running applications. The next few solutions in this chapter illustrate some of the ways you can use the file-type Registry entries to accomplish things otherwise not possible. 4.3.3. Protect Your File TypesOne of the most aggravating aspects of using Windows is when the settings you've spent time customizing are overwritten or simply forgotten. Sometimes this is the result of a bug, but often, and especially in the case of file types, there's more to it. Some software developers jury-rig an application so that it overwrites your file associations, either when it's first installed or, even worse, every time the program runs. That way, their program becomes the default whether you like it or not. For some proprietary file types, such as Excel Files (.xls), this isn't much of a problem, because there really aren't any other programs that use these files. The impact is greater on more general file types, such as the large quantity of graphics formats (.gif, .jpg, .tif, .bmp, and .png ), where there are literally hundreds of applications that use these files. It's not unusual for several of these applications to be installed simultaneously on a single system, all competing for the dubious distinction of being the default. Probably the most high-profile example of this competition is that between competing web browsers; not only are file associations in play, but URL associations as well. Every time you open an Internet Shortcut or click a web link in any application, the URL association is what's used to decide which web browser application to use. Ideally, only you should be in the position to decide which program you use for each task. Unfortunately, it's essentially impossible to write-protect (prevent the overwriting of ) any Registry settingsincluding file typesin Windows XP. Although it's possible to set user permissions for various Registry keys (see Chapter 8), this only restricts access for programs run by other users. Probably the most effective protection against overwriting file types is to back up the portions of the Registry that are at risk, allowing you to easily restore them should the need arise. This is accomplished with Registry patches; see Section 3.3.5 before continuing. The procedure outlined here would be a good one to follow, for example, before installing an application you believe might overwrite an existing file type. Repeat these steps for each file type you wish to protect:
Although there's unfortunately only so much you can do to prevent your file types from being overwritten, other workarounds do exist. Try adding a context-menu item for each program installed on your system, such as "Open with Notepad" and "Open with WordPerfect" for text files. That way, whatever the default is, you'll always have your preferred applications handy. One sticking point you may encounter when trying to reconfigure file types is that some actions use Dynamic Data Exchange (DDE). DDE is a method of communication between applications, sometimes used by Windows to communicate with the applications it launches, and is discussed earlier in this section. If a particular file type for an application stops working for some reason, it could be that the DDE information has changed or been erased altogether. If this is the case, you'll usually have to reinstall the application to restore the DDE-enabled file types, because there's little standardization with DDE. Often, however, simply deactivating the Use DDE option in the Editing action for type window is enough to fix the problem. 4.3.4. Customize Context Menus for Drives, Folders,and Desktop IconsFolders, drives, and desktop icons also have customizable context menus, but the File Types window (described earlier) has limitations on what can actually be changed. However, you can modify these context menus in the Registry. Refer to Section 4.3.2, earlier in this chapter, for more information on the Registry structure involved in this solution:
4.3.5. Print Out a Folder ListingWhat would seem to be a simple function, the ability to print out a list of files in any given folder, does not exist in Windows XP. However, there is a way, using folder context menus, to add this functionality to Windows:
Creative Element Power Tools (available at http://www.creativelement.com/powertools) comes with several similar context-menu add-ons, allowing you to print or copy a folder's contents to the clipboard, among other things. See Windows XP in a Nutshell (O'Reilly) for extensive coverage of batch files and DOS commands such as dir. 4.3.6. Turn File Icons into Thumbnail PreviewsWindows tries to be as graphical as possible, which is sometimes its downfall. Case in point: when was the last time you found the icon for an application or associated document to be the least bit helpful in determining what was inside? In Explorer, when you view a folder containing cursors (.cur files), animated cursors (.ani files), or icons (.ico files), their file icons are previews of their contents instead of simply generic icons for the application with which they're associated. Now, Windows has the capability to generate these types of thumbnail previews for other kinds of files as well, and a special feature in Windows XP takes it even further. 4.3.6.1 Solution 1: Icon previews for bitmap (.bmp) filesThe advantage of this solution is that once the change has been made, it will be enabled automatically for all folders on your system. The disadvantages are that this solution works only for .bmp files, and the thumbnail previews will never be larger than the rest of your system icons (usually 32 32 pixels):
To increase the size of icons, double-click the Display icon in Control Panel, choose the Appearance tab, and click Advanced. Select Icon from the Item menu, and type in a larger value for the size, such as 48 or 64. Note that this will make all icons on your system (those on the desktop, and in the Large Icons display in Explorer) larger. 4.3.6.2 Solution 2: Use built-in icon previews for all graphic filesThe advantages of this solution are that it works for more file types, including .bmp, .jpg, and .gif files, and that the previews can be larger than normal icons. The disadvantages include that the option needs to be enabled for each folder you view (you wouldn't want to set it as the default). Also, it's a pretty clumsy interface, and image files that it doesn't understand are shown simply with their standard file icons rather than being hidden. If you are viewing a folder containing more than just image files, the display is less than ideal. Open Explorer and locate any folder that contains at least one graphic image file (.jpg, .gif, or .bmp). Select Thumbnails from the View menu (this option may not be available if you have Internet Explorer integration disabledsee Chapter 8). Select one of the other view modes (such as Details or Large Icons) to restore the display to normal. If you've configured Explorer to display hidden files, you'll notice a new hidden file, thumbs.db (which contains the thumbnail data), in any folder you view. As long as this file is present, the folder's view will always be set to Thumbnails. If you delete this file, and then reopen the folder, it should revert back to the standard Details or Large Icons view.
If you need a better thumbnail preview, try a third-party application, such as ACDSee (http://www.acdsee.com/). It not only has a far superior thumbnail viewer, but is a much better and faster image viewer than XP's Windows Picture and Fax Viewer (discussed later in this chapter). 4.3.7. Disable the Automatic Display of Thumbnails in Certain FoldersOne of the new marketing gimmicks Microsoft is using to promote Windows XP is that it is supposedly "task oriented," which means that the design elements are first and foremost designed to help accomplish tasks. Unfortunately, this is more lip service than anything else; most of the time, Windows XP tends to be more component-oriented than task oriented. What Microsoft is actually referring to is the added assumptions Windows makes, many of which are just plain wrong and end up simply annoying us. For example, if you view certain folders (such as My Pictures) in Explorer or the File Open/Save dialog, its contents will be shown using the Thumbnails view instead of the standard List or Details views. Although you can manually switch the view each time you open the folder, there are several ways to turn it off. 4.3.7.1 Solution 1: Modify the assumptions made about a given folder
This feature should be available for every folder on your system except your system folders. Unfortunately, you can't customize system folders (such as My Pictures), so you'll have to settle for one of the remaining solutions. 4.3.7.2 Solution 2: Change the way thumbnails look (requires TweakUI)
Unfortunately, this won't disable the thumbnails, but it will make them the same size as standard icons. The result is a less cumbersome and easier-to-use interface, but it's not perfect. See the following solution if this isn't suitable. 4.3.7.3 Solution 3: Relocate your system folders
While this returns the display of your folders to the standard icon view, it does cause any applications that default to your My Pictures folder (when using File Open/Save dialogs, for instance) to look in a different location, which means that you'll have to manually navigate to the desired folder each time. See Section 4.4.3, later in this chapter, for a further workaround. 4.3.8. Turn off the Windows Picture and Fax ViewerThe Windows Picture and Fax Viewer is set as the default image viewer for all sorts of file types in Windows XP. Unfortunately, choosing another program as the default in the File Types window (described earlier in this chapter) won't change this, and there's no option in the interface that can disable this component. It's a really stupid design, and it takes a Registry change to fix it:
|
|
EAN: 2147483647
Pages: 97
