Section 3.3. Registry Procedures
|
3.3. Registry ProceduresThe solutions in the rest of this chapter will show you how to use the Windows Registry: how to find keys, how to automate changes, how to back up, and more. Use these techniques throughout the rest of the book, whether you're just playing around or trying to solve a problem. Note that there are a few programs designed to make working with the Registry and its settings easier. For instance:
3.3.1. Backing Up the RegistryTaking a few minutes to make sure you have a good backup of your Registry now will save you hours of headaches later. But backing up the files that contain your Registry data (called hives) can be tricky. HKEY_USERS and HKEY_LOCAL_MACHINE are, essentially, the only true root keys, because the Registry's three other root keys are simply symbolic links, or "mirrors," of different portions of the first two (see Section 3.2, earlier in this chapter). This means that only these two branches actually need to be physically stored on your hard disk. Since the files in which the Registry is stored are never edited directly, you're likely to never need to know what they're called or where they're located. In fact, they can't even be copied while Windows is running, so you won't be able to back them up directly. However, sooner or later, you'll run into them, so the following is a list of all of the hive files in which the Registry is physically stored on your hard disk.
Now, since these hive files are in use whenever Windows is running, they can't be read or modified by any other processes. This means that there is no direct way to back up or restore your entire Registry simply by copying these files (as is possible in some earlier versions of Windows). There are, however, several ways to achieve an effective Registry backup:
The important thing to realize with all of these backup solutions is that they require advanced planning. Don't wait until your system won't start before you start thinking about backing up. See Chapter 6 for simple backup tips. 3.3.2. Finding the Right Registry KeyThe two main obstacles you'll encounter when trying to make a change to the Registry are (1) finding where a setting is located in the Registry, and (2) determining what modifications are necessary to affect the desired changes. Sometimes it's obvious, such as a theoretical value called ShowSplashScreen, with its contents set to 1 (one); changing the 1 to a 0 (zero) would most likely result in turning the option off.[8] Other times you'll see a long, seemingly meaningless series of numbers and letters. Although there are no strict rules as to how values and keys are named or how the data therein is arranged, a little common sense and intuition will get you through most situations.
Here's a solution that will help you find the corresponding Registry key for a particular setting in Windows. For this example, we'll find the Registry setting associated with showing or hiding hidden files in Windows Explorer, and then we'll create the appropriate Registry patch.
The idea is to take snapshots (make Registry patches) of your entire Registry before and after a change is made in Explorer (or any other program). By comparing the two snapshots, we can easily see which Registry keys and values were affected:
For some settings (such as the one in this example), you may want to make two patches: one to turn it on, and one to turn it off. Simply double-click the patch corresponding to the setting you desire. You may notice that some changes involve the actual removal of a key or value, instead of simply the modification of an existing entry. See Section 3.3.5.2, later in this chapter for details on automating the deletion of Registry data. This solution will help you find the appropriate keys and values associated with a particular Windows or application setting, and it can also help locate hidden settings (those that don't appear in dialog boxes). The setting in the previous example is located in a key that contains other settings, some of which aren't included in the Folder Options dialog box. Experiment with some of the more interesting sounding values, such as CascadePrinters and ShowSuperHidden. There are some caveats to this approach, mostly that the File Compare utility will often pull out more differences than are relevant to the change you wish to make. It's important to look closely at each key in the resulting Registry patch to see if it's really applicable and necessary. See Chapter 9 for a discussion on the Windows Script Host, which documents automating changes to the Registry that don't involve Registry patches.
3.3.3. Search the Registry EffectivelyThe Registry Editor has a simple search feature, allowing you to search through all the keys and values for text. Just select Find from the Registry Editor's Edit menu, type the desired text (Figure 3-6), and click Find Next. Figure 3-6. Use Registry Editor's Search feature to find text in key names, value names, and value data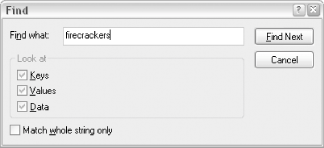 Because the Registry can become quite large and have a wide variety of settings and information, it is important to learn to search effectively, so you don't miss anything or waste a lot of time wading through irrelevant results. Additionally, the Registry Editor doesn't have a search-and-replace feature, so doing something as simple as changing every occurrence of c:\program files to d:\program files can be a monumental chore. Here are some tips that may help:
3.3.4. Search and Replace Registry DataThe Registry Editor has no search-and-replace feature, and with good reason: a single poorly chosen replace operation could make Windows inoperable. But there are times when you do need to replace all occurrences of, say, a folder name like c:\stuff\Cory with another folder name like d:\stuff\Henna. Depending on the number of occurrences, such an operation could take hours. Registry Agent (part of Creative Element Power Tools, available at http://www.creativelement.com/powertools/ not only gives you an better way to search the Registry (search results are shown in a list, instead of one at a time), but supports search-and-replace operations as well. Here's how to replace all occurrences of Microsoft with DaveSoft:
Even if you don't use the search-and-replace feature, Registry Agent serves as a pretty slick searching tool, and overcomes the annoying hunt-and-peck approach of the Registry Editor's search feature. 3.3.5. Using Registry PatchesIn addition to editing the Registry with the Registry Editor (see earlier in this chapter), you can make changes by using Registry patches. A Registry patch is simply a text file with the .reg extension that contains one or more Registry keys or values. If you double-click on a .reg file, the patch is "applied" to the Registry, meaning that the contents of the patch are merged with the contents of the Registry. This tool is especially handy for backing up small portions of the Registry or distributing Registry settings to other computers. For example, if a particular application stores its custom toolbar in the Registry, you can use a Registry patch to copy the toolbar to another computer, saving time that would otherwise be spent painstakingly configuring the 431 toolbar items on the new machine. A Registry patch is also a handy way to back up Registry data, such as file types, which are constantly at risk of being changed by other applications (see Section 4.3.3). More importantly, however, Registry patches can be used to back up portions of the Registry to safeguard them against modifications you're about to make, such as the modifications suggested throughout the rest of this book. 3.3.5.1 Create a Registry patch
Creating a Registry patch is the easy part; the hard part can be determining the Registry key to be exported in the first place. See Section 3.3.2 earlier in this chapter for details. Once you've created the patch, you can modify it or apply it to your (or someone else's) system, as described in the following sections. 3.3.5.2 Edit a Registry patchSince Registry patches are just plain text files, you can edit them with any plain-text editor, such as Notepad (notepad.exe). The contents of the Registry patch will look something like the text shown in Example 3-1. Example 3-1. Contents of a Registry patch created from HKEY_CLASSES_ROOT \.txtWindows Registry Editor Version 5.00 [HKEY_CLASSES_ROOT\.txt] @="txtfile" "PerceivedType"="text" "Content Type"="text/plain" [HKEY_CLASSES_ROOT\.txt\ShellNew] "NullFile"="" The first line, Windows Registry Editor Version 5.00, tells Windows that this file is a valid Registry patch; don't remove this line. The rest of the Registry patch is a series of key names and values. The key names appear in brackets ([...]) and specify the full path of the key. The values contained within each key follow. The name of the value is given first, followed by an equals sign and then the data stored in each value. The value names and value data are always enclosed in quotation marks. A value name of @ tells the Registry Editor to place the value data in the (default) value (as shown in the fourth line of the example).
If you are familiar with the particular information contained within the Registry patch you've just created, you can edit anything you wish and save the changes when you're done. Note that only making changes to a Registry patch doesn't mean anything; your changes won't take effect in the Registry until the Registry patch is applied (described in the next section). There are several reasons why you might want to edit a Registry patch file:
3.3.5.3 Apply a Registry patchYou can apply a Registry patch at any time and to any computer. There are three ways to do this, but there is really no difference between them, at least as far as the final results are concerned. Do whatever is most convenient. 3.3.5.4 Solution 1: From Explorer
3.3.5.5 Solution 2: From within the Registry Editor
3.3.5.6 Solution 3: From the command line
If the Registry Editor is currently running and you are viewing a key that was modified by a patch that was just applied, RegEdit should refresh the display automatically to reflect the changes. If it doesn't, press the F5 key or go to View When you apply a Registry patch, you are merging the keys and values stored in a patch file with the Registry. Any keys in the applied patch that don't already exist will be added to the Registry. Pre-existing keys in the patch will be left alone. If a specific value already exists, the value will be changed to whatever is in the patch. However, any values already in an existing key that aren't in the Registry patch will remain. This means that if you create a patch, rename a key or value (different from changing its data), and then apply it, the original key or value will remain intact and you'll have a duplicate. |

If you're creating a Registry patch on your computer for use on another, make sure any folder names or drive letters are corrected for the new computer. If, for example, a Registry patch created on one computer references c:\my_ folder\my_ program.exe, you'll need to make sure to change all occurrences of the text to d:\her_ folder\my_ program.exe to reflect any applicable differences. Using Expandable String values, as described earlier in this chapter, virtually eliminates this problem.
See Chapter 9 for a discussion on the Windows Script Host, which documents how to further automate changes to the Registry.
3.3.5.7 Using Registry patches on earlier versions of Windows
Many of the Registry patches you create and modify in Windows XP will be applicable in other versions of Windows. But there are two issues you'll need to address before you can use Registry patches on a computer running Windows 9x/Me:
- Unicode versus ANSI
-
Registry patches created in Windows XP and Windows 2000 are encoded as Unicode text, a format not supported by the Registry Editor in Windows 9x/Me. Unless you convert these files to ANSI or ASCII files, they'll just show up as jibberish in earlier versions of Windows.
- The header
-
As stated previously, the single-line header placed at the beginning of every Registry patch in Windows XP is Windows Registry Editor Version 5.00. If you change this to REGEDIT4, the Registry patch will be readable in Windows 9x/Me, as well as in Windows 2000/XP.
Here's a quick procedure to convert a Registry patch created in Windows XP so that it can be used in Windows 9x/Me. Note that this procedure won't stop Windows XP and Windows 2000 from recognizing the patches, which makes one wonder why Microsoft changed the format.
Open a newly created Registry patch file in Notepad (notepad.exe).
Remove the line that reads:
Windows Registry Editor Version 5.00
and replace it with the following:
REGEDIT4
Go to File
 ANSI from the Encoding list at the bottom of the Save As dialog. Make sure the filename is correct, and click Save when you're done.
You can also save Registry patches for use in earlier versions of Windows right in the Registry Editor. Go to File
Win9x/NT 4 Registration Files from the Save as type list.
Despite the different format, Registry patches are applied in the same way in all versions of Windows. Refer to the instructions earlier in this section for details.
3.3.6. Create an Interface for a Registry Setting
The whole point of accessing the Registry is to view and modify settings that are otherwise inaccessible in Explorer, the Control Panel, or the hundreds of dialogs boxes scattered throughout the operating system. However, there is a way to patch into the interface and add checkboxes and radio buttons that are linked to whatever Registry settings we want.
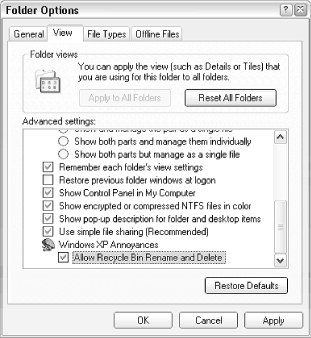
Start by going to Control Panel Advanced settings list in this dialog box is presented in a somewhat awkward list format, apparently to accommodate the large number of options. However, the less-than-ideal presentation is actually designed to allow customization, permitting Microsoft (or you) to easily add or remove items from the list. See Figure 3-8 for an example of a customized version of this window.
Figure 3-8. The Advanced Folder Options dialog box is a flexible, customizable list of Registry settings
Although the "customizability" of this dialog isn't necessarily intended for you to add an option for any Registry setting you want, whether it's related to Explorer or not, that's precisely what you can do with it, thanks to the following solution.
The idea of this solution is that you link up a checkbox or radio button to a valueany value you choosein your Registry. This would, for example, allow you to make certain Registry changes accessible to yourself or others (such as users in a workgroup that you administer), reducing the need for them to mess around in the Registry. You can also remove any unwanted options that normally appear here but that you don't want easily changed.
The format is actually quite remarkable, because you don't have to be a programmer to utilize this feature. You can add new options to a certain portion of the Registry and then tie those options to other Registry settings. The downside is that the syntax requires that numerous parameters be typed, which can be cumbersome. The following procedure should allow you to make changes to existing settings, as well as add your own settings fairly easily:
Open the Registry Editor.
Expand the branches to: HKEY_LOCAL_MACHINE\Software\Microsoft\Windows\CurrentVersion\Explorer\Advanced\Folder.
Notice that the actual hierarchy in the Folder Options window is reproduced here in the Registry, although the list items may appear in a different order than their corresponding Registry entries. This is because the captions in the Folder Options list aren't necessarily the same as the names of the corresponding Registry keys here, yet both collections are sorted alphabetically. For example, the Remember each folder's view settings option is represented by the ClassicViewState key in the Registry.
Take this opportunity to back up the entire branch by highlighting the Advanced key and selecting Export from the File menu. This way, you'll be able to easily restore the defaults without having to reinstall Windows.
At this point, you can remove any unwanted entries by deleting the corresponding keys from this branch; the Text value in each key should be enough to explain what each key is for.
To add a new item, start by simply creating a new key, keeping the hierarchy in mindfor example, are you adding a setting to the top level, or possibly a new setting to an existing group, or are you creating a new group for additional options?
Name the key anything you want, although the more descriptive, the better.
The values inside each key determine the properties of the corresponding setting. For example, one value affects the caption, while another affects the default value. Feel free to fish around the existing keys for examples.
To add a property, create a new value, name it appropriately (described later), double-click it, and then type the contents for the value. Table 3-2 lists the properties that affect the visual appearance of a specific item, and Table 3-3 lists the properties that affect what happens when a specific item is turned on or off in the Folder Options window.
Table 3-2. Visual properties of Folder Options items
Value name
Data type
Description of value contents
Type
String
This can be set to either group, checkbox, or radio, representing a folder, checkbox, or radio button, respectively. Checkboxes are square options and can either be either on or off. Radio buttons are round options that are linked to other radio buttons in the same folder, in that only one at a time can be selected (you can have multiple groups of radio buttons). And folders, of course, are used to organize the various other options. This parameter is required by all items.
Text
String
This is the actual caption of the option as it will appear in the dialog box. This can be as long as you want (better too descriptive than too vague), but the paradigm dictates that only the first word be capitalized and that there be no period. This parameter is required by all items.
Bitmap
String
This specifies the icon, used for folder items only. If omitted, it's a rather ugly bent arrow. The syntax[17] is filename,index, where filename is the full path and filename of the file containing the icon, and index is the icon number (starting with zero), if the file contains more than one icon. To specify the familiar yellow folder, type %SystemRoot%\system32\Shell32.dll,4 here. This parameter is optional for all folders and has no effect on checkboxes and radio buttons.
HelpID
String
This is the filename and optionally the help context ID, pointing to the documentation for this item. If the user selects the item and presses the F1 key, this specifies the help note that will appear. The syntax is filename#id, where filename is the name of a .hlp or .chm file, and id is the numeric help context id (commonly used by programmers) of the topic you want to display. Omit id to simply show the index page of the specified help file. This parameter is optional.
[17] The Bitmap value uses the same syntax as the DefaultIcon property for file types, as documented in Section 4.3.2.
Table 3-3. Registry-related properties of Folder Options items
Value name
Datatype
Description of value contents
HKeyRoot
DWORD
This is an eight-digit number representing the root of the Registry path containing the target Registry setting. Use the hexadecimal number 80000000 for HKEY_CLASSES_ROOT, 80000001 for HKEY_CURRENT_USER, 80000002 for HKEY_LOCAL_MACHINE, 80000003 for HKEY_USERS, or 80000005 for HKEY_CURRENT_CONFIG. For some reason, it must be separated from the rest of the Registry path, specified in RegPath, later. This parameter is required for all checkbox and radio items.
RegPath
String
This is the path specifying the location of the target Registry setting, not including the root (see HKeyRoot, earlier). For example, for HKEY_CURRENT_USER\Software\Microsoft\Windows\CurrentVersion, you would only enter Software\Microsoft\Windows\CurrentVersion here. This parameter is required for all checkbox and radio items.
ValueName
String
This is the name of the target Registry value. This value is where the setting data is stored when the option is turned on or off in the Folder Options window. The key containing said value is specified by the RegPath and HKeyRoot parameters, listed earlier. This parameter is required by all checkbox and radio items.
CheckedValue
Should match target value data type
This holds the data to be stored in the target Registry value (specified by the RegPath and ValueName parameters earlier), when said option is turned on. If you're configuring an option to be used on both Windows 9x/Me and Windows XP/2000 systems, use both the CheckedValueW95 and CheckedValueNT parameters instead of this value. Otherwise, this parameter is required by all checkbox and radio items.
CheckedValueW95
Should match target value data type
Use this instead of CheckedValue, above, if you're configuring an option to be used on both Windows 9x/Me and Windows XP/2000 systems. This value contains the data that will be applied if the system is running Windows 9x/Me. Used in conjunction with CheckedValueNT, below.
CheckedValueNT
Should match target value data type
Use this instead of CheckedValue, above, if you're configuring an option to be used on both Windows 9x/Me and Windows XP/2000 systems. This value contains the data that will be applied if the system is running Windows XP, 2000, or NT. Used in conjunction with CheckedValueW95, later.
UnCheckedValue
Should match target value data type
This holds the data to be stored in the target Registry value, when said option is turned off. This value is optional; if omitted, it is assumed to be 0.
DefaultValue
Should match target value data type
This is the default value, used only if the target Registry value does not already exist. As soon as the option in the Folder Options window is turned on or off at least once, this parameter is ignored, and Windows instead reads the state of the target value, comparing it to CheckedValue and UnCheckedValue to determine if the option should appear checked or unchecked. This value is optional; if omitted, it is assumed to be 0.
The value type (String, Binary, DWORD) of the CheckedValue, UnCheckedValue, and DefaultValue parameters all depend on what the target value requires. For example, if the target value you're changing is a DWORD value, then all three of these parameters must also be DWORD values.
After you've created keys and entered the appropriate property values, your Registry should look something like Figure 3-9, and the resulting Folder Options dialog box should look like Figure 3-8. If Folder Options is open, you'll have to close it and reopen it for the changes to take effect.
Figure 3-9. Settings that appear in the Advanced Folder Options list are configured in the Registry

If you try to add a setting using the previous procedure and it doesn't show up in Folder Options, most likely one or more required values are missing.
Close the Registry Editor when you're finished.
The examples shown in Figure 3-8 and Figure 3-9 show how another solution in this book (see the discussion of the Recycle Bin in Section 4.1.1) can be turned into an advanced Folder Options setting. Here, a single checkbox allows you to easily turn on and off the Rename and Delete commands in the Recycle Bin's context menu.
When the Folder Options dialog box is first displayed, each option is set according to the current value of the corresponding settings. More specifically, the current data stored in each target value is compared with the corresponding CheckedValue and UnCheckedValue, and the option in the Advanced settings list is set accordingly. When the OK button is pressed in Folder Options, the settings in the Registry are then written using the same criteria.
To reproduce a setting elsewhere in the Windows interface or the interface of a third-party application, you'll first need to find the respective Registry setting; see Section 3.3.2, earlier in this chapter, for more information. Refer also to the section on Registry patches, which offers a very handy way to reproduce the customizations made here on any number of computers.
3.3.7. Using INI Files
If you've been using a Windows PC for any length of time, you've probably come across files with the .ini filename extension. Initialization files (or Configuration Settings, as they're known in any recent release of Windows) were used in the old days to store settings for applications, as well as Windows itself, before the Registry was implemented. INI files are simply text files (editable with any plain-text editor, such as Notepad) that are specially formatted to store such settings. Because INI files are limited in their maximum file size (64 KB) and are not as efficient as the Registry, application developers have been strongly encouraged to abandon INI files and instead store settings in the Registry. Since some applications still use INI files to store certain settings, it may become necessary to look for and change settings in INI files as well.
An example of an application that may still use an INI file today is an application installer. An INI file would allow a program to read and store settings without having to rely on the Registry; that way, the settings would be accessible regardless of the computer on which the program was run. INI files are also handy (for the same reason) for programs that run over a network. Windows also includes a few INI files, although they're generally used only to maintain compatibility with older applications.
To edit an INI file, just double-click it, and it will open in Notepad.[18] A typical INI file looks something like this:
[18] To configure another text editor to be the default INI file editor, see the discussion of file types in Chapter 4.
[Episodes] 2F01=The Last Traction Hero 9F22=Spay Anything 4f12=Why do Fools fall in Lava? 7F09=Porch Pals [Cities] first=Brockway second=Ogdenville third=North Haverbrook
Section names are always enclosed in square brackets ([...]); the lines that follow are the settings contained in that section. A section continues until the next section begins or the file ends. Settings include a setting name, followed by an equals sign, and then the data assigned to that setting.
You'll notice that the structure of INI files is similar (but not identical) to that of Registry patches, discussed earlier in this chapter.
3.3.7.1 Searching INI files for settings
In addition to searching the Registry, you may want to search all INI files for a particular setting:
Open a Search window (see Chapter 2).
Type *.ini in the All or part of the file name field, and type the text for which you want to search in the A word or phrase in the file field.
Double-click on any file in the search results to view it, and use your text editor's search feature to find the specific instance of text in the file.
3.3.7.2 Special case: System.ini and Win.ini
INI files can be found in a variety of places; some applications place their INI files in the application folder, while others store them in the Windows folder (the preferred location, recommended by Microsoft many years ago). Although it's becoming less common, some applications store their settings in the file, Win.ini, which is the INI-file equivalent of the HKEY_USERS branch of the Registry.
Right alongside Win.ini is the System.ini file, the INI-file equivalent of the HKEY_LOCAL_MACHINE Registry branch. Both of these files are still included in Windows XP, although it's primarily to maintain compatibility with such older applications that expect to find or store certain settings therein.
There's typically little interest anymore in either of these files. If you're familiar, for example, with the now-obsolete Load= and Run= lines in the [Windows] section of Win.ini, that functionality is taken care of by the Startup folder in the Start Menu, as well as several locations in the Registry (see Chapter 6 for details). Similarly, the shell= line of System.ini, which was used to specify an alternate Windows shell (replacing Program Manager in Windows 3.x or Explorer in Windows 95) is no longer supported at all in Windows XP.
|
EAN: 2147483647
Pages: 97