Use Actions
Actions are like macros ”they collect and automate many functions and allow you to apply a whole set of collected keystrokes or mouse-clicks. You can use actions for a wide range of purposes, from automating printer settings to applying a set of effects to an object.
Illustrator comes with an underrated and useful set of pre-defined actions. Using one of these built-in actions is as simple as selecting it from the Actions palette. To view the Actions palette, choose Window Actions.
The Actions palette includes sets of steps that apply formatting changes, such as rotation or path simplification, to a selected object. Other actions allow you to perform file operations, such as exporting a selected object to a browser-friendly JPEG image. The Actions palette is shown in Figure 21-11.
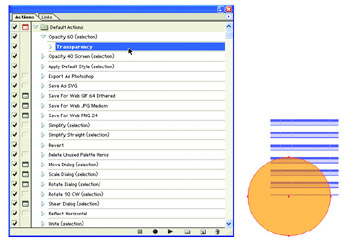
Figure 21-11: Exploring the Actions palette. The Transparency action is assigning 60-percent opacity.
If you expand an action (click the triangle next to it so that the triangle is pointing down), you can see all the tasks that action will perform. For example, the action selected in Figure 21-12 will save the selected object as a GIF image, with transparency (the background color will be hidden) and no interlacing (it won t phase in, but instead will appear all at once in a browser). And the action even includes instructions about which folder to save the file to on the hard disk. That not only saves a bunch of work, it also helps you make sound decisions about the best file attributes to use when exporting a selected image for the Web.
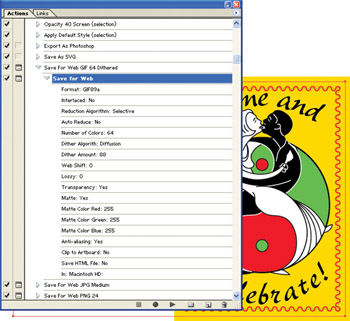
Figure 21-12: The Save For Web GIF 64 Dithered action combines 18 menu and dialog box selections.
| Note | Some of the default actions require that an object be selected. This is usually reflected by the fact that the word selection is displayed parenthetically after the action's name . |
To apply an action, simply click the action s name in the Actions palette and then click the Play button in the Actions palette, at the bottom of the palette.
Create an Action
Creating an action can be an elaborate process. How elaborate depends on what you re trying to accomplish. Something like creating rounded rectangle buttons for a web page can be done without too much effort. Of course, the more elaborate the effort in the beginning, the more work your action will save you in the long run.
The following steps use a simple example to illustrate how actions work. The action you define will create a simple rounded rectangle button that you can use on a web page. Follow these steps to create this action from scratch:
-
Click the Create New Action button at the bottom of the Actions palette, as shown in Figure 21-13. It resembles a page with its lower-left corner bent upward.

Figure 21-13: Beginning to define a new action -
The New Action dialog box appears. Enter a name for your action and choose a set where it will reside. It s safe to leave it at the default, Default Actions, if you wish. (You ll explore what sets are and how to create them in the Save an Action section later in this chapter.) Click Record. As soon as you do so, the new action begins capturing your keystrokes.
-
Select the Rounded Rectangle tool and draw a rounded rectangle somewhere on the artboard .
-
Select the Gradient tool and set the gradient to a white-to-black linear gradient in the Gradient palette. (Gradients are explained in Chapter 16.)
-
Drag the Gradient tool from the left side of the rectangle to the right side to fill the object with the gradient.
-
Choose Edit Copy.
-
Choose Edit Paste In Front to duplicate the object.
-
Choose Object Transform Scale, and enter 90 percent in the Scale window under Uniform.
-
Choose Object Transform Rotate, and enter 180 degrees in the Angle box.
-
Click the Stop Playing/Recording button at the bottom of the Actions palette.
If you followed the steps above, you created an action. To test the action, first select the objects you created and press DELETE to clear the artboard. Then select your action in the Actions palette and click the Play button. If everything worked right, the action should create a rounded rectangle button for you.
| Tip | If you click in the Toggle Dialog On/Off column in the Actions palette (next to the action name), you can turn on (or disable) dialog boxes for options in your action. Turning on dialog boxes allows the person playing the action to make selections in dialog boxes throughout the process, while disabling dialog box applies default dialog box settings or settings you define as you record the macro. |
Manage Actions
The beauty of actions is that all you need to do is click the mouse a couple of times to have all the work done for you. Even better, though, is that you can create your own actions and share them .
You share actions by first saving them. Then they can be reused ”in other files on your computer, or even by other users. If you no longer need an action, you can clear a little memory by deleting it.
Save an Action
To save an action, you must create it in a new set. You can create a new set when you first create an action, or you can create a set by clicking the Create New Set button (it looks like a folder) at the bottom of the Actions palette. If you create a set after you have defined an action, you can drag the action into the new set folder in the Actions dialog box to include it among those to save.
| Caution | To clarify: you can only save a set of actions, you can't save actions that are not part of a set. The easiest way to do this is to define a new set and then, with the new set selected in the Actions palette, start defining a new action. |
Once you have created a set, choose Save Actions from the Actions palette menu, as shown in Figure 21-14. The Save Set To: dialog box will open . From within that dialog box, you can choose a location for your action set and give it a filename.
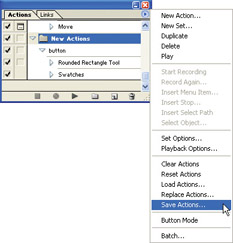
Figure 21-14: Saving an action
Share Actions
Any set of actions that you ve saved can be shared with other files or with other Illustrator artists . To share a set of actions, simply locate the file that you saved the set to and copy that file onto a disk, e-mail it to someone, or place it on the Web for others to share.
An action set file is saved with the extension .aia, and these files are cross-platform compatible. That is, actions created on a PC should work on a Mac, and vice versa. Once you have an action on disk, you can add it to the Actions palette by choosing Load Actions from the Actions palette menu and then navigating to the file.
Delete an Action
If you have an action that you have no further use for, you can delete it by selecting it in the Actions palette and clicking the small trash bin button in the Actions palette. Alternatively, you can drag and drop the action from the palette onto the trash bin button, or you can select the action and choose Delete from the Actions palette menu.
EAN: 2147483647
Pages: 175