INSTALLING AND CONFIGURING APPLICATIONS
| | ||
| | ||
| | ||
Since the operating system needs to allow multiple users to run and access applications (and thus application Registry settings) simultaneously , a program must be installed in such a fashion that the Registry changes are replicated for all users. There are two basic methods for installing an application on a Citrix Presentation Server 4 server to cause this replication to take place. The recommended method is to use the Control Panel and run the Add/Remove Programs application. The other is to run the change user /install and change user /execute commands from a command prompt.
Using Add/Remove Programs
The advantage to installing an application using Add/Remove Programs from the Control Panel is that it creates the "shadow key" properly in all cases. The Add/Remove Programs application monitors changes to the HKEY_CURRENT_USER key and saves them in the shadow key. This key is then propagated to each user, as shown in Figure 13-1, so that they may have unique settings for that application.
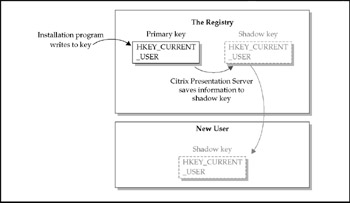
Figure 13-1: Shadow key propagation
| Note | Do not allow the system to reboot until after you click Finish in the Add/Remove Programs application. Doing so will ensure that the shadow key information is safely written. |
Using Change User /Install
Using the change user/install command works well most of the time, but we have seen that in some cases shadow key information is missed. For example, there is a known problem installing Internet Explorer in this manner, but it works perfectly well using the Add/Remove Programs application. This method involves opening a command prompt, typing change user /install , installing the application, and then typing change user /execute .
| Note | If you use this method, make sure you do not allow the system to reboot without first issuing the change user /execute command. If you do not issue the command, the system may not properly record the changes to the Registry. |
The Application Installation Checklist
The basic procedure for installing applications on a Windows 2000 Server or Windows Server 2003 running Presentation Server 4 is as follows :
-
Make sure you are logged on to the test server console as a member of the local Administrators group .
-
Reset any remote sessions with the Citrix Management Console.
-
Disable logons to the server using the Citrix Management Console (select Server Properties Presentation Server settings, and then uncheck the Enable Logons To This Server check box) to prevent users from logging on during the application installation.
-
Run the Add/Remove Programs application and select the application's setup program to begin installation.
-
Click Finish after the application has completed installation and before the server reboots.
-
If an application compatibility script exists, run it. Review the notes in the script and any "read me" notes on application compatibility, and then perform any other necessary steps.
-
At this point, the application is installed, and testing can begin.
| Note | Though you can uninstall an application with Add/Remove Programs, we don't recommend it. We recommend using the imaging process outlined in Chapter 11 or Installation Manager (discussed later in this chapter) to create standard server images including packaged applications. If an application needs to be removed, simply restore the image that was current before the application package was installed or unpublish the application within Installation Manager. Other methods can leave remnants of the application in the form of leftover Registry changes or library files that can cause problems with the system or with other applications. |
Presentation Server Application Isolation Environment
Citrix released the Application Isolation Environment (AIE) feature set with Citrix Presentation Server 4. As we have said earlier in this chapter, this feature has fundamentally changed the face of Presentation Server, allowing many organizations to move forward with an enterprise deployment strategy using more cost-effective thin clients and more security-effective locked-down PCs, because applications that previously could not be deployed with Terminal Server, now can be. Additionally many applications that previously required their own server farm can now be consolidated with other applications using this new feature. This feature set essentially allows an administrator to install an application on a Presentation Server server as if were is the only application on the server, virtualizing the file space and Registry space. This virtualization effectively "fixes" applications that weren't written to understand Terminal Services multiuser mode or that conflict with other applications installed on the server.
How AIE Works
An isolation environment is a virtual environment that can be created on a Citrix Presentation Server server. To understand the concept of an isolation environment, think of it is as an isolation chamber into which applications that previously caused problems in a Terminal Services/Presentation Server environment can be installed and executed. One or more "misbehaving" applications can be run in this isolation chamber without affecting the rest of the system. A "misbehaving" application in the context of isolation environments is one that exhibits incompatible or unsociable behaviors relative to other applications or the system in general when installed on Presentation Server.
An isolation environment is created by virtualizing specific operating system resources so that an incompatible or unsociable application can be safely installed and published on a Presentation Server server. The isolation environment provides a virtual mapping from an application's view of system resources to the physical operating system resources. The mapping is accomplished through the use of rules. Rules specify how an application behaves within an isolation environment.
What Is Virtualized?
Application isolation virtualizes certain operating system resources to provide a compatible environment for applications published in a server farm:
-
– File system The files and directories an application uses can be a source of application conflicts. Conflicts are primarily caused because many applications, particularly legacy applications, are not designed for multiuser environments. For example, an application may use the same pathname for a file that contains per-user data. In this case, if one user updates this file, it affects all other users. In the worst case, this would prevent multiple users from running the application simultaneously and corruption of the file, which could cause the application to fail for all users. By virtualizing the file system components of the application, the application will now run correctly on the Presentation Server.
-
– Registry Applications store configuration information in the system Registry. The two most important sections of the Registry are HKEY_LOCAL_MACHINE (HKLM) and HKEY_CURRENT_USER (HKCU). Terminal Servicesaware applications are designed to use these Registry sections correctly. However, single-user applications or applications that are not TS-aware may use these Registry sections incorrectly, which can result in incompatible behaviors that prevent the application from functioning correctly on a Presentation Server server. Virtual-izing the Registry entries of an application resolves the conflicts so that the application will run correctly in a Presentation Server environment.
-
– Named objects Windows applications can create objects such as events, semaphores, and sections, which are used to communicate with other applications. Each object has a name that is globally visible on the system. An example of a conflict caused by named objects is when two instances of an application reference the same object name . Both application instances need separate objects but instead end up sharing a single object. This can cause unpredictable application behavior. When an application running in an isolation environment attempts to access to any of the preceding system resources, the isolation environment redirects the request to an alternative location based on a set of rules. Within an isolation environment, any request for access to a resource that previously caused conflicts is redirected to an alternative location, thus eliminating the conflict. The redirection is managed and executed by Presentation Server without any change to the application binaries or the operating system.
When to Use Application Isolation
Application compatibility or sociability problems that application isolation attempts to resolve or mitigate typically involve file, Registry, or system objects on a Presentation Server server. The following are some behaviors that help identify application compatibility or sociability issues on Presentation Server:
-
– When you cannot open multiple instances of an application A single user is unable to open more than one instance of an application, or two users attempting to launch a published application experience application launch failure; this occurs when an application is designed to lock certain system resources upon execution.
-
– When you cannot install different versions of the same application on a single server Multiple versions of some applications cannot be installed or executed on a single Presentation Server server. This is because the two versions of the application share the same resources or overwrite existing files from a previous installation. Usually, the application installer simply does not allow installations of multiple versions to continue. In some cases, one version of the application stops working after two versions of the application are installed.
-
– When applications share a system resource or resources There are instances when two or more applications share specific system files (DLL, INI, etc.), resulting in conflicting versions of the file being present. For example, applications that use the Java Runtime Environment (JRE) can cause conflicts of this type.
-
– When applications use hard-coded file paths or settings If an application uses hard-coded file paths or settings, you may be unable to publish different versions that application on Presentation Server. Typically such applications do not allow per-user settings and paths. An application may use hard-coded file paths or settings if multiple users are unable to launch individual instances of the application.
-
– When an application does not integrate well with Presentation Server Some applications are not designed to run on Terminal Services and do not work well on Presentation Server. Such applications are typically not designed for multiuser environments and hence don't perform as expected on Presentation Server. Other applications that are problematic to install on Presentation Server use hard-coded path and key names (HKEY_LOCAL_MACHINE) and do not differentiate between individual users that run the application. This results in conflicts such as the inability to launch multiple instances of an application, multiple users being unable to launch the same application, and so on.
Tested Applications
Listed next are popular applications that should be considered candidates to be installed into isolation environments on Presentation Server 4. Citrix has verified that these applications exhibit conflicts or incompatibilities under certain conditions in a Presentation Server environment and are suitable candidates for isolation. These applications can be safely installed and published for use on server farms using application isolation.
-
– Adobe Reader 4.05, 5.1, 6.01, and 7.0
-
– Microsoft Office 2000
-
– Crystal Reports 7.0
-
– Microsoft Office XP
-
– Crystal Reports 8.0
-
– Microsoft Office 2003
-
– FoxPro 2.6 for DOS
-
– Oracle Client 8 i
-
– Internet Explorer 5.5
-
– Oracle Client 9 i
-
– Internet Explorer 6.0
-
– Project 98
-
– Sun Java Runtime Environment (JRE) 1.3
-
– SAP GUI 4.6D
-
– Sun Java Runtime Environment (JRE) 1.4
-
– SAP GUI 6.2
-
– MDAC 2.6 and 2.7
-
– StarOffice 5.2
-
– Mozilla Firefox 1.0
-
– StarOffice 7.0
-
– Microsoft Office 97
-
– WinZip 9.0
Using Isolation Environments
Isolation environments can be created, configured, and used in conjunction with application publishing on a server farm by following the minimum steps described here:
-
Create an isolation environment from the Citrix Management Console.
-
Associate existing published applications with the isolation environment or install a new application into an isolation environment and publish it for use.
-
Optionally, configure the properties of the isolation environment to address issues caused by specific applications or usage scenarios.
-
Publish the isolated application for use.
Isolation Environment Properties
An isolation environment created using the Management Console has the following associated property variables :
-
– Applications Specifies which applications are associated with or installed in this particular isolation environment.
-
– Roots Specifies the directories and Registry locations in which files modified by users (user profile root) and applications (installation root) reside.
-
– Rules Specifies policies that prescribe how an isolated application accesses system resources, such as files, the Registry, and named objects.
-
– Security Specifies the security policy to apply to this isolation environment. Isolation environment security can be Enhanced or Relaxed .
Applications An isolation environment can contain associated, installed, or published applications. Each is further defined here:
-
– Associated applications Applications are installed directly on to the operating system on one or more servers running Presentation Server and are configured to launch within the confines of an isolation environment. They can be accessed from outside the isolation environment. Deleting an isolation environment has no effect on the application; however, user-specific files created within the isolation environment are deleted.
-
– Installed applications These are applications installed into an isolation environment using the aiesetup command. Installed applications must be published on Presentation Server before they can be made available to users.
-
– Published applications The application was installed into this isolation environment using the aiesetup command and is published for use on one or more servers.
Roots The roots specify the virtual directories and Registry locations in which files modified by users and applications reside. The following root locations are administrator-defined for an isolation environment:
-
– User Profile root (user-specific location) Specifies the location in which the files or Registries modified or added by the user reside. The user profile root is a unique folder created for each user profile. This setting enables the isolation environment to create and maintain profile-specific copies of files modified by a user. Files created or saved by the current user are located in the folder called %APPDATA%\Citrix\AIE\AIE_name\Device\drive_letter.
-
– Installation root (application-specific location) Specifies the perisolation environment location of a directory/Registry key hierarchy for applications installed into an isolation environment. Installation root is unique for each isolation environment.
Rules Rules define how applications access system resources. Rules can be of the following types:
-
– Isolation rule An isolation rule forces isolated applications to search for a resource in the user profile root, followed by installation root, and finally in the virtual location requested by the application. An isolation rule can be per user or per isolation environment. In the case of the former, a copy of system resources is created in the user profile root for each user. If the isolation rule is per isolation environment, a single copy of the required system resource is created in the installation root location and shared by all users accessing that particular isolation environment. Create per isolation environment rules for resources that can be shared.
Note Create per-user isolation rules if you need to ensure that each user gets his or her own copy of the requested resource.
-
– Redirection rule A redirection rule modifies a request for a resource to reference another physical location. No search is made in the user profile root, installation root, or original location requested by the application. Redirection rules are used to allow an application to access files, Registry keys, and objects in a specific location without first searching the user profile root and installation root locations. For example, a redirection rule may specify that all requests to access c:\temp are redirected to c:\footemp.
-
– Ignore rule An ignore rule does not modify the request made by the application. The request is passed through the isolation environment unmodified. You can use an ignore rule to allow access outside of the isolation environment to the location requested by the application. The Ignore rule is essentially a special redirection rule, where redirection occurs to the actual location requested by the application.
Security Isolation environment security properties specify user permissions of an isolation environment to launch executable files that reside in the user profile root. Security can be Enhanced or Relaxed.
-
– Enhanced Prevents users connected to isolated applications from executing files (such as .exe, .dll, and .ocx) located in the server hard drive folders, such as "device\c" located under the user profile root when the user logs on. Use this security level to prevent issues caused by running files that could cause application conflicts, hijack DLLs, or install hostile code on the system.
-
– Relaxed Select this option to allow users of this isolation environment to download executable files into the user profile root, as well as installation root or in the actual physical location.
| Note | Windows permissions override any settings allowed by isolation environment security modes. For example, if permissions on a Windows server do not permit execution of a file, a request originating from an isolation environment to execute the file is denied even if the isolation environment is set to relaxed security mode. |
Isolation Environment Modes
Application isolation environments can be set to operate in install or execute mode. The primary function of these modes is to ensure that when set to install mode, applications install correctly into an isolation environment; and when set to execute mode applications can be used by multiple users without causing conflicts (file system, Registry or named object) or incompatibilities.
To install an application into an isolation environment, run the aiesetup command from the command prompt. This sets the specified isolation environment to install mode, and the destination for all file operations for the isolation environment is redirected to the installation root (per application/per isolation environment folder).
After the application installation is complete, the isolation environment is automatically set to execute mode. In execute mode, all file operations for the isolation environment are redirected to user profile root (per user/per isolation environment folder).
Isolating Applications An application can be isolated either by installing it into an isolation environment, or by associating it with an isolation environment.
Install an Application into an Isolation Environment By installing an application into an isolation environment, it becomes completely isolated. Application shortcuts, Registry settings, paths, etc., reside within the confines of the isolation environment. If an isolation environment is deleted, paths to applications installed into the isolation environment are deleted as well.
| Note | Install an application into an isolation environment only when you have ascertained that it is exhibiting incompatible behavior. |
To install an application into an isolation environment, use the aiesetup command. The aiesetup command must be run at the command prompt of the server on which you wish to install the application. To run aiesetup , type the following command at the command prompt:
aiesetup Isolation_Environment_Name Setup_ [ parameters ]
where Isolation_Environment_Name is the name of the target isolation environment; Setup_application is the installation file (MSI or EXE) for the application to be installed, and parameters are commands that the installer executes at run time.
Isolation by Association When associating an application with an isolation environment, all the interactions of the associated application with system resources are managed by the isolation environment. The isolation environment forces the application to launch in the isolation environment and access a virtualized version of system resources. This prevents direct access of key system resources by the application, which in turn prevents the occurrence of application conflicts and incompatibilities.
Associating an Application with an Isolation Environment To associate applications with an isolation environment, do the following:
-
Open the Management Console and select the Isolation Environments node.
-
Right-click the isolation environment you wish to configure and select Properties from the context menu. The Properties dialog for the selected isolation environment appears.
-
In the Properties dialog, select Applications in the properties browser. A list of applications installed into or associated with that isolation environment, if any, appear in the Applications pane.
-
Click Add to add a new application. The Choose Application dialog, containing a list of published applications available on the server farm, appears.
-
Select one or more published applications from the list and click OK. The selected applications are added to the isolation environment.
Uninstalling Isolated Applications Prior to the introduction of isolation environments, an administrator could remove applications from a server by running the appropriate uninstall program using the Windows Add/Remove Programs functionality. However, uninstall programs do not necessarily delete everything that was installed, resulting in an incomplete uninstall.
An application installed within an isolation environment can be efficiently removed by deleting all the files that reside in the installation root location of the isolation environment (typically, C:\Program Files\Citrix\AIE\< aiename >) and deleting Registry entries under installation root (typically, HKLM\Software\Citrix\AIE\< aiename >).
Because an application's file system and Registry are isolated, this approach provides a clean uninstall of the application from the server.
User-specific files resident in the user profile root of the isolation environment folder are also deleted; therefore, we recommend that you follow whatever process your company policy dictates with regard to backing up user-specific files, before deleting the isolation environment folder.
Deleting Isolation Environments To delete an Isolation Environment, simply select it in the Citrix Management Console and delete it. Deleting an isolation environment does not remove application-or user-specific files resident in the deleted isolation environment folder on disk. Because applications installed into isolation environments may not function correctly when the isolation environment is deleted, it is good practice to delete the contents of the isolation environment folder when deleting an isolation environment.
Creating a New Isolation Environment An isolation environment is created at the server farm level. The controls for creating isolation environments are available from the Management Console. To create a new isolation environment,
-
In the Citrix Management Console, right-click the Isolation Environments node and select New Isolation Environment from the context menu. Or in the Management Console, click Actions New Isolation Environment. The New Isolation Environment dialog appears.
-
In the New Isolation Environment dialog box, enter a name for the new isolation environment and click OK. A new entry for the isolation environment just created, for example "TestAIE," appears in the Contents pane for the Isolation Environments node.
Publishing the Isolated Application After installing an application into an isolation environment, it must be published on the server farm so that users can access the application. To publish an application installed into an isolation environment, use the Application Publishing Wizard.
The Application Publishing Wizard provides a guide through the process of publishing an application and allows the selection of application isolation settings for the application to be published. Follow these steps to publish the application:
-
In the Application Publishing Wizard, follow wizard prompts to enter application information and click Next.
-
In Specify What To Publish dialog box, select Application as the Application Type.
-
Select the Isolate Application check box and click Settings. The Isolation Settings dialog appears.
-
In the Isolation Settings dialog, from the list of available isolation environments, select the isolation environment into which you installed the application.
-
Check the Application Was Installed Into Environment check box.
-
Select the application you need from the Choose Installed Application drop-down list.
-
Enter application parameters, if applicable , in the Command Line Arguments field.
-
Click OK to save the configuration and return to the Application Publishing Wizard.
-
Continue with application publishing steps as normal.
Isolation Environment Rules
Isolation environments are constructed by defining a set of rules that specify how the application behaves within the confines of an isolation environment.
Presentation Server administrators can define and use rules to exert control over application interactions with operating system resources. The following section describes the general types of rules that can be created and best practice information for such rules.
Creating Isolation Rules When creating a new isolation environment on Presentation Server, its default behavior is to isolate everything with a few exceptions. In short, this means that when an application requests access to a system resource (such as a file, Registry, or named object), a per-user version of the file or key is created as required. Our testing indicates that this default behavior mitigates most application conflicts and allows applications to run correctly on Presentation Server.
Isolation rules ensure that per-user and per-application level versions of files and keys are created. This is the primary method through which applications are isolated from each other on Presentation Server.
Isolation per user creates an individual copy of each resource that a particular user accesses.
Isolation per isolation environment creates a single copy of a resource for a particular isolation environment.
| Note | You can add one of these rules to ensure that there is one copy of a resource per isolation environment. For example, you could create a rule that isolates the Registry hive, HKLM\software\ classes, when you install Microsoft Office. Because each user does not require his own version of this hive, you can create a rule that isolates this particular Registry hive for the isolation environment. |
Ignore Rules The rules engine allows "holes" to be defined in the isolation environment using ignore rules so that an application can write to the underlying system.
Ignore rules were created because there are instances when an application inside an isolation environment needs to share data with an application outside the isolation environment. For example, users can print to network printers available within an ICA session. These printers are automatically created when the user connects to a published application on Presentation Server. If the published application is running within an isolation environment, called My_AIE, which has an isolation rule applied to it, auto-creation of network printers fails because a copy of the Registry hive HKEY_CURRENT_USER\ Printers is created for each user.
You can ensure printer auto-creation occurs by creating a rule for My_AIE, which ignores the Registry hive, HKEY_CURRENT_USER\Printers.
Redirect Rules A redirect rule redirects an application request for a file or Registry key to a specified location. For example, if an application creates the file, c:\temp\data.txt, regardless of the user, then it might be sensible to redirect those files to c:\aietemp\ %USERNAME%. This means, if UserA ran the application in an isolation environment, then c:\temp\data.txt is created in c:\aietemp\UserA\data.txt.
In the preceding example, the administrator may wish to clean up the \temp directory each time the system boots up. By redirecting all attempts to access the c:\temp directory to c:\aietemp on a per-user basis, the administrator can clean up the temporary data easily at startup. The redirect rule also has the benefit of using the application in a multiuser context (the application was being used in a single-user context prior to application isolation).
Redirect rules allow administrators to punch holes through an isolation environment to the real system while preserving isolation among applications.
Rules Prioritization A rule for an isolation environment is based on a specific location; either a file path or a Registry key path. Rules are matched by the most specific path to the resource being accessed. A rule applies to the object (file, Registry, or named object) specified and all the children of the specified path, unless a more specific rule exists. For example, create the following rules:
Create an ignore rule for the file path, C:\Documents And Settings\%USERNAME%. This means that every file and directory created under C:\Documents And Settings\ %USERNAME% is created in the real system location because you specified, through the ignore rule, that this directory location is not isolated.
You then add a per user isolation rule for C:\Documents and Settings\ %USERNAME%\Windows because you want to isolate the per-user Windows directory, C:\Documents and Settings\%USERNAME%\Windows.
Using the most specific match concept, the following occurs when an application attempts to open these files:
-
– If an application opens the file C:\Documents and Settings\%USERNAME%\ Application Data\CompanyA\foo.txt, then the ignore rule for C:\Documents and Settings\%USERNAME% applies.
-
– If an application attempts to open C:\Documents and Settings\%USERNAME% \ Windows\Win.ini, then the isolate per-user rule for C:\Documents and Settings\ Windows applies.
Restrictions and Limitations to Rules Do not modify or delete the available default rules. If the default rules are modified, the isolation environment may be unable to run applications correctly.
You can use an asterisk (*) as a wildcard character only at the end of an "ignore named object" rule. For example, the rule "ignore object*" ignores all named objects with a name starting with "object." Use of an asterisk (*) is not allowed in isolate or redirect object rules.
File system rules can apply to either files or directories. A rule can be created to alter the behavior of individual files, or of directories and all of the files within them. For example, you may have a redirect rule for "C:\temp\fileA.txt," as well as one for "C:\ temp\subdir1."
Rules that specify a Registry object apply only to Registry keys. They do not apply to Registry values.
| Note | Do not modify rules once an application is installed and in use. If you do so, the effect is similar to that experienced when you rename directories or keys that an application is installed into. It can cause unpredictable results because the resources used by the application have effectively been moved or relocated by the modified rules. |
Rules are interpreted at run time; therefore, any modifications to existing rules are interpreted the next time an application associated with or installed into an isolation environment is launched. If a modification takes place during a launch of an isolated application, these changes will not affect running applications. The modified rules will be interpreted and take effect the next time the application is executed. It is important to keep in mind that changing rules for installed applications may have adverse effects on application behavior.
A rule must be specified in terms of a full directory or key level. Matches are performed on the full name of a given hierarchy level. For example, if you create a redirect rule for "C:\temp\fil," the rule applies only to a file called "C:\temp\fil," the files under the directory "C:\temp\fil," and to the directory named "C:\temp\fil."
Using Environment Variables to Construct Rules
Environment variables for isolation environments on Presentation Server make it easier to build rules containing references to path locations that can change at run time. For example, the application data location can change depending on the language you selectEnglish, French, German, and so on. This can lead to errors if the default rules for an isolation environment are used.
Use these environment variables to construct path-specific segments, in a rule, that may change at run time. For example, in the case of language-specific application data locations, you can use %AIE_COMMONAPPLICATIONDATA% to ensure that an explicit rule is created for the selected language. At run time, %AIE_COMMONAPPLICA-TIONDATA% is substituted with the language-specific application data location, such as C:\Documents and Settings\All Users\Application Data.
Use an environment variable to ensure universality of a rule if any of the following conditions are true:
-
– The path location contains a username.
-
– Translation errors occur with standard application locations.
-
– Relative locations of applications change, for example, the location where you install Presentation Server.
Environment variables can also be used to quickly check where certain paths are within a script. For example, to find out what the file system installation root for an isolation environment is, use %AIE_FSINSTALLROOT%.
All environment variables for isolation environments are prefixed with "AIE_". When a new isolation environment is created, a number of default rules apply. These default rules use the environment variables listed next to render them universally applicable.
General Application Installation Tips
Though it is impossible to provide installation tips for all common applications, we thought it would be appropriate to include a few to set expectations. There is a wealth of information about application configurations on the Citrix Web site (http://www.support.citrix.com). We have found the online knowledge center (Citrix's knowledge base and user forums) to be particularly useful, as it contains many technical notes from other users on application difficulties and the methods used to fix or work around them.
The following examples show the format for application installation and configuration checklists. They are provided both as an example of the process of installing an application under Presentation Server and as a suggestion for record keeping purposes.
Example Installation Instructions: Installing Microsoft Office 2003 on Windows Server 2003 for Use in a Terminal Services/Presentation Server Environment
For the purposes of providing an example of a common application installation in a Terminal Services environment, we will use our fictional case study, CME Corporation, introduced in Part III at the end of Chapter 10, as an example. CME Corporation, a medical device manufacturer with 3,000 employees worldwide, will be deploying Microsoft Office 2003. In order to install Office 2003 in the Terminal Services environment, a Microsoft Transform (MST) file will be used for installation. The MST file allows for full customization of the install, including configuration of the Outlook profile with a user-specific profile.
| Note | Unlike Office 2000, Office 2003 does not require a special transform to install Office on a Terminal Servicesenabled computer. Office 2003 Setup detects that it is being run under Terminal Services, and it preconfigures all the proper options. Because a transform file allows a custom configuration, including Outlook Profile configuration, we will cover the custom transform file setup in this section. |
To install Office, do the following:
-
Create an administrative installation of Office 2003.
-
Install the Microsoft Office 2003 Resource Kit. The ORK can be downloaded from http://www.microsoft.com/office/ork/xp/appndx/appa04.htm.
-
Create a custom Microsoft Transform file.
-
Execute the Microsoft Office 2003 installation program to install Microsoft Office 2003. (CME Corporation will use Installation Manager as described later in this chapter, and thus will need to add the package to the CMC.)
| Note | Installation of Office 2003 on a Terminal Servicesenabled system requires the use of the Application Server mode configuration. A computer configured for Remote Administration mode is not recognized by Office 2003 Setup and installs Office 2003 as if it were being installed to a generic workstation. |
Creating an Administrative Installation of Office 2003 To create an administrative installation of Office 2003, run the setup program with a /a switch and choose an installation directory on an easily accessible network share. For example, from the desktop of any Windows 2000 Server machine in the environment, click Start Run, and then type: setup.exe /a path\name SHORTFILENAMES=TRUE /qb /L* path\name of log file .
The following are various command-line options available:
-
– /a Enables Windows Installer to perform an administrative installation of a product on a network share.
-
– SHORTFILENAMES=TRUE Directs Windows Installer to create all filenames and folders with MS-DOS-compatible filenames. Required when you run Windows Installer from the command line.
-
– /qb Sets the user interface to the basic level (simple progress and error handling).
-
– /L* Turns on logging and sets a path for the log file. The * flag causes the switch to log all information.
-
– path\name of log file Path and filename of the Windows Installer log file.
Installing the Office 2003 Resource Kit The Office 2003 resource kit can be downloaded from http://www.microsoft.com/office/ork/xp/appndx/appa04.htm. Install it, accepting all of the defaults.
Creating a Custom Office 2003 Terminal Services Transform File After installing the Office 2003 Resource Kit, we are ready to create a custom Microsoft Terminal Server Transform (MST) file with the Custom Installation Wizard for CME's environment. We will later use this file with Installation Manager to deploy Office 2003 to all current and future Presentation Server servers.
To create and configure a custom Microsoft Office 2003 Terminal Services Transform file,
-
Click Start Programs Microsoft Office Tools Microsoft Office 2003 Resource Kit Tools Custom Installation Wizard. Click Next to go forward with the installation.
-
Click the Browse button.
-
Browse to the PROPLUS.MSI file (this filename will be different for the Premium or Standard versions of Office 2003) located on the administrative installation share and click OK; then click Next.
-
Select Create A New MST File and click Next.
-
Select a location and name the file TERMSRVR.MST to save the new MST. Click Next.
-
Specify the default installation path and the organization name and click Next.
-
Specify if you want to uninstall any previous Office versions as part of the Office 2003 install and click Next.
-
Select the features that you do not want to install and click Next. (Set the installation state of the selected feature to Not Available, Hidden, or Locked. Select the Do Not Migrate Previous Installation State check box.)
Note The Do Not Migrate Previous Installation State check box must be selected for each feature that is set to Not Available, Hidden, or Locked. Carefully choose which features to install. Features like animation and the office assistant should not be installed, since they can cause unnecessary strain on the server.
-
Click Next on the following screens, making any customizations appropriate.
-
On the Outlook Screen: customize the Default Profile page, choose New Profile, and name the profile %username% . Then click Next.
-
Select Configure An Exchange Server Connection and enter an Exchange Server name; then click Next.
-
Click Customize Additional Outlook Profile and Account Information.
-
Click Add and choose Outlook Address Book; then click Next and Finish on the Add Account Wizard.
-
Click Next.
-
Continue to click Next while making any appropriate changes until the wizard is complete.
Executing the Microsoft Office 2003 Installation Program For basic installation to one server, use the Add/Remove Programs or change user /install as described earlier in this chapter and click Start Run; then type: setup.exe TRANSFORMS=C:\TERMSRVR.MST /qb . Click OK.
To install this application to multiple servers, please see the section "Presentation Server Installation Manager" later in this chapter.
Managing the Application List
Before launching into the application test process, it is important to have a controllable list of applications targeted for production. The list should be as small as possible but still have representative applications in any category that your company needs to use. What must be avoided is a lack of standardization within a category. For example, a large organization may be using both Microsoft Office 2000 and Office 2003. Make every effort to choose one application (or suite, in this case) for deployment in the Presentation Server environment. It will reduce complexity, ease support, and cause less confusion to the user community.
Application Testing Procedure
Each application should go through two phases of testingcomponent testing and system testingin order to assess how it functions running by itself and as part of a fully configured server. The strategy is to have as much breadth and depth of testing coverage as is practical, given the realities of most fast-paced corporate IT departments. The effort of creating and refining an application testing process is worthwhile. Over time, the IT staff will become fast, proficient, and confident at running the tests.
Component Testing
This phase of testing is designed to exercise an application running by itself in a multiuser environment. This can be especially important with applications that were not written specifically for this environment, do not have application-compatibility scripts, or are older DOS or 16-bit applications.
Generic Functions The generic functions of the component test phase are functions that are common to most applications. Examples of generic functions are Execute (run the program), Exit, File-Print, File-Open, and Cut and Paste. Coverage of generic functions is important to ensure the application works as expected in a multiuser environment. One test list can be created that will cover every application slated for deployment, or at least broad categories of applications. Not every test on the list will apply, but running the test list is important nonetheless.
Specific Functions As the name implies, these are functions that are specific to each application. At least one test list should be created for each application to cover specific functions. Examples are running a custom macro in Microsoft Excel, creating a new project in Visual J++, and changing the color saturation in Adobe Photoshop.
System Testing
The system-testing phase is designed to ensure that an application behaves predictably on a server loaded with other applications. This is also typically the phase that includes some load testing for performance. A system test involves running the following steps:
-
– Run the component tests again on a fully configured server. Such a server has all the applications slated for production deployment loaded; has the network connected; and is participating in a domain, a server farm, and load balancing. The idea is to set up an environment that is as close to the production environment as possible.
-
– Test necessary application integration functionsfor example, database access through Microsoft Excel, cutting and pasting between applications, running a mail-merge macro in Microsoft Word, or running a custom client application that provides a front-end user interface to a legacy system.
-
– Load-test the application. Establish as many user sessions as are likely to be used in production. This can be done either literally or through scripting or a commercial testing application as covered in Chapter 11. Have several people run test lists on the application simultaneously.
-
– Test the application using all targeted client environments. This includes not only desktop PCs, laptops, and Windows terminals, but also different points in the enterprise network and other different types of network connections.
Anecdotal Testing
We have found that a period of " beating on the application" after all other formal testing has been done is often very useful. This type of undirected testing allows the testers to think "outside the box" and exercise functions that the test-list creators may not have thought of. Anecdotal testing is no substitute for formal testing and should never be used as the sole testing method.
Test Lists
There is no secret to creating good test lists, but there is an art to it that can only be mastered with practice. The most important thing to remember is not to let "best get in the way of better." In other words, it is better to start with a basic test list and make it better over time than to delay the test process until the perfect test list is completed. The perfect test list will never be realized without experience in the process.
We have provided the following example test list as a starting point. Feel free to adapt it to other programs or even modify its structure to fit your needs. Table 13-1 shows a test list of generic functions that can be applied to most applications. In addition to this generic list, a more specific list should also be developed to ensure that a particular application's functionality has been fully tested.
| Step | Test Generic) | Description | Expected Result | Result | Pass/Fail | Notes |
|---|---|---|---|---|---|---|
| 1 | Launch Method #1 | Click the Application icon on the desktop. | The application executes. | Application is executed. | P | |
| 2 | Launch Method #2 | Click Start Programs, the program group, and the application name. | The application executes. | Application is executed. | P | |
| 3 | Open a document | Choose File Open from the menu. | The default or last data directory is displayed. | The default directory was displayed. | P | Might want to run this test two more times to see which directory is displayed. |
| 4 | Print a document | Choose File Print from the menu. | Current document prints in full. | Document printed. | P | |
|
| ||||||
| 24 | Exit Method #1 | Choose File Exit from the menu. | The application exits. | Application is exited | P | |
| 25 | Exit Method #2 | Click the X in the upper-right corner of the main application window. | The application exits. | Application is exited | P | This method is faster. |
| Note | Substitute the information in parentheses in the tables with information specific to the application being tested. |
Pass or Fail Status
Once a test list has been run, a report of the application, test lists, tests run, and the status can be generated. It is not unreasonable to expect an application to pass all tests before being considered for production deployment.
Test Cycles
All test lists run on a particular application are considered one test cycle. Keep in mind, all tests may not pass. Following the test cycle, and after any fixes or corrections have been made, all test lists with failed tests should be run again. Once all the failed tests have passed, a final run of the entire suite of test lists is advisable to make sure nothing new was "broken" during this phase. This is often referred to as regression testing. The cycle repeats until all tests pass or until the pass percentage meets a predetermined acceptance level. Once all tests have passed or met the goal, the application can be considered a candidate for production deployment.
EAN: 2147483647
Pages: 137