THE PRODUCTION DEPLOYMENT PROCESS
| | ||
| | ||
| | ||
Once an application has completed the testing process, it is time to manage its deployment into the production environment. Unless extensive load testing was done before deployment, we recommend putting the application on one or just a few servers to begin with and using the ICA Passthrough capability to direct users to the new application, as shown in Figure 13-2. You should also consider having an "early adopter" user group that can begin employing the application before it is deployed throughout the enterprise. A week or two of running the application in this manner can reveal any last-minute issues not discovered in testing, without unduly burdening the user community with problems.
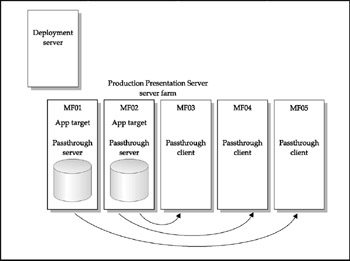
Figure 13-2: Deploying an application to a few servers
Sample Process Checklist for Application Deployment
The following checklist provides a guideline for an application deployment process. Modify it to fit your organization and established procedures.
-
A qualified request for application support is made to IT.
-
Verification that management has approved the application is completed.
-
A contact person for the application has been identified. This person will be the point of contact for communicating the application's status.
-
Review of the application's specifications and requirements is done.
-
– Is the software 32-bit?
-
– Are there Registry entries?
-
– If internally developed, are network paths hard-coded?
-
– Are there any system library dependencies?
-
-
Install the application on the test server. Document all steps of the install.
-
Perform any necessary software configurations for operation in a Terminal Services environmentfor example, Registry changes, INI file settings, file or directory modifications.
-
Create specific function test lists. Determine the suitability of generic function test lists and modify as appropriate. Create test lists for both component and system test phases.
-
Begin Test Cycle 1. Perform component testing.
-
Repeat component testing until all tests have passed, or the pass percentage is acceptable.
-
Begin system testing. Add the application to the last good server image that includes other production applications and operating system modifications. Rerun component tests and add system tests.
-
As part of system testing, load-test the application. Test with a single user (usually the contact specified in Step 3).
-
Get five test users from the contact to run selected system test lists. Determine whether further load testing is necessary or if results can be extrapolated from the five-user test.
-
Repeat the test cycle until all system tests have passed.
-
Turn over testing documentation and certification to production IT staff for installation.
-
Install the application on one or two production servers. Set up ICA Passthrough to make the application available to the appropriate users. Monitor the server's performance to ensure that there are no utilization spikes or any other irregularities.
-
Survey users to see if the application is performing properly.
-
Schedule production deployment using a chosen distribution method (for instance, imaging or Installation Managercovered later in this chapter).
-
Deploy the application.
-
After one week of production, survey a sample of users to see if the application is performing properly.
Mass Deployment
Once an application has gone through the preceding installation and testing procedure, Step 17 calls for production deployment across the farm to all users who need the application. Obviously, in smaller organizations, the installation of an application on two or three servers is often less time-consuming than the time it would take to automate and implement the process. But in larger enterprises, such as our case study, CME Corporation, the installation of an application across 100 servers can be a daunting task. In this case, the investment in developing the automation and deploying it pays off very quickly. We have seen large enterprises deploy full suites of applications overnight across thousands of servers to thousands of users by utilizing one of the automation procedures we will detail here.
Imaging Software
As detailed in Chapter 11, Ghost and DeployCenter can be utilized to build a standard server installation image and clone that image to multiple other servers. This process is extremely useful for the initial builds of the servers, and for major rebuilds, but can be tedious for minor application upgrades and maintenance (such as hotfixes and patches). For the purposes of server and application maintenance and singular application installs , we recommend the use of Presentation Server Installation Manager.
Presentation Server Installation Manager
Installation Manager (IM) is designed to automate the application installation process and facilitate application replication across Presentation Server servers throughout the enterprise. Although IM does not facilitate the initial server building and configuration process, it is quite handy for software installation and maintenance. Through the use of IM, applications can be distributed across multiple servers in minutes rather than days or weeks. Presentation Server Installation Manager is bundled with the Enterprise Edition of Presentation Server 4 and cannot be purchased separately. IM is fully integrated into the CMC.
Presentation Server Installation Manager creates a central repository for software application packaging and distribution. Having a central repository that packages, distributes, and inventories applications aids administrators by
-
– Allowing all software to be managed in a single location
-
– Allowing scheduling of application deployment/distribution during low server load times
-
– Allowing retention/tracking of all applications/versions contained in each server in the server farm
If the farm is configured using an application load-balanced architecture, IM allows for the rapid tuning and placement of applications onto the server groups, as well as ensuring consistency across all server types.
The next four sections provide details regarding the IM components .
Packager IM Packager monitors application installation routines and records changes as installation commands in a script. The script file and application files are used to install the application on target servers in the Presentation Server farm.
Since the Packager is primarily responsible for recording application installations, it is recommended that Packager run in an environment that closely approximates the environment of the target servers.
Installer Service Installer Service interprets the ADF or MSI file in the package and installs the software on the target servers. In order for the package to execute on a server, the Installer Service must be installed and running.
File Server A file server is required to store application packages that have been created by the packager. A network share must be created on the file server with read-write permissions and be accessible to all servers using IM to install applications. Once a package is created and stored, the administrator can deploy the package referencing the network share point to the target servers in the server farm.
Presentation Server Installation Manager Plug-In The Presentation Server Installation Manager Plug-In is a plug-in that works with the Citrix Management Console (CMC). Using the Presentation Server Installation Manager Plug-In, an administrator can
-
– Schedule install and uninstall jobs
-
– View a job's status
-
– View packages
-
– Change package properties
-
– Create server groups
The Application Packaging Process In creating an application package, the administrator is granted three options:
-
– Package Installation Recording Packager captures the procedures to install an application.
-
– Package an Unattended Program Packager prompts for the application and associated command-line parameters. This is for applications that can be installed without a user interface.
-
– Package Selected Files Packager prompts for files and/or folders.
If the option Package installation recording is selected, the Packager prompts for the choice of adding Application Compatibility Scripts and/or Additional Files. It then records the installation of an application and builds the package, which is stored in the network file share.
If the Package An Unattended Program option is selected, the Packager requests the application executable, optional command-line parameters, and any additional files. The executable, command-line parameters, and additional files are then compiled into a package and stored in the network file share.
If the option Package Selected Files is selected, the Packager prompts for the files and/or folders. These files and/or folders are collected and created as a package that is stored in the network file share.
Figure 13-3 provides a conceptual design of the package-building process.
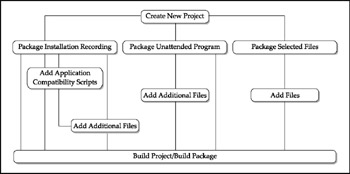
Figure 13-3: The conceptual design of a package-building process
The Job Process A job is a package that has been scheduled for installation or uninstallation on target servers. The process to create a job is displayed in Figure 13-4. To create a job, the administrator selects a package to be installed or uninstalled . The Job window prompts for the target servers to process the job, the name of the job, and a schedule for the job. If the administrator chooses to execute the job immediately, the job is saved to IM and then immediately executed. If the administrator chooses to schedule the job later, the job is saved to IM and executed at the scheduled time.
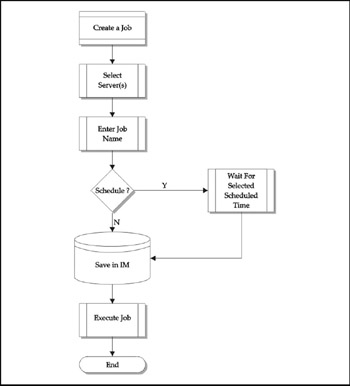
Figure 13-4: The IM job creation process
IM Installation and Configurations
For our case study of CME Corporation, we will plan to install Office 2003 across the entire server farm of 100 Windows Server 2003 terminal servers running Citrix Presentation Server 4.
The following tasks were completed prior to the installation of other components.
-
– Windows Server 2003 with Presentation Server 4 was installed and fully tested on the test server farm.
-
– All server fully qualified domain names were registered in DNS.
Since IM is part of the Enterprise Edition of Presentation Server 4, the Enterprise Edition was selected as the type of product version to install. The Presentation Server installation was performed according to the instructions listed in Chapter 12.
The environment setup shown in Figure 13-5 involves four servers.
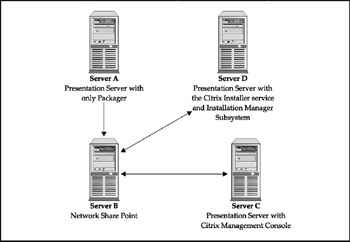
Figure 13-5: Installation Manager server configurations
The configurations of the servers in Figure 13-5 are listed in Table 13-2.
| Server Name | Operating System (OS) | Application and Function |
|---|---|---|
| Server A | Windows Server 2003 with Presentation Server 4 | IM Packager software packaging server |
| Server B | Any accessible network file share | Network share point |
| Server C | Windows Server 2003 with Presentation Server 4 | Management Console |
| Server D | Windows Server 2003 with Presentation Server 4 | IM installer service and IM subsystem |
This environment operates by creating and storing packages on a network server file share (Server B). After the packages are created, the packages can be deployed to Servers A, C, and D, although in a large environment like CME Corporation, the machines serving these roles should be dedicated to provide the flexibility and bandwidth necessary.
Packaging Office 2003 for IM Deployment
Microsoft Office 2003 uses a Microsoft Installer package (MSI) for unattended installation. The MSI file for MS Office 2003 is PROPLUS.msi. We will utilize the custom transform file we created earlier in the chapter.
To create a Presentation Server Installation Manager Package for Office 2003, the following steps must be performed:
-
Create a folder for Office 2003 on the IM network share server (Server B).
-
Insert the MS Office 2003 CD or connect to a network share with Office 2003.
-
Open a command prompt on Server A.
-
Change drives to either the CD-ROM drive or the network share with MS Office 2000.
-
Type the following: msiexec /a PROPLUS.msi .
-
Enter the product code.
-
Enter the IM network share path ( \\Server B\Office 2003 share )the Office 2003 administrator installation files will be copied .
-
Copy the Termsrvr.mst file created earlier in the chapter to the IM network share path (\\Server B\Office 2003 share) on Server B.
Creating the Office 2003 Package The following steps should be performed in order to add the Office 2003 MSI package (or any other MSI package) to the CMC:
-
Open the CMC.
-
Expand the Installation Manager node.
-
Right-click the Packages node.
-
Select Add Package.
-
Enter the package name.
-
Choose Yes to add transforms or command-line parameters.
-
Add the Termsrvr.mst file.
Scheduling MS Office 2003 Package for Target Servers The following steps detail the procedures required for scheduling and installing the MS Office 2003 Package on target servers:
-
Open the CMC.
-
Expand the Installation Manager node.
-
Expand the Packages node.
-
Right-click the Office 2003 package.
-
Select Install Package.
-
Select the target servers on which the package will be installed.
-
Click Next.
-
Schedule a time to execute the package or execute the package immediately.
Caution Executing a package is bandwidth intensive . Start by testing a small package targeted to a limited number of servers to get a feel for the load that will be put on the network. For larger server farms, schedule the execution for off-hours, and spread the executions over time to ensure the network can support the additional load. Executions over a WAN will require even greater planning and testing to ensure that the package will be fully executed prior to users resuming use of the WAN.
-
Click Finish.
-
Click OK.
After these steps are completed, the CMC displays a Job entry for the Office 2003 package. The Job entry states the job name, status, and scheduled time.
EAN: 2147483647
Pages: 137