INSTALLING AND CONFIGURING CITRIX ACCESS GATEWAY AND ADVANCED ACCESS CONTROL AT CME
| | ||
| | ||
| | ||
In preparation for their Access Gateway implementation, CME upgraded their Presentation Server farm to Presentation Server 4. All requisite service packs , patches, and hot-fixes were applied.
| Note | Differentiating between the two types of "farms" that are involved in a CAG with AAC deployment can be confusing. "Presentation Server farm" refers to the Citrix Presentation Server 4 server farm that delivers applications. "Access Server farm" refers to the collection of AAC Servers that are the intermediaries between the CAG and internal resources (including Presentation Server farms, Web servers, and other resources.) |
Component Systems Requirements
The CAG/AAC architecture requires several basic building blocks: the Citrix Access Gateway Appliance, the AAC Server, the WI Server, and a back-end SQL database server, the STA component of the Presentation Server.
Citrix Access Gateway
Citrix Access Gateway appliance Version 4.2 or higher
AAC Server
AAC Server minimum requirements are
-
– 512MB of physical memory
-
– Microsoft Windows 2000 Server Family with Service Pack 3, or Windows Server 2003, Standard Edition, Web Edition, or Enterprise Edition with all service packs and updates installed
-
– Internet Information Services (IIS) 5.0 or 6.0
-
– Microsoft Windows Installer 3.0 (already included on Windows Server 2003 SP1)
-
– Microsoft .NET Framework 1.1 with Service Pack 1
-
– Microsoft Data Access Components (MDAC) Version 2.7 Refresh
SQL Server
The database server for AAC must be one of the following:
-
– Microsoft SQL Server 2000 with Service Pack 3a
-
– Microsoft SQL Server 7 with Service Pack 4
-
– Microsoft SQL Desktop Edition (MSDE) Service Pack 3
Citrix Licensing Server
Citrix Presentation Server 4 Licensing Server is required. Licenses for CAG with AAC must be fulfilled and installed on the Licensing Server.
Citrix Presentation Server with Secure Ticketing Authority (STA)
At least one Presentation Server farm server (preferably the infrastructure server) must be designated as the STA.
Web Interface
Web Interface integration required Web Interface Version 4.2 and the matching Access Suite Console.
Clients
Basic connectivity to the Citrix Access Gateway requires only the familiar ICA Web client. This allows logon and enumeration of the resources provided by the Access Server farm, and to applications served up through the Access Server farm by the Web Interface and Presentation Server farm. Table 16-2 provides a list of supported platforms and associated browsers. Additionally, Windows 2000 or XP users must be members of the Administrators or Power Users group to download and install ActiveX controls, and the following browser requirements must be configured on all clients:
-
Enable execution of client-side JavaScript.
-
– Allow downloading of signed ActiveX controls.
-
– Allow downloading of Java applets if you provide access to published applications and restrict users to the Client for Java.
| Devices | Operating System | Web Browser |
|---|---|---|
| Desktop workstations | Microsoft Windows: Windows XP Home/Professional SP2 Windows 2000 Professional SP4 | Internet Explorer 5.5 SP2 Internet Explorer 6.0 SP1 Netscape Navigator 8.0 Mozilla Firefox 1.0.4 |
| Apple Macintosh OS X (English only) 1 0.3.9 or greater | Safari 1.2 Netscape Navigator 8.0 Mozilla Firefox 1.0.4 | |
| Red Hat Linux Netscape Navigator 8.0 | Mozilla Firefox 1.0.4 | |
| PDAs and Smartphones | PalmOS 5.2.1 (Palm Tungsten C) PalmSource Web Browser Microsoft Pocket PC 2003 2.0 Internet Explorer Internet (HP iPaq Pocket PC h6300) Explorer Default Web Microsoft Windows Mobile 2003 Browser (Smartphone) RIM BlackBerry (BlackBerry 7100t) | PalmSource Web Browser 2.0 Internet Explorer Internet Explorer Default Web Browser |
More advanced features require the following additional client components.
The Endpoint Analysis Client This client is required to support AAC scans . The End-point Analysis Client can be distributed as an ActiveX control, a browser plug-in, or a Windows 32-bit application. To use the Endpoint Analysis Client, the following client-side software is required:
-
– Microsoft Windows 2000 or XP with all service packs and critical updates
-
– One of the three Endpoint Analysis Clients
-
– A supported Web browser:
-
– Microsoft Internet Explorer 5.5 SP2 or 6.0 SP1 with cookies enabled and permission to load signed ActiveX controls if distributing the ActiveX control
-
– Netscape Navigator 8.0 if distributing the browser plug-in
-
– Mozilla Firefox 1.0.4 if distributing the browser plug-in
-
Live Edit Client This client is required to support Live Edit. Live Edit requires
-
– Microsoft Windows 2000 or XP with all service packs and critical updates
-
– Microsoft Internet Explorer 6.0 SP1 with cookies enabled and permission to load signed ActiveX controls
-
– The Live Edit Client ActiveX control
-
– An appropriate Microsoft Office editing application such as
-
– Microsoft Word 2000, XP, or 2003
-
– Microsoft Excel 2000, XP, or 2003
-
– Microsoft PowerPoint 2000, XP, or 2003
-
– Microsoft Visio 2000, 2002, or 2003
-
Web Site Viewer The Web Site Viewer requires Internet Explorer Version 5.5 SP2 or 6.0 SP1 with all service packs and critical updates and the ability to download and install the signed ActiveX control.
The Secure Access Client This client is required to support true VPN access to IP networks. The Secure Access Client acts as a proxy between the client computer and the Access Gateway appliance. The Secure Access Client can be distributed as a desktop application for Microsoft Windows or Linux operating systems or downloaded and installed automatically when users enter the secure Web address of the Access Gateway appliance and a logon point in a Web browser. In addition to the Administrative rights previously stipulated for Windows 2000 and XP users, Linux user must have the tcl and tk packages installed to use the Secure Access Client.
Basic Installation
The installation procedures in the following paragraphs are presented as a high-level sequence of events. They are neither all inclusive nor are they intended to accurately detail configuration processes and procedures for CAG with AAC. Implementation of Citrix Access Gateway with Advanced Access Controls in a production environment requires extensive planning and a full understanding the business' access strategy and needs, particularly when the full capabilities of the Citrix Access Gateway are to be effectively leveraged. Capabilities such as endpoint analysis and policy-based access based on identity, endpoint scan results, roles, and similar variables should never be undertaken without a carefully planned process and specific requirements and goals. Administrators are encouraged to read the complete design and implementation guidance for CAG and AAC available on Citrix's Web site before proceeding with any CAG implementation. Once a full understanding is achieved, administrators should work to define a corporate access strategy.
Citrix Access Gateway
Configuring the CAG for integration with AAC is a multistep process. First, the CAG must be set up for basic management and connectivity via the serial console, and then additional settings are configured via the Administration Portal. Next , the downloadable Administration Tool is use for more complex configurations, and finally (after completing Advanced Access Control installation), the Administration Tool is used to transfer CAG control to the AAC server.
Basic Console-Based Setup For initial configuration of the CAG, complete the following steps:
-
Connect the CAG interfaces to the appropriate switch ports (internal and external).
-
Connect a computer running terminal emulation software (9600 bps, 8 data bits, no parity, 1 stop bit) to the CAG console (serial) port with a null-modem cable.
-
Once the CAG serial console opens, enter the default administrator credentials (username = root, password = rootadmin). Set the IP address and subnet mask and the default gateway device for Interface 0 (external) by typing and pressing ENTER to choose Express Setup. Respond to the prompts and then commit your changes by typing y; the Citrix Access Gateway will then restart.
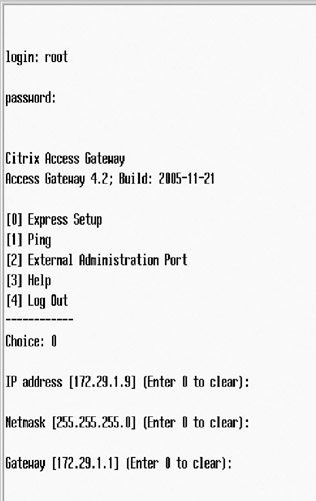
-
After the Gateway has rebooted, verify that the Access Gateway can ping a connected network device on the external interface (the management workstation) by typing 1 and entering the IP address of the computer as shown here.
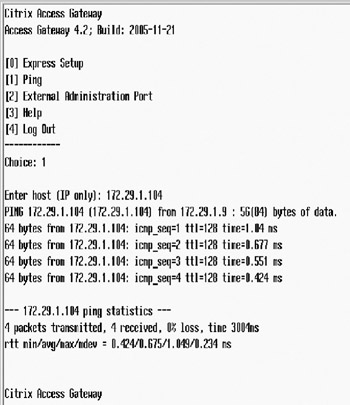
| Note | At this point in setup, the CAG has not been configured with additional routes. The management workstation must be in the same subnet as the external interface of the CAG. |
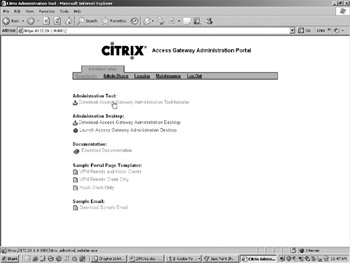
Making Changes via the Access Gateway Administration Portal The Access Gateway Administration Portal allows the user to make basic configuration changes to the CAG, including
-
– Changing the administrator password
-
– Uploading licenses
-
– Downloading documentation
-
– Modifying portal page templates
-
– Modifying a sample e-mail for end users
-
– Viewing Access Gateway logs
-
– Uploading certificates
-
– Uploading a saved configuration or a software upgrade
-
– Saving the CAG configuration and restarting and shutting down the CAG
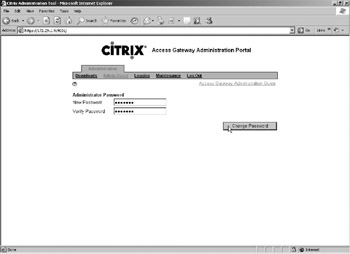
Although these basic CAG settings can be configured using the Access Gateway Administration Portal, the downloadable (from the Administration Portal page) Administration Desktop utility provides a simpler user interface. Only the password change need be executed from the Access Gateway Administration Portal.
Complete the following steps to prepare for administration with the Access Gateway Administration Tool:
-
Access the Portal with a Web browser at https ://www.new_internal_ip_address:9001.
-
Since a certificate has not yet been installed on the Access Gateway, a security alert dialog box appears. Click Yes and the Access Gateway Administration Portal will appear.
-
Change the default "root" password by navigating to the Admin Users section and entering a new password.
-
In the Access Gateway Administration Portal, navigate to the Downloads, and under Administration, click Download Access Gateway Administration Tool Installer. Run the installer to install the Administration Tool on the management computer, and then open the Administration Tool by double-clicking the icon.
| Note | The downloaded Administration Tool is version-specific. You cannot install more than one version (4.1 or 4.2) on the management workstation at a time. Previous versions must be uninstalled through "Add or Remove Programs" before installing a different version. |
Making Changes via the Access Gateway Administration Tool The Access Gateway Administration Tool provides the interface needed to make the CAG accessible, manageable, and secure. Complete the following steps:
-
Log on to the CAG from the Access Gateway Administration Tool using the external interface address previously assigned.

-
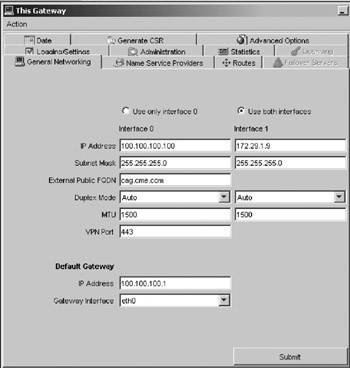
Navigate to the General Networking tab and assign IP parameters for the internal (Interface 1) connection.
-
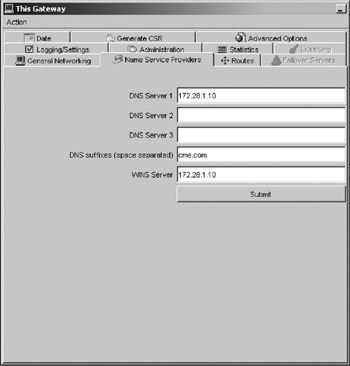
Navigate to the Name Service Providers tab and assign the internal DNS and WINS servers (as a minimum, DNS is needed).
-
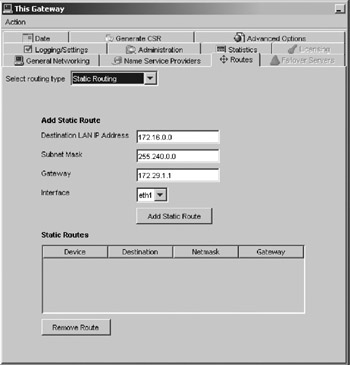
Navigate to the Routes tab and assign the static route to the internal network (ultimately the CAG will be managed from this network and provide secure connectivity for resources in this network). Based on CME's hierarchical address scheme, a single aggregate route defines all internal destinations.
-
Navigate to the "Generate CSR" tab and enter the required information for the CAG certificate. This certificate will secure all traffic to, from, or through the CAG. Submit the CSR to the selected Certificate Authority (CA). When the certificate is received, use the Administration tab to upload the certificate.
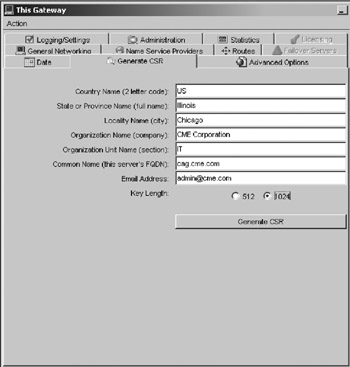
| Tip | Always request the certificate in Base-64 format as a ".crt format." Other formats must be converted before they can be uploaded to the CAG. If the CA requires additional intermediate certificates, these must also be in Base-64 format and uploaded to the CAG. |
Once these changes are submitted and the CAG restarted, CME will be able to access the CAG from any internal network and specifically manage the CAG from the AAC Server. Once the CAG is reconfigured for administration from Advanced Access Controls, most on-box management features are used only for CAG appliance maintenance tasks, and not for configuration tasks .
Obtaining an SSL Certificate for the Citrix Access Gateway A Digital ID, also known as a digital certificate or SSL certificate, is the electronic equivalent of a passport or business license. It is a credential issued by a trusted authority that individuals or organizations can present electronically to prove their identity or their right to access information.
When a Certification Authority (CA) such as VeriSign issues Digital IDs, it verifies that the owner is not claiming a false identity. Just as when a government issues a passport and officially vouches for the identity of the holder, when a CA gives your business a digital certificate, it is putting its name behind your right to use your company name and Web address.
This section describes the basic process for obtaining a third-party server certificate from a well-known CA such as VeriSign or Thawte. The processes for obtaining a certificate may differ slightly between CAs, but the steps are basically the same. Most CAs will include a variety of services and extras with their certificate offerings. These services may include 40-or 128-bit SSL (Global Server) IDs; business authentication; and protection against economic loss resulting from the theft, corruption, impersonation, or loss of a certificate. Services may also include trials of a security analysis or security auditing service, accelerated certificate delivery, and certificate revocation and replacement periods. Be sure to check with each potential CA for details on their individual services.
CME has chosen to use a 128-bit SSL Server ID from VeriSign for their Citrix Access Gateway. This will secure the traffic and packets from the Internet to the CAG.
In order to complete the certificate request, CME needs to provide the following documentation to the Certificate Authority:
-
– Proof of Organization Before a Secure Server ID can be issued, the CA will need to verify that your company or organization has the legal right to conduct business under the name you specify in your enrollment request. Documentation may include: a business license, the registration of a trade name, or a Dun & Bradstreet number. If you have a Dun & Bradstreet D-U-N-S Number registered for your organization, it may help expedite the verification process and issuance of your Secure Server ID.
Note Your organization's legal name must match the organization name in your enrollment request. Otherwise , the CA will be unable to authenticate your organization.
-
– Proof of Domain Name To issue your certificate, your domain name registration must be verified against the organization name provided during enrollment. CAs can only issue a Secure Server ID to the organization that has the legal right to use the domain name. The Common Name (domain name) for the server that will use the Server ID must be the fully qualified domain name. For CME's FQDN, "http://www.cag.cme.com,"http://www.cme.com is the domain name and access is the host name.
-
– About the CSR for CAG The fields that must be completed to generate a CSR for the CAG use industry-standard terminology:
-
– Key Length The bit length field determines the certificate's encryption strength. We recommend a setting of 1024 to provide reasonable encryption strength without sacrificing performance.
-
– Organization and Organizational Unit The legal name of your organization and the name of your division or department.
-
– The Common Name (domain name) This is the valid DNS name of your Web Interface site and Secure Gateway server. If you decide to change the common name of the site, you will have to obtain a new certificate. This will correspond with the Issued To: field on the summary screen.
-
– Geographical Information Fill in the appropriate information.
-
Domain Services
AAC requires a Domain Account with Local Administrator rights on all component platforms (AAC, Presentation Server servers, etc.). To simplify the process, CME will create a new user account "svc_aac_admin" as a member of the Windows "Domain Admins" security group.
Additionally, internal and external DNS entries are required to match the new FQDN of the Citrix Access Gateway, while new internal records are required for the AAC server and associated suite components.
SQL Server
To allow simplified installation of the AAC, the existing SQL server used for the Citrix Datastore must have an additional user and associated database created for AAC. The actual AAC installation will create this database, provided the minimum prerequisites are met.
-
– Create a SQL User Account "sa_ctxaac" (or other name). Although SQL authentication and Windows authentication are both supported, CME will use SQL authentication.
-
– The newly created "sa_ctxaac" must be included in the Database Creators server role on SQL Server. Once the AAC installation creates the database, this database user must be reassigned (downgraded) to db_datareader and db_datawriter permissions only.
Citrix Licensing Server
The existing Citrix Licensing Server will be used for AAC and CAG, but the "Citrix Access Gateway with Advanced Access Controls" licenses must be fulfilled (from the Citrix Licensing Web site) and uploaded to the Citrix Licensing Server. In keeping with Citrix's best practices for survivability , the Licensing Server was deployed (during CME's upgrade to Citrix Presentation Server 4) in a clustered configuration on an existing internal Windows Server 2003 Cluster.
AAC Server
Before installing AAC, the host server must meet all prerequisites in terms of service packs, hotfixes, patches, and MDAC versions, and must be a Domain Member. The IIS installation on the host server must be properly configured in terms of Web Services Extensions (Figure 16-3). Specifically,
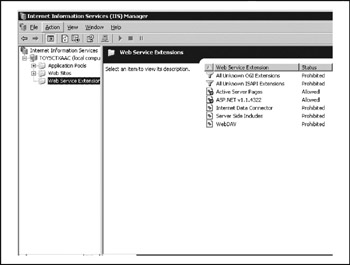
Figure 16-3: IIS Web Services Extensions
-
– ASP.NET and Active Server Pages must be set to Allow.
-
– Front Page Server Extensions and WebDAV must be set to Prohibited.
| Tip | As of this writing, the AAC installation prerequisite CD ships with a file called "NDP1.1sp1-KB867460-X86.exe." This is the ASP.NET service pack for Windows 2000 Server. If installing on Windows Server 2003, the current version for Windows Server 2003 (Win2k3-net11sp1.exe) must be downloaded and installed instead. |
AAC Installation CME's installation will not (initially) employ additional features such as Live Edit, HTML Preview, Web e-mail via Microsoft Exchange, or PDA Synchronization. Each of these requires additional software such as Microsoft Office or Exchange Systems Manager to be installed on every server in the Access Server farm (AAC servers). During AAC installation, warnings with regard to these services can be ignored.
To install AAC (the CME hostname is ORD-AAC01), in CME's case on Windows Server 2003, Run "AutoRun.exe" from the AAC media CD and select the Advanced Access Controls Server and Management Console components for installation (Figure 16-4). When the installation completes, accept the default value to launch the Advanced Access Controls Server Configuration Wizard.
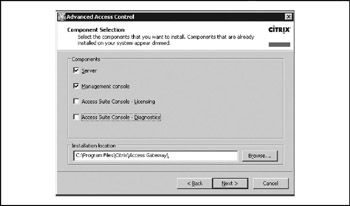
Figure 16-4: AAC component selection
| Tip | If the AAC server will support HTML preview, deselect the Run Server Configuration check box on the last screen. Two optional open source components, GhostScript and a PDF-to-HTML converter, should be installed prior to configuring the server. See the Citrix Access Gateway with Advanced Access Control Administrator's Guide for details on how to download and install these components. |
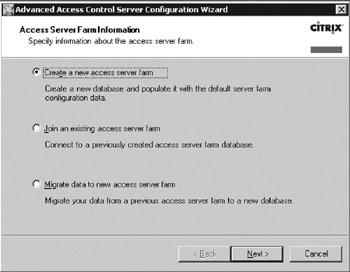
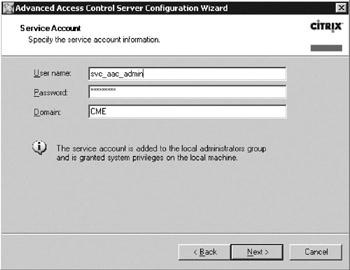
To provide the initial configuration, step through the screens of the AAC Server Configuration Wizard:
-
Define a new Access Server farm (not Presentation Server farm) as shown here. When CME expands their access platform (adding the second CAG and additional AAC servers in the Access Server Farm) they will select Join An Existing Access Server Farm and the new AAC server will "pull" settings from the original server.
-
Provide the previously assigned AAC service account (Domain Admin account) and credentials.
-
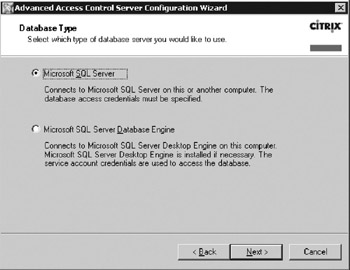
CME will use the existing SQL server and create a new database for AAC through the wizard, shown here.
-
Provide the appropriate SQL credentials and server identity as shown next. The Access Server Farm name is the name of the farm to which this (and future) AAC servers will belong.
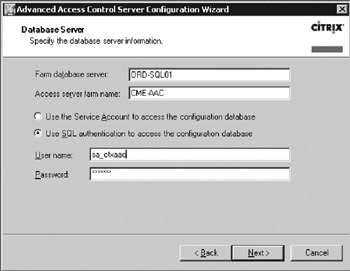
Note Identify CME's existing Citrix Licensing Server (which runs on the default TCP port 27000) as the selected Licensing Server for AAC, shown here.

-
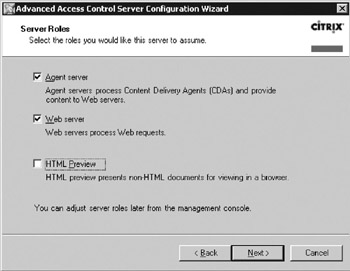
Assign the server roles with HTML Preview deselected. The HTML Preview role may be added later, but the Agent server and Web server roles are mandatory for creating the Access Server farm. The Agent server role provides policy management and enforcement and supports legacy Content Delivery Agents (aka MetaFrame Secure Access Manager). The Web server role provides the user interface functionality and authentication processing.
-
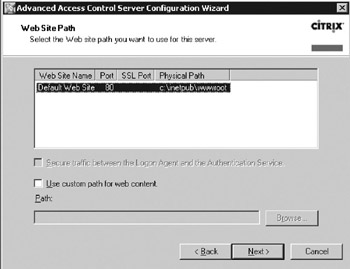
Use the default Web site path .
-
An installation summary window appears. Click Next to accept the listed configurations and complete the installation.
Verifying the Basic Installation Once AAC installation is completed, verify the AAC server status (Figure 16-5).
-
Click StartProgramsCitrixAccess GatewayServer Configuration to launch the Advanced Access Control Configuration utility.
Note Verify that AAC configuration data is correctly reflected by checking the Service Account, Server Farm Information, Configured Logon Points (a sample logon point should have been created), and Authentication Server Details sections.
-
Verify that all services are started under the Services section. Checking the services can eliminate needless troubleshooting during ensuing setupit is quite common that at least one service doesn't automatically start after the initial installation.
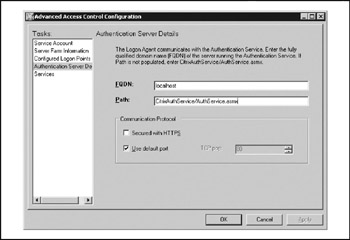
Figure 16-5: Advanced Access Control configuration ( post-install )
| Tip | The "AuthService.asmx" listed on the "Authentication Server Details" is not a Windows service visible through the Services Control Panel applet. If it is ever necessary to change the Authentication Server for the Access Server farm (such as troubleshooting or distributing services across Access Server farm members), you must change/verify the settings in three locations: the "Authentication Server Details" in the Advanced Access Control Configuration utility already mentioned; the Access Gateway Settings window of the AAC Server's Access Suite Console (see the note in the later section "Finalizing Management Settings for the CAG in AAC"); and on the Web Interface (see the note in the later section "Web Interface"). |
Switching CAG Control to the AAC Server The final step in initial CAG and AAC integration is to reconnect to the CAG with the Access Gateway Administration Tool, navigate to the Advanced Options tab, and change the option for Administer The Access Gateway Using: to "Advanced Access Controlsincludes an access server farm." The display changes and requires identification of the AAC as shown in Figure 16-6. When you "submit" this data, the CAG registers with the AAC server.

Figure 16-6: Changing CAG control to AAC
Finalizing Management Settings for the CAG in AAC Once the CAG has rebooted, it should automatically register with the AAC server. From this point forward, configuration of CAG behavior is accomplished through the Access Suite Console on the AAC Server. Note that the Access Suite Console installed on an AAC Server is different than the console version on a typical Presentation Server server. Complete the following steps:
-
Launch the Access Suite Console. Select first the Access Gateway heading and then Run Discovery as shown in Figure 16-7.
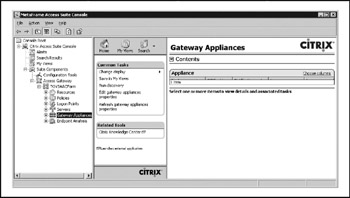
Figure 16-7: AAC Access Suite Console -
Once the Gateway Appliance is discovered , select Edit Gateway Appliance Properties.
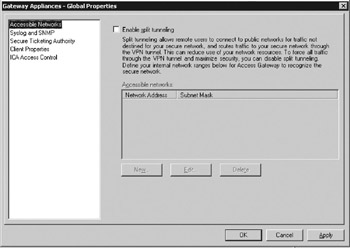
Note Under Accessible Networks deselect Split Tunneling. CME does not allow clients connected to the corporate network to be concurrently connected to Internet resources.
-
Under Secure Ticketing Authority add the Presentation Server Farm Infrastructure Servers as shown here; then click OK to finish.
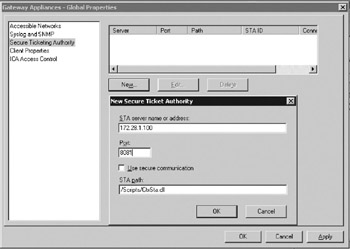
Note A minor annoyance, when adding the STA servers, is that if you enter the new XML service port first and then tab to the IP Address field, the XML value returns to the default port 80.
-
In the Console, select the named AAC farm and then Edit Farm Properties.
-
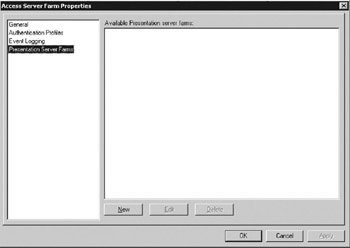
Select the Presentation Server Farms and click New to add the existing CME Presentation Server farm.
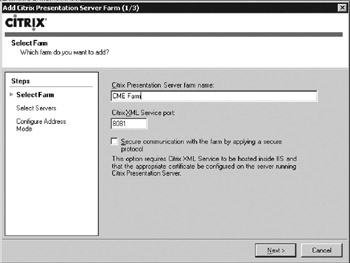
-
In the pop-up windows select General and enter the farm name and XML service port.
-
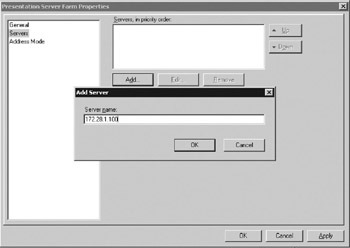
Click on Servers and then Add Server and enter the IP address or FQDN of the Presentation Server farm's infrastructure servers.
-
Once the Infrastructure Servers are listed, ensure the Set Failover Sequence Of Unavailable Servers is selected and set the Bypass Interval For Failed Server value to 30 minutes.
-
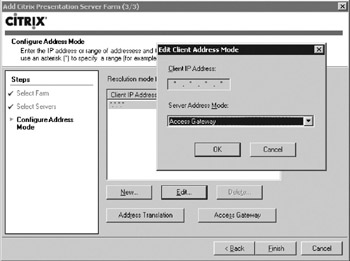
Select Address Mode and then edit the default (*.*.*.*) value, change the Server Address Mode: to Access Gateway, and click OK.
-
Click the Access Gateway button. In the Access Gateway Settings window, Check the Configure Access Gateway For Communication With The Citrix Presentation Server Farm box and then enter the FQDN of the CAG (the name on the CSR). Verify that the AAC Server hostname is correctly listed in the "Authentication Service URLs" area and then click OK.
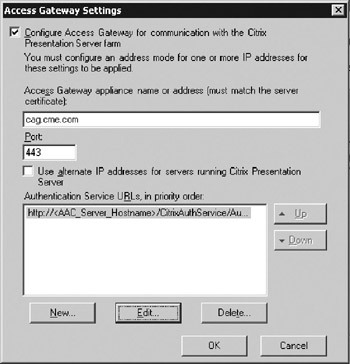
Note This is the second location mentioned under the earlier "AuthService.asmx" Tip.
-
Click Finish then OK to complete the sequence.
Citrix Presentation Server with Secure Ticketing Authority (STA)
Unlike previous versions of Citrix Presentation Server and the legacy WI/SG deployment, Citrix Presentation Server 4 installs the STA service on every Presentation Server Farm server by default. CME followed best practices and changed the default XML port from TCP 80 to TCP 8081 to avoid conflicts with IIS. Every Presentation Server farm server runs the STA service; however, CME has identified their Presentation Server farm infrastructure servers as the logical target for STA connectivity from the Web Interface, AAC, and associated access center components. The CME infrastructure servers are otherwise normal Presentation Server farm members but do not deliver applications. These servers are reserved for tasks such as Zone Data Collectors, STA services, Farm Metric Services, and the like. Keeping infrastructure maintenance workload insulated from application delivery workload ensures anomalies related to application delivery workload (such as a misbehaving application or server resource issue) cannot degrade infrastructure service or availability.
Web Interface
To use the Web Interface (WI) as a Web resource and deliver Presentation Server farm applications to the CAG via AAC, the Web Interface Version 4.2 must be installed in accordance with Citrix's Web Interface Administrators Guide.
Once installation is complete, some default configurations must be changed through the Web Interface's Access Suite Console. Launch the Access Suite Console and complete the following steps:
-
Navigate to Suite ComponentsConfiguration ToolsWeb Interface and select Create Site.
-
Select the site type "Citrix Presentation Server" and click Next.
-
For Specify The IIS Location, accept the default and check the Set As The Default Page of rte IIS Site box and click Next.
Note Under Specify The Configuration Source select the Use Local Configuration File(s) radio button and click Next.
-
Under Specify The Access Method select the Using Advanced Access Controls radio button and enter the URL as http://www.<AAC-Hostname>:<Port> and click Next.
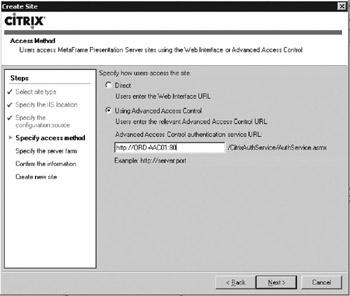
Note This is the third location mentioned under the earlier "AuthService.asmx" Tip above.
-
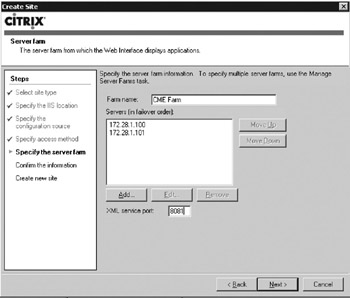
Under Specify The Server Farm add the CME Presentation Server Farm name and the IP addresses of the Infrastructure Servers. Ensure the XML service port is correct, and then click Next. The settings are shown here.
Caution Web Interface should only be managed using the Access Suite Console. The Console will apply necessary changes to IIS through the Console API. Do not attempt to change any settings directly within IIS unless you plan to rebuild the IIS server anyway.
-
Review the site configuration information screen and complete the site creation.
Presentation Server Farm Servers (All Servers)
For the Presentation Server farm to work correctly with the AAC Server, only one change is required in normal Presentation Server configuration. From the Presentation Server Console of a Presentation Server farm member server, navigate to Servers, select each server, and right-click to access the context menu. Select Properties, and when the properties window appears, navigate to XML Service and check Trust Requests Sent To The XML Service as shown in Figure 16-8. This step must be repeated for every server; there is no global farm setting.

Figure 16-8: Configuring the Presentation Server XML service
Basic Configuration
While detailed configuration instructions are beyond the scope of this chapter, basic concepts are necessary before delving in to the complexity of Citrix Access Gateway with Advanced Access Control Administrator's Guide. Configuring the AAC for users to access resources is a simple sequence with complex steps based on the requirements of the access strategy. At the most fundamental level,
-
– Define "Accessible Networks" as a subset of "Entire Network." The "Entire Network" object includes all internal networks in the CAG routing table by default. Without a more limited definition, a new VPN connection would be able to access the entire internal network.
-
– Create, enable, and deploy a default logon point to allow users to connect.
-
– Add managed resources. Resources can include Web resources (including Web Interface and the Presentation Server farm), file shares (handled as rewritten Web URLs), and network resourcesroutable networks to be accessed via the VPN capabilities of the Secure Access Client.
-
– Create policies to grant users access to selected resources. Policies are grouped as one of two types: access policies and connection policies.
-
– Access policies (the term is somewhat confusing) actually govern access to resources provided by or through the Access Server Farm; they are effectively "resource policies."
-
– Connection policies govern VPN connectivity to designated IP resources provided by the CAG with no in-line AAC interaction (only policy processing).
-
-
– Create policy filters to define the conditions under which the policy applies. Filters can define four types of conditions:
-
– Logon point. Applies the policy based on the URL the user employs to connect to the network.
-
– Authentication strength. Applies the policy based on whether users authenticate with passwords only or use advanced authentication.
-
– Endpoint analysis scan outputs. Applies the policy based on information gathered by endpoint analysis scans of the client device. Scans must be defined and configured before they are available for integration into a filter.
-
– Client certificate (Client SSL Certificate).
-
The combination of policies and filters are the key to the flexibility of the CAG/AAC combination. Several important factors should always be considered when building the policies and filters needed to support client access:
-
– The "Entire Network" object is predefined and will be subject to default policies and filters. Always redefine a specific, restrictive policy and filter sequence for access to "Entire Network."
-
– Policies are additive; the user inherits the sum of the policies unless a "deny" rule is applied.
-
– Filters are like reusable code modules, the same filter may be used in multiple policies, but only one filter per policy.
-
– To achieve the effect of multiple filters on a single policy, filters can be nested (complex filters that contain other filters).
Tip For anyone working with filters and policies, take time to brush up on your Boolean logic. For those of us old enough to remember original HP calculators programmed in RPN, the construct of filters makes perfect sense.
-
– Filters should always be constructed to evaluate to "TRUE." As an example, if the intent of a policy was to only allow access for users running the approved virus scanner, the obvious filter would be to test for an endpoint analysis scan for the existence of the minimum virus scanner version and pattern file. When a noncomplying user attempts access, the test "IF [scanner versus] and [pattern file] ‰ [required versions]" evaluates to FALSE and logical policy actions must be applied (deny access). To ensure the filter evaluates as TRUE, create as a custom filter constructed as: "IF NOT [scanner versus] and [pattern file] ‰ [required versions]" with the same action (deny access).
Note AAC-defined filters must evaluate as TRUE, or they cannot be used in the Presentation Server farm to control behavior.
-
– Filters and policies defined in the AAC can be used within the Presentation Server farm as part of Citrix Presentation Server policies or Access Control settings on published applications. There is no direct linkage (query) between the input boxes in the Presentation Server console for this data and the data previously defined in AAC. You must manually type the policy or filter name (correctly) to uses the parameter within the Presentation Server farm.
EAN: 2147483647
Pages: 137
- Step 2.1 Use the OpenSSH Tool Suite to Replace Clear-Text Programs
- Step 3.1 Use PuTTY as a Graphical Replacement for telnet and rlogin
- Step 4.5 How to use OpenSSH Passphrase Agents
- Step 5.2 Troubleshooting Common OpenSSH Errors/Problems
- Step 6.2 Using Port Forwarding Within PuTTY to Read Your E-mail Securely