Applying Web User Controls
Applying Web User Controls
Another component of accelerated enterprise application development is the reuse of user interface elements. User interface reuse also yields the same benefits that come from using templates: consistency, reduction of errors, and faster development. Begin by looking at the application's User Interface Specification (UIS). A properly designed enterprise application will include a UIS that sketches or " mocks up" the entire application. It should include every form control on every Web form. It should describe the form controls in good detail, such as control names , types, labels, valid values, actions, and behavior when interacting with various roles. The IssueTracker enterprise application implements both static and dynamic Web user controls.
Packaging Static Content
Examples of packaging static content into Web user controls include the application header and footer. These two user interface elements will appear within every page of the Web application. These two items could easily be coded into the Web form itself. If the application name or version number changes, then there is a likely possibility that every Web form will need to change in response.
To address this possibility, open the Solution Explorer and navigate to the controls folder within the WebUI project. Select Add ˜ Add Web User Control from the context menu. Enter AppHeader.ascx for the filename and click OK. The form designer displays an empty Web form. For the IssueTracker application, just a simple graphic is sufficient for the application header. After creating and saving the header image as a GIF file, drag an Image control from the Toolbox and drop it into the AppHeader.ascx page. Then, point its ImageUrl property to the location of the new GIF file. The result looks something like Figure 7-10.
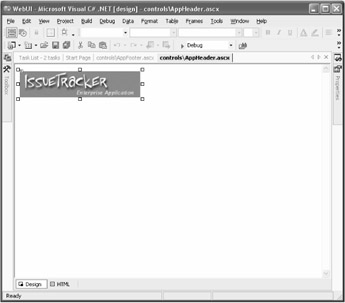
Figure 7-10: Creating the application header user control
After you create the application header's user control, you can compile and use it. Rebuild the WebUI project and then open the IssueDetails.aspx Web form. Drag the AppHeader Web user control straight from the Solution Explorer and drop it into the Web form, replacing the $$PAGE_HEADER$$ marker. In the form designer, the new header appears as a plain box marked as User Control ” AppHeader1 . To see the new header in action, start the project and point to the IssueDetails.aspx page. Figure 7-11 illustrates the IssueDetails.aspx page with its new header control in place.
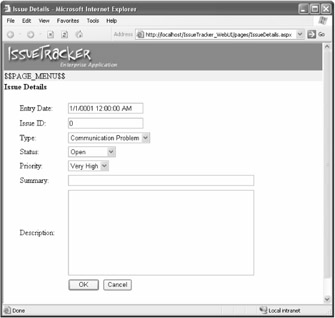
Figure 7-11: The IssueDetails.aspx page displaying its new header Web user control
The same steps implement the footer control. A new file, AppFooter.aspx, implements static text as a Web user control. Web user controls nicely package any static content needed in multiple Web forms. As functional and useful as they are, Web user controls are even more beneficial for reused dynamic functionality.
Packaging Dynamic Functionality
Just as Web user controls package static content for reuse among multiple Web forms, they also package dynamic functionality. A great example of this is the Web application's menu. Because the .NET Framework does not provide a menu Web control, you need to implement one as a Web user control. To make things more interesting, this menu will also tap into the Session object to retrieve the person's role and enable only functions enabled for that role. Chapter 13, "Understanding .NET Security and Cryptography," goes into much deeper detail about handling user roles at the application level and the code level.
Begin by adding a new Web user control, AppMenu.ascx, to the controls folder within the WebUI project. In the empty form designer, place six LinkButton controls with the properties shown in Table 7-2.
| TEXT | ID | ENABLED |
|---|---|---|
| View Issue | lnkViewIssue | False |
| New Issue | lnkNewIssue | False |
| Edit Issue | lnkEditIssue | False |
| Delete Issue | lnkDeleteIssue | False |
| Help | lnkHelp | True |
| Logout | lnkLogout | True |
After adding the controls outlined in Table 7-2, the AppMenu.ascx Web user control should look like Figure 7-12. For extra cosmetics, the figure shows a simple label control displaying the pipe character () between the LinkButton controls.

Figure 7-12: Implementing a role-based menu that dynamically enables options
Next, you need to enable the AppMenu.asc Web user control. Open the code-behind document for the control to edit its Page_Load event handler. As Listing 7-14 outlines, the first step is to create a new User object instance and assign it to the values saved in the application's session. Next, the User object's role is evaluated. For added safety, the C# language does not permit automatic fall-through from one case to another. An explicit goto case must actively specify a fall-through. The reason for the case fall-through is that the IssueTracker security model defines roles with incremental permissions. In each case, the role with access to certain functionality simply enables the matching LinkButton control.
| |
private void Page_Load(object sender, System.EventArgs e) { // Put user code to initialize the page here User objUser = (User)Session["USER_OBJECT"]; switch( objUser.UserRole ) { case (int)User.UserRoleType.Administrator: lnkDeleteIssue.Enabled = true; goto case (int)User.UserRoleType.Manager; case (int)User.UserRoleType.Manager: lnkEditIssue.Enabled = true; goto case (int)User.UserRoleType.TypicalUser; case (int)User.UserRoleType.TypicalUser: lnkNewIssue.Enabled = true; lnkViewIssue.Enabled = true; goto case (int)User.UserRoleType.Guest; case (int)User.UserRoleType.Guest: break; } return; } | |
Tying everything together, Listing 7-15 implements the btnOK_Click event handler for the AppLogin.aspx page. This method replaces Listing 7-12 and populates a new User object with data retrieved from the Business Facade project's UserManager class rather than the hard-coded sample data. As Listing 7-4 described earlier, the UserManager class works with other underlying classes to validate a person's credentials. When the User object is populated , it is added to the session and the Web form redirects to the IssueSummary.aspx page.
| |
private void btnOK_Click(object sender, System.EventArgs e) { User objUser = new User(); objUser = UserManager.GetUser( txtEmailAddress.Text, txtPassword.Text ); Session.Add( "USER_OBJECT", objUser ); Response.Redirect( "IssueSummary.aspx", true ); return; } | |
Figure 7-13 shows the completed IssueSummary.aspx page, complete with a header, footer, data-bound list, and role-based menu. The menu only displays links enabled by the role of the logged-in user. That role was assigned during application login in Listing 7-15 and validated when the menu control was loaded in Listing 7-14.
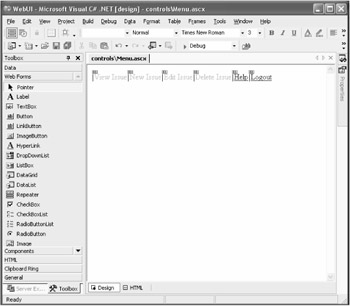
Figure 7-13: The completed IssueSummary.aspx page with the populated form controls
You can create any number of Web user controls to add to a project. The goal is to identify reuse of content and functionality across the entire Web application. Doing so immediately reduces the time it takes to build the application, reduces the number of errors found in the application, and increases user interface consistency.
EAN: 2147483647
Pages: 119
- Step 1.1 Install OpenSSH to Replace the Remote Access Protocols with Encrypted Versions
- Step 1.2 Install SSH Windows Clients to Access Remote Machines Securely
- Step 3.3 Use WinSCP as a Graphical Replacement for FTP and RCP
- Step 3.4 Use PuTTYs Tools to Transfer Files from the Windows Command Line
- Conclusion