| Microsoft Visual Studio .NET offers four types of deployment project templates: -
Setup project Used to create installation packages for deploying Windows-based applications -
Web setup project Used to create installation packages for deploying Web-based applications -
Merge module project Used to create installation packages for components that can be shared by multiple applications -
Cab project Used to package ActiveX components so they can be downloaded over the Internet Creating a Web Application for Deployment Before we delve into the details of creating deployment projects with the help of Visual Studio .NET, you need to create an application that can be deployed. Perform the following steps to create a simple Web application named WebSqlApp that returns the result of any SELECT query from the SQL Server Northwind database. Do the following: -
Open Visual Studio .NET and create a new blank solution named 315C14 at c:\inetpub\ wwwroot \ExamCram . (You might need to change the directory based on your configuration.) -
Add a new Visual C# ASP.NET Web Application project at the following location: http://localhost/ExamCram/315C14/WebSqlApp . -
Use Server Explorer to create a data connection to the SQL Server Northwind database. Drag and drop the data connection on the Web form to create a SqlConnection object ( sqlConnection1 ). -
Place a TextBox control ( txtQuery ), a Button control ( btnExecute ), a Label control ( lblError ), and a DataGrid control ( dgResults ) on the form. Set the TextMode property of the txtQuery control to MultiLine . Set the Visible property of the lblError control to false . -
Switch to Code view and add the following line to the using directive: using System.Data.SqlClient; -
Enter this code to the event handler of the btnExecute control: private void btnExecute_Click(object sender, System.EventArgs e) { SqlCommand cmd = sqlConnection1.CreateCommand(); cmd.CommandType = CommandType.Text; cmd.CommandText = txtQuery.Text; SqlDataAdapter da = new SqlDataAdapter(); da.SelectCommand = cmd; DataSet ds = new DataSet(); try { da.Fill(ds, "Results"); dgResults.DataSource = ds; dgResults.DataMember = "Results"; dgResults.DataBind(); } catch (Exception ex) { lblError.Text = "Error executing query: " + ex.Message; lblError.Visible = true; } } -
Change the solution configuration to Release mode and run the solution. Creating a Web Setup Project Visual Studio .NET also has a Setup Wizard that helps you interactively create various types of setup and deployment projects. Follow these steps to learn how to use the Setup Wizard to create a simple installer for the WebSqlApp application: -
In the Solution Explorer, right-click Solution and select Add, New Project. Select Setup and Deployment Projects from the Project Types tree; then select Setup Wizard from the list of templates. -
Name the project WebSqlSetup . Click OK, which launches the Setup Wizard. The first screen that appears is the Welcome screen; click Next. -
The second screen asks you to choose a project type. Select Create a Setup for a Web Application. Then click Next. -
The third screen of the wizard enables you to choose the project outputs to include in the setup package. Select Primary Output from WebSqlApp and Content Files from WebSqlApp . Click Next. -
Open WordPad and create two files: ReadMe.rtf and License.rtf . Save these files after writing some sample text. The fourth screen of the wizard enables you to choose the files to include in the setup package. Click the Add button and include the ReadMe.rtf and License.rtf files. Click Next. -
The fifth and last screen of the wizard is the Project Summary screen. Click Finish to create the project. -
Activate the Properties window for the WebSqlSetup project. Set the manufacturer to WebSql Software, the product name to WebSql, and the title to WebSql Installer. -
Right-click the WebSqlSetup project in the Solution Explorer and select View, File System. This opens the File System Editor. Select the Web Application Folder node in the File System Editor and change its VirtualDirectory property to WebSql . -
Set the solution configuration to Release, and then build the WebSqlSetup project. Open Windows Explorer and navigate to the Release folder inside the project folder. Run the setup.exe file. Alternatively, on the development machine, you can install the application by right-clicking the project in the Solution Explorer and selecting the Install option from its context menu. This opens the WebSql Setup Wizard. Accept the default values and complete the installation. -
Open Internet Explorer and navigate to http://localhost/ExamCram/315C14/WebSql/WebForm1.aspx . Enter a query and click the button to get the results of the query. -
Select Control Panel, Add or Remove Programs from the Windows Start menu to open the Add or Remove Programs dialog box. Select the WebSql application and click the Remove button to uninstall it. The WebSql application is uninstalled from your computer. Alternatively, on the development machine, you can uninstall it by right-clicking the setup project in the Solution Explorer and selecting the Uninstall option from its context menu. This setup project works only on the computers on which the .NET Framework runtime has been already installed. For more information on how to redistribute the .NET Framework 1.1 with your application, refer to www.msdn.com/library/en-us/dnnetdep/html/redistdeploy1_1.asp. For more information on how to redistribute the .NET Framework 1.0 with your applications, refer to www.msdn.com/library/en-us/dnnetdep/html/redistdeploy.asp. You can modify the configuration settings for a Web setup project by selecting the project in the Solution Explorer and selecting Project, Properties from the main menu. This opens the Project Property Pages dialog box, as shown in Figure 14.1. Figure 14.1. The Property Pages dialog box displays the configuration properties of the Web Setup project. 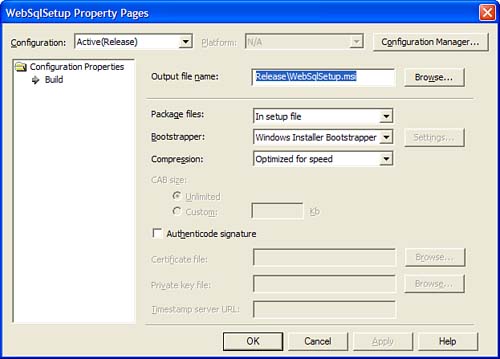 This dialog box has five main configuration properties: -
Output File Name Specifies the output filename of the installation package (the .msi file). -
Package Files Specifies how to package the files. The options are As Loose Uncompressed Files, In Setup File, and In Cabinet File(s). If the In Cabinet File(s) option is selected, you can also specify the maximum size of the CAB files. -
Bootstrapper Specifies whether a Windows Installer bootstrap file needs to be created for launching the installation program. -
Compression Specifies whether to optimize the installation files for size or speed or if no optimization is required. -
Authenticode Signature Enables you to specify the file containing the Authenticode certificate, private key file, and timestamp server URL (which is provided by the certification authority).  |