Customizing Web Setup Projects
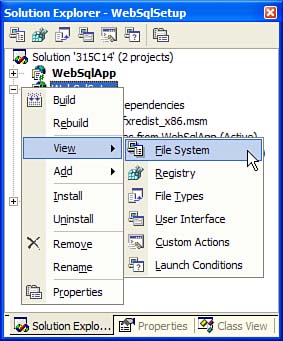
| You might want an installation program to provide custom features and perform custom actions, such as creating Registry entries and providing a customized user interface for installation. Visual Studio .NET provides various editors to customize the installation process, as shown in Figure 14.2. Figure 14.2. You can launch various editors for a Web setup project via the Solution Explorer. The File System EditorThe File System Editor specifies where the project output and other files will be installed on the target computer. The File System Editor provides a mapping of the file system on the target machine. For example, at the time of installation, the special folder Web Application Folder is converted to the actual path of the Web application on the target machine. The Registry EditorThe Registry Editor enables you to specify Registry keys, subkeys, and values that are added to the Registry in the target machine during installation. You can also import Registry files to the Registry Editor. The File Types EditorThe File Types Editor enables you to associate file extensions and actions with an application. Using the User Interface EditorThe User Interface Editor enables you to customize the user interface provided during the installation process. The user interface is divided into three stagesstart, progress, and end. You can add different types of dialog boxes for each stage, but each stage enables only certain types of dialog boxes to be added. The User Interface Editor displays the user interface applicable to both the end user and the administrative installations. You can customize the user interface for both of these types of installations. The administrative installation occurs when you run the msiexec command-line tool with the /a option. Using the Custom Actions EditorThe Custom Actions Editor enables you to run compiled DLL or EXE files, script files, or assemblies at the end of an installation. These files can be used to perform vital custom actions that were not carried out during installation. If the custom action fails, the entire installation process is rolled back. For example, you might have to install the database that is required by your application during the installation process. The four phases in which custom actions can be performed are install, commit, rollback, and uninstall. Follow these steps to create a simple custom action that launches the WebSqlApp application toward the end of the installation:
The previous example uses the static Process.Start() method to launch Internet Explorer with the given URL. You also set the InstallerClass property to false because the LaunchWebSql class did not inherit from the Installer class. The .NET Framework supplies the Installer class to provide a base for custom installations. Using the Launch Conditions EditorThe Launch Conditions Editor enables you to set conditions to be evaluated when the installation begins on the target machine. If the conditions are not met, the installation stops. The Launch Conditions Editor enables you to perform searches on the target machine for a file, a Registry key, or Windows Installer components. For example, you could add a condition that Microsoft Data Access Components (MDAC) version 2.7 or higher should be installed for the installation to continue. |
EAN: N/A
Pages: 191