17.10 LAYOUT MANAGEMENT IN QT
|
17.10 LAYOUT MANAGEMENT IN QT
The C++-based Qt toolkit provides the following classes to serve as layout managers:
QHBox QHBoxLayout QVBox QVBoxLayout QGrid QGridLayout QLayout
Of these, QHBox, QVBox, and QGrid insert automatically a new widget[19] into the next available cell in the layout. The other four give the programmer greater control over where a given widget will be in the overall layout controlled by the manager.
17.10.1 Box Layout
If we wish for all the child widgets to be arranged horizontally, regardless of how the window is resized, we use either the QHBox or the QHBoxLayout classes. The following example illustrates the notion of automatic layout with QHBox. The child widgets in lines (C), (D), and (E) as they are created get automatically inserted into a horizontal arrangement without the invocation of any sort of an "add" function:
//QHBoxTest.cc #include <qpushbutton.h> #include <qhbox.h> #include <qapplication.h> class MyHBox : public QHBox { public: MyHBox(); }; MyHBox::MyHBox() { setSpacing( 5 ); //(A) setMargin( 10 ); //(B) new QPushButton( "button1", this ); //(C) new QPushButton( "button2", this ); //(D) new QPushButton( "button3", this ); //(E) } int main( int argc, char* argv[] ) { QApplication a( argc, argv ); MyHBox* hb = new MyHBox(); hb->show(); a.setMainWidget( hb ); return a.exec(); }
No matter how many widgets we create in the constructor MyHBox::MyHBox(), they will all be arranged horizontally and will appear in the order in which they are created. The spacing between adjoining widgets in the horizontal arrangement is controlled by invoking setSpacing with its argument set to the desired spacing in pixels, as we do in line (A). If you'd like blank space to show around the horizontal arrangement, that can be done by invoking setMargin in the manner shown in line (B). Using the g++ compiler, this program can be compiled by the command line
g++ -o QHBoxTest QHBoxTest.cc -I$QTDIR/include -L$QTDIR/lib -lqt
The output of the program is shown in Figure 17.16.
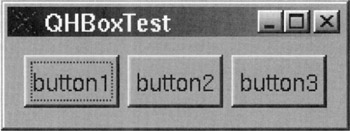
Figure 17.16
If you wish to exercise greater control over the placement of a widget as it is created for a horizontal arrangement of widgets, you'd use QHBoxLayout. The following example from Dalheimer[14] accomplishes exactly the same as the previous example, but with the QHBoxLayout layout manager:
//QHBoxLayoutTest.cc #include <qdialog.h> #include <qpushbutton.h> #include <qlayout.h> #include <qapplication.h> class MyDialog : public QDialog { public: MyDialog(); }; MyDialog::MyDialog() { QPushButton* b1 = new QPushButton( "button1", this ); //(A) b1->setMinimumSize( b1->sizeHint() ); //(B) QPushButton* b2 = new QPushButton( "button2", this ); b2->setMinimumSize( b2->sizeHint() ); QPushButton* b3 = new QPushButton( "button3", this ); b3->setMinimumSize( b3->sizeHint() ); QHBoxLayout* layout = new QHBoxLayout( this ); layout->addWidget( b1 ); //(C) layout->addWidget( b2 ); layout->addWidget( b3 ); layout->activate(); //(D) } int main( int argc, char* argv[] ) { QApplication a( argc, argv ); MyDialog* dlg = new MyDialog(); dlg->show(); a.setMainWidget( dlg ); return a.exec(); }
Note that for each button created inside the MyDialog constructor, as in line (A), we declare its parent widget via the second argument to the button constructor and we add it to the layout by invoking the addWidget function, as in line (C). The buttons will appear in a horizontal arrangement in the order in which they are added to the layout. By supplying additional arguments to the addWidget function, one can specify stretch and alignment for each child widget. The prototype of the addWidget function is
void QBoxLayout::addWidget( QWidget* widget, int stretch = 0, int alignment = 0 );
The value assigned to stretch dictates how much a child widget will grow or shrink in relation to the other child widgets as the parent window is resized. And the value assigned to alignment dictates how much a child widget will stay centered in the portion of the space allocated to it as the parent window is resized. The actual values assigned to stretch and alignment are not important; what's important is how these values compare against the values assigned to the same variables for the other child widgets.
The above example also illustrates how we can establish a minimum size for a child widget. The minimum size for button b1 is set in line (B) to the value returned by sizeHint. Presumably, this is the size at which the displayed child widget will look the best. If we also wanted to tell the layout manager what maximum size to use for the widget, we would invoke setMaximumSize. Layout management in the above program is activated by invoking activate in the manner shown in line (D).
The program shown above can be compiled with the following command line:
g++ -o QHBoxLayoutTest QHBoxLayoutTest.cc \ -I$QTDIR/include -L$QTDIR/lib -lqt
The GUI produced by this program looks like what's shown in Figure 17.17
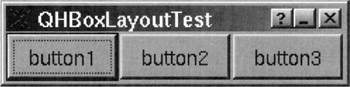
Figure 17.17
Our discussion above applies identically to QVBox and QVBoxLayout, except that these two classes produce vertical arrangements of their child widgets, as opposed to horizontal arrangements.
17.10.2 Grid Layout
Our next example illustrates the use of QGrid for placing the child widgets in a rowcolumn arrangement. The int argument to a QGrid constructor, as in line (A) below, specifies how many columns to use. The number of rows is arbitrary. A new row of widgets is added if warranted by the addition of a new widget. The example below shows the buttons arranged in two columns. There are three rows, but the last row contains only one button since the program creates only five child widgets.
//QGridTest.cc #include <qpushbutton.h> #include <qgrid.h> #include <qapplication.h> class MyGrid : public QGrid { public: MyGrid( int ); }; MyGrid::MyGrid( int cols ) : QGrid( cols ) { setSpacing( 5 ); setMargin( 10 ); new QPushButton( "button1", this ); new QPushButton( "button2", this ); new QPushButton( "button3", this ); new QPushButton( "button4", this ); new QPushButton( "button5", this ); } int main( int argc, char* argv[] ) { QApplication a( argc, argv ); MyGrid* mg = new MyGrid( 2 ); //(A) mg->show(); a.setMainWidget( mg ); return a.exec(); }
This program produces the output shown in Figure 17.18.
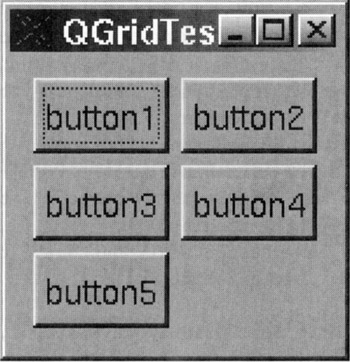
Figure 17.18
With QGridLayout, we can specify both the number of rows and the number of columns for a table-like display of widgets. In the following program, the invocation
QGridLayout* layout = new QGridLayout( this, 2, 3 );
in line (A) creates a grid of cells consisting of 2 rows and 3 columns. Other versions of this constructor allow for the specification of spacing to be used between the cells of the grid. When spacing is not specified, the default is for a QGridLayout to inherit the parent's spacing.
The cells in a layout produced by QGridLayout use matrix indexing. The index of the top left cell is (0,0), of the next cell in the top row (0,1), and so on. The row and column indices are used by the addWidget function, as in the invocation
layout->addWidget( b3, 0, 2 );
in line (B), which says to insert the widget b3 in the first row of cells in the third column. Widgets in a grid layout are also allowed to occupy multiple cells by the invocation of addMultiCellWidget.
//QGridLayoutTest.cc #include <qdialog.h> #include <qpushbutton.h> #include <qlayout.h> #include <qapplication.h> class MyDialog : public QDialog { public: MyDialog(); }; MyDialog::MyDialog() { QPushButton* b1 = new QPushButton("button1", this); b1->setMinimumSize(b1->sizeHint()); QPushButton* b2 = new QPushButton("button2", this); b2->setMinimumSize(b2->sizeHint()); QPushButton* b3 = new QPushButton("button3", this); b3->setMinimumSize(b3->sizeHint()); QPushButton* b4 = new QPushButton("button4", this); b4->setMinimumSize(b4->sizeHint()); QGridLayout* layout = new QGridLayout(this, 2, 3); //(A) layout->addWidget(b1, 0, 0); //(B) layout->addWidget(b2, 0, 1); layout->addWidget(b3, 0, 2); layout->addWidge(b4, 1, 1); layout->activate(); } int main(int argc, char* argv[]) { QApplication a(argc, argv); MyDialog* dlg = new MyDialog(); dlg->show(); a.setMainWidget(dlg); return a.exec(); }
The output of the program is shown in Figure 17.19.
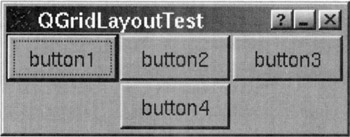
Figure 17.19
For specialized effects, it is also possible to create your own layout manager by extending the class QLayout.
Finally, when you create your widget class, you'd also need to specify its layout properties. In most cases, this requires providing implementations for sizeHint(), minimumSizeHint(), and sizePolicy() methods.
[19]Recall that the terms "widget" and "component" are used interchangeably in this chapter. What a component is to AWT/Swing, a widget is to Qt and to GNOME/GTK+.
|
EAN: 2147483647
Pages: 273