17.5 MINIMALIST GUI PROGRAMS IN AWTSWING
|
17.5 MINIMALIST GUI PROGRAMS IN AWT/SWING
Here is a minimalist GUI program in Java's AWT/Swing. All it does is to display a top-level window of a certain size and at a certain location on the terminal screen.
//FirstWindow.java import javax.swing.*; class FirstWindow { public static void main(String[] args) { JFrame f = new JFrame( "FirstWindow" ); f.setSize( 300, 200 ); f.setLocation( 200, 300 ); f.setVisible( true ); } }
The program shown above will create a window from the top-level container JFrame from the javax.swing package. This window, of width 300 pixels and height 200 pixels, has its upper left-hand corner located at the pixel coordinates (200, 300), with 200 being the x-coordinate (the horizontal coordinate) and 300 the y-coordinate (the vertical coordinate). The origin of the (x,y) coordinate frame is the top left corner of the screen for a top-level window, meaning a window that is not contained in any other container. The coordinate x increases to the right horizontally and the coordinate y increases downwards vertically from the origin.[8] The last statement in the program, the call to setVisible, makes the window appear on the screen.[9] Figure 17.2 shows the window created by the above program.
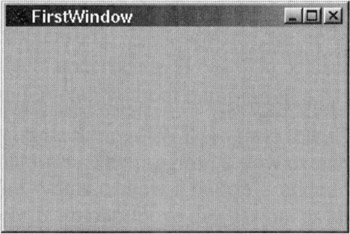
Figure 17.2
The program shown above is much too rudimentary-you won't even be able to exit the program when you click on the close button of the displayed window. To exit, you'll have to "kill" the process in which the program is running. Later we will discuss how we can rectify this shortcoming. For now, let's first discuss the composition of top-level windows in Swing.
A top-level container in Swing, such as JFrame, JDialog, JApplet, and so on, consists of a JRootPane lightweight container object that does behind-the-scenes work for the top-level container for managing the layout, the visibility, the look-and-feel, and so on, of the components that go into the top-level container.[10] As shown in Figure 17.3, in general a root pane container consists of a three panes: a layered pane of type JLayeredPane, a content pane, and a glass pane. The root pane can create and manage the other panes. The important point to remember is that a top-level Swing container always has these three panes associated with it: a layered pane, a content pane, and a glass pane.
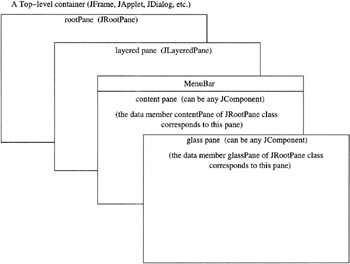
Figure 17.3
The layered pane and the glass pane can be used to create novel and interesting user-interface effects. For example, the layered pane accepts the notion of "depth". When you add a widget to a layered pane, you can specify a depth value for it. This is done with the help of an integer argument to the method that adds a widget to the pane, the integer argument serving as a depth index. The larger the value of this index, the closer the widget is to the front. Certain values of this index are reserved. For example, the value of -300 for the depth index corresponds to the instance that holds the content pane. The depth index of 0 is also important; if you do not specify a depth index when adding widgets to a layered pane, the depth index of 0 will be used by default. The depth index of 100 is used for floating toolbars and pallets. The depth index associated with a widget in a layered pane can be changed dynamically. So if a widget A was in front of widget B, that fact could be reversed after some specified user interaction.
If you do not want depth effects, you'd use the content pane and its optional menu bar for the widgets you want displayed through the top-level container. A content pane can be any arbitrary JComponent object. After constructing a JComponent object, you can make it a root pane's content pane by invoking setContentPane() on the root pane object. A JPanel usually makes a good candidate for constructing one's own content pane. However, a more common approach consists of first bringing up the default content pane associated with the root pane of a top-level container by invoking the getContentPane() method and then adding widgets to the returned object by using "add" methods, as in
rootPane.getContentPane(). add( myWidget );
Although the subject of layout managers will be taken up later, we want to mention quickly here that the default layout manager associated with the default content pane is BorderLayout. It is however permissible to customize a content pane-including the default content pane-by changing its layout manager and also by changing its border. In line with the above syntax, the layout manager associated with the default content pane can be changed by
rootPane.getContentPane().setLayout( myLayoutManager );
The glass pane, which can also be any arbitrary JComponent object, sits on top of all other panes associated with a top-level container. By default, a glass pane is transparent for obvious reasons. A glass pane can be used to trap mouse events sourced by multiple widgets underneath. It can also be used to paint or draw images over multiple widgets underneath without being limited by their boundaries.
We will now show a simple Swing/AWT program that illustrates the content-pane feature of a top-level container. The program below extends our earlier program by adding a button to it. The syntax of how a button is added to the top-level container in line(G) should be clear from our above discussion, as should the statement about setting the layout manager in line (F). With regard to the rest of the program, the reader should at this time gloss over the addWindowListener and the addActionListener statements in lines (A) and (E). Suffice it to say here that the former causes the window to close and the program to quit when you click on the close button of the window, and the latter causes the message "Have a Good Day!" to be printed out on your terminal window when you click on the button.
//FirstWindowWithButton.java import javax.swing.*; import java.awt.*; // for FlowLayout import java.awt.event.*; // for ActionListener class FirstWindowWithButton { public static void main(String[] args) { JFrame f = new JFrame( "FirstWindowWithButton" ); f.addWindowListener(new WindowAdapter() { //(A) public void windowClosing(WindowEvent e) { System.exit(0); } }); JButton b = new JButton("Click Here for a Message"); //(B) b.setVerticalTextPosition( AbstractButton. CENTER ); //(C) b.setHorizontalTextPosition( AbstractButton. CENTER ); //(D) b.addActionListener( new ActionListener() { //(E) public void actionPerformed( ActionEvent evt ) { System.out.println( "Have a Good Day!" ); } }); f.getContentPane().setLayout( new FlowLayout() ); //(F) f.getContentPane().add( b ); //(G) f.setLocation( 100, 50); //(H) f.pack(); //(I) f.setVisible( true ); //(J) } }
We will also explain later the reason for the use of FlowLayout in line (F) when we explain the difference between different types of layout managers. All we want to say here is that if you use the default layout manager that comes with a content pane-the BorderLayout-the button you create may end up occupying the entire width of the window if you should enlarge the window by dragging one of its corners. Using FlowLayout makes a button look like a button and causes it to be displayed in the top middle of the window.
The reader should note that instead of the setSize invocation in FirstWindow.java, we now invoke pack in line (I) to size the window. The pack method automatically sizes a top-level window so that all its contents are at or above their preferred minimum sizes. In this case, since it contains only a single button, the top-level window will be just large enough to hold the button. For complex top-level windows, we usually get a superior presentation with pack than with setSize since the former lets the layout manager decide how to size the window. The layout managers have built-in smarts to account for platform and other dependencies that affect component size.
Figure 17.4 shows the window created by the above program.

Figure 17.4
[8]When the method setLocation is invoked on a Component that is inside another Container, the coordinates x and y are with respect to the upper left-hand corner of the enclosing container.
[9]Instead of f.setVisible(true), we could also have invoked f.show(). The two usages do the same thing before a window is "realized," a concept we will discuss in the next chapter. After a window is realized, one should invoke setVisible(true).
[10]The Swing top-level containers like JFrame, JDialog, and JApplet are obtained by extending their AWT counterparts and implementing the RootPaneContainer interface.
|
EAN: 2147483647
Pages: 273