6.6 User Interface View
6.6 User Interface ViewSetup projects automatically provide a user interface for your installation. It follows the normal Windows Installer style in which a dialog presents a series of pages that guide the user through the installation process. The User Interface view lets you edit this user interface.
For simple applications, you will not need to edit the user interface at all. Whether you use the Setup Wizard or simply create a blank Setup project, Visual Studio .NET will add a basic user interface for you. The default user interface just provides an introduction screen, asks where to install the application, and then gets on with it. It uses installer properties to put the name of your application where it is required and otherwise uses generic text so you will not even need to modify any of the default strings. However, if the standard boilerplate is not to your liking or if you want to collect information from the user during the installation process, you will need to modify the user interface. As Figure 6-4 shows, the User Interface view consists of a pair of trees. The Install tree represents the sequence of pages that will be displayed when installing the application. The Administrative Install tree shows the sequence that will be used if an administrator installs the application onto a network share (see sidebar). Figure 6-4. User Interface view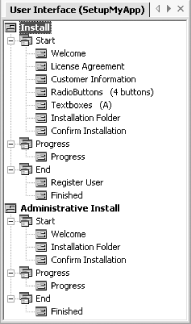
The installation UI is divided into three phasesStart, Progress, and End. These map directly onto the installation phases discussed earlier. Each item within a phase represents a single page in the user interface. You cannot add or delete phasesyou can only add or remove pages from them. The Start phase contains pages that will be displayed before anything is done to the target computer. This phase is used for presenting information to and gathering data from the user. The default settings display three pages in this phase. The first page, Welcome, is usually used to provide a short description of what will be installed, along with a copyright warning. The second page, Installation Folder, asks the user which folder the program files should be copied into. The third page, Confirm Installation, informs the user that installation is about to begin and offers one last chance to cancel the installation. The Progress phase contains just one page, Progress. This will be displayed while the various installation steps such as file copying and registry configuration are performed. It shows a progress bar indicating roughly how far through the process the installer is. This gives users something marginally more interesting than a blank window to watch and provides an approximate idea of how much longer the installation is likely to take. You should not attempt to add any extra user interface pages to the Progress phaseit should contain just the Progress page. (The installer has no way of using more than one page in the Progress phaseit displays the Progress page when installation is in progress, and automatically moves on to the end phase once installation is complete.) The End phase contains pages that will be shown after the installation is complete. By default, this contains just the Finished page, which informs the user that installation has completed successfully. If your application has an online registration system, you might add an extra page here to support it. 6.6.1 UI PagesEach page in the installation process is represented in the User Interface view by a node under one of the three phases. Visual Studio .NET does not let you view the pages as they will appearall editing is done through the Properties window for each page. If you wish to see how the pages will appear, you must build the Setup project and run the .msi file itself. If you select Add Dialog from the context menu of either of the Start nodes in the User Interface view, the Add Dialog dialog, shown in Figure 6-5, will be displayed. You can add dialogs only from the list offeredyou cannot design your own pages. (Visual Studio .NET does not provide a tool for creating the appropriate resources, it just supplies a number of prebuilt dialogs. If you want to design your own, you will need to use a more advanced tool such as the Windows Installer SDK, Wise, or InstallShield.) Figure 6-5. Adding a dialog Most of these dialogs are concerned with getting user inputRadioButtons and Checkboxes pages allow choices to be made, while the Customer Information and Textboxes pages allow strings to be entered. The Register User page allows you to support installation-time registration. There are also special pages for displaying a splash screen, a license agreement, and a Read Me file.
The text shown on each of the pages is edited through the Properties window. There is only one property common to all page types, and that is the BannerBitmap . You may use this to replace the default bitmap that appears at the top right of the dialog during installation. If you change this on one dialog, Microsoft recommends that you change it on all dialogs, in order for the same picture to be displayed throughout installation.
You can change the order in which the dialogs appear by dragging them into the required position in the view. You can also move them up or down one position at a time using their context menus . Visual Studio .NET does not provide direct visual editing of the pagesif you want to see what they will look like, you have to run the installer. Pages are edited by selecting them in the User Interface view and editing their properties in the Properties panel. 6.6.1.1 Welcome pageThis page introduces the user to the installation process for an application by showing a welcome message along with a short copyright warning. This either should be the first page shown or should follow the Splash page where present. Figure 6-1 shows the Welcome page, featuring the standard boilerplate. If you want to change this text, you can use the page's two properties, WelcomeText and CopyrightWarning . You can change these strings to whatever text is appropriate for your application within the limits of the space available. The copyright warning cannot be longer than six lines, and the welcome text must fit into 11 lines. (Visual Studio .NET will not prevent you from entering too much text, it will simply be truncated at runtime to fit the space available.) The default WelcomeText uses the ProductName installer property to insert the name of your product into the text. This installer property can be set by selecting the Setup project in the Solution Explorer and modifying its ProductName property in the Properties window. By default, it will be whatever name you gave the Setup project. You cannot change the banner text at allit will always say "Welcome to the [ProductName] Setup Wizard." 6.6.1.2 Installation Folder pageThis page allows the user to choose the folder in which the application's files will be installed. (This is used only with normal Windows applications. Web applications use the Installation Address page instead.) This page only has one property: BannerBitmap . The content and text are fixed, except in that the name of your application will be substituted in a couple of places, as Figure 6-6 shows. Figure 6-6. The Installation Folder page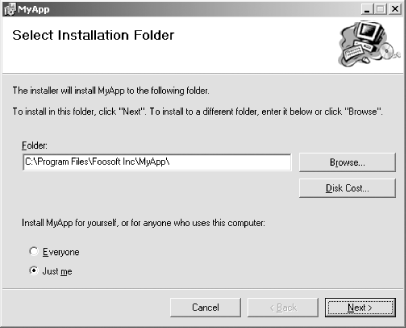 If the installing user is an administrator, Windows Installer will allow the application to be installed for either all users or just the installing user. This allows Start menu shortcuts to be placed in the All Users folder, making the application accessible to all users on the machine. When users who are not in the Administrators group install the application, the bottom part of this page will simply be blank. 6.6.1.3 Installation Address pageThis page should be present in any web application installer. (Normal applications use the Installation Folder page instead.) It allows a virtual directory and port number to be chosen for the application. As with the Installation Folder page, the Installation Address page has only one property: BannerBitmap . The rest of the page's form and content are nonnegotiable. 6.6.1.4 Confirm Installation pageThis page informs the user that the installation is about to proceed and provides a last opportunity to cancel. This page supports only the BannerBitmap property. The banner text will always be "Confirm Installation." The body text will always be:
6.6.1.5 Progress pageThe Progress page will be displayed while the various steps of installation are performed. It displays a progress bar to give a rough idea of how much longer the install will take. The Back and Next buttons are disabled on this page. The Cancel button remains enabled, allowing the user to cancel the install partway through. Cancellation causes any changes to be rolled back. As well as the usual BannerBitmap property, this page provides a ShowProgressBar property. If you set this to false, the progress bar will not be shown. This is occasionally useful, because some applications provide erratic or unhelpful progress bar feedback. (This can happen if the install spends most of its time performing one slow custom action or if the application is very small.)
Once the installation has completed, the installer will move on to the first window in the End phase. 6.6.1.6 Finished pageThis page tells the user that the installation is complete. It should be the last page in the End phase. (By default, it is the only page in the End phase.) This page has no properties. Its banner is always "Installation Complete," and its body text always indicates that the installation was successful. The Cancel and Next buttons will be grayed out, leaving just a Close button. 6.6.1.7 RadioButtons pagesThere are three RadioButtons pages, allowing you to present a selection of two, three, or four mutually exclusive options. Remember that each different page type can be used only once in any given installer. So, although you can have an installer with both a RadioButtons (2 buttons) and a RadioButtons (4 buttons) page, you cannot have two pages with four buttons. (Again, you will need to use a more powerful tool to build your installer if you absolutely must have more than one page with the same number of radio buttons.) The various RadioButtons pages all work in the same way. As Figure 6-7 shows, you can set the text that appears in the banner and at the top of the main dialog area. This is done with the BannerText and BodyText properties. There are also properties for setting the button text: ButtonNLabel , where N is a number from 1 to 4. You should keep this text to one linealthough it can wrap to two lines, the button control isn't quite large enough, and any characters that descend below the text baseline (such as a lowercase g or y ) will have their descenders truncated. Figure 6-7. A RadioButtons page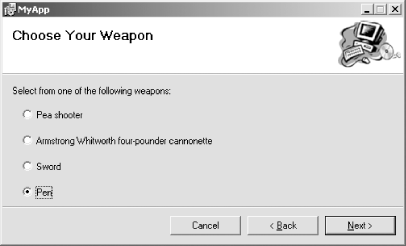 The results of the selection will be available to later installation stages and can be used to control conditional installation or passed as parameters to custom actions. The default name of the installer property that stores the user's selection is BUTTON2 , BUTTON3 , or BUTTON4 , depending on whether you are using the two-button, three-button, or four-button dialog. You can change this name by setting the page's ButtonProperty property. The value of this installer property is determined by the radio button the user selects. By default, it will be 1, 2, 3, or 4, but you can change the value that each button will assign if you want. Simply set the ButtonNValue properties (where N is a number from 1 to 4).
6.6.1.8 Checkboxes pagesCheckboxes pages are similar to RadioButtons pages in that they allow the user to select from a list of options. The most obvious difference is that radio buttons are mutually exclusive while checkboxes can be selected in any combination. However, the Checkboxes dialogs work slightly differently from the RadioButtons ones. There are still three (named (A), (B), and (C)), but all three are identical. The only reason there are three different Checkboxes dialogs is to allow an installer to have up to three pages with checkboxes. Each page can have up to four checkboxes. (And unlike the RadioButtons dialogs, all three pages can have the same number of buttons.) The usual, BannerText and BodyText properties are supported. There are also four Checkbox N Visible properties that determine which checkboxes are visible. The text labels are controlled with the Checkbox N Label properties. Because each checkbox can be checked independently of the rest, each sets its own installer property. You can choose the name of each installer property with the Checkbox N Property properties. By default, it will be CHECKBOX XN , where X is the name of the Checkboxes dialogeither A, B, or Cand N is the number of the checkbox. These properties are all Boolean. You can set their initial settings with the Checkbox N Value properties. As with the RadioButtons pages (and all other input pages), Visual Studio .NET places new pages at the end of the phase by default. You must move them to an earlier position, since you are not allowed to have pages following the Confirm Installation dialog. 6.6.1.9 Textboxes pagesTextboxes pages let the user type in arbitrary strings. There are three Textboxes pages, named (A), (B), and (C), and as with the Checkboxes, all three are identical. The reason there are three is to allow an installer to have more than one page with text boxes. A Textboxes dialog has the usual BannerText and BodyText properties as in Figure 6-8, and it can have up to four text boxes. The presence or absence of each text box is determined by the EditNVisible properties (where N is between 1 and 4). Text box labels are set with the EditNLabel properties. Figure 6-8. A Textboxes page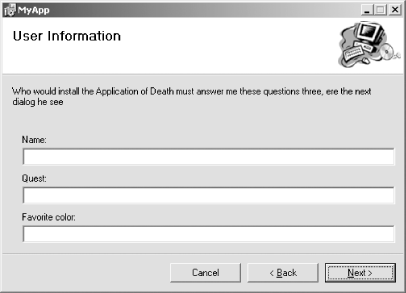 The values the user types in each text box are made available to later stages of the installation process through installer properties. By default, these properties are named EDIT XN , where X is the name of the Textboxes dialogeither A, B, or Cand N is the number of the text box. You can change these variable names with the Edit N Property properties. You can set default values for the fields with the Edit N Value properties. 6.6.1.10 Customer Information pageThe Customer Information page allows certain information about the customer to be collected. This page will always ask the user's name. Optionally, it can also ask for the name of the user's organization and even for a serial number to be entered. Figure 6-9 shows the page with all three fields present. The optional fields are enabled by setting the ShowOrganization and ShowSerialNumber properties to true. If you ask for a serial number, you must tell Windows Installer what the format of the number should be by setting the SerialNumberTemplate property. A serial number template defines the pattern of characters required to make a valid serial number. The template will be used to arrange the text boxes on the dialog and to enforce a valid-looking serial number to be entered. The template includes special characters from Table 6-2. Any other characters will simply be copied verbatim into the dialog between any text boxes. (This is how text and hyphens have been displayed between the boxes in Figure 6-9.) Table 6-2. Serial number template special characters
The template used for Figure 6-9 is: Figure 6-9. Customer Information page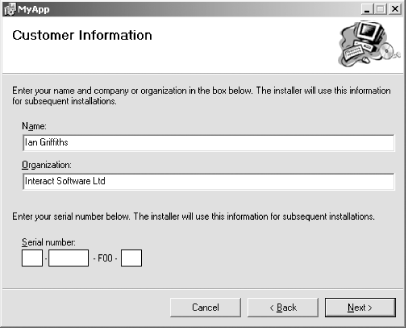 <###-%%%%%%% - F00 - %%%> The ranges of special characters (three digits, seven checked digits, three checked digits) have been displayed as three text boxes. The remaining characters have simply been shown between the text boxes. Interspersing short, easily recognized fixed sequences of characters can be useful for long serial numbersdisplaying the fixed sequences in the dialog can help users not lose their place as they copy the serial number. The digits marked with a % in the serial number template get special treatmentas Table 6-2 says, they will be checked with the Windows Installer validation algorithm. This is the venerable old algorithm that has been used for many years in some of Microsoft's own products. It works by adding up all of the checked digits and then dividing the result by seven. If the remainder is zero, the number is valid; otherwise it is not. This is not an antifraud techniquenot only is the algorithm extremely well known, even someone who doesn't know the algorithm will not have to guess many different serial numbers until one is accepted. The purpose of this validation is simply to reduce the chances of a transcription error when the user types in the serial number.
6.6.1.11 License Agreement pageIf you want users to agree to the terms of a license before letting them install your product, you can add a License Agreement page (see Figure 6-10) to the installer. This page simply displays any Rich Text Format (RTF) file, along with a pair of radio buttons allowing the user to indicate whether the terms are acceptable. Users will not be allowed to proceed unless they agree to the termsthe Next button is enabled only when the I Agree button is clicked. Figure 6-10. License Agreement page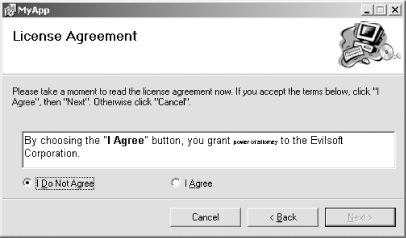 The RTF file must be in the Setup project's File System view. It is chosen with the LicenseFile property. Editing this property brings up a browser that allows files that have been added to the File System view to be selected, as shown in Figure 6-11. Figure 6-11. Choosing a license agreement file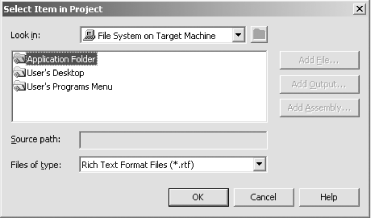 If you have not already added a license file with the File System view, you can do it from within this browser. Be aware though that the Exclude property of files added this way will be set to false. This means that, although the license file will be built into the MSI, enabling it to be shown during installation, it will not be copied onto the user's computer. Depending on how you feel about not giving the user a copy of the terms they just agreed to, you may wish to adjust this setting from the default. (The Exclude property can be edited in the Properties windowjust select the relevant file either in the Solution Explorer or the File System view.) The only other property supported by the License Agreement page is Sunken . This simply determines whether the RTF file will be displayed in an area with a 3D-effect sunken edge or in a control drawn flush with the surrounding dialog. 6.6.1.12 Splash pageWhen users install your application, you may wish for the first thing they see to be a piece of visual design, to make the installer blend in with your product's visual branding. The Welcome page's inflexibility makes this hard to achieve, so you can add a Splash page that will display a bitmap at the start of the installation process. Your bitmap will fill the parts usually occupied by the banner and body. Accordingly, this is the only page not to have the BannerBitmap property; you specify the splash bitmap with the SplashBitmap property. You should ensure that the bitmap is the correct size. The appropriate dimensions are 480 pixels wide and 320 pixels high. If your image is a different size , Windows Installer will stretch it to fill the available space, which may distort the image. This page also supports the Sunken property, letting you control whether a 3D-effect edge will be drawn around your bitmap. 6.6.1.13 Read Me pageMany applications provide a file that contains useful information a user might need to know before running an application. Such files have traditionally been called ReadMe. With Windows Installer, you can provide such information within the installer user interface by adding a Read Me page.
Read Me pages are very similar to License Agreement pagesthey just display an RTF file. The main difference is that users are not required to click on any button to indicate that they have read or agree to the file's contents. The RTF file is chosen with the ReadmeFile property. As with the License Agreement, this must be a file added to one of the folders visible in the File System view. Again, the file may have its Exclude property set to true if you wish to display it at installation time, but not copy it to the target machine. 6.6.1.14 Register User pageIf your application has an online registration system, you might wish to direct users to that at the end of the installation process. You can do this by adding a Register User page, which provides a button that users can click to register. They are not forced to registerthey are allowed to click the Next button without first clicking the Register button.
If the user clicks the button in order to register, Windows Installer will launch the application of your choice. You should supply an executable, which should be in one of the folders in the File System view. You specify the executable with the Executable property. Windows Installer will pass the arguments listed in the Arguments property. Note that you can pass any installer properties by enclosing them in square brackets. For example, placing [EDITA1] in the parameter list will pass the text entered into the first text box on the Textboxes (A) page. |

EAN: 2147483647
Pages: 147