Software Inventory
Software inventory is a new addition to SMS 2.0. It may be sacrilegious to say so, but as most SMS administrators knew from SMS 1.x, true software inventory capabilities just didn't exist, and what did exist was largely inadequate. Almost always the SMS 1.x administrator would turn to a third-party add-on to collect true software inventory.
SMS 2.0 offers greatly enhanced software inventory capabilities. Actually, the developers completely reengineered the software inventory client component, and it works quite well. A third-party add-on might still provide some extra bells and whistles for you, but the client component is quite robust.
Like its hardware counterpart, the Software Inventory Client Agent (also sometimes referred to as the Software Inventory Agent) runs automatically on the client according to a schedule you create and collects information according to options you select. However, unlike the Hardware Inventory Client Agent, the Software Inventory Client Agent processes data the same way on both 16-bit and 32-bit clients. This is because the Software Inventory Client Agent scans local drives rather than querying the WMI.
The Software Inventory Client Agent collects application information that includes the following data:
- Filename, version, and size
- Manufacturer name
- Product name, version, and language
- Data and time of file creation (presumably at installation)
The Software Inventory Client Agent can also collect copies of specific files.
As with hardware inventory, once software inventory has been collected at the client, it is passed on to the CAP. The CAP in turn forwards the information to the site server. Software inventory is ultimately stored in the SMS database, so it is again important for us to draw a distinction between primary and secondary site servers. Recall that the main difference between a primary and a secondary site server is that a primary site server maintains access to an SQL Server database.
As with hardware inventory, you can enable the Software Inventory Client Agent for the clients on a secondary site. As a matter of fact, the configuration settings for the Software Inventory Client Agent can even be different from the secondary site's parent site. When software inventory is passed to the secondary site server by the CAP, the secondary site server forwards the information to its parent primary site, where it can be added to the SMS database.
Enabling Software Inventory
To begin, let's get the Software Inventory Client Agent enabled and installed on our SMS clients. Then we'll explore how inventory is actually collected. To enable the Software Inventory Agent through the SMS Administrator Console, follow these steps:
- Under Site Settings, navigate to the Client Agents folder and expand it.
- Right-click on Software Inventory Client Agent, and choose Properties from the context menu to display the Software Inventory Client Agent Properties window, shown in Figure 9-22.
- Select the Enable Software Inventory On Clients check box.
- Notice that the default inventory collection schedule on the client will be once a week. You can specify from 1 to 23 hours, 1 to 31 days, or 1 to 4 weeks under Simple Schedule. Or you can select Full Schedule and then click the Schedule button to display the Schedule dialog box, shown in Figure 9-23. Designate a more specific start time and recurrence pattern, and then choose OK.
- Select the Inventory Collection tab, shown in Figure 9-24.
- Notice that the default files that the agent will scan for are those with an .EXE extension. You can click the New button (the yellow star) to add additional files. Wildcard characters are acceptable to narrow the scan.
- Check the appropriate options under Reporting Detail. These three options can tailor how data is collected and represented to you:
- Product Version Information Reports information that the agent can read from the file header of "known" products, including company name, product name, version, and language. For example, the program executable for Microsoft Word 97 is Winword.exe. Winword.exe contains binary header information that identifies the manufacturer, product name, and version associated with the Microsoft Word 97 program.
- Files Associated With Known Products Additionally reports the filename (and other file information) associated with the inventoried product—for example, Resource Explorer would associate Winword.exe with Microsoft Word. This option is available only when Product Version Information is selected.
- Files Not Associated With Known Products Reports filename and other information for files for which the header information contains no product information—for example, some game files. These files will be displayed in the Resource Explorer Unknown list.
- Click on the File Collection tab, shown in Figure 9-25, if you want to also collect a copy of specific files from each client.
- To add the name of a specific file, click the New button to display the New File dialog box, and enter the name of the file. Wildcard characters are acceptable. Then click OK to return to the File Collection tab.
- Specify a value in the Maximum Data Collected Per Client (MB) edit box. This option lets you identify how much total file data can be collected from the client during a software inventory cycle. This value can be as large as 20 MB. Keep in mind, especially if you are using wildcard characters, that collected files can generate a larger amount of additional network traffic than the basic software inventory.
- Click on the Inventory Names tab, shown in Figure 9-26, to standardize the names of the company or product that are displayed when you view software inventory information. Sometimes, as companies update their software applications or create new versions, the developers include variations on the company's or the product's name in the header information included in the program executable. Of course, when you view the software inventory, the products will be sorted and displayed according to each variation of the company or product name. This can make it difficult for you to find all versions of the product.
- Select which name type you want to standardize; your choices are Product or Company. In the Display Name section, click the New button to display the Display Name Properties dialog box. Enter the name you want to be displayed on the product information screen, and click OK to return to the Inventory Names tab. In the Inventoried Names section, click the New button to display the Inventoried Name Properties dialog box. Enter the names that have been inventoried by the Software Inventory Client Agent that you want standardized to the display name you entered in the Display Name section and click OK to return to the Inventory Names tab.
- Click OK to begin the site update process.
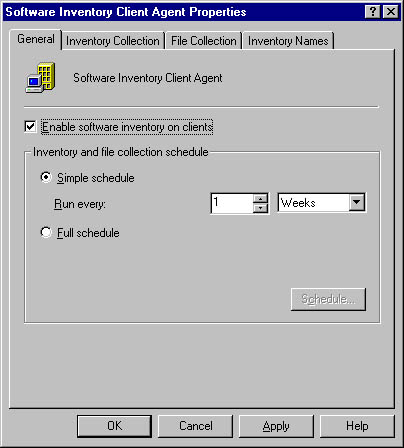
Figure 9-22. The Software Inventory Client Agent Properties window.
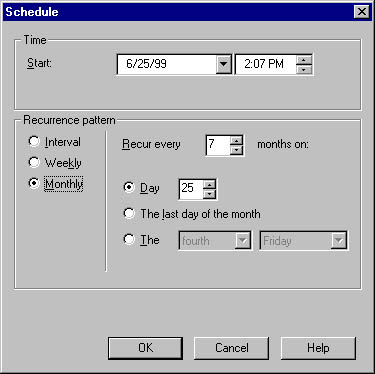
Figure 9-23. The Schedule dialog box.
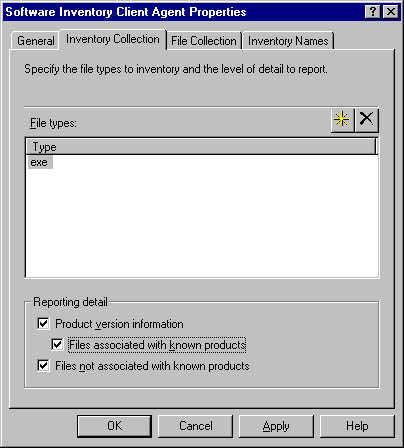
Figure 9-24. The Inventory Collection tab.
You must enable at least one of the three options to enable SMS to report information on inventoried files. By default, all three options are enabled.
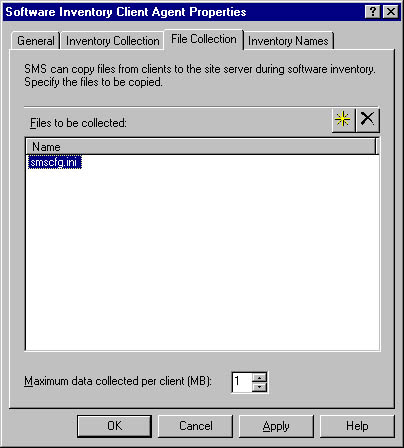
Figure 9-25. The File Collection tab.
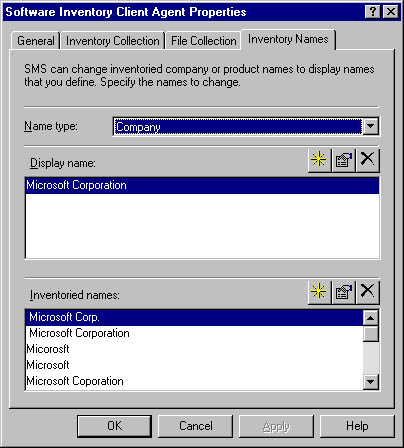
Figure 9-26. The Inventory Names tab.
This example lists several variations of the company name for Microsoft—Microsoft Corp., Microsoft Corporation, Microsoft, and so on—that will be displayed as Microsoft Corporation when viewing software inventory information.
Collected files are stored on the site server in the SMS\Inboxes\Sinv.box\FileCol folder. If the file changes at all on the client, the Software Inventory Client Agent will collect it again at the next cycle. By default, SMS will retain the last five copies of the file that were collected. Think about that. At 1 MB per file and five collected copies per client, for 1000 clients you would require 5 GB of storage space just for your collected files. Not pretty! Obviously, you would not use this as an alternative backup process. However, it can be used to look for files that should not be on a client, like a game executable. The number of such collected files ought to be significantly smaller. All collected files are kept in the database for 90 days before they are aged out.
![]()
NOTE
To modify the number of copies of collected files maintained at the site server, you need to modify the following registry entry: HKEY_LOCAL_MACHINE\Software\Microsoft\SMS\Components\SMS_Software_Inventory_Processor. Look for the value Maximum Collected Files, and change it as desired.
When you enable the Software Inventory Client Agent, you are making a change to the site properties, and the site's site control file (Sitectrl.ct0) will be updated as a result (as described in Chapter 3). The following three files are written to the SMS\Inboxes\Clicfg.src directory on the site server:
- Sinv.cfg Software Inventory Client Agent configuration settings
- Sinv.nal CAPs from which the agent can be installed
- Sinv.pkg Instructions for installing the agent on the client for various platforms
In the same directory, the client offer file is also updated to indicate that the Software Inventory Client Agent needs to be installed on all SMS clients for the site. The offer file is Cli_xxx.ofr, where xxx indicates the client operating system platform.
Inbox Manager copies these files to the CAP_site\Clicomp.box directory on the CAPs. At the next CCIM cycle on the client (every 23 hours, or when an update is forced through the SMS 2.0 Resource Guide Client Utilities tool (Cliutils.exe) or the Systems Management Control Panel applet), CCIM will connect to the CAP, read the client offer file, and proceed to initiate the installation of the Software Inventory Client Agent by launching Insinv32.exe or Insinv16.exe (depending on the platform). You can find these two files in the CAP_site\Clicomp.box\Sinv\platform folder, where platform is either Alpha or i386.
Thirty minutes after the Software Inventory Client Agent is started, the first complete inventory is collected from the client as specified by the inventory and collected files options you specified.
Client Requirements and Inventory Frequency
The client computer will require about 200 KB for the Software Inventory Client Agent support files. A complete default inventory will generate a software information file of about 100 KB in size, depending on what you told the agent to scan for and how much data it found. Software inventory history is maintained on each client in the \MS\SMS\Clicomp\Sinv\Sinv.his file. The initial inventory is also passed to the CAP and then to the site server. Like hardware inventory, subsequent software inventory cycles generally report only changes to the inventory. Therefore, you can expect a corresponding amount of network traffic associated with the installation (one time), with the first complete inventory (one time), and with subsequent delta inventories (according to your schedule).
As with hardware inventory, the schedule you choose should reflect the frequency with which you need to collect or update the inventory record of your clients. If your clients have fairly standard software installations and do not make or are not allowed to make substantial changes on their own, you could collect inventory less frequently—say, once a week or even once a month.
If your client computers keep changing in terms of software installations, updates, and uninstalls, you may need to report changes to the inventory more frequently—perhaps once a day or once every 12 hours. The more frequent the inventory is collected, the more potential network traffic will be generated. Like the Hardware Inventory Client Agent, the Software Inventory Client Agent will continue to run and report inventory regardless of whether a user is actually logged onto the client.

TIP
Software inventory can be forced to run through the Systems Management Control Panel applet. Double-click on the applet to display the Systems Management Properties window, and click on the Components tab. Select the Software Inventory Agent entry in the Component list, and then click Start Component.
Multiple Sites and Software Inventory
Earlier in this chapter, we talked about the possibility of a client being assigned to more than one SMS site and the effect on hardware inventory. Recall that in this situation, SMS will follow predefined rules to determine which agent properties from which SMS site take precedence over the others. If software inventory is enabled on any one site, it will be installed on the client. Inventory frequency is determined by the principal site. If, however, the principal site has disabled software inventory, inventory will still be collected according to the schedule of the next site that has software inventory enabled.
The principal site for each client can be set through the Systems Management Control Panel applet installed on each SMS client. To set the principal site, open the Systems Management applet on the client in question and select the Sites tab to view a list of all the SMS sites to which the client has been assigned. Unless the client is a member of multiple SMS sites, only one site will appear here. If the list contains multiple entries, the entry at the top of the list is designated the principal site. To change the principal site, use the Move Up and Move Down buttons.
In addition, the Software Inventory Client Agent will report on all file types configured on all the sites to which the client is assigned—that is, if site A reports on .EXE files and site B reports on .DLL files, the Software Inventory Client Agent will scan for both .EXE and .DLL files. The same is true for collected files specified in multiple sites. The amount of data collected and reported will represent the highest level of detail specified at any of the sites.
Software Inventory Collection Process Flow
Now let's explore the software inventory collection process in more detail. This process is illustrated in Figure 9-27. Remember that the inventory collection process is the same for both 16-bit and 32-bit clients.
The first time inventory collection runs—30 minutes after installation of the Software Inventory Client Agent—a complete software inventory is collected and its history is written to the \MS\SMS\Clicomp\Sinv\Sinv.his file on the client. Each subsequent inventory generates a delta file, containing the details for only those inventory properties that have changed since the last interval. When a complete inventory file has been generated, Sinv32.exe writes a temporary file with an .SIC (software inventory complete) extension to the \MS\SMS\Clicomp\Sinv folder on the client. For subsequent inventory cycles, this delta file will have an .SID (software inventory delta) extension.
Copy Queue Manager renames the file with a unique filename but retains the file extension (.SIC or .SID). It then copies the file to the CAP_site\Sinv.box folder on the CAP. At this point, the software inventory process is complete on the client. The SMS Client Service will start the Software Inventory Client Agent again at the next scheduled interval.
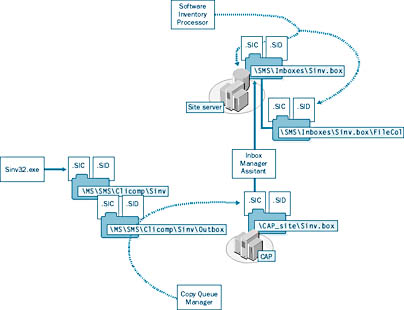
Figure 9-27. The software inventory collection process flow.
![]()
NOTE
Once Copy Queue Manager copies the inventory file to the CAP, the temporary files (.SIC and .SID) are deleted.
Inbox Manager Assistant running on the CAP in turn moves the file to Software Inventory Processor's inbox (the SMS\Inboxes\Sinv.box folder) on the site server. If the site server is a primary site server, Software Inventory Processor writes the data to the SMS database on the SQL server. If the file is deemed corrupt, it is written to the SMS\Inboxes\Sinv.box\Badsinv folder. If a parent site exists, Software Inventory Processor forwards the MIF file to Replication Manager, which forwards the file to the Software Inventory Processor inbox on the parent site server. Collected files are removed from the inventory file and written to the SMS\Inboxes\Sinv.box\FileCol\ID folder. Files collected from SMS clients are stored in a separate ID folder for each client. The ID folder name represents the resource ID assigned to the client when the client was discovered.
TIP
You can find each client's resource ID by viewing its discovery data in the Collections folder in the SMS Administrator Console or by creating a query to display the resource IDs for all the clients.
Software Resynchronization
Occasionally, Software Inventory Processor may determine that the inventory data it receives is somehow "bad," or out of sync with the SMS database. In these circumstances, a resync will be triggered automatically. The following events can trigger a software inventory resync:
- Software Inventory Processor tries to update data that does not exist in the SMS site database.
- The inventory data has been corrupted.
- The client computer has attached to an SMS site different from the one shown in the last inventory.
When one of these events triggers a resync, Software Inventory Processor creates a .CFG file for the client and writes a resync request to it. As with the hardware inventory, this file is maintained in the SMS\Inboxes\Clidata.src folder on the site server. Inbox Manager writes this file to the corresponding folder on the CAP (CAP_Site\Clidata.box). The next time CCIM runs (on its 23-hour cycle or after a forced update), the .CFG file is read, the client's registry is updated with the resync information (on 32-bit clients only), and the SMS Client Service directs the Software Inventory Agent to generate a complete software inventory.
Status Messages and Log Files for Software Inventory
As we've seen, status messages and log files are generated throughout the inventory installation and collection process. As we did for hardware inventory, let's begin here with the log files. As you know, client logs are enabled by default and are written automatically to the \MS\SMS\Logs folder on each client. As you monitor the installation of the Software Inventory Client Agent, look for entries related to the detection of the Software Inventory Client Agent offer in the Ccim32.log file. Monitor the SMSapm32.log file for entries that show when the Advertised Programs Monitor scheduled the installation of the Software Inventory Client Agent on the client. Insinv32.log tracks the agent installation. Figure 9-28 shows examples of the entries you might find in these logs using SMS Trace.
To track the generation of software inventory files on the client, monitor the Sinv32.log. Cqmgr32.log tracks the copying of inventory and status messages to the CAP. Monitoring the log files for Software Inventory Processor (Sinvproc.log), Inbox Manager (Inboxmgr.log), and Inbox Manager Assistant (Inboxast.log) can help you determine the role of these files in the software inventory collection process.
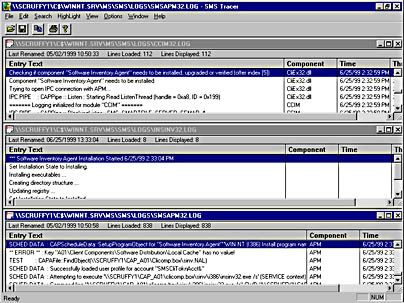
Figure 9-28. Sample entries for Ccim32.log, SMSapm32.log and Insinv32.log.
Within 60 minutes of installation, CCIM will generate a status message announcing the successful installation of the Software Inventory Client Agent. The Software Inventory Client Agent itself will generate a status message after the first inventory collection and again after every subsequent collection. Copy Queue Manager forwards these status messages to Status Manager's inbox on the CAP (CAP_Site\Statmsgs.box), and Inbox Manager Assistant forwards them from the CAP to Status Manager's inbox on the site server (SMS\Inboxes\Statmgr.box). You can view these status messages by running a status message query through the SMS Administrator Console using a process similar to that for hardware inventory.
Figure 9-29 shows an example of status messages generated by the installation of the Software Inventory Client Agent and the collection of the inventory from the client. These messages are obtained after running the status message query All Status Messages From A Specific System. The message with ID 10600 indicates that inventory has been successfully collected; 10605 indicates that a file has been collected; 10204 from CCIMreports that the Software Inventory Client Agent was successfully installed. Notice that CCIM reported the installation 60 minutes later, in accordance with its verification cycle.
On the site server, monitor the status messages of Software Inventory Processor. Look for messages in the 37xx range, which identify successful processing of MIF files. Also monitor status messages for Replication Manager for forwarding of MIF files to a parent site.
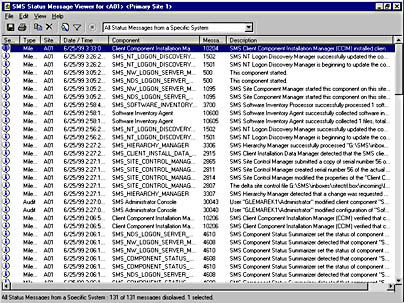
Figure 9-29. The SMS Status Message Viewer window.
Viewing Software Inventory
You can view software inventory through the SMS Administrator Console in much the same way as you view hardware inventory. The procedure is described here:
- Navigate to the Collections folder and expand it.
- Select the collection that contains the client or clients whose inventory you want to view, right-click on the client entry, choose All Tasks from the context menu, and then choose Start Resource Explorer to display the Resource Explorer window, shown in Figure 9-30.
- Expand Software, and select Collected Files to view a list of files collected for the client.
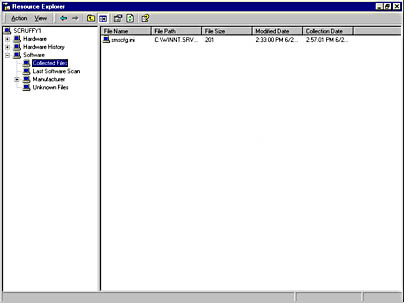
Figure 9-30. The Resource Explorer window.
TIP
Properties are listed horizontally across the viewing screen, requiring you to scroll across to view all the properties. If you right-click on an object and choose Properties from the context menu, you can view the same properties listed vertically in a Properties window.
- Select Last Software Scan to determine the last time the agent ran, as shown in Figure 9-31.
- Expand Manufacturer to view the product data collected by the Software Inventory Client Agent, as shown in Figure 9-32. Expand each entry to see more specific version information. As you select each version, you can view the filename (and other attributes) associated with this product, assuming that you enabled the Files Associated With Known Products option for the agent.
- Select Unknown Files to view a list of those files for which the agent could not obtain product information (if you selected the Files Not Associated With Known Products option when you configured the agent), as shown in Figure 9-33.
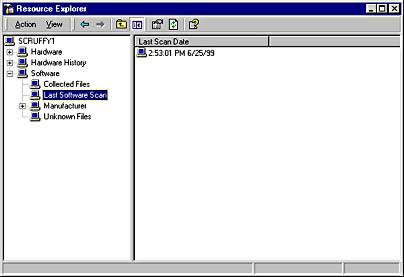
Figure 9-31. The Resource Explorer window, with Last Software Scan selected.
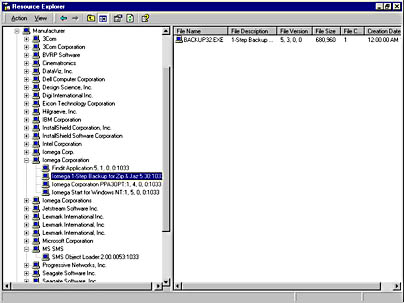
Figure 9-32. The Resource Explorer window, with Manufacturer expanded.
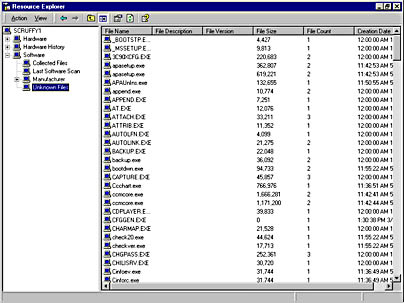
Figure 9-33. The Resource Explorer window, with Unknown Files selected.
![]()
REAL WORLD File Path Queries for Collected FilesYou've probably noticed that when you view Collected Files through the Resource Explorer, you do not see the path—that is, the directory on the client in which the files were found. This information is stored with the file information in the SMS database, however, which means that it can be queried. To view the path information, you need to create a query.
To create a simple query to display all the properties of the selected file, follow these steps:
- In the SMS Administrator Console, navigate to the Queries folder.
- Right-click on Queries, choose New from the context menu, and then choose Query to display the Query Properties window, shown in Figure 9-34.
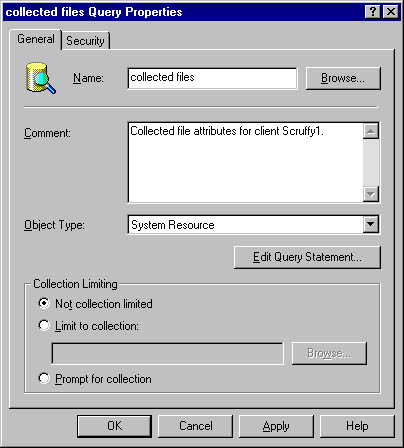
Figure 9-34. The Query Properties window.
- On the General tab, enter a descriptive name for the query and a comment if desired. From the Object Type drop-down list, select System Resource.
- Click Edit Query Statement to display the Query Statement Properties window, as shown in Figure 9-35.
On the General tab, you define the query results view—that is, which attributes you want displayed when you run the query. Click the New button to display the Result Properties window.
- Click the Select button to display the Select Attribute dialog box, shown in Figure 9-36.
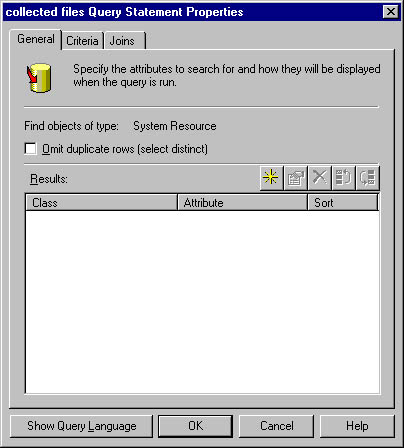
Figure 9-35. The Query Statement Properties window.
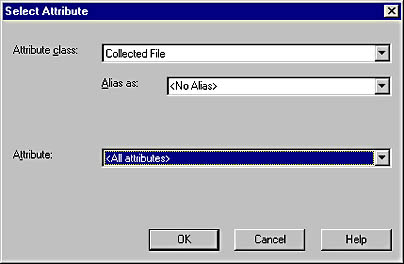
Figure 9-36. The Select Attribute dialog box.
- Select the attribute class Collected Files and the attribute (File Name, File Path, File Size, and so on) you want to display. Then click OK.
Repeat this process until you have added all the attributes you are interested in displaying when you run the query, or choose All Attributes as your Attribute option to display all the attributes.
- Click OK again to return to the Query Statement Properties window. On the Criteria tab, you will define what the query should look for.
- Click the New button to display the Criterion Properties window, shown in Figure 9-37.
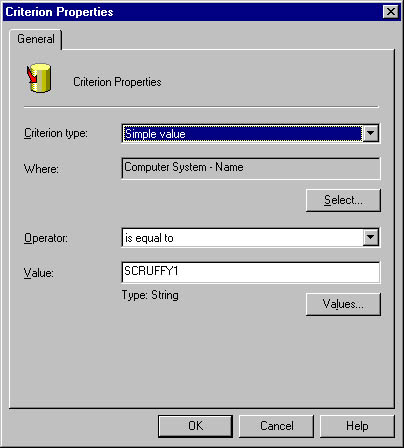
Figure 9-37. The Criterion Properties window.
- Click the Select button once again to display the Select Attribute dialog box, and select an attribute class and an attribute to search on. Since you want to list all collected files for a specific client in this example, select Computer System as your attribute class and Name as the attribute, and click OK to return to the Criterion Properties window.
- Select an operator from the drop-down list, and enter a value to search on or click the Values button to view the current values in the database. Then click OK.
- Choose OK to return to the Query Statement Properties window, as shown in Figure 9-38, and click OK again to save your query.
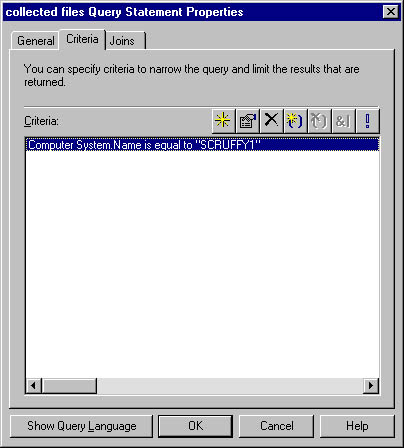
Figure 9-38. The Query Statement Properties window.
To execute your new query, follow these steps:
- In the SMS Administrator Console, navigate to the Queries folder and expand it.
- Select your new query, right-click on it, and choose Run Query from the context menu. The query result is displayed with the result attributes you selected, as shown in Figure 9-39.
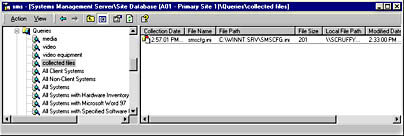
Figure 9-39. The SMS Administrator Console showing the query results.
You will now see the path included as part of the query results. With a little modification, you can make this query more generic and useful by having it prompt you for the client name when you execute it.
EAN: 2147483647
Pages: 167