Hardware Inventory
The Hardware Inventory Client Agent (also sometimes referred to as the Hardware Inventory Agent) collects a broad assortment of hardware properties from the client. When we think of hardware inventory, most of us, especially those of us familiar with earlier versions of SMS, think of the basic data: disk information such as space used and space available; memory, video, processor, and operating system data; and MAC, IP, and subnet addresses. To be sure, some of this hardware information sounds a lot like the discovery data stored in the discovery data records (DDRs) we looked at in Chapter 7. However, hardware inventory is nothing like discovery data.
In fact, a great deal more hardware information is collected than just these basics. The hardware inventory process for 32-bit clients, for example, is designed to query the Windows Management Instrumentation (WMI) that is part of the SMS client installation to obtain its data. Windows Management itself can expose a vast amount of information about the client, obtaining information from various providers, including the WIN32 subsystem of Windows NT, the registry, the BIOS of the computer, and so on. As a result, the amount of data reported about each of the basic hardware components is more extensive and can actually be extended further. This extension is done by modifying the Managed Object Format (MOF) file stored on the site server.
Data not normally collected as part of the basics can also be reported as part of the hardware inventory. For example, you could report on program groups created on the client, or network printer connections, or account information such as the user's full name or security ID (SID). This reporting is accomplished through the creation of text files known as Management Information Format (MIF) files that you present to SMS as an update to the database.
If information is not available directly through the Hardware Inventory Client Agent, you can update client records with your own manually generated data—or even create whole new classes of object types, such as "multimedia equipment." Or you can obtain one of several new third-party add-ons to SMS 2.0 to obtain data such as OEM-specific DMI-based information. Once hardware inventory has been collected at the client, it is passed on to the client access point (CAP). The CAP, in turn, forwards the hardware inventory to the site server. Hardware inventory is ultimately stored in the SMS database, so it is important to draw a distinction between primary and secondary site servers. As we saw in Chapter 4, the main difference between a primary and a secondary site server is that a primary site server maintains access to an SQL Server database.
In the case of hardware inventory, this does not mean that you cannot enable the Hardware Inventory Client Agent on a secondary site server for its clients. In point of fact, you can, and the agent's configuration settings can even be different from the secondary site's parent site. When hardware inventory is passed to the secondary site server by the CAP, the secondary site server forwards the information to its parent primary site, where it can be added to the SMS database.
Enabling Hardware Inventory
Let's begin by getting the Hardware Inventory Client Agent enabled and installed on our SMS clients. Then we'll explore how inventory is actually collected. You can enable the Hardware Inventory Client Agent through the SMS Administrator Console. To do so, follow these steps:
- Under Site Settings, navigate to the Client Agents folder and expand it.
- Right-click on Hardware Inventory Client Agent, and choose Properties from the context menu to display the Hardware Inventory Client Agent Properties window, shown in Figure 9-1.
- Select the Enable Hardware Inventory On Clients check box.
- The default inventory collection schedule on the client is once a week. With the Simple Schedule option, you can specify collection to run once every 1 to 23 hours, 1 to 31 days, or 1 to 4 weeks. Or you can select Full Schedule and then click the Schedule button to display the Schedule dialog box, shown in Figure 9-2. Here you can designate a more specific start time and recurrence pattern. When you have finished, click OK.
- Click OK again to begin the site update process.
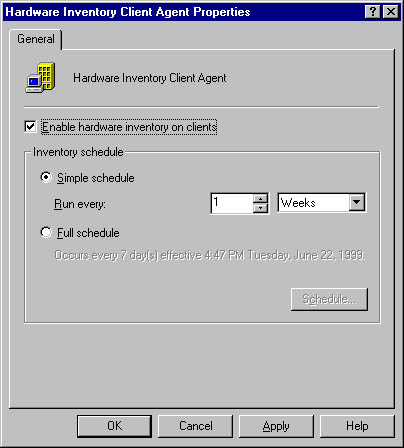
Figure 9-1. The Hardware Inventory Client Agent Properties window.
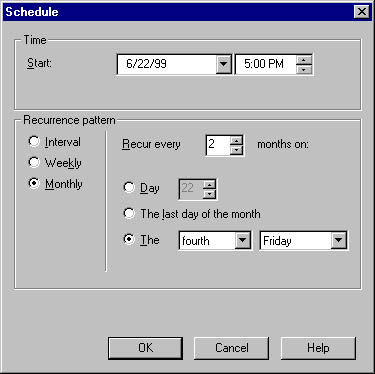
Figure 9-2. The Schedule dialog box.
When you enable the Hardware Inventory Client Agent, you are of course making a change to the site properties, and the site's site control file (Sitectrl.ct0) will be updated as a result (as described in Chapter 3). The following three files are written to the SMS\Inboxes\Clicfg.src directory on the site server:
- Hinv.cfg Contains the Hardware Inventory Client Agent configuration settings
- Hinv.nal Contains the CAPs from which the Hardware Inventory Client Agent can be installed
- Hinv.pkg Contains the instructions for installing the Hardware Inventory Client Agent on the client for various platforms
In the same directory, the client offer (.OFR) file is also updated to indicate that the Hardware Inventory Client Agent needs to be installed on all SMS clients for the site. This file is named Cli_xxx.ofr, where xxx represents the client operating system platform. The client offer file is used by the site server to notify its clients of any client components that need to be installed, updated, or removed. It is created on the site server and copied to each CAP for the site.
As you know, SMS clients are installed from a CAP or CAPs for the SMS site. Inbox Manager copies these files to the CAP_site\Clicomp.box directory on the CAPs. At the next Client Component Installation Manager (CCIM) cycle on the client (every 23 hours, or when an update is forced through the SMS 2.0 Resource Guide utility Client Utilities tool (Cliutils.exe) or the Systems Management Control Panel applet), CCIM will connect to the CAP and read the client offer file. CCIM will then proceed to initiate the installation of the Hardware Inventory Client Agent. This agent is installed by launching Inhinv32.exe or Inhinv16.exe (depending on the platform), both of which can be found in the CAP_site\Clicomp.box\Hinv\platform folder, where platform is either Alpha or i386.
At this time, the SMS_def.mof file is compiled into the WMI layer on the client, the agent support files are installed, the hardware inventory log files are updated, and the agent is started. Ten minutes after the Hardware Inventory Client Agent is started, the first complete inventory is collected from the client as specified by the SMS_def.mof file through WMI and is then copied to the CAP.
Client Requirements and Inventory Frequency
The client computer will require about 400 KB for the Hardware Inventory Client Agent support files. A complete default inventory will generate a hardware information file 100 KB to 200 KB in size. A copy is stored on the client as part of the WMI Common Information Model (CIM) repository. The initial inventory is also passed to the CAP and then to the site server. Subsequent inventory files generally report only changes to the hardware inventory, however, so you can expect a corresponding amount of network traffic associated with the installation (one time), with the first complete inventory (one time), and with subsequent delta inventories (according to your schedule). The delta inventory is an inventory cycle that creates a delta inventory file containing the information that has changed since the previous inventory.
The schedule you specify should reflect the frequency with which you need to collect or update the inventory record of your clients. If your clients have fairly standard hardware installations and do not make or are not allowed to make substantial changes on their own, you could collect inventory less frequently—say, once a week or even once a month.
However, if your client computers are volatile regarding hardware changes, you may need to report changes to the inventory more frequently—perhaps once a day or once every 12 hours. The more frequent the inventory, the more potential network traffic will be generated. SMS 1.x administrators will notice that the option to collect inventory at every logon is no longer available. This is because the Hardware Inventory Agent now runs as a background process on the client computer rather than as a logon server-based process triggered by the SMS script file. In fact, the Hardware Inventory Client Agent will continue to run and report inventory regardless of whether a user is actually logged on to the client.

TIP
The Hardware Inventory Client Agent can be forced to run through the Systems Management applet in the Control Panel. Double-click on the applet to display the Systems Management Properties window, and select the Components tab. Select the Hardware Inventory Agent entry in the Components list, and then click the Start Component button.

CAUTION
Inventory stored in the SMS database is historical in nature, meaning that it is only as accurate as the last time you collected the inventory record. If your clients are volatile, as described earlier, and you rely on the inventory to identify clients' available disk space for installation applications, you may require an inventory schedule that is more frequent.
Multiple Sites and Hardware Inventory
In Chapter 8, we saw that a client can be assigned to more than one SMS site. Recall that in this situation, SMS will follow predefined rules to determine which agent properties from which SMS site take precedence over the others. If hardware inventory is enabled on any one site, it will be installed on the client. Inventory frequency, however, is determined by the principal site. If the principal site has disabled hardware inventory, inventory will still be collected according to the schedule of the site that has hardware inventory enabled.
The principal site for each client can be set through the Systems Management Control Panel applet installed on each SMS client. To set the principal site, double-click on the Systems Management applet on the client in question and select the Sites tab in the Systems Management Properties window. The Sites tab displays all the SMS sites to which the client has been assigned. Unless the client is a member of multiple SMS sites, only one site will be listed here. If multiple entries are shown, the entry at the top of the list is designated the principal site. To specify a new principal site, use the Move Up and Move Down buttons.
Hardware Inventory Collection Process Flow
Now let's explore the hardware inventory collection process in more detail. In this section, we'll look at the process from the perspectives of both 32-bit clients (Microsoft Windows 95, Windows 98, Windows NT, and Windows 2000) and 16-bit clients (Microsoft Windows 3.1 and Windows for Workgroups).
32-Bit Clients
Recall that the Hardware Inventory Client Agent uses WMI to obtain hardware inventory data about various classes of objects designated in the SMS_def.mof file. When the Hardware Inventory Client Agent (Hinv32.exe) is scheduled to run, it reads the SMS_def.mof file and queries the CIM Object Manager component of WMI for the object properties it needs to report on. The CIM Object Manager, in turn, retrieves the current information from the appropriate object providers, such as WIN32, and then passes the data to the Hardware Inventory Client Agent. This process is illustrated in Figure 9-3.
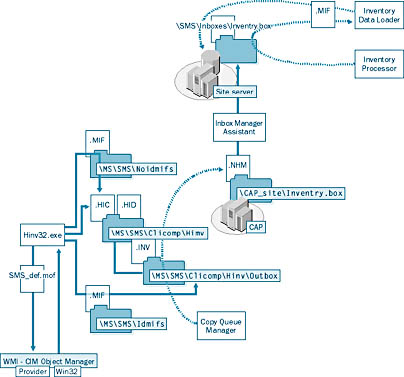
Figure 9-3. The hardware inventory collection process for 32-bit clients.
The first time the Hardware Inventory Client Agent runs—approximately 10 minutes after its installation—a complete inventory is collected and its history is maintained in the CIM repository on each client. Each subsequent inventory generates a delta file only, detailing only those inventory properties that have changed since the last interval. When a complete inventory file is generated, Hinv32.exe writes a temporary hardware inventory complete (.HIC) file to the \MS\SMS\Clicomp\Hinv folder on the client. For subsequent inventory cycles, this delta file will have a hardware inventory delta (.HID) extension.
At this time, Hinv32.exe looks for any NOIDMIFs that might reside in the \MS\SMS\Noidmifs folder on the client. Refer to the section "MIF Files" later in this chapter for details about MIF files. If the client deems a NOIDMIF valid, it is included as part of the .HIC or .HID file. If not, it is written to the \MS\SMS\Noidmifs\Badmifs folder. Hinv32.exe also looks for any IDMIFs stored in the \MS\SMS\Idmifs folder on the client. If an IDMIF is deemed valid, it is moved to the \MS\SMS\Clicomp\Hinv\Outbox folder. If not, it is written to the \MS\SMS\Idmifs\Badmifs folder.
![]()
NOTE
The Badmifs folder is created only if a bad NOIDMIF or IDMIF is detected. By default, the MIF file size is set to 250 KB. A NOIDMIF or an IDMIF is considered bad if it exceeds 250 KB in size or if it cannot be parsed successfully because of syntax errors or because, in the case of IDMIFs, it is being used to update the system architecture for an existing client record.
Hinv32.exe renames the .HIC or .HID file with the extension .INV and copies it to the \MS\SMS\Clicomp\Hinv\Outbox folder, which is monitored by Copy Queue Manager (Cqmgr32.dll). Copy Queue Manager renames the file with a unique filename and changes the extension to .NHM (no history MIF). It then copies the file to the CAP_site\Inventry.box folder on the CAP. At this point, the hardware inventory process is complete on the client. The SMS Client Service will start the Hardware Inventory Client Agent again at the next scheduled interval.
![]()
NOTE
Once Copy Queue Manager copies the inventory file to the CAP, the temporary files (.HIC, .HID, .INV) are deleted. This process generally happens in a matter of seconds, so you may not see the files unless you are watching closely.
Inbox Manager Assistant running on the CAP in turn moves the file to Inventory Processor's inbox (the SMS\Inboxes\Inventry.box folder) on the site server. If the site server is a primary site server, Inventory Processor adds a binary header to the .NHM file, renames it with the extension .MIF and moves it to Inventory Data Loader's inbox (the SMS\Inboxes\Dataldr.box folder). Inventory Data Loader then reads the .MIF file, parses the data, and writes it to the SMS database on the SQL server. If a parent site exists, Inventory Data Loader forwards the .MIF file to Replication Manager, which forwards it to Inventory Data Loader's inbox on the parent site server.
If the site server is a secondary site server, Replication Manager forwards the .MIF file to the parent primary site server's Inventory Data Loader inbox, where it is processed as described earlier.
16-Bit Clients
The hardware inventory collection process on 16-bit clients, as illustrated in Figure 9-4, is similar in many respects to the process described for 32-bit clients, with two major exceptions. The first, of course, is the absence of Windows Management since these clients do not support WMI. Because of this, no history is maintained on the client, and—here is the second exception—a complete, albeit significantly smaller, inventory is generated at each inventory cycle.

Figure 9-4. The hardware inventory collection process flow for 16-bit clients.
When hardware inventory is installed on a 16-bit client, a 16-bit agent (Hinv16.exe) is provided by SMS. The first time the Hardware Inventory Client Agent runs—approximately 10 minutes after its installation—a complete inventory is collected. Each subsequent inventory also generates a complete inventory.
Hinv16.exe will still read the SMS_def.mof file, but it will collect only the classes of objects listed here, with limited properties. (SMS 1.x administrators should immediately recognize this list, as these are the same objects collected from SMS 1.x clients.)
- Disk
- Device Drivers
- IRQ Resources
- Memory
- Name
- Network
- Operating System
- Pointing Devices
- Printer Ports
- Processor
- Serial Ports
- TSR
- Video Configuration
Hinv16.exe actually tests for each of these objects. It creates a temporary file named SMSSafe.tmp in the \MS\SMS\Core\Data directory in which it records any failed hardware tests. Failed tests are noted in the client's SMS.ini file until the SMS administrator resolves them and removes their references.
When the complete inventory file is generated, Hinv16.exe writes a file with a .RAW extension to the \MS\SMS\Clicomp\Hinv folder on the client. The .RAW file represents a complete hardware inventory stored in a binary format rather than an .MIF format. At this time, Hinv16.exe will also look for any NOIDMIFs that might reside in the \MS\SMS\Noidmifs folder on the client. Unlike with 32-bit clients, there is no syntax checking of the NOIDMIF here. The .MIF file is included as part of the .RAW file. There is no support for IDMIF processing on 16-bit clients.
Copy Queue Manager (Cqmgr16.dll) copies the file to the CAP_Site\Inventry.box folder on the CAP provided the user is logged onto the network. If not, the .RAW files will stack up on the client (depending on the collection frequency you specify) until the user next logs onto the network. At this point, the hardware inventory process is complete on the client.
![]()
NOTE
Once Copy Queue Manager copies the inventory file to the CAP, the .RAW file is deleted. This process generally happens in a matter of seconds, so you may not see the file unless you are watching closely.
Inbox Manager Assistant running on the CAP in turn moves the file to Inventory Processor's inbox (the SMS\Inboxes\Inventry.box folder) on the site server. If the site server is a primary site server, Inventory Processor receives the .RAW file. If this is the first inventory file received for the client, Inventory Processor creates a history file (.HIS) for it on the site server and maintains the file there in the SMS\Invproc.box\History folder. Inventory Processor then generates an .MIF file from the .RAW file and moves it to Inventory Data Loader's inbox (the SMS\Inboxes\Dataldr.box folder). If a history file already exists for the client, Inventory Processor will compare the .RAW file against the history file and generate a delta .MIF file, again moving it to Inventory Data Loader's inbox.
Inventory Data Loader then reads the .MIF file. At this point, Inventory Data Loader will perform a syntax check on the .MIF file to determine whether it is a valid MIF. If it is, Inventory Data Loader parses the data and writes it to the SMS database on the SQL server. If a parent site exists, Inventory Data Loader forwards the .MIF file to Replication Manager, which forwards it to Inventory Data Loader's inbox on the parent site server. If the file is not a valid MIF, Inventory Data Loader moves it to the Badmifs folder (SMS\Inboxes\Dataldr.box\Badmifs).
If the site server is a secondary site server, Replication Manager forwards the inventory .MIF to the parent primary site server's Inventory Data Loader inbox, where it is processed as described earlier.
Hardware Resynchronization
Occasionally, Inventory Data Loader may determine that the inventory data it receives is somehow "bad," or out of sync with the SMS database. In these instances, a resynchronization (resync) will be triggered automatically. Resync is a corrective process that can cause the client agent to ignore the history file and collect a complete hardware inventory. Specific events that trigger hardware inventory resync include the following:
- The inventory MIF contains updates for a database record that does not exist.
- The MIF itself contains bad or corrupted data.
- The client has attached to a new SMS site.
![]()
NOTE
Resync doesn't change the hardware inventory schedule—the next inventory cycle will start at the scheduled time.
When a resync is triggered, Inventory Data Loader creates a .CFG file for the client and writes a resync request to it. This file is maintained in the SMS\Inboxes\Clidata.src folder on the site server. Inbox Manager writes this file to the corresponding folder on the CAP (CAP_Site\Clidata.box). The next time CCIM runs (on its 23-hour cycle or when an update is forced), the .CFG file is read, the client's registry is updated with the resync information (on 32-bit clients), and the SMS Client Service directs the Hardware Inventory Client Agent to generate a complete hardware inventory.
The hardware inventory collection process proceeds as described earlier for 32-bit and 16-bit clients. For 16-bit clients, the resync flag is contained within the .RAW file so that it is treated as a complete inventory file by Inventory Processor.
![]()
NOTE
If the client belongs to multiple sites, the complete inventory triggered by a resync event will be forwarded to all the sites the client belongs to.
Status Messages and Log Files for Hardware Inventory
Status messages and log files are generated throughout the inventory installation and collection process. Let's begin with the log files. Unlike log files generated on the site server, client logs are enabled by default and written automatically to the \MS\SMS\Logs folder on each client. When monitoring hardware inventory, you should view the Ccim32.log file for entries related to the detection of the Hardware Inventory Client Agent offer. For example, the notification that the Hardware Inventory Client Agent needs to be installed is made to the client through the client offer file, as discussed in the section "Enabling Hardware Inventory" earlier in this chapter. Monitor the SMSapm32.log file for entries related to Advertised Programs Monitor scheduling the installation of the Hardware Inventory Client Agent. Inhinv32.log tracks the installation of the agent. Figure 9-5 shows examples of the entries you might find in these logs using SMS Trace.
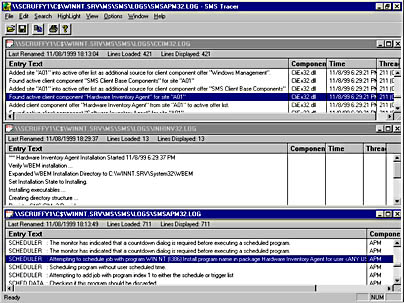
Figure 9-5. Sample entries for Ccim32.log, Inhinv32.log, and SMSapm32.log in SMS Tracer.
Hinv32.log tracks the generation of inventory files as well as updates to the SMS_def.mof file, as illustrated in Figure 9-6. Notice the start of the inventory cycle as well as the enumeration of object classes.
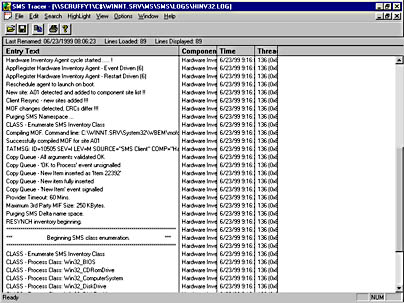
Figure 9-6. Sample entries for Hinv32.log in SMS Tracer.
Cqmgr32.log tracks the copying of inventory and status messages to the CAP, as illustrated in Figure 9-7. Notice when the client connects to the Inventry.box folder on the CAP.
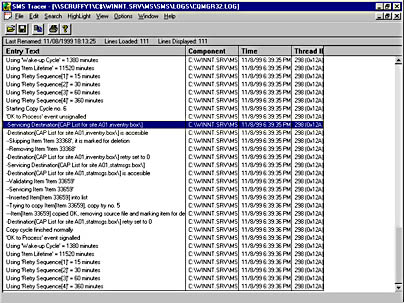
Figure 9-7. Sample entries for Cqmgr32.log in SMS Tracer.
You should also monitor the respective log files for Inventory Processor (Invproc.log), Inventory Data Loader (Dataldr.log), Inbox Manager (Inboxmgr.log), and Inbox Manager Assistant (Inboxast.log) to monitor their part in the inventory collection process.
Within 60 minutes of installation, CCIM will generate a status message announcing the successful installation of the Hardware Inventory Client Agent. The Hardware Inventory Client Agent itself will generate a status message after the first inventory collection, and again after every subsequent collection. Copy Queue Manager forwards these status messages to Status Manager's inbox on the CAP (CAP_Site\Statmsgs.box), and of course Inbox Manager Assistant forwards them from the CAP to Status Manager's inbox on the site server (SMS\Inboxes\Statmgr.box).
You can view these status messages by running a status message query through the SMS Administrator Console. To do so, follow these steps:
- Navigate to the System Status folder, expand it, and select the Status Message Queries folder.
- Right-click on the query All Status Messages From A Specific System, and choose Show Messages from the context menu to display the All Status Messages From A Specific System window, as shown in Figure 9-8.
- In the Prompted Value list, select Machine Name. Click Specify and enter the name of the client computer you want to report on, or click Load Existing to have SMS query the database and compile a list of all client names it has recorded.
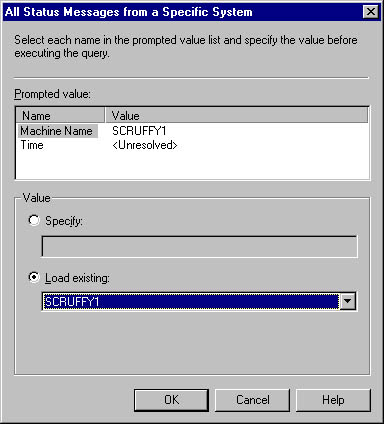
Figure 9-8. The All Status Messages From A Specific System window.
![]()
NOTE
This process can take a while for large databases.
- Select Time in the Prompted Value list. The options in the Value section will change. Either specify a starting date and time from which you want to see status messages or choose Select Date And Time to enter a range of hours (1, 2, 6, or 12 hours ago).
- Click OK. The SMS Status Message Viewer will display all the status messages recorded for that client during the period specified.
Figure 9-9 displays an example of status messages generated by the installation of the Hardware Inventory Client Agent and the collection of the inventory from the client. Look for message IDs of 10500, indicating that inventory has been successfully collected; 10505, indicating that the inventory schema (SMS_def.mof) has been updated; and 10204 from CCIM (selected in Figure 9-9), reporting that the Hardware Inventory Client Agent was successfully installed. Note that CCIM made this report an hour later, which is its verification cycle.
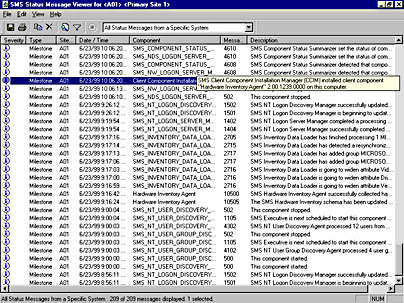
Figure 9-9. The Status Message Viewer, showing that the Hardware Inventory Client Agent has been installed and that inventory has been collected for this client.
For a list of clients that have installed the Hardware Inventory Client Agent, run the status message query Clients That Installed The Hardware Inventory Client Agent. To view status messages for clients based on their collection membership, run the status message query All Status Messages For A Specific Collection At A Specific Site. Of course, you could create your own status message query as well. Refer back to Chapter 5 for more information on how to create status message queries.
On the site server, monitor the status messages of Inventory Data Loader. Look for messages in the 27xx range identifying successful processing of MIFs. Monitor the status messages for Inventory Processor for resynchronization or the processing of .RAW files from 16-bit clients, and monitor status messages for Replication Manager for forwarding of MIF files to a parent site.
Viewing Hardware Inventory
Hardware inventory is viewed through the SMS Administrator Console. The process is shown here:
- Navigate to the Collections folder and expand it.
- Select the collection that contains the client or clients whose inventory you want to view.
- Right-click on the appropriate client entry in the right pane, choose All Tasks from the context menu, and then choose Start Resource Explorer.
- In the Resource Explorer window, expand Hardware to view a list of object classes for which properties have been collected, as shown in Figure 9-10. Select each object to view its instances and properties.
- Expand Hardware History to view information collected from previous inventories such as Logical Disk History, Memory History, and Operating System History, as shown in Figure 9-12.

Figure 9-10. The Resource Explorer window, with Logical Disk selected.
The Resource Explorer window lists properties horizontally across the viewing screen, requiring you to scroll across to see all the properties. However, if you right-click on an object and choose Properties from the context menu, you can view the same properties listed in a vertical column, as shown in Figure 9-11.
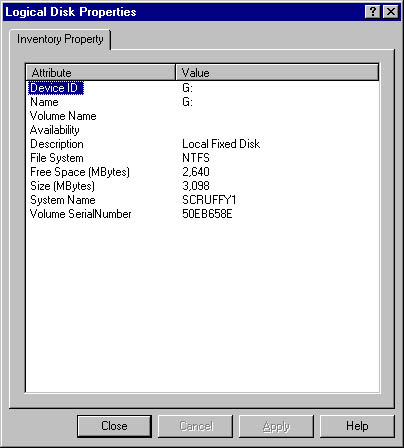
Figure 9-11. The Logical Disk Properties window.
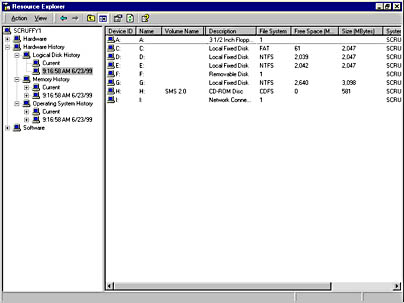
Figure 9-12. The Resource Explorer window, with Hardware History expanded.
TIP
You could use Hardware History to develop resource usage trends for your clients—for example, to track how much disk storage is utilized over a period of time or whether paging might be excessive due to a lack of RAM.
The entries listed under Hardware in the Resource Explorer window represent the object classes identified through the SMS_def.mof file and any MIF files that were created to be appended to or modify the client's inventory record. As you can see, it is quite a thorough list. You can actually collect more than ten times the amount of data than you could through the hardware inventory process in earlier versions of SMS.
Customizing Hardware Inventory
There are two ways to customize the inventory that you collect from a client or add to the database as a new class of object: you can modify the default SMS_def.mof file, or you can create custom MIF files. Either method will require some planning and testing on the part of you, the SMS administrator. As we've seen, the default SMS_def.mof file collects a large amount of data—100 to 200 KB per client. Modifying the file could result in larger amounts of data to track, more network traffic when sending the data to the CAPs and site server, and so on. Adding an MIF file can also result in additional inventory data being reported. Also, while the SMS_def.mof exists as a template that can be modified, in general, MIF files must be created.
SMS_def.mof
As mentioned, you can consider the SMS_def.mof file a template that defines for Windows Management on SMS clients which inventory objects, or hardware classes, should be queried and how much data should be collected for each. The master SMS_def.mof file is maintained in the SMS\Inboxes\Clifiles.src\Hinv folder on the site server. This file is copied to the CAP (CAP_Site\Clifiles.box\Hinv) and ultimately to each client (\MS\SMS\Sitefile\site\Hinv).
Included with SMS 2.0, but not installed by default, is a utility called MOF Manager. This tool gives you the ability to enable or disable hardware classes and their properties through an easy-to-navigate interface. Using this tool, you can enable additional object classes beyond those already collected, disable object classes to stop collecting their properties, and specify which properties to collect or ignore on a per-object basis.
The installation setup file for MOF Manager is included on the SMS 2.0 CD in the folder Support\Reskit\Bin\platform\Mofman, where platform is either Alpha or i386. Simply execute the Setup.exe found there and follow the simple MOF Manager Setup Wizard instructions. By default, the MOF Manager shortcut icon will be created in a program group named SMS 2.0 Resource Kit; you can add the icon to the Systems Management Server program group if you prefer.

PLANNING
When you upgrade the site server with SMS 2.0 Service Pack 1, the original utilities found in the \Support folder are replaced with an updated version contained in a self-extracting executable file named Support.exe. Executing this file creates a new folder named SMS 2.0 Supportability Files (placed by default in the C:\Program Files folder). The MOF Manager setup file can be found in the Reskit\Bin\platform\Mofman subdirectory under SMS 2.0 Supportability Files.
After you launch the MOF Manager, open the SMS_def.mof file found in the SMS\Inboxes\Clifiles.src\Hinv folder. Figure 9-13 shows a sample SMS_def.mof file.
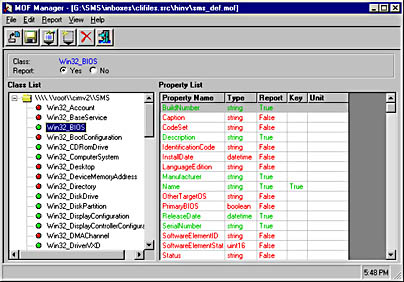
Figure 9-13. The MOF Manager window, showing a sample SMS_def.mof file.
Every hardware class that has a green indicator (with Yes selected for the Report option) represents a hardware class for which one or more properties can be collected. As you select each hardware class, you can see at a glance which of its properties is set to be collected—all those highlighted in green or set to True. As you can see, a fair amount of data is collected by default.
In Figure 9-13, the hardware class WIN32_BIOS is selected. This object is set to report BIOS information for properties such as BuildNumber, Manufacturer, ReleaseDate, and Version. You can disable any of these properties if you don't require that information. You can also enable any additional property you want to report on—for example, you might choose to enable InstallDate or CodeSet. To change the status of a class property, double-click on that entry in the Properties list or select the entry and select the Yes option at the top left of the MOF Manager screen.
CAUTION
It bears repeating that your choice of objects and their properties can generate a very large inventory file. If for some reason you feel tempted to turn on and collect every possible object and property, remember that the inventory process was not designed to support that scenario, nor would it be very practical for you as an administrator in the long run.
Some hardware classes that you enable may result in additional network traffic generated to find or resolve resources. For example, WIN32_LogicalDisk will report not only local partitions, but also any current network connections. Properties for WIN32_Desktop and WIN32_Environment may require a connection to a domain controller to validate a username to its SID.
Before you roll out significant changes to the SMS_def.mof file, be sure to test the file on a few sample clients to be sure that you are collecting the information you expected to collect and that the network traffic generated as a result falls within acceptable limits for your network.
TIP
The Systems Management Server Administrator's Guide provides a short list of the more common Web-Based Enterprise Management (WBEM) object classes and their properties. The Systems Management Server 2.0 Resource Guide (part of the Microsoft BackOffice 4.5 Resource Kit available through Microsoft Press) provides a complete list; see appendixes B and C. Although not compiled specifically for use with MOF Manager, these lists explain the hardware classes and their attributes, making your use of MOF Manager more meaningful.
MIF Files
Another way to modify the hardware inventory is through the creation of MIF files. MIF files modify the database by creating architectures, object classes, and attributes. Architectures define entire new classes of objects, whereas object classes and attributes are generally added to existing architectures.
Two types of MIF files can be created: NOIDMIFs and IDMIFs. NOIDMIFs are used to modify or append object classes and properties to existing client inventory records—hence the term "no id." You are not creating a new architecture; you are simply appending to an existing architecture—namely, System Resources. You could use a NOIDMIF to add a client system's asset number, information about peripheral devices attached to the computer, or even the department name or code to the existing client record.
IDMIFs, on the other hand, are used to create new architectures of object classes and attributes. For example, suppose you want to report on all the multimedia equipment you have within your organization. Through an IDMIF, you could create a new architecture (say, Multimedia Equipment) with its own object classes—(perhaps Audio, Video, CD, Tape, PC Conferencing), each of which would have one or more attributes (Model, Manufacturer, Asset number, Cost, and so on). IDMIFs can also be used to update existing architectures—for example, to add stand-alone computers to the database or to associate an architecture with existing computer records for the purpose of creating queries and collections that can be linked to unique properties.
![]()
MORE INFO
Although it would be nice to present examples showing how each of these types of MIFs can be used and explain their basic structure, we don't want to reinvent the wheel here with an in-depth explanation of MIF usage and interaction. That level of detail can be found in the Systems Management Server 2.0 Resource Guide (part of the Microsoft BackOffice 4.5 Resource Kit available through Microsoft Press) and also through Microsoft TechNet and the various partner programs offered by Microsoft. Be sure to read Chapter 10 of the Resource Guide, which discusses customizing hardware inventory, if you want to use MIF files to their greatest advantage.
The basic structure of IDMIFs and NOIDMIFs is essentially the same. Because they are text files, they can be created using any text editor. Actually, most third-party add-ons for SMS 2.0 are capable of generating MIF files that update the database with various kinds of information. SMS Installer notifies the site server about the successful or failed installation of an application through a status MIF file. The MIF file format is an industry standard format. If you have created any kind of scripts or batch files in the past, you will find it easy to create an MIF file. Let's start with the NOIDMIF.
Creating a NOIDMIF NOIDMIFs are perhaps the most commonly used MIF file because they add to existing computer records and they are easiest to create. Figure 9-14 shows a sample of a NOIDMIF designed to add the client computer's department name and department code to its existing hardware record in the SMS database.
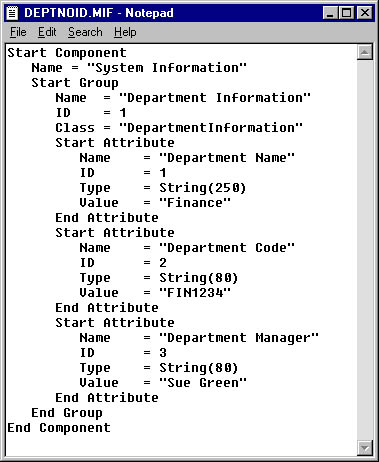
Figure 9-14. A sample NOIDMIF file.
NOIDMIFs always begin with Start Component and a general component name. The next step is to create an object class. You do this by adding the Start Group statement, a Name describing the group, an ID, and a class. The Name attribute is the string displayed in the Resource Explorer that refers to this class. The ID attribute represents this group in relation to any other group in this MIF. For example, if you add another group, you would give it an ID of 2, and so on—the number is unique. The Class attribute is used by SMS internally for processing the group information.
Next you list each attribute that you are adding for this object. In this case, we are adding three attributes: Department Name, Department Code and Department Manager. Each attribute entry begins with Start Attribute and ends with End Attribute. For each attribute, you must provide at a minimum Name, ID, Type, and Value settings. These attributes are fairly self-explanatory. Name is a descriptive attribute name. ID represents the attribute in relation to other attributes. Type indicates whether the value is a text string, a number, or a list, and gives the value's length when appropriate. Value, of course, is the current value you are assigning to the attribute. You end the MIF file with End Group and End Component statements.
Save the NOIDMIF with a descriptive filename and the .MIF extension. The file must be placed in the \MS\SMS\Noidmifs folder on each client you want to update. You can do this using SMS 2.0's package distribution process, which will be discussed in Chapter 12. At the next hardware inventory cycle, the MIF file will be read, evaluated for syntax, and added to the client's inventory file, as described in the section "Hardware Inventory Collection Process Flow" earlier in this chapter, and then updated to the client's SMS database record. It can then be viewed through Resource Explorer, as shown in Figure 9-15.
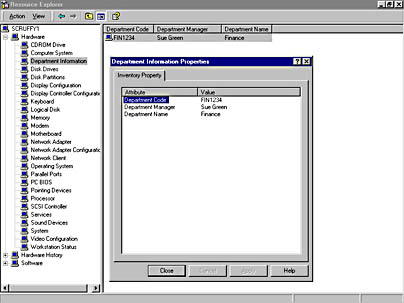
Figure 9-15. A sample NOIDMIF viewed through Resource Explorer.
CAUTION
Be sure that the MIF file you create using a text editor is saved with the .MIF extension. Text editors such as Notepad append a .TXT extension. It's easy to miss this, and if you do, you will spend an inordinate amount of time trying to figure out why the MIF file is not working.
Creating an IDMIF As mentioned, the basic structure of an IDMIF is similar to that of a NOIDMIF. The main difference comes at the beginning of an IDMIF file, as you can see in the example shown in Figure 9-16.
IDMIFs require that you include the following two statements at the top of the MIF:
- //Architecture Identifies the name of the new architecture (object class) you are creating
- //UniqueID Defines a single unique value that identifies this specific instance of the architecture in the database
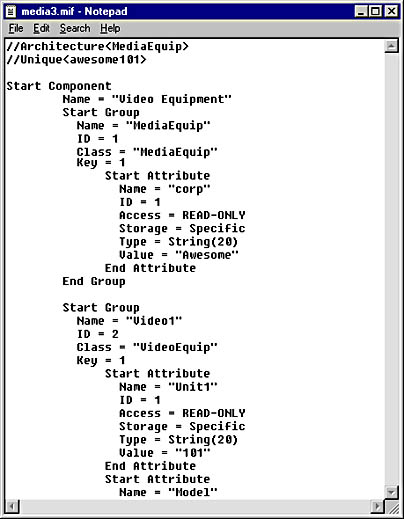
Figure 9-16. A sample IDMIF file.
IDMIFs also require that you include a top-level group that has the same name as the architecture and that has at least one attribute defined. Also, if a class has more than one instance within an architecture, you must have defined at least one key attribute to avoid overwriting previous instances with subsequent information. A key value is simply one of the group attributes. As with NOIDMIFs, you must save the file with an .MIF extension. You can place the file in the \MS\SMS\Idmifs folder on any SMS client.
Viewing an IDMIF Unlike NOIDMIFs, which are associated with specific clients, IDMIFs generally add new object classes to the database. Therefore, you cannot view this information through Resource Explorer. Instead, you must create a query to extract and view the relevant data from the SMS database. For details on creating such queries, refer to Chapter 15.
As mentioned, NOIDMIFs are generally associated with individual client records, and as such, they must be placed in the \MS\SMS\Noidmifs folder on each client. Of course, you can use SMS package distribution to accomplish this. IDMIFs can also be placed in the Idmifs folder on the SMS client. However, since IDMIFs generally are not associated with any one client, you can place an IDMIF in the Idmifs folder on any SMS client. For that matter, you could also place the IDMIF in the CAP_Site\Inventry.box folder on the CAP or in the SMS\Inboxes\Inventry.box folder on the site server. The end result will be the same.
MIF Tools in the Microsoft BackOffice 4.5 Resource Kit The Microsoft BackOffice 4.5 Resource Kit CD contains several tools that can assist you in the process of creating MIF files. The first tool, MIFCheck, is also included on the SMS 2.0 CD in the Support\Reskit\Bin\platform\Diagnose folder on the CD. This is a command-line tool that you can use to determine whether your MIF file is syntactically correct. The MIFCheck.exe and MIF files must both be in the same directory. To run MIFCheck.exe, at a command line execute the command:
Mifcheck filename.mif
If MIFCheck finds an error, it will specify the error and the line on which it occurred. You can then go back to the MIF file, fix the problem, and rerun MIFCheck to check for additional errors. Figure 9-17 illustrates how to use this tool.

Figure 9-17. The MIFCheck command running in the Command Prompt window.
TIP
MIFCheck will find only one error at a time, so you must rerun MIFCheck after you fix each error to be sure that the MIF file is error-free.
The Microsoft BackOffice 4.5 Resource Kit contains two additional tools that should be familiar to SMS 1.x administrators: MIF Form Generator (MIFGen.exe) and MIF Entry (MIFWin.exe). MIF Form Generator allows you to create an MIF form using a GUI, use SMS or some other method to deliver the form to the client, and then have a user fill out the form using MIF Entry. MIF Entry would generate the actual MIF and place it in the \MS\SMS\Noidmifs folder on the client.
MIF Form Generator and MIF Entry were left out of the RTM version of SMS 2.0, but thanks to popular demand, they have been included with the Microsoft BackOffice 4.5 Resource Kit—updated to support SMS 2.0, of course.
Because they are Resource Kit tools and are well-documented there, we won't look at them in detail here. However, let's take a moment to look at the MIF Form Generator and MIF Entry interfaces, as well as the resulting MIF file.
Figure 9-18 shows a completed form that includes three fields (attributes)—Department Manager, Department Code, and Department Name.
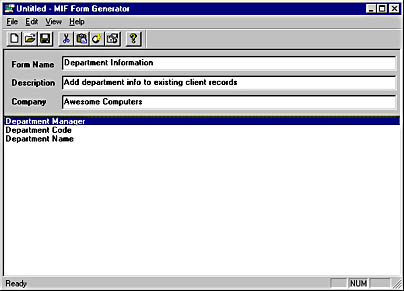
Figure 9-18. Sample form screen.
Figure 9-19 shows the properties of one of the fields, a list type.
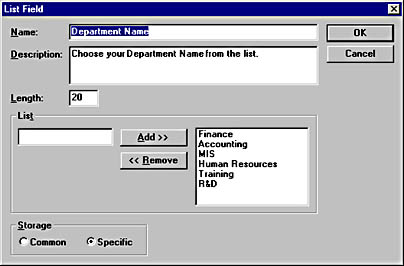
Figure 9-19. Sample list field properties.
There is nothing elegant here. You are building a simple form that either you or your user will fill out. Notice that you can include directions for the user, and in some cases, default values for a field.
If your intention is to create the form using predefined values, generate an MIF file from it, and distribute the MIF file to the client's MS\SMS\Noidmifs folder using the SMS distribution process (which will be discussed in Chapter 12), select the Read-Only option in the Properties window for each field. If you intend to have your users fill in the form, leave this option unselected.
When you save the form, it will be given the extension .XNF. This file can be distributed to the \MS\SMS\Bin folder on each client computer after you have installed the MIF Entry tool on the client. When the user runs this tool (or you execute it via a package), the user can select each field and enter the appropriate values, as shown in Figure 9-20.
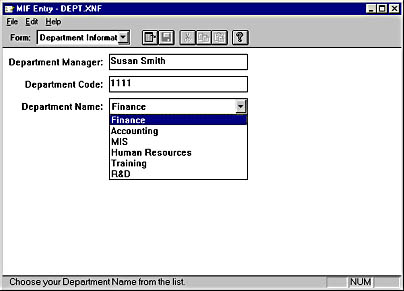
Figure 9-20. Sample MIF Entry form.
When the user saves the form, it is automatically saved as an MIF file in the \MS\SMS\Noidmifs folder on that client and will be reported on the next hardware inventory cycle. Figure 9-21 shows the resulting MIF file. Looks similar to the one we created manually, doesn't it?
Of course, you don't have to ask your users to fill out the MIF forms at all. You could generate the MIF files yourself using the MIF Entry tool and then distribute them to the individual clients, as discussed earlier.
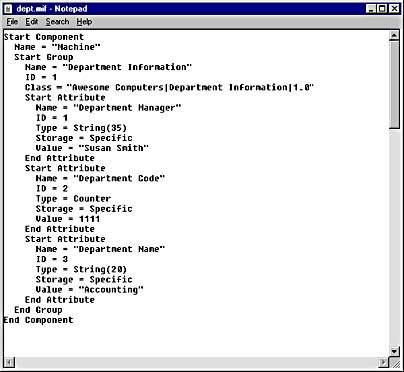
Figure 9-21. Sample MIF file generated by the MIF Entry tool.
EAN: 2147483647
Pages: 167