Planning the Site Structure
Whether you need to upgrade all your SMS 1.2 servers to SMS 2.0 or maintain a mixed SMS 1.2 and 2.0 environment, you will need to spend some time thinking through the two scenarios. Both bring up issues that tend to split into server-related and client-related concerns. A checklist of premigration considerations should include the following tasks:
- Review the current SMS site structure
- Determine which client platforms need to be supported within your upgraded site structure
- Review server hardware and software currently in use
- Explore site limitations between SMS 1.2 servers and SMS 2.0 servers
- Review and clean up the database to be converted
- Document current site settings that need to be re-created
- Back up the site and the server
Of course, you must also apply SMS 1.2 Service Pack 4. For a detailed discussion about this service pack, refer to the section "Applying Systems Management Server 1.2 Service Pack 4" later in this chapter. You will no doubt add items specific and unique to your own SMS installation, but this checklist should serve as a good starting point as you prepare your SMS 2.0 migration strategy. We'll look at each of these tasks in detail in the sections that follow.
Reviewing the Current Site Structure
The first step in developing a migration strategy is to review your current SMS site structure. The current SMS site structure can play a more significant role in determining your migration strategy than you might realize. In general, the clearer your understanding of the current site structure, the easier it will be for you to manage upgrading the sites and maintaining a mixed site. This means documenting all aspects of your current structure, site by site.
Identify the location of your sites' logon servers, distribution servers, site servers, and helper servers—all of these will be affected by an upgrade in one way or another. You should check to see whether any SMS 1.2 sites are overlapping Microsoft Windows NT domains. Since SMS 2.0 is more concerned with site boundaries than with domain structure, overlapping sites can pose some challenges dring an upgrade.
If your system currently supports SMS 1.2 secondary sites, consider whether you need to retain this support. Perhaps the needs of that site or your organization have changed since the secondary sites were implemented. Once you have upgraded an SMS 1.2 secondary site's parent from SMS 1.2 to SMS 2.0, that secondary site can no longer be managed by the parent. It is easier to join one SMS 1.2 site to another than it is to attach an SMS 1.2 site to an SMS 2.0 site. It is also easier to delete an SMS 1.2 secondary site from its original parent SMS 1.2 site than it will be once the parent site is upgraded.
Also, most SMS 1.2 database objects are not completely migrated or upgraded from SMS 1.2 to 2.0. It will be necessary to re-create objects such as custom queries or site security, and that task will much easier if you have adequately documented those settings prior to migration.

TIP
If your site would benefit by reconfiguring the site structure, especially where secondary site servers are concerned, it would be easier to make the modifications prior to beginning the upgrade process. This technique gives the sites a chance to propagate their updated information, including inventory data, up through the reconfigured structure. The databases will then be ready for conversion.
Determining Which Client Platforms Need to Be Supported
You already know that certain client operating system platforms that are supported in SMS 1.2 are not supported in SMS 2.0. These platforms include MSDOS 5.0 and later, Apple Macintosh System 7.x, and IBM OS/2 2.11. Prior to upgrading any existing site servers to SMS 2.0 or implementing any new site servers using SMS 2.0, you need to revisit those clients and determine whether they still need to be managed by an SMS site. If not, you should remove the old SMS client components from those clients before upgrading the site server they belong to.
If these clients still need to participate in an SMS site, they can be managed only by an SMS 1.2 site and you will still be looking at implementing a mixed site of SMS 1.2 and SMS 2.0 servers. While this is not an impossible situation, it is also not without challenges. Mixed-site interoperability will be discussed in detail in the section "Maintaining Mixed Sites Within the Same Site Structure" later in this chapter.
TIP
Take this opportunity to review the hardware components for your proposed SMS 2.0 clients to be sure that you have adequate resources to support installation of the SMS 2.0 client components. For example, installation of all SMS 2.0 client components will require at least 16 MB of free disk space.
Reviewing Hardware and Software Currently in Use
Now is an excellent time for you to review the hardware and software currently in use on your Windows NT servers. Recall from Chapter 2 that some minimum and recommended hardware and software requirements must be met to successfully upgrade to or install SMS 2.0 on a Windows NT server. For example, you should have at least 128 MB of RAM and 2 GB of available disk space on an NTFS partition, and your server's processor must be at least an Intel Pentium 166 MHz.
By now, you certainly understand that RAM, disk space and I/O, and processor speed are all important factors in maintaining acceptable performance for SMS 2.0 site systems, particularly the site server and SMS database server. You must upgrade your servers accordingly before beginning an upgrade or install process.
In terms of software, some simple, non-negotiable terms must be met in order to upgrade to or install SMS 2.0. The proposed site server must be running Windows NT 4.0 with Service Pack 4 or later, and it must be fully Y2K-compliant. This means that, in addition to Service Pack 4, you must install the Y2K components and updated Microsoft Data Access Components (MDAC) as well as Microsoft Internet Explorer 4.01 with Service Pack 1. All of these items can be found on the SMS 2.0 CD and are appropriately updated through the SMS 2.0 Service Pack 1 installation process.
Also, Windows NT 4.0 supports Microsoft SQL Server 6.5 or later, and SMS 2.0 requires SQL Server 6.5 with Service Pack 4 or later applied. SQL Service Pack 4 also is included on the SMS 2.0 CD. SQL Server 7.0 is highly recommended for use with SMS 2.0 because of its significant performance enhancements and improved database handling.

CAUTION
If you are upgrading from SMS 1.2 to SMS 2.0 and also upgrading from SQL Server 6.5 to 7.0, perform the SMS upgrade first. SMS 1.2 does not support SQL Server 7.0, and if you perform the SQL Server upgrade first, you will lose database support for the existing SMS 1.2 site.
Exploring Site Limitations in a Mixed-Version Environment
If you need to maintain a mixed SMS 1.2 and SMS 2.0 site structure, you need to be aware of several limitations as you reorganize the structure and roll out the upgrade. Although SMS 1.2 sites can report to SMS 2.0 sites, the reverse is not supported—that is, SMS 2.0 sites can report only to other SMS 2.0 sites and not to SMS 1.2 sites. Be sure your proposed mixed-site structure reflects this reporting path. This limitation also almost guarantees the necessity of performing a top-down upgrade of SMS 1.2 sites. Begin your upgrade with the SMS 1.2 central site and work your way down to ensure that all SMS 2.0 sites always report to another SMS 2.0 site.
![]()
NOTE
If you will be supporting a mixed SMS 1.2 and SMS 2.0 site structure, the SMS 1.2 site servers must be upgraded with SMS 1.2 Service Pack 4. This service pack implements several performance and component enhancements that deal specifically with interoperability between SMS 1.2 and SMS 2.0 sites.
SMS 1.2 components cannot be installed or run on an SMS 2.0 site system. For example, you could not define an SMS 2.0 logon point to be a helper server for an SMS 1.2 site server. Similarly, SMS 2.0 client access points (CAPs) cannot be installed on SMS 1.2 logon servers. However, SMS 1.2 and SMS 2.0 sites can share distribution points because there are no SMS components installed on those servers. Also, SMS 2.0 no longer supports servers running MIPS or LAN Manager. If you need to maintain these platforms, plan on keeping an SMS 1.2 site around to do so.
Perhaps the most important of these limitations is that SMS 1.2 and SMS 2.0 cannot share the same SQL Server database, although both sites can maintain separate SMS databases on the same SQL server.
Any SMS 1.2 servers within an SMS 2.0 site will themselves become SMS 2.0 clients, including the SMS 1.2 site server. For example, a distribution point can be shared by both an SMS 1.2 and SMS 2.0 site, but the distribution point will become a client to the SMS 2.0 site only.
SMS 1.2 site properties can be administered only through the SMS 1.2 Administrator window. The SMS 1.2 Administrator window cannot be installed on the same Windows NT workstation as the SMS 2.0 Administrator Console. This means that you will need to maintain a separate administrator's workstation to support the SMS 1.2 site.
TIP
The Add/Remove 1.2 Console tool (V12Admin.ipf) in the Microsoft BackOffice 4.5 Resource Kit allows the support of both the SMS 2.0 Administrator Console and the SMS 1.2 Administrator window on the same Windows NT workstation. This utility is described in the section "Systems Management Server 1.2 Administrator Window" later in this chapter.
SMS 1.2 supports intersite communications via Microsoft SNA servers using the SNA Sender. SMS 2.0 does not support this mode of communication. Instead, it supports SNA over RAS to connect these sites. If you need to maintain SNA connectivity, be sure to configure the site server to use SNA over RAS.
SMS 2.0 also does not support the concept of the helper server in the manner in which SMS 1.2 does. You must move SMS components from the helper servers back to the site server before you begin the upgrade process. If you do not, once the upgrade has been completed those helper servers will be "orphaned" and SMS components will have to be removed manually—a messy project.
Reviewing and Cleaning Up the Database
Although the actual SMS 2.0 upgrade process does a fairly good job of converting the SMS 1.2 database, performing whatever maintenance and cleanup tasks are necessary to make the database as error-free as possible before the upgrade is strongly recommended. Otherwise, you could run the risk of migrating "bad" data into the new site, and what's the point of doing that?
Reviewing the Database
Before you upgrade, you should perform the usual recommended SQL Server database maintenance tasks. As we saw in Chapter 18, Microsoft recommends the following database maintenance commands for consistency checks:
- DBCC CHECKDB Verifies that index and data pages are correctly linked for each database table, indexes are in the proper sort order, pointers are consistent, and page information and offsets are reasonable
- DBCC CHECKALLOC (DBCC NEWALLOC in SQL Server 6.5) Verifies that all data pages are appropriately allocated and used
- DBCC CHECKCATALOG Verifies consistency in and between system tables
- DBCC UPDATEUSAGE Reports on and corrects inaccuracies in the Sysindexes table that could result in incorrect space usage reports
For details about how to execute these commands using the SQL Server 6.5 ISQL/w graphical query interface, refer to Chapter 18. Also refer to your SQL Server documentation for complete information about these and other database maintenance commands.
Removing Duplicate Records
As mentioned, the upgrade process has been designed to deal positively with some database inconsistencies. For example, if the upgrade process encounters a duplicate data key that should be unique after conversion, it removes all instances of the duplicate key as well as any unused data keys to ensure consistency. The deleted data should be regenerated after the next inventory update cycle is performed.
If you suspect that your database is in poor shape—that it contains duplicate records—you should clean up those records before the upgrade. Figure 19-1 shows an example of duplicate records displayed in the SMS 1.2 Administrator window—in this case, the same computer name appears with different SMSIDs. Obviously, with a small database you can clean up these duplicates quickly simply by selecting the relevant records and pressing the Delete key. However, this task would be much more daunting in a database consisting of hundreds or thousands of records.
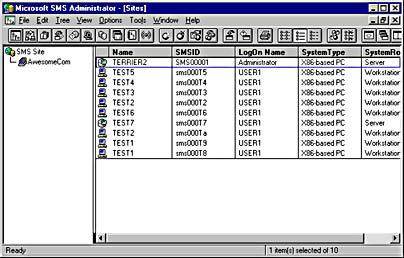
Figure 19-1. Sample duplicate records displayed in the SMS 1.2 Administrator window.
Fortunately, duplicate records can also be identified and removed using the SMS 1.2 database maintenance utility DBClean.exe. DBClean.exe should be in the \SMS\Site.Srv\X86.bin directory on the SMS 1.2 site server. If you don't find it there, look for it on the SMS 1.2 CD.
To use DBClean.exe to remove duplicate records, follow these steps:
- Using the Windows Explorer, find DBClean.exe and double-click on it.
- The SMS Database Manager SQL Login dialog box will appear, as shown in Figure 19-2. Enter the name of the SQL server on which the SMS database can be found, and enter the name of the SMS database. Provide the SQL login ID—usually the default, sa—as well as the password for that account.
- Click OK to display the SMS Database Manager window, shown in Figure 19-3.
- Choose Display Duplicate Personal Computers from the Machines menu to display the Duplicate Machines window, shown in Figure 19-4.
- If the database contains duplicate records, the window will display the Attributes entries Name and NetCardID. Double-click on either to display the duplicate records by name or network card address, as shown in Figure 19-5.
- Select a duplicate record name to display the actual records in the right pane, as shown in Figure 19-6. Each record will display the date and time of the last hardware scan, the computer's name, its SMSID, the site it belongs to, the Windows NT and SMS domains it is a member of, and its system role, such as server or workstation.
- To delete a record, select that record in the right pane and then choose Delete Selected PCs from the Edit menu or press the Delete key. A message box will appear asking you to confirm the deletion, as shown in Figure 19-7. Click Yes.
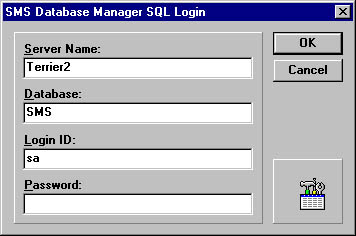
Figure 19-2. The SMS Database Manager SQL Login dialog box.
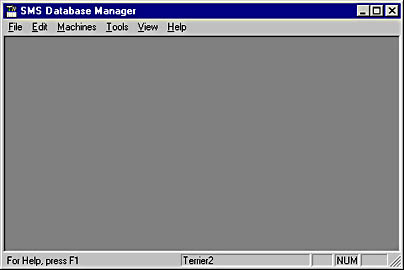
Figure 19-3. The SMS Database Manager window.
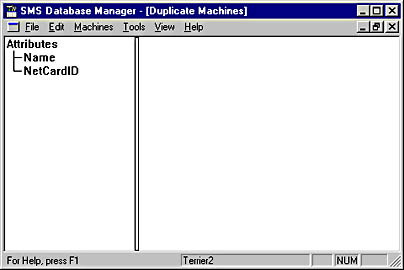
Figure 19-4. The Duplicate Machines window.
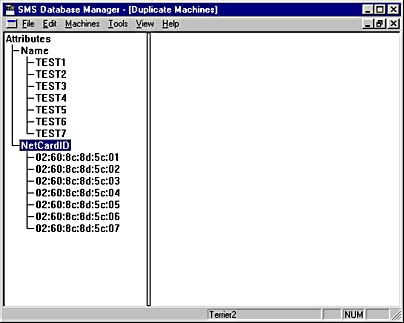
Figure 19-5. Duplicate records listed by name or network card address.
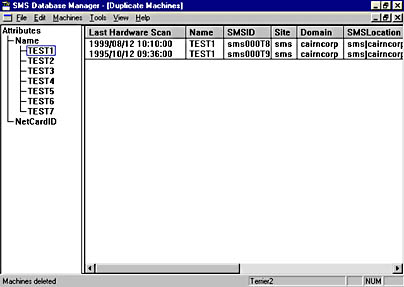
Figure 19-6. Duplicate record details.
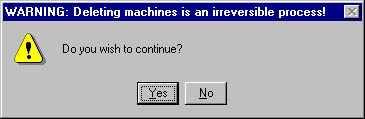
Figure 19-7. Warning message that appears before you delete a record.
![]()
NOTE
You may need to switch back from the SMS Database Manager window to the SMS 1.2 Administrator window to cross-reference the computers listed in Figure 19-6 by their SMSIDs to be sure you are deleting the appropriate records.
- It may happen that the two records actually reference the same physical computer. In this case, you can choose to merge the two records to create a single "good" record instead of deleting the duplicate.
- The duplicate records will now appear as one record, as shown in Figure 19-9.
- Repeat steps 6 though 9 for each duplicate entry, until all duplicate records have been dealt with. When you have finished, choose Refresh from the View menu to rescan the database. If all duplicate records have been removed, a message box will appear, as shown in Figure 19-10, notifying you that no duplicate records were found.
- Close the SMS Database Manager utility.
To merge two records, select the records to be merged in the right pane by Ctrl-clicking on each, and choose Merge History For Selected PCs from the Edit menu. A message box will appear, asking you to confirm the merge, as shown in Figure 19-8. Click Yes.
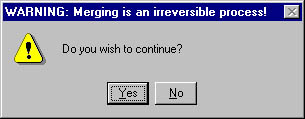
Figure 19-8. Warning message that appears before you merge records.
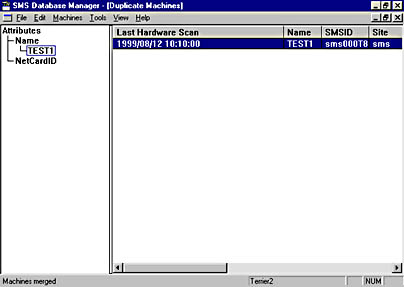
Figure 19-9. The merged record.
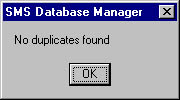
Figure 19-10. Message box that appears when no duplicate records are found.
As shown in Figure 19-11, our SMS 1.2 Administrator window now contains only one entry for each computer, indicating that the duplicate entries have indeed been cleaned up.
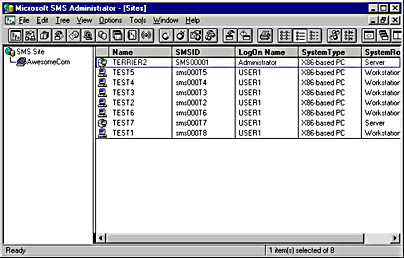
Figure 19-11. The cleaned-up database shown in the SMS 1.2 Administrator window.
![]()
NOTE
The SMS Database Manager utility (DBClean.exe) can also remove collected files for computers that have been deleted, and it can group classes and unused common and specific records created through custom MIF files and associated with computers that no longer exist in the database. Deleting these elements should also be considered part of the cleanup process for the SMS database.
Removing Obsolete Records
To ensure that database conversion occurs quickly and efficiently, consider removing out-of-date records. For example, records that haven't been updated for 60 or 90 days could probably be eliminated from the database with little effect. If these records are still active, they will be added back to the database when they are discovered or inventoried by SMS 2.0.
To remove old records from the database in SMS 1.2, follow these steps:
- In the SMS Administrator Sites window, choose Delete Special from the Edit menu to display the Delete Special dialog box, shown in Figure 19-12. This option is available only in the Sites, Jobs, and Events windows.
- Select the criterion for deleting computer records from the drop-down list. Your choices are Machines With Last Activity or Machine History Records.
- Select a specific cut-off date from the Dated Before drop-down list, or enter a specific number of days in the Older Than text box, and then click OK. A message box will appear, as shown in Figure 19-13, asking you to confirm the deletion. Click Yes.
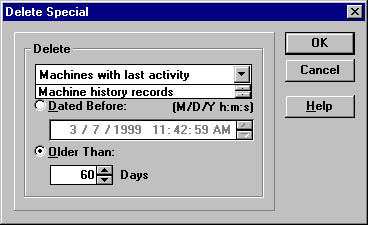
Figure 19-12. The Delete Special dialog box.
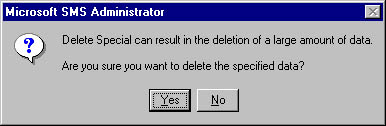
Figure 19-13. Message box that appears before you delete a record.
SMS will indicate the number of items deleted from the database, and the SMS Administrator Sites window will be refreshed, as shown in Figure 19-14.
CAUTION
Once again, it is imperative that you review the records you intend to delete to be sure that it is appropriate to do so. Otherwise, you may unintentionally lose data records.
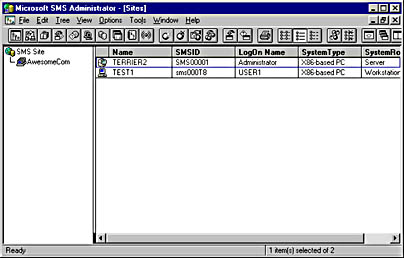
Figure 19-14. The updated Sites window.
Checking Database Size
Part of your database review should include a look at the current size of the database. Remember that SMS 2.0 will require about 100 KB to 200 KB per client to store discovery and inventory data, depending on how much inventory you choose to collect. You current database size may have been appropriate for the SMS 1.2 site server, but the database could be woefully undersized for use by SMS 2.0.
Use Chapter 2 as a guide to assist you in determining the appropriate database size. Modify the current database size to accommodate the larger amount of data collected. For example, if you will be supporting 1000 clients, the database size needs to be at least 1000 × 100 KB, or 100 MB. The transaction log also should be resized if necessary to be at least 10 percent of the database size. Using the same example, the transaction log should be at least 10 MB.
Additionally, the SQL Server tempdb database—used to support the database for queries, sorts, and other tasks—should be at least 20 percent of the database size, and its transaction log should be 20 percent of that. Using our sample database size of 100 MB, the tempdb database should be at least 20 MB (100 MB × 20%) and the tempdb transaction log should be at least 4 MB (20 MB × 20%).
To resize a database in SQL Server 6.5, follow these steps:
- From the Microsoft SQL Server 6.5 program group, launch SQL Server Enterprise Manager.
- Navigate to the Database Devices folder and expand it, as shown in Figure 19-15.
- Select the database device entry for your SMS database, right-click on it, and choose Edit from the context menu to display the Edit Database Device dialog box, shown in Figure 19-16. For this example, we will select SMSData.
- Increase the database size to a value appropriate for the upgrade, and then click Change Now.
- Repeat steps 3 and 4 for the database log device.
- In the Enterprise Manager, navigate to the Databases folder and expand it, as shown in Figure 19-17.
- Select the database entry for your SMS database, right-click on it, and choose Edit from the context menu to display the Edit Database Properties window, shown in Figure 19-18.
- Click the Expand button to display the Expand Database dialog box, shown in Figure 19-19. Select the data device and log device you modified previously. The Size values represent the amount of free space available in the devices. Click Expand Now.
- When the expansion process is complete, the Edit Database dialog box is displayed with the new data and log sizes reflected, as shown in Figure 19-20. Click OK.
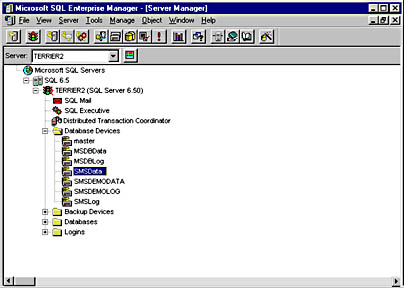
Figure 19-15. The expanded Database Devices folder.
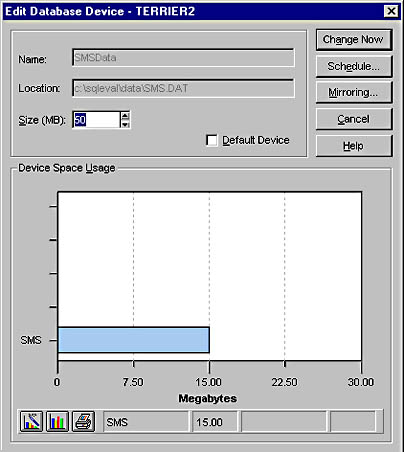
Figure 19-16. The Edit Database Device dialog box.

Figure 19-17. The expanded Databases folder.
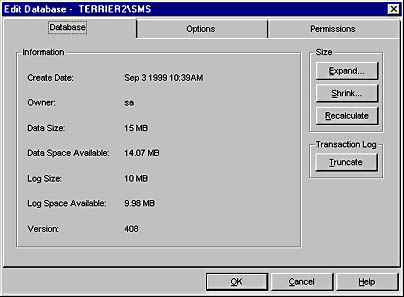
Figure 19-18. The Edit Database Properties window.
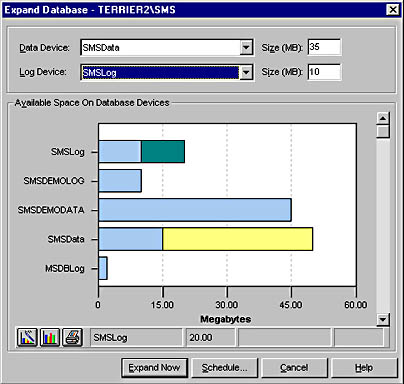
Figure 19-19. The Expand Database dialog box.

Figure 19-20. The updated Edit Database Properties window.
The review and cleanup tasks we've performed on the database are essential to the upgrade process. Refer to your SQL Server 6.5 documentation for complete information about the other options available for editing your database and its devices.
Documenting Current Site Settings
SMS 1.2 has fewer site properties than SMS 2.0. Most of these properties are static by nature and are handled quite differently than they are in SMS 2.0. Consequently, most SMS 1.2 site properties are not carried over to the new SMS 2.0 site. If you need to preserve any properties or settings, especially customized MIF files, queries, or security settings, document them prior to performing the upgrade or they will be lost. In this section, we'll look at some of the more significant items you should consider documenting prior to upgrade.
Machine Groups
The SMS 2.0 upgrade process converts existing SMS 1.2 machine groups to SMS 2.0 collections. The only real issue for you is to be sure that you haven't used any of the default collection names as machine group names, as these will be overwritten with the SMS 2.0 default collection membership. The default collection names are listed here:
- All Systems
- All Users
- All User Groups
- All Windows 3.1 Systems
- All Windows 95 Systems
- All Windows 98 Systems
- All Windows For Workgroups Systems
- All Windows NT Server Systems
- All Windows NT Systems
- All Windows NT 3.51 Workstation Systems
- All Windows NT 4.0 Workstation Systems
- All Windows NT Workstation Systems
Queries
Because SMS 2.0 database objects are so different from SMS 1.2 database objects, any queries you created in SMS 1.2 will be discarded. If you want to be able to create similar queries for use with SMS 2.0, you will need to document each query before the upgrade.
Jobs
The upgrade process deletes all SMS 1.2 active jobs except system jobs. If you have created jobs that you want to maintain under SMS 2.0, including recurring jobs, be sure to document the job settings and targets so that you can create similar advertisements in SMS 2.0.
Custom MIF Files
Any custom MIF files you created on your own or any custom MIF files you created using the SMS 1.2 MIF Form Generator can also be used under SMS 2.0. The SMS 1.2 MIF Form Generator saves the custom MIF file with an .XNF extension. However, if you store these files in the \SMS directory structure, they will be overwritten when the directory is upgraded. If you want to keep these files, copy them to a directory other than \SMS.
Package Definition Files and Wrapper Programs
As with custom MIF files, package definition files (PDFs) and wrapper programs used to create packages under SMS 1.2 can be used in SMS 2.0. Here too, if you store these files in the \SMS directory structure, they will be overwritten when the directory is upgraded. If you want to keep these files, copy them to a directory other than \SMS.
Collected Files
Along the same lines, files collected through the SMS 1.2 software inventory collection process are stored in the \SMS directory structure. Consequently, these files will be overwritten when the new \SMS directory structure is created. If you need to retain copies of these files, copy them to a directory other than \SMS.
TIP
Consider discarding the old versions of these collected files and collecting new versions using the SMS 2.0 software inventory process. This will ensure that you have the newest copies of the files and that they are viewable through the SMS Administrator Console.
Logon Scripts
If you use the standard logon script files that come with SMS 1.2, there is really nothing to concern yourself with here. During the upgrade process, SMS 1.2 logon script files and user profiles are removed. When an SMS 2.0 logon discovery or logon installation method is enabled, the SMS 2.0 site server will automatically overwrite the old version of the logon script files with the new version of the script files. However, if you have created customized versions of these files, you should document the changes you made—and why—and make backup copies of the customized logon scripts so that you can re-create them in SMS 2.0 if necessary.
Security Settings
SMS 1.2 allows you to allocate security based on roles—for example, help desk, package administrator, and so on. These roles are tied to the SQL Server database security you set. As we've seen, SMS 2.0 handles database objects and their security in a decidedly different manner. In fact, SMS 2.0 object security is far more robust and granular than the object security provided through SMS 1.2.
If you want to create security levels in SMS 2.0 that are similar to those under SMS 1.2, be sure to document them carefully. You can then use object class and instance security through SMS 2.0 to re-create those security levels and enhance and improve them.
Physical Disk Inventory
All data regarding physical disks collected from SMS 1.2 client computers is discarded during the database upgrade process. A more current and complete inventory of the physical disk is generated during SMS 2.0's hardware inventory process. This data will then be added to the existing client record. However, this process can take time to complete. If you need access to physical disk data for your existing clients, consider running a report to document that information prior to upgrading.
Backing Up the Site and the Server
While not entirely necessary, especially if you like to live on the wild side, it is a good idea to back up your SMS 1.2 site, including not only the site database but also the SMS directory structure and registry keys. This backup can assist you mightily if you encounter problems with the upgrade and need to restore your site—as will all the other documentation procedures we've discussed.
In addition, consider creating or updating the emergency repair disk for the Windows NT server on which your site is installed. This disk will assist you in restoring registry keys and SMS services should you need to do so. After the upgrade is successfully completed, update the emergency repair disk again, as SMS 2.0 makes extensive changes to the registry, services, and components installed.
TIP
You should consider creating a lab environment in which you can test the database upgrade process—and recovery, if need be—outside of a production environment. This testing environment can help you to identify problem records, old settings that need to be documented, and other issues that can and will be unique to your installation.
EAN: 2147483647
Pages: 167